Thiết lập biểu tượng tùy chỉnh cho ổ cứng di động trên Windows 10
- Thứ ba - 02/06/2020 00:58
- In ra
- Đóng cửa sổ này
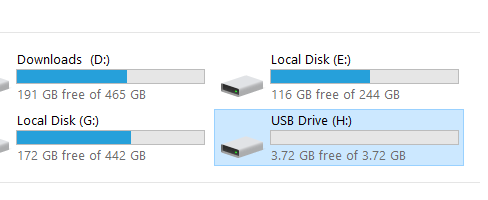
Bất cứ khi nào bạn kết nối một thiết bị hoặc một ổ cứng di động (ổ USB chẳng hạn,…) trên máy tính của mình, Windows 10 sẽ nhanh chóng nhận và hiển thị tên cũng biểu tượng mặc định của thiết bị hoặc ổ cứng di động đó.
Tuy nhiên, nếu cảm thấy thật tẻ nhạt khi cứ phải nhìn thấy các biểu tượng tương tự mỗi khi kết nối các thiết bị và ổ cứng di động trên máy tính của mình, và bạn muốn thay thế các biểu tượng cũ bằng các biểu tượng sinh động, vui nhộn hơn. Khi đó bạn có thể thiết lập các biểu tượng tùy chỉnh mà bạn muốn cho thiết bị hoặc một ổ cứng di động kết nối với máy tính của mình.
Trong bài viết dưới đây Quản trị mạng sẽ hướng dẫn bạn các bước để thêm một biểu tượng tùy chỉnh và tên cho các ổ cứng gắn ngoài kết nối trên máy tính Windows 10 của mình.

Thiết lập biểu tượng tùy chỉnh cho ổ cứng di động
Thực hiện quá trình này để hiển thị một biểu tượng tùy chỉnh cho một ổ cứng di động, bao gồm một tập tin icon (biểu tượng) và file autorun.inf, mà bạn sẽ lưu trữ trên ổ cứng di động (ổ USB chẳng hạn, …).
Trước khi thực hiện quá trình bạn cần phải có một tập tin icon (.ico) mà bạn muốn sử dụng. Bạn có thể tìm thấy cả “đống” biểu tượng trên các trang web, trong đó có nhiều biểu tượng miễn phí có sẵn mà bạn có thể tải về và sử dụng.
Trong phần hướng dẫn dưới đây, Quản trị mạng sẽ sử dụng một biểu tượng USB từ IconArchive, nhưng bạn có thể tải các biểu tượng khác nhau trên các trang web khác nhau và sử dụng.
Sau khi đã tải xong file .ico, bạn sẽ phải tiến hành sao chép biểu tượng này và tạo file autorun.inf trên ổ cứng di động. Để làm được điều này, thực hiện theo các bước dưới đây:
1. Kết nối ổ cứng di động mà bạn muốn thiết lập biểu tượng (icon) tùy chỉnh.
2. Sử dụng File Explorer để mở ổ cứng di động.
3. Trong thư mục gốc của ổ cứng di động, kích chuột phải vào đó chọn New => Text Document.

4. Đặt tên file là autorun.inf rồi nhấn Enter.
Lưu ý:
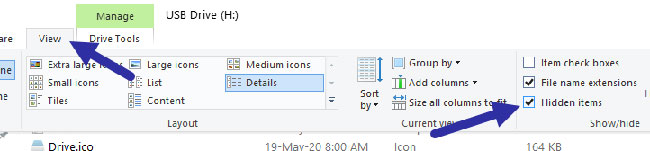
Nếu hệ thống của bạn không hiển thị phần đuôi mở rộng của tập tin, mở tab View trên File Explorer, sau đó click chọn tùy chọn File name extensions để đổi tên file text autorun.inf.
Nếu không, sau khi đổi xong tên file sẽ thành autorun.inf.txt, và tập tin này sẽ không đúng.
Ngoài ra bạn đọc có thể tham khảo thêm các bước để hiển thị thư mục, tập tin và phần đuôi mở rộng trên Windows 7, 8 và 10 tại đây.
5. Click chọn Yes để xác nhận đổi tên tập tin.
6. Kích đúp chuột vào autorun.inf để mở tập tin và sao chép, dán các dòng dưới đây vào:
[Autorun]
Icon=icon-name.ico
Label=drive-label

Lưu ý:
Tại mục Icon, hãy chắc chắn rằng bạn đã thay đổi icon-name.ico bằng tên icon (biểu tượng) của bạn và mục Label bạn đã thay đổ tên ký tự ổ đĩa mà bạn muốn.
7. Click chọn File.
8. Click chọn Save.
9. Đóng cửa sổ text editor lại.
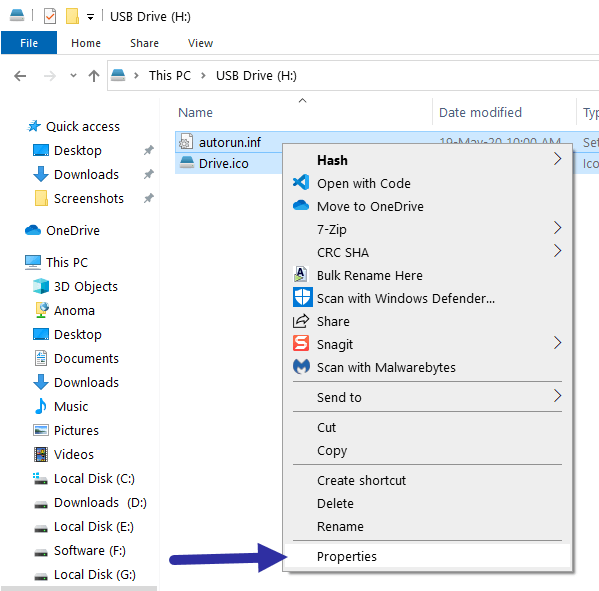
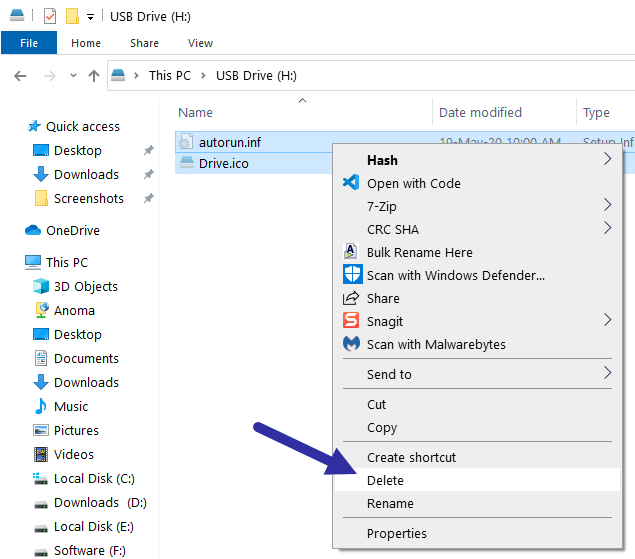
10. Chọn tập tin autorun.inf và tập tin icon.
11. Kích chuột phải vào đó và chọn Properties.

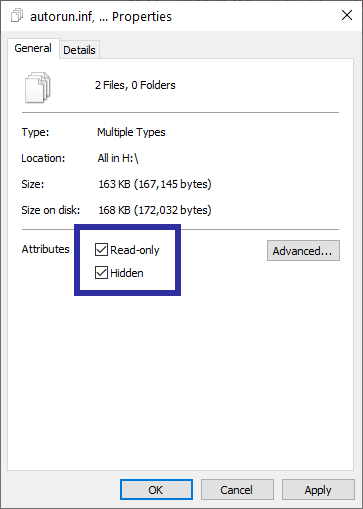
12. Trên cửa sổ Properties, tại mục Attributes, đánh tích chọn tùy chọn Hidden để ẩn các tập tin quan trọng trong ổ đĩa và bạn không xóa nhầm các tập tin đó đi.

13. Click chọn Apply.
14. Click chọn OK để hoàn tất quá trình.
Sau khi đã hoàn tất các bước, tiến hành ngắt kết nối ổ cứng di động đang kết nối với máy tính của bạn, sau đó tiến hành chèn lại ổ USB. Và trên File Explorer bạn sẽ nhìn thấy biểu tượng và tên mới cho ổ cứng di động của bạn.
(Tùy chọn) Ẩn các file Drive.ico và autorun.inf
Cả hai file Drive.ico và autorun.inf đều có thể gây mất tập trung. Bạn có thể ẩn chúng để chúng không xuất hiện cùng với các file hoặc thư mục khác trong ổ USB nữa.
1. Chọn cả hai file Drive.ico và autorun.inf, nhấp chuột phải vào chúng và chọn Properties.
2. Trong cửa sổ Properties, chọn hộp kiểm Read-only và Hidden.
3. Nhấp vào nút Apply > OK để lưu các thay đổi.
Thế là xong! Cả hai file này hiện đang bị ẩn. Nếu bạn muốn xem chúng, hãy chuyển đến tab View và chọn hộp kiểm Hidden files.
Khôi phục biểu tượng ổ USB mặc định
Nếu không còn muốn sử dụng biểu tượng tùy chỉnh nữa, bạn có thể khôi phục biểu tượng mặc định bằng cách xóa các file Drive.ico và autorun.inf.
1. Cắm USB vào và mở nó.
2. Chuyển đến tab View và chọn hộp kiểm Hidden files.
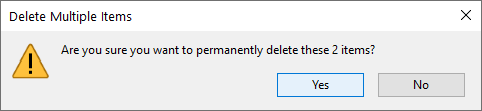
3. Điều này sẽ hiển thị các file ẩn. Chọn cả hai file Drive.ico và autorun.inf, nhấp chuột phải vào chúng và chọn tùy chọn Delete.
4. Bạn sẽ thấy một cảnh báo, nhấp vào Yes.
Sau khi xóa các file này, hãy chèn lại USB vào và bạn sẽ thấy biểu tượng ổ đĩa mặc định thay vì biểu tượng tùy chỉnh.