<!DOCTYPE html>
    <html lang="vi" xmlns="http://www.w3.org/1999/xhtml" prefix="og: http://ogp.me/ns#">
    <head>
<title>Hướng dẫn thiết lập và quản lý FTP Server trên Windows 10</title>
<meta name="description" content="Hướng dẫn thiết lập và quản lý FTP Server trên Windows 10 - Savefile - Tin Tức -...">
<meta name="author" content=".: Nguoicodonvn2008.info - Cõi lòng người cô đơn :.">
<meta name="copyright" content=".: Nguoicodonvn2008.info - Cõi lòng người cô đơn :. [admin@nguoicodonvn2008.info]">
<meta name="robots" content="index, archive, follow, noodp">
<meta name="googlebot" content="index,archive,follow,noodp">
<meta name="msnbot" content="all,index,follow">
<meta name="generator" content="NukeViet v4.5">
<meta http-equiv="Content-Type" content="text/html; charset=utf-8">
<meta property="og:title" content="Hướng dẫn thiết lập và quản lý FTP Server trên Windows 10">
<meta property="og:type" content="website">
<meta property="og:description" content="Savefile - Tin Tức - https&#x3A;&#x002F;&#x002F;www.nguoicodonvn2008.info&#x002F;vi&#x002F;news&#x002F;savefile&#x002F;kien-thuc-may-tinh&#x002F;huong-dan-thiet-lap-va-quan-ly-ftp-server-tren-windows-10-9730.html">
<meta property="og:site_name" content=".&#x3A; Nguoicodonvn2008.info - Cõi lòng người cô đơn &#x3A;.">
<meta property="og:url" content="https://www.nguoicodonvn2008.info/vi/news/savefile/kien-thuc-may-tinh/huong-dan-thiet-lap-va-quan-ly-ftp-server-tren-windows-10-9730.html">
<link rel="shortcut icon" href="https://nguoicodonvn2008.info/favicon.ico">
<link rel="canonical" href="https://www.nguoicodonvn2008.info/vi/news/savefile/kien-thuc-may-tinh/huong-dan-thiet-lap-va-quan-ly-ftp-server-tren-windows-10-9730.html">
<link rel="alternate" href="https://nguoicodonvn2008.info/vi/news/rss/" title="Tin Tức" type="application/rss+xml">
<link rel="alternate" href="https://nguoicodonvn2008.info/vi/news/rss/karaoke-dual/" title="Tin Tức - Karaoke Dual" type="application/rss+xml">
<link rel="alternate" href="https://nguoicodonvn2008.info/vi/news/rss/nhac-tre/" title="Tin Tức - Nhạc trẻ" type="application/rss+xml">
<link rel="alternate" href="https://nguoicodonvn2008.info/vi/news/rss/tru-tinh/" title="Tin Tức - Trữ tình" type="application/rss+xml">
<link rel="alternate" href="https://nguoicodonvn2008.info/vi/news/rss/nuoc-ngoai/" title="Tin Tức - Nước ngoài" type="application/rss+xml">
<link rel="alternate" href="https://nguoicodonvn2008.info/vi/news/rss/remix/" title="Tin Tức - Remix" type="application/rss+xml">
<link rel="alternate" href="https://nguoicodonvn2008.info/vi/news/rss/tam-su-tinh-yeu/" title="Tin Tức - Tâm sự tình yêu" type="application/rss+xml">
<link rel="alternate" href="https://nguoicodonvn2008.info/vi/news/rss/tho-suu-tam/" title="Tin Tức - Thơ sưu tầm" type="application/rss+xml">
<link rel="alternate" href="https://nguoicodonvn2008.info/vi/news/rss/cuoc-song/" title="Tin Tức - Cuộc sống" type="application/rss+xml">
<link rel="alternate" href="https://nguoicodonvn2008.info/vi/news/rss/phan-mem/" title="Tin Tức - Phần mềm" type="application/rss+xml">
<link rel="alternate" href="https://nguoicodonvn2008.info/vi/news/rss/kien-thuc-may-tinh/" title="Tin Tức - Kiến thức máy tính" type="application/rss+xml">
<link rel="alternate" href="https://nguoicodonvn2008.info/vi/news/rss/hoc-tap/" title="Tin Tức - Học tập" type="application/rss+xml">
<link rel="alternate" href="https://nguoicodonvn2008.info/vi/news/rss/tai-lieu/" title="Tin Tức - Tài liệu" type="application/rss+xml">
<link rel="alternate" href="https://nguoicodonvn2008.info/vi/news/rss/de-thi/" title="Tin Tức - Đề thi" type="application/rss+xml">
<link rel="preload" as="style" href="https://nguoicodonvn2008.info/assets/css/font-awesome.min.css" type="text/css">
<link rel="preload" as="style" href="https://nguoicodonvn2008.info/themes/default/css/bootstrap.non-responsive.css" type="text/css">
<link rel="preload" as="style" href="https://nguoicodonvn2008.info/themes/default/css/style.css" type="text/css">
<link rel="preload" as="style" href="https://nguoicodonvn2008.info/themes/default/css/style.non-responsive.css" type="text/css">
<link rel="preload" as="style" href="https://nguoicodonvn2008.info/themes/default/css/news.css" type="text/css">
<link rel="preload" as="style" href="https://nguoicodonvn2008.info/themes/default/css/custom.css" type="text/css">
<link rel="preload" as="script" href="https://nguoicodonvn2008.info/assets/js/jquery/jquery.min.js" type="text/javascript">
<link rel="preload" as="script" href="https://nguoicodonvn2008.info/assets/js/language/vi.js" type="text/javascript">
<link rel="preload" as="script" href="https://nguoicodonvn2008.info/assets/js/DOMPurify/purify3.js" type="text/javascript">
<link rel="preload" as="script" href="https://nguoicodonvn2008.info/assets/js/global.js" type="text/javascript">
<link rel="preload" as="script" href="https://nguoicodonvn2008.info/assets/js/site.js" type="text/javascript">
<link rel="preload" as="script" href="https://nguoicodonvn2008.info/themes/default/js/news.js" type="text/javascript">
<link rel="preload" as="script" href="https://nguoicodonvn2008.info/themes/default/js/main.js" type="text/javascript">
<link rel="preload" as="script" href="https://nguoicodonvn2008.info/themes/default/js/custom.js" type="text/javascript">
<link rel="preload" as="script" href="https://nguoicodonvn2008.info/themes/default/js/bootstrap.min.js" type="text/javascript">
<link rel="stylesheet" href="https://nguoicodonvn2008.info/assets/css/font-awesome.min.css">
<link rel="stylesheet" href="https://nguoicodonvn2008.info/themes/default/css/bootstrap.non-responsive.css">
<link rel="stylesheet" href="https://nguoicodonvn2008.info/themes/default/css/style.css">
<link rel="stylesheet" href="https://nguoicodonvn2008.info/themes/default/css/style.non-responsive.css">
<link rel="StyleSheet" href="https://nguoicodonvn2008.info/themes/default/css/news.css">
<link rel="stylesheet" href="https://nguoicodonvn2008.info/themes/default/css/custom.css">
<style type="text/css">
	body{background: #fff;}
</style>
    </head>
    <body>
<div id="print">
	<div id="hd_print">
		<h2 class="pull-left">.&#x3A; Nguoicodonvn2008.info - Cõi lòng người cô đơn &#x3A;.</h2>
		<p class="pull-right"><a title=".&#x3A; Nguoicodonvn2008.info - Cõi lòng người cô đơn &#x3A;." href="https://nguoicodonvn2008.info/">https://nguoicodonvn2008.info</a></p>
	</div>
	<div class="clear"></div>
	<hr />
	<div id="content">
		<h1>Hướng dẫn thiết lập và quản lý FTP Server trên Windows 10</h1>
		<ul class="list-inline">
			<li>Thứ năm - 23/01/2025 20:51</li>
			<li class="hidden-print txtrequired"><em class="fa fa-print">&nbsp;</em><a title="In ra" href="javascript:;" onclick="window.print()">In ra</a></li>
			<li class="hidden-print txtrequired"><em class="fa fa-power-off">&nbsp;</em><a title="Đóng cửa sổ này" href="javascript:;" onclick="window.close()">Đóng cửa sổ này</a></li>
		</ul>
		<div class="clear"></div>
		<div id="hometext">
		</div>
				<div class="imghome">
			<img alt="Hướng dẫn thiết lập và quản lý FTP Server trên Windows 10" src="https://st.quantrimang.com/photos/image/2016/03/31/FPT-server-windows-10.jpg" width="460" class="img-thumbnail" />
		</div>
		<div class="clear"></div>
		<div id="bodytext" class="clearfix">
			<p style="text-align: justify;">Nếu muốn tạo một đám mây riêng để chia sẻ và chuyển đổi các file có lưu lượng lớn mà không bị giới hạn, bạn có thể tạo một FTP Server (File Transfer Protocol Server) trên máy tính Windows 10 của mình.</p>

<p style="text-align: justify;">&nbsp;</p>

<p style="text-align: justify;"><img alt="FPT Server" data-i="0" data-src="https://st.quantrimang.com/photos/image/2016/03/31/FPT-server-windows-10.jpg" data-was-processed="true" height="413" src="https://st.quantrimang.com/photos/image/2016/03/31/FPT-server-windows-10.jpg" title="FPT Server" width="650" /></p>

<h2 style="text-align: justify;">1. Cài đặt FTP Server trên Windows 10</h2>

<p style="text-align: justify;">Tương tự như trên các phiên bản trước, trên Windows 10 cũng được tích hợp các yếu tố cần thiết để chạy FTP Server. Thực hiện các bước dưới đây để cài đặt FTP Server trên máy tính Windows 10 của bạn:</p>

<p style="text-align: justify;">1. Nhấn tổ hợp phím<strong>&nbsp;Windows + X</strong>&nbsp;để mở Menu Power rồi chọn&nbsp;<strong>Programs and Features</strong>.</p>

<p style="text-align: justify;">2. Click chọn liên kết<strong>&nbsp;Turn Windows features on or off</strong>.</p>

<p style="text-align: justify;">&nbsp;</p>

<div style="text-align: justify;">​​​​​​<img alt=" Turn Windows features on or off" data-adbro-processed="true" data-i="1" data-src="https://st.quantrimang.com/photos/image/2016/03/31/Turn-Windows-features-on-or-off.jpg" data-was-processed="true" height="468" src="https://st.quantrimang.com/photos/image/2016/03/31/Turn-Windows-features-on-or-off.jpg" title=" Turn Windows features on or off" width="650" /><br />
<br />
</div>

<p style="text-align: justify;">3. Mở rộng Internet Information Services sau đó đánh tích vào tùy chọn&nbsp;<strong>FTP Server</strong>.</p>

<p style="text-align: justify;">4. Mở rộng FTP Server rồi đánh tích chọn<strong>&nbsp;FTP Extensibility</strong>.</p>

<p style="text-align: justify;">5. Đánh tích chọn&nbsp;<strong>Web Management Tools</strong>&nbsp;với các tùy chọn mặc định.</p>

<p style="text-align: justify;">6. Click chọn&nbsp;<strong>OK</strong>&nbsp;để bắt đầu cài đặt.</p>

<p style="text-align: justify;"><img alt="chọn OK " data-i="2" data-src="https://st.quantrimang.com/photos/image/2016/03/31/click-ok.jpg" data-was-processed="true" height="368" src="https://st.quantrimang.com/photos/image/2016/03/31/click-ok.jpg" title="chọn OK " width="415" /></p>

<p style="text-align: justify;">7. Click chọn<strong>&nbsp;Close</strong>.</p>

<h2 style="text-align: justify;">2. Cấu hình FTP site trên Windows 10</h2>

<p style="text-align: justify;">Sau khi đã cài đặt các yếu tố cần thiết để chạy FTP Server trên máy tính Windows 10 của bạn, tiếp theo tiến hành tạo một FTP site:</p>

<p style="text-align: justify;">1. Nhấn tổ hợp phím&nbsp;<strong>Windows + X</strong>&nbsp;để mở menu Power User rồi chọn&nbsp;<strong>Control Panel.</strong></p>

<p style="text-align: justify;">2. Mở&nbsp;<strong>Administrative Tools</strong>.</p>

<p style="text-align: justify;">3. Kích đúp chuột vào<strong>&nbsp;Internet Information Services (IIS) Manager</strong>.</p>

<p style="text-align: justify;"><img alt="Internet Information Services (IIS) Manager" data-i="3" data-src="https://st.quantrimang.com/photos/image/2016/03/31/Internet-Information-services-IIS-Manager.jpg" data-was-processed="true" height="468" src="https://st.quantrimang.com/photos/image/2016/03/31/Internet-Information-services-IIS-Manager.jpg" title="Internet Information Services (IIS) Manager" width="650" /></p>

<p style="text-align: justify;">4. Mở rộng bảng Connection rồi kích chuột phải vào<strong>&nbsp;Site.</strong></p>

<p style="text-align: justify;">5. Chọn<strong>&nbsp;Add FTP Site</strong>.</p>

<p style="text-align: justify;"><img alt=" Add FPT Site" data-i="4" data-src="https://st.quantrimang.com/photos/image/2016/03/31/Add-FTP-Site.jpg" data-was-processed="true" height="383" src="https://st.quantrimang.com/photos/image/2016/03/31/Add-FTP-Site.jpg" title=" Add FPT Site" width="650" /></p>

<p style="text-align: justify;">6. Đặt tên cho FTP site mới của bạn rồi nhập đường dẫn đến thư mục FTP mà bạn muốn sử dụng để gửi và nhận các file.</p>

<p style="text-align: justify;"><strong>Lưu ý:</strong></p>

<p style="text-align: justify;">Bạn có thể sử dụng nút Make New Folder để tạo một thư mục cụ thể chứa file FTP.</p>

<p style="text-align: justify;">7. Click chọn&nbsp;<strong>Next</strong>.</p>

<p style="text-align: justify;"><img alt="chọn Next" data-i="5" data-src="https://st.quantrimang.com/photos/image/2016/03/31/chon-next.jpg" data-was-processed="true" height="496" src="https://st.quantrimang.com/photos/image/2016/03/31/chon-next.jpg" title="chọn Next" width="650" /></p>

<p style="text-align: justify;">8. Trên giao diện Binding and SSL Settings, bỏ tất cả các thiết lập mặc định, thay đổi tùy chọn<strong>&nbsp;SSL</strong>&nbsp;thành&nbsp;<strong>No SSL</strong>.</p>

<p style="text-align: justify;">9. Click chọn<strong>&nbsp;Next.</strong></p>

<p style="text-align: justify;"><strong><img alt="chọn Next" data-i="6" data-src="https://st.quantrimang.com/photos/image/2016/03/31/no-ssl.jpg" data-was-processed="true" height="496" src="https://st.quantrimang.com/photos/image/2016/03/31/no-ssl.jpg" title="chọn Next" width="650" /></strong></p>

<p style="text-align: justify;">10. Tại mục Authentication, đánh tích chọn tùy chọn<strong>&nbsp;Basic.</strong></p>

<p style="text-align: justify;">11. Tại mục Authorization chọn&nbsp;<strong>Specified users</strong>&nbsp;từ menu drop-down.</p>

<p style="text-align: justify;">12. Nhập địa chỉ email tài khoản Windows 10 hoặc tên tài khoản Local cho phép bạn truy cập FTP Server.</p>

<p style="text-align: justify;">13. Đánh tích chọn tùy chọn<strong>&nbsp;Read</strong>&nbsp;và&nbsp;<strong>Write.</strong></p>

<p style="text-align: justify;">14. Click chọn<strong>&nbsp;Finish.</strong></p>

<p style="text-align: justify;"><strong><img alt=" chọn Finish" data-i="7" data-src="https://st.quantrimang.com/photos/image/2016/03/31/finissh.jpg" data-was-processed="true" height="496" src="https://st.quantrimang.com/photos/image/2016/03/31/finissh.jpg" title=" chọn Finish" width="650" /></strong></p>

<h2 style="text-align: justify;">3. Làm thế nào để cho phép FTP Server thông qua Windows Firewall (tưởng lửa)?</h2>

<p style="text-align: justify;">Nếu Windows Firewall (tường lửa) đang hoạt động trên máy tính của bạn, Firewall sẽ chặn bất kỳ một kết nối nào đang cố gắng truy cập FTP Server.</p>

<p style="text-align: justify;">Thực hiện các bước dưới đây để cho phép FTP Server thông qua Firewall (tường lửa):</p>

<p style="text-align: justify;">1. Mở Start Menu, sau đó nhập Windows Firewall và khung Search rồi nhấn Enter.</p>

<p style="text-align: justify;">2. Click chọn liên kết&nbsp;<strong>Allow an app or feature through Windows Firewall</strong>.</p>

<p style="text-align: justify;"><img alt="Allow an app or feature through Windows Firewall" data-i="8" data-src="https://st.quantrimang.com/photos/image/2016/03/31/Allow-an-app-or-feature-through-Windows-Firewall.jpg" data-was-processed="true" height="468" src="https://st.quantrimang.com/photos/image/2016/03/31/Allow-an-app-or-feature-through-Windows-Firewall.jpg" title="Allow an app or feature through Windows Firewall" width="650" /></p>

<p style="text-align: justify;">3. Click chọn<strong>&nbsp;Change Settings</strong>.</p>

<p style="text-align: justify;">4. Chọn&nbsp;<strong>FTP Server</strong>&nbsp;và đánh tích vào cả 2 tùy chọn&nbsp;<strong>Private</strong>&nbsp;và&nbsp;<strong>Public</strong>.</p>

<p style="text-align: justify;">5. Click chọn&nbsp;<strong>OK.</strong></p>

<p style="text-align: justify;"><strong><img alt="Change Settings" data-i="9" data-src="https://st.quantrimang.com/photos/image/2016/03/31/change-setting.jpg" data-was-processed="true" height="468" src="https://st.quantrimang.com/photos/image/2016/03/31/change-setting.jpg" title="Change Settings" width="650" /></strong></p>

<p style="text-align: justify;">Từ giờ bạn có thể sử dụng FTP client để kết nối với FTP Server mà bạn vừa tạo trên Local Network (mạng nội bộ).</p>

<h2 style="text-align: justify;">4. Cấu hình Router để cho phép các kết nối bên ngoài như thế nào?</h2>

<p style="text-align: justify;">Để máy chủ FTP Sever của bạn có thể kết nối Internet, bạn phải cấu hình Router để mở số cổng 21 trong TCP/IP cho phép kết nối với máy tính của bạn.</p>

<p style="text-align: justify;">1. Nhấn tổ hợp phím<strong>&nbsp;Windows + X</strong>&nbsp;để mở Menu Power User rồi chọn&nbsp;<strong>Command Prompt.</strong></p>

<p style="text-align: justify;">2. Nhập lệnh<strong>&nbsp;ipconfig</strong>&nbsp;vào cửa sổ Command Prompt rồi nhấn Enter.</p>

<p style="text-align: justify;">3. Note địa chỉ IP Default Gateway lại. Địa chỉ IP Default Gateway chính là địa chỉ Router của bạn.</p>

<p style="text-align: justify;"><img alt="địa chỉ IP Default Gateway" data-i="10" data-src="https://st.quantrimang.com/photos/image/2016/03/31/Default-Gateway.jpg" data-was-processed="true" height="341" src="https://st.quantrimang.com/photos/image/2016/03/31/Default-Gateway.jpg" title="địa chỉ IP Default Gateway" width="650" /></p>

<p style="text-align: justify;">4. Mở trình duyệt mặc định trên máy tính của bạn.</p>

<p style="text-align: justify;">5. Trên thanh địa chỉ bạn nhập địa chỉ IP của Router (chính là địa chỉ IP Default Gateway mà bạn note ở trên) rồi nhấn Enter.</p>

<p style="text-align: justify;">6. Đăng nhập bằng thông tin Router của bạn.</p>

<p style="text-align: justify;">7. Tìm mục Port Forwarding (thông thường tùy chọn này ở dưới mục thiết lập WAN hoặc NAT).</p>

<p style="text-align: justify;">8. Tạo một Port Forwarding mới bao gồm các thông tin dưới đây:</p>

<p style="text-align: justify;"><strong>Service name:</strong>&nbsp;Bất kỳ một tên nào mà bạn muốn sử dụng. Chẳng hạn như FPT-Server.</p>

<p style="text-align: justify;"><strong>Port rage:</strong>&nbsp;Sử dụng cổng 21.</p>

<p style="text-align: justify;"><strong>Địa chỉ TCP/IP của máy tính</strong>: Mở Command Prompt sau đó nhập ipconfig vào cửa sổ Command Prompt. Địa chỉ IPv4 là địa chỉ TCP/IP của máy tính.</p>

<p style="text-align: justify;"><strong>Local TCP/IP port:</strong>&nbsp;Sử dụng cổng 21.</p>

<p style="text-align: justify;"><strong>Protocol</strong>: TCP.</p>

<p style="text-align: justify;"><img alt=" Port Forwarding " data-i="11" data-src="https://st.quantrimang.com/photos/image/2016/03/31/thiet-lap-port-forwarding.jpg" data-was-processed="true" height="507" src="https://st.quantrimang.com/photos/image/2016/03/31/thiet-lap-port-forwarding.jpg" title=" Port Forwarding " width="650" /></p>

<p style="text-align: justify;">9. Áp dụng thay đổi và lưu lại cấu hình Router mới.</p>

<h2 style="text-align: justify;">5. Truy cập FTP Server trên bất kỳ một máy tính nào đó</h2>

<p style="text-align: justify;">Dưới đây là cách kiểm tra FTP Server nhanh nhất sau khi đã cấu hình Firewall (tường lửa) và Port Forwarding 21 trên Router:</p>

<p style="text-align: justify;">Mở trình duyệt mặc định trên máy tính của bạn sau đó nhập vào thanh địa chỉ trình duyệt địa chỉ IP, định dạng liên kết FTP rồi nhấn Enter.</p>

<p style="text-align: justify;">Địa chỉ IP của bạn chẳng hạn là FTP://192.168.1.105.</p>

<p style="text-align: justify;"><img alt="Địa chỉ IP" data-i="12" data-src="https://st.quantrimang.com/photos/image/2016/03/31/dia-chi.jpg" data-was-processed="true" height="429" src="https://st.quantrimang.com/photos/image/2016/03/31/dia-chi.jpg" title="Địa chỉ IP" width="650" /></p>

<p style="text-align: justify;">Để kiểm tra FTP Server kết nối Internet, truy cập Google hoặc Bing rồi tìm kiếm&nbsp;<strong>What&#039;s my IP?</strong></p>

<p style="text-align: justify;">Note lại kết quả địa chỉ IP rồi nhập địa chỉ IP đó vào thanh địa chỉ trình duyệt sử dụng định dạng liên kết là FTP rồi nhấn Enter.</p>

<h2 style="text-align: justify;">6. Làm thế nào để upload file trên FTP Server Windows 10?</h2>

<p style="text-align: justify;">1. Nhấn tổ hợp phím&nbsp;<strong>Windows + E</strong>&nbsp;để mở File Explorer.</p>

<p style="text-align: justify;">
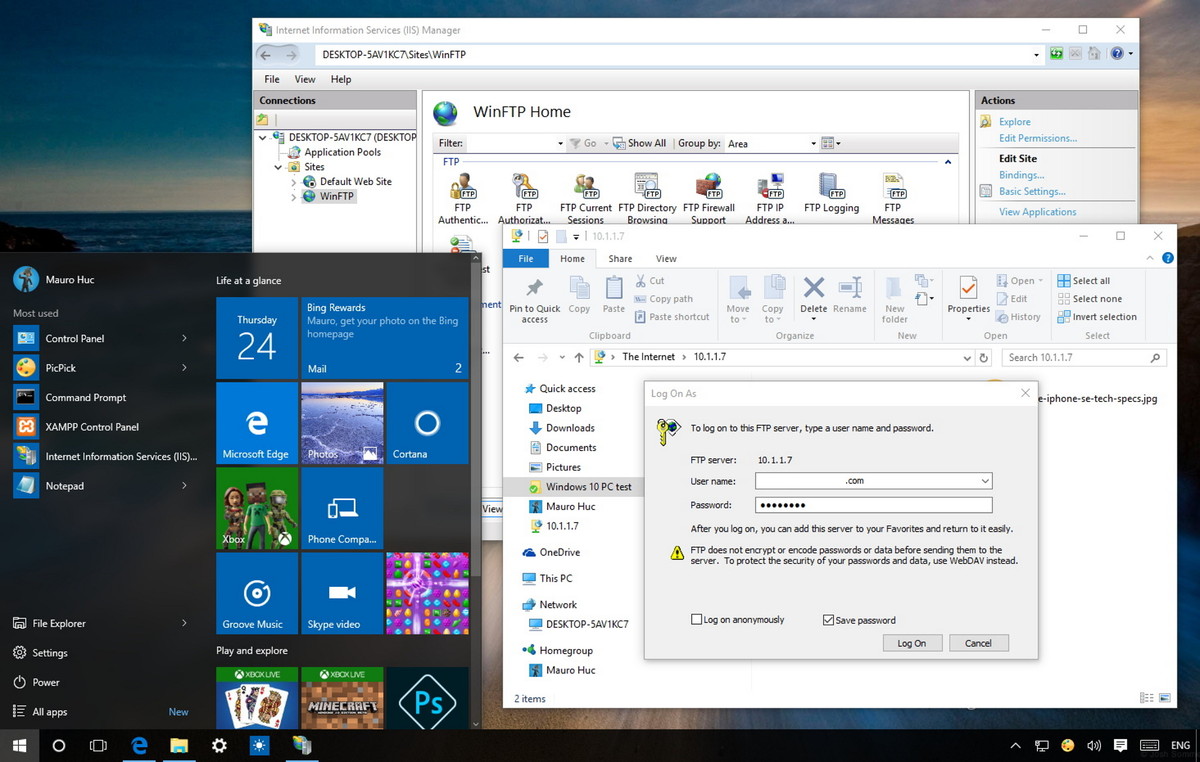
2. Trên thanh địa chỉ, nhập địa chỉ IP Public của bạn cùng định dạng FTP, chẳng hạn như FTP://172.217.3.14.</p>

<p style="text-align: justify;">3. Nhập tên người dùng và mật khẩu.</p>

<p style="text-align: justify;">4. Đánh tích tùy chọn<strong>&nbsp;Save password.</strong></p>

<p style="text-align: justify;">5. Click chọn&nbsp;<strong>Log on.</strong></p>

<p style="text-align: justify;"><strong><img alt="Log on" data-i="13" data-src="https://st.quantrimang.com/photos/image/2016/03/31/log-on.jpg" data-was-processed="true" height="343" src="https://st.quantrimang.com/photos/image/2016/03/31/log-on.jpg" title="Log on" width="650" /></strong></p>

<p style="text-align: justify;">Ngoài ra bạn có thể kích chuột phải vào&nbsp;<strong>Quick Access</strong>&nbsp;ở khung bên trái rồi chọn<strong>&nbsp;Pin current folder to Quick Access</strong>&nbsp;để dễ dàng kết nối lại FTP server trong những lần tiếp theo.</p>

<p style="text-align: justify;"><img alt="Pin current folder to Quick Access" data-i="14" data-src="https://st.quantrimang.com/photos/image/2016/03/31/Quick-access.jpg" data-was-processed="true" height="467" src="https://st.quantrimang.com/photos/image/2016/03/31/Quick-access.jpg" title="Pin current folder to Quick Access" width="650" /></p>

<h2 style="text-align: justify;">7. Tạo nhiều tài khoản FTP trên Windows 10 như thế nào?</h2>

<p style="text-align: justify;">Nếu muốn cho phép nhiều người truy cập FTP Server bạn phải tạo một tài khoản Windows 10 mới cho mỗi người dùng truy cập, liên kết các tài khoản này với thư mục FTP và cấu hình cài đặt phù hợp. Để làm được điều này, bạn thực hiện theo các bước dưới đây:</p>

<h3 style="text-align: justify;">Thêm một tài khoản người dùng mới trên Windows 10:</h3>

<p style="text-align: justify;">1. Nhấn tổ hợp phím<strong>&nbsp;Windows + I</strong>&nbsp;để mở trình đơn Settings.</p>

<p style="text-align: justify;">2. Click chọn&nbsp;<strong>Accounts.</strong></p>

<p style="text-align: justify;">3. Click chọn<strong>&nbsp;Family &amp; other users.</strong></p>

<p style="text-align: justify;">4. Click chọn tiếp&nbsp;<strong>Add someone else to this PC.</strong></p>

<p style="text-align: justify;"><strong><img alt="Add someone else to this PC" data-i="15" data-src="https://st.quantrimang.com/photos/image/2016/03/31/Add-someone-else-to-this-PC.jpg" data-was-processed="true" height="529" src="https://st.quantrimang.com/photos/image/2016/03/31/Add-someone-else-to-this-PC.jpg" title="Add someone else to this PC" width="650" /></strong></p>

<p style="text-align: justify;">5. Click chọn liên kết&nbsp;<strong>I don&#039;t have this person&#039;s sign-in information.</strong></p>

<p style="text-align: justify;"><strong><img alt="I don&#039;t have this person&#039;s sign-in information" data-i="16" data-src="https://st.quantrimang.com/photos/image/2016/03/31/I-don-have-this-person-sign-in-information.jpg" data-was-processed="true" height="629" src="https://st.quantrimang.com/photos/image/2016/03/31/I-don-have-this-person-sign-in-information.jpg" title="I don&#039;t have this person&#039;s sign-in information" width="650" /></strong></p>

<p style="text-align: justify;">6. Click chọn liên kết&nbsp;<strong>Add a user without a Microsoft account</strong>.</p>

<p style="text-align: justify;"><img alt=" Add a user without a Microsoft account" data-i="17" data-src="https://st.quantrimang.com/photos/image/2016/03/31/Add-a-user-without-a-Microsoft-account.jpg" data-was-processed="true" height="629" src="https://st.quantrimang.com/photos/image/2016/03/31/Add-a-user-without-a-Microsoft-account.jpg" title=" Add a user without a Microsoft account" width="650" /></p>

<p style="text-align: justify;">7. Nhập thông tin tài khoản người dùng rồi click chọn&nbsp;<strong>Next</strong>&nbsp;để hoàn tất.</p>

<p style="text-align: justify;"><img alt="Nhập thông tin tài khoản người dùng " data-i="18" data-src="https://st.quantrimang.com/photos/image/2016/04/01/dien-thongtin-tai-khoan.jpg" data-was-processed="true" height="629" src="https://st.quantrimang.com/photos/image/2016/04/01/dien-thongtin-tai-khoan.jpg" title="Nhập thông tin tài khoản người dùng " width="650" /></p>

<h3 style="text-align: justify;">Thêm một tài khoản người dùng để truy cập thư mục FPT:</h3>

<p style="text-align: justify;">1. Kích chuột phải vào thư mục FPT rồi chọn&nbsp;<strong>Properties</strong>.</p>

<p style="text-align: justify;">2. Click chọn thẻ&nbsp;<strong>Security.</strong></p>

<p style="text-align: justify;">3. Click chọn<strong>&nbsp;Edit.</strong></p>

<p style="text-align: justify;"><strong><img alt="Edit" data-i="19" data-src="https://st.quantrimang.com/photos/image/2016/03/31/edit.jpg" data-was-processed="true" height="481" src="https://st.quantrimang.com/photos/image/2016/03/31/edit.jpg" title="Edit" width="363" /></strong></p>

<p style="text-align: justify;">4. Click chọn&nbsp;<strong>Add.</strong></p>

<p style="text-align: justify;"><strong><img alt=" Add" data-i="20" data-src="https://st.quantrimang.com/photos/image/2016/03/31/add.jpg" data-was-processed="true" height="450" src="https://st.quantrimang.com/photos/image/2016/03/31/add.jpg" title=" Add" width="363" /></strong></p>

<p style="text-align: justify;">5. Nhập tài tên tài khoản người dùng rồi click chọn&nbsp;<strong>Check Name.</strong></p>

<p style="text-align: justify;"><strong><img alt="Check Name" data-i="21" data-src="https://st.quantrimang.com/photos/image/2016/03/31/check-name.jpg" data-was-processed="true" height="220" src="https://st.quantrimang.com/photos/image/2016/03/31/check-name.jpg" title="Check Name" width="400" /></strong></p>

<p style="text-align: justify;">6. Click chọn<strong>&nbsp;OK.</strong></p>

<p style="text-align: justify;">7. Tại mục Group or user names, chọn tên tài khoản người dùng mà bạn vừa tạo rồi chọn quyền cho phép phù hợp.</p>

<p style="text-align: justify;"><img alt="Group or user names" data-i="22" data-src="https://st.quantrimang.com/photos/image/2016/03/31/group-or-username.jpg" data-was-processed="true" height="450" src="https://st.quantrimang.com/photos/image/2016/03/31/group-or-username.jpg" title="Group or user names" width="363" /></p>

<p style="text-align: justify;">8. Click chọn&nbsp;<strong>Apply</strong>.</p>

<p style="text-align: justify;">9. Click chọn&nbsp;<strong>OK.</strong></p>

<h3 style="text-align: justify;">Cấu hình tài khoản người dùng mới để truy cập FPT Server:</h3>

<p style="text-align: justify;">1. Nhấn tổ hợp phím&nbsp;<strong>Windows + X</strong>&nbsp;để mở Menu Power User rồi chọn&nbsp;<strong>Control Panel.</strong></p>

<p style="text-align: justify;">2. Mở Administrative Tools.</p>

<p style="text-align: justify;">3. Kích đúp chuột chọn&nbsp;<strong>Internet Information Services (IIS) Manager.</strong></p>

<p style="text-align: justify;">4. Mở rộng&nbsp;<strong>Sites.</strong></p>

<p style="text-align: justify;">5. Chọn<strong>&nbsp;FTP site</strong>&nbsp;sau đó kích đúp chuột vào&nbsp;<strong>Authorization Rules</strong>.</p>

<p style="text-align: justify;"><img alt="Authorization Rules" data-i="23" data-src="https://st.quantrimang.com/photos/image/2016/03/31/Authorization-Rules.jpg" data-was-processed="true" height="426" src="https://st.quantrimang.com/photos/image/2016/03/31/Authorization-Rules.jpg" title="Authorization Rules" width="650" /></p>

<p style="text-align: justify;">6. Kích chuột phải rồi chọn<strong>&nbsp;Add Allow Rules.</strong></p>

<p style="text-align: justify;"><strong><img alt="Add Allow Rules" data-i="24" data-src="https://st.quantrimang.com/photos/image/2016/03/31/Add-Allow-Rules.jpg" data-was-processed="true" height="426" src="https://st.quantrimang.com/photos/image/2016/03/31/Add-Allow-Rules.jpg" title="Add Allow Rules" width="650" /></strong></p>

<p style="text-align: justify;">7. Chọn&nbsp;<strong>Specified user</strong>&nbsp;rồi nhập tên tài khoản người dùng mới mà bạn vừa tạo.</p>

<p style="text-align: justify;">8. Thiết lập quyền cho phép<strong>&nbsp;Read</strong>&nbsp;và&nbsp;<strong>Write</strong>&nbsp;nếu bạn muốn cho phép người dùng truy cập.</p>

<p style="text-align: justify;">9. Click chọn&nbsp;<strong>OK</strong>.</p>

<p style="text-align: justify;"><img alt="chọn OK" data-i="25" data-src="https://st.quantrimang.com/photos/image/2016/03/31/click-chon-ok.jpg" data-was-processed="true" height="424" src="https://st.quantrimang.com/photos/image/2016/03/31/click-chon-ok.jpg" title="chọn OK" width="469" /></p>

<div style="text-align: justify;">&nbsp;</div>
		</div>
				<div id="author">
						<p>
				<strong>Nguồn tin:</strong>
				Quantrimang.com:
			</p>
		</div>
	</div>
	<div id="footer" class="clearfix">
		<div id="url">
			<strong>URL của bản tin này: </strong><a href="https://www.nguoicodonvn2008.info/vi/news/savefile/kien-thuc-may-tinh/huong-dan-thiet-lap-va-quan-ly-ftp-server-tren-windows-10-9730.html" title="Hướng dẫn thiết lập và quản lý FTP Server trên Windows 10">https://www.nguoicodonvn2008.info/vi/news/savefile/kien-thuc-may-tinh/huong-dan-thiet-lap-va-quan-ly-ftp-server-tren-windows-10-9730.html</a>

		</div>
		<div class="clear"></div>
		<div class="copyright">
			&copy; .&#x3A; Nguoicodonvn2008.info - Cõi lòng người cô đơn &#x3A;.
		</div>
		<div id="contact">
			<a href="mailto:admin@nguoicodonvn2008.info">admin@nguoicodonvn2008.info</a>
		</div>
	</div>
</div>
        <div id="timeoutsess" class="chromeframe">
            Bạn đã không sử dụng Site, <a onclick="timeoutsesscancel();" href="https://nguoicodonvn2008.info/#">Bấm vào đây để duy trì trạng thái đăng nhập</a>. Thời gian chờ: <span id="secField"> 60 </span> giây
        </div>
        <div id="openidResult" class="nv-alert" style="display:none"></div>
        <div id="openidBt" data-result="" data-redirect=""></div>
		</script>
		<div class="car-top">
  <span><img src="https://nguoicodonvn2008.info/themes/default/images/car.png" alt=""></span>
</div>
<script src="https://nguoicodonvn2008.info/assets/js/jquery/jquery.min.js"></script>
<script>var nv_base_siteurl="/",nv_lang_data="vi",nv_lang_interface="vi",nv_name_variable="nv",nv_fc_variable="op",nv_lang_variable="language",nv_module_name="news",nv_func_name="savefile",nv_is_user=0, nv_my_ofs=-4,nv_my_abbr="EDT",nv_cookie_prefix="nv4c_e856T",nv_check_pass_mstime=1738000,nv_area_admin=0,nv_safemode=0,theme_responsive=0,nv_recaptcha_ver=2,nv_recaptcha_sitekey="",nv_recaptcha_type="image",XSSsanitize=1;</script>
<script src="https://nguoicodonvn2008.info/assets/js/language/vi.js"></script>
<script src="https://nguoicodonvn2008.info/assets/js/DOMPurify/purify3.js"></script>
<script src="https://nguoicodonvn2008.info/assets/js/global.js"></script>
<script src="https://nguoicodonvn2008.info/assets/js/site.js"></script>
<script src="https://nguoicodonvn2008.info/themes/default/js/news.js"></script>
<script src="https://nguoicodonvn2008.info/themes/default/js/main.js"></script>
<script src="https://nguoicodonvn2008.info/themes/default/js/custom.js"></script>
<script type="application/ld+json">
        {
            "@context": "https://schema.org",
            "@type": "Organization",
            "url": "https://nguoicodonvn2008.info",
            "logo": "https://nguoicodonvn2008.info/uploads/angel.gif"
        }
        </script>
<script src="https://nguoicodonvn2008.info/themes/default/js/bootstrap.min.js"></script>
<script type="text/javascript">
var $scrolltop = $('.car-top');
$scrolltop.on('click', function () {
    $('html,body').animate({
        scrollTop: 0
    }, 800);
    $(this).addClass("car-run");
    setTimeout(function(){ $scrolltop.removeClass('car-run');}, 1000);
    return false;
});
$(window).on('scroll', function ()
{ 
    if($(window).scrollTop() >= 200)
    {
        $scrolltop.addClass("show");
        $scrolltop.addClass("car-down");
    }
    else
    {
       $scrolltop.removeClass("show");
       setTimeout(function(){ $scrolltop.removeClass('car-down');}, 300);
    }
});
</script>
</body>
</html>