Hướng dẫn tạo và lưu file trong Photoshop CS6
- Thứ sáu - 05/08/2022 00:59
- In ra
- Đóng cửa sổ này
Quantrimang đã giới thiệu tới bạn giao diện của Photoshop CS6 để có thể tập làm quen. Tiếp theo, chúng ta sẽ cùng học cách tạo và lưu file thông qua bài viết này.
File trong Photoshop là gì?
File trong Photoshop hay còn gọi là Document (Tài liệu), là một vùng làm việc được tạo ra với các thuộc tính như kích thước, độ phân giải, hệ màu... Thông qua các thiết lập sẵn, bạn có thể tạo ra hình ảnh, file thiết kế với các thuộc tính đó. Các thao tác chỉnh sửa, thiết kế sau sẽ chỉ có thể áp dụng trong vùng làm việc đó.
Để có thể tạo được file đúng chuẩn, bạn sẽ cần nắm được các khái niệm cơ bản. Bao gồm:
Kích thước file làm việc
Đây là kích thước thực tế của file khi được xuất ra thành ảnh, PDF... Kích thước này sẽ bao gồm width (chiều rộng) và height (chiều dài). Quy ước khi viết về kích cỡ của file ảnh sẽ là chiều rộng trước và chiều dài sau.
Ví dụ: Kích thước của một banner quảng cáo Facebook là 900x603px tức là file ảnh rộng 900px và cao 603px.
Tỷ lệ file làm việc
Tỷ lệ file sẽ được quy định bởi thông số chiều rộng chia chiều cao. Trong thiết kế, khi nói về 1 file có kích thước nào đó người ta đang nói về tỷ lệ của file.
Ví dụ: Bạn cần thiết kế 1 file kích thước 1x2m đồng nghĩa với việc bạn cần thiết kế file theo tỷ lệ 1:2 chứ không phải là tạo 1 file có kích thước 1x2m.
Trong trường hợp bạn làm file sai với tỷ lệ mà khách hàng yêu cầu, chất lượng của sản phẩm có thể bị ảnh hưởng tùy vào mức độ sai lệch.
Độ phân giải của file Photoshop
Đây là mật độ điểm ảnh (pixel) trên một đơn vị chiều dài. Độ phân giải sẽ phụ thuộc vào số pixel/inch. Đối với các thiết kế với mục đích đăng tải lên mạng thì bạn có thể để mật độ điểm ảnh là 72px/inch. Trong khi các file sử dụng để in ấn cần có mật độ điểm ảnh từ 150 đến 300px/inch.
Cách tạo file trong Photoshop CS6
Bạn có thể tạo file trong Photoshop CS6 với hai cách khác nhau: Tạo file với kích thước định sẵn hoặc tạo file với kích thước ảnh cho trước.
Để tạo được file mới bạn sẽ cần thực hiện theo các bước sau.
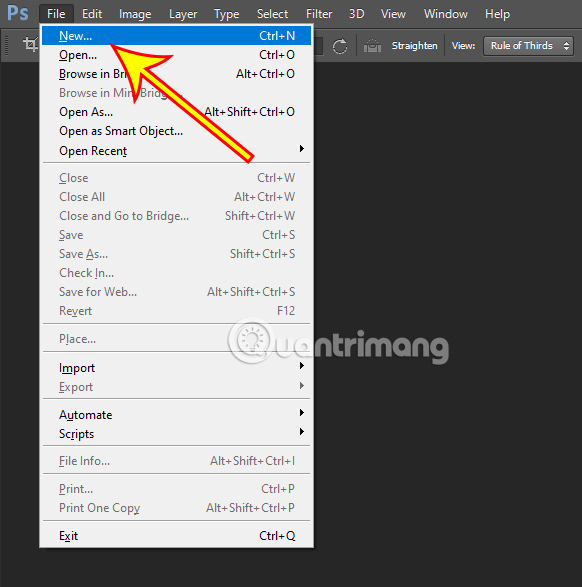
Bước 1: Tại giao diện chính của Photoshop CS6, nhấn vào mục File, chọn New để tiến hành tạo file mới.
Ngoài ra bạn cũng có thể ấn nhanh phím tắt Ctrl + N thay cho thao tác trên.
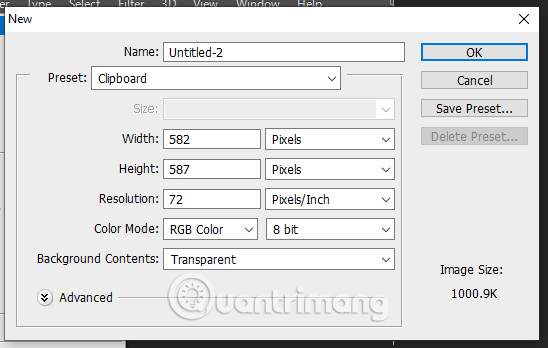
Bước 2: Một cửa sổ tùy chỉnh xuất hiện. Tại cửa sổ này bạn sẽ cần thiết lập các thông số cho file của mình. Cụ thể bao gồm:
- Name: Tên cho file.
- Preset: Các chế độ kích thước đã có sẵn trong Photoshop CS6. Nếu như bạn muốn tự tùy chỉnh kích thước thì có thể chọn Custom.
- Size: Cho phép bạn chọn tỷ lệ hoặc kích thước sẵn có. Trong trường hợp bạn chọn Custom ở phần Preset thì sẽ không có chế độ này.
- Width/Height: Cho phép bạn thiết lập kích thước của file. Ngoài ra bạn cũng có thể tùy chỉnh đơn vị đo mà mình muốn.
- Resolution: Thiết lập mật độ điểm ảnh.
- Color Mode: Thiết lập hệ màu cho file. Trong trường hợp file của bạn sử dụng cho các thiết bị điện tử thì hãy để chế độ RGB. Khi sử dụng cho in ấn hãy chuyển sang CMYK.
- Background Contents: Thiết lập màu nền cho file.
Bước 3: Sau khi đã thiết lập được các thông số phù hợp với nhu cầu sử dụng, nhấn OK để tạo ra file làm việc của bạn.
Bạn cũng có thể ấn Enter trên bàn phím để tiến hành tạo file nhanh chóng.
Cách xuất file, lưu file trong Photoshop CS6
Sau khi tạo xong file và hoàn tất quá trình thiết kế, việc cuối cùng bạn cần làm chính là xuất file. Có hai cách để bạn xuất file, đó là xuất file ảnh và file psd.
Trong đó, việc xuất file psd có tác dụng giúp bạn có thể mở lại file và chỉnh sửa lại nội dung sau này nếu muốn. Còn đối với file ảnh, bạn sẽ không thể chỉnh sửa được nữa.
Để xuất ra file ảnh, bạn sẽ làm như sau:
Bước 1: Vào File chọn Save for Web.

Bước 2: Lựa chọn định dạng file rồi nhấn vào nút Save.

Bước 3: Một cửa sổ xuất hiện, bạn cần nhập tên file, nơi lưu file và cuối cùng nhấn OK để hoàn tất việc xuất file ảnh.
Nếu muốn lưu file psd thì bạn cần làm theo các bước dưới đây.
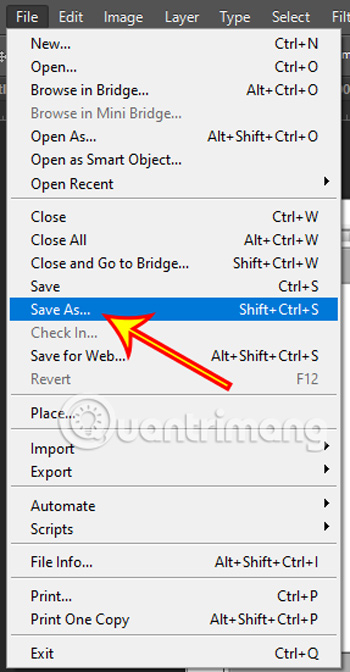
Bước 1: Nhấn vào File, chọn Save hoặc Save as.
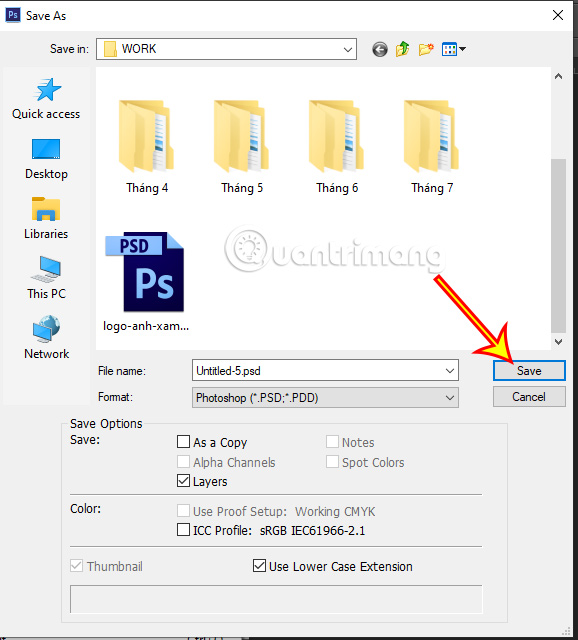
Bước 2: Một cửa sổ mới xuất hiện, chọn nơi lưu trữ file rồi nhấn OK để hoàn tất quá trình lưu file psd.
Thông qua bài viết này, Quantrimang đã hướng dẫn cho bạn một cách chi tiết về cách tạo file cũng như lưu file trên Photoshop CS6. Ở những bài viết tiếp theo chúng ta sẽ cùng tìm hiểu về cách mở file có sẵn trong Photoshop cũng như nắm được các phím tắt trong phần mềm này.
