Hướng dẫn đổi tên máy in trên Windows 10
- Thứ sáu - 02/02/2024 23:01
- In ra
- Đóng cửa sổ này
Khi kết nối máy in với máy tính, theo mặc định hệ thống sẽ hiển thị tên đầy đủ toàn bộ những máy in đang kết nối với máy tính cũng như đã kết nối trước đây. Trong trường hợp người dùng sử dụng nhiều máy in trên 1 máy tính, thì việc đổi tên máy in sẽ dễ dàng hơn trong khi sử dụng. Chúng ta có thể đặt tên riêng biệt cho từng loại máy để không sử dụng nhầm giữa các máy với nhau. Bài viết dưới đây sẽ hướng dẫn bạn đọc cách đổi tên máy in trên Windows 10.
Cách 1: Đổi tên máy in qua Settings
Bước 1:
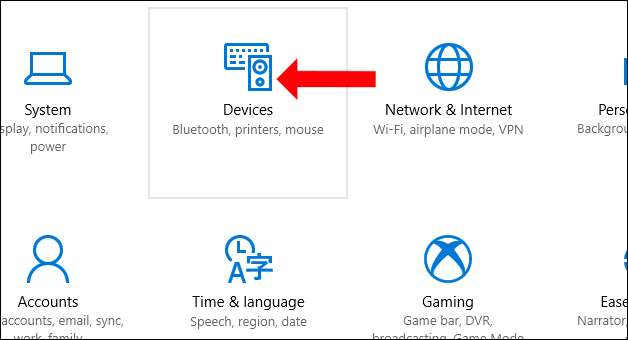
Chúng ta nhấn vào nút Settings trên giao diện rồi nhấn chọn tiếp vào mục Devices. Hoặc có thể nhấn tổ hợp Windows + I để mở giao diện Windows Settings.
Bước 2:
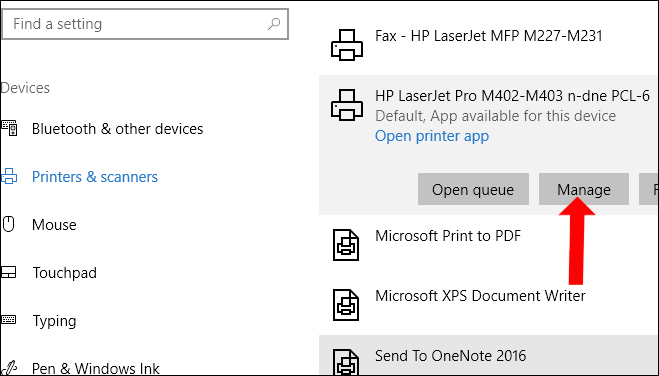
Xuất hiện giao diện mới nhìn xuống mục Printers & scanners, rồi nhìn sang bên phải chúng ta sẽ thấy toàn bộ những máy in đang liên kết với máy tính. Click chọn vào máy in muốn đổi tên, rồi nhấn vào nút Manage.
Bước 3:
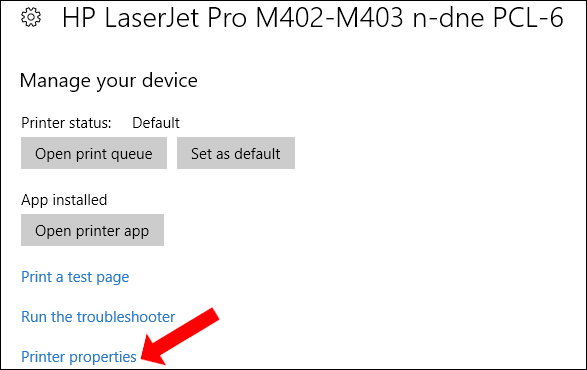
Chuyển sang giao diện mới nhấn chọn vào Printer Properties.
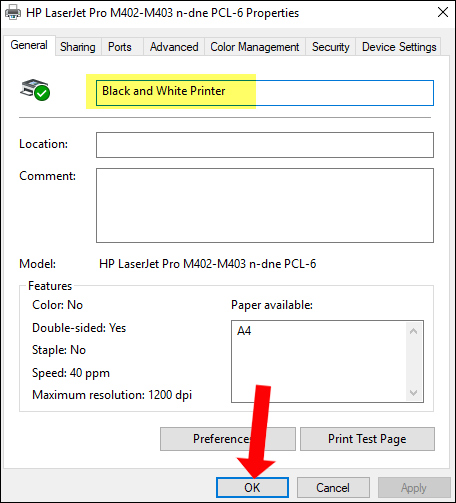
Click tiếp vào tab Genetal để tiến hành chỉnh sửa tên máy in ngay tại dòng trên cùng. Cuối cùng nhấn OK để lưu lại thay đổi.
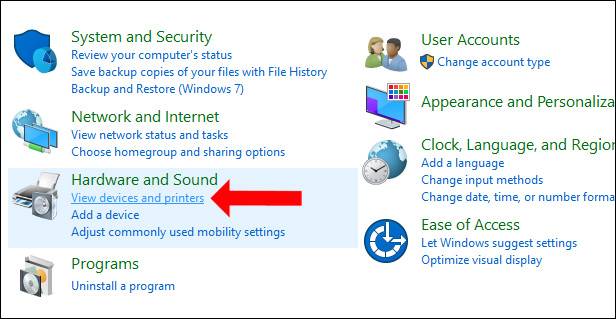
Cách 2: Đổi tên máy tính qua Control Panel
Bước 1:
Mở giao diện Control Panel rồi tại mục Hardware and Sound, nhấn chọn vào mục View devices and printers.
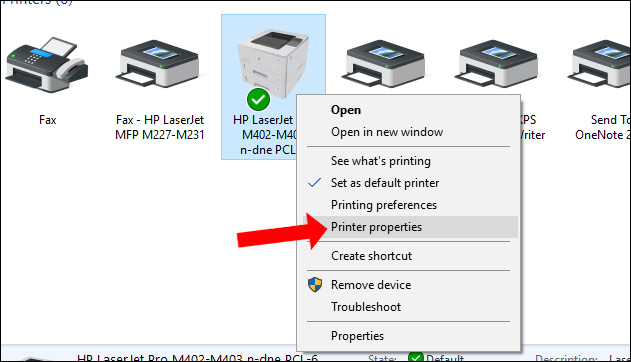
Bước 2:
Tại giao diện mới, người dùng click chuột phải lên máy in muốn đổi tên rồi nhấn vào tùy chọn Printer Properties trong menu chuột phải.
Bước 3:
Cũng xuất hiện hộp thoại tương tự như Cách 1. Tại Tab General, người dùng chỉ cần đổi tên máy in sang tên mới muốn đặt rồi nhấn OK để lưu lại tên mới là xong.

Cách 3: Đổi tên máy in bằng PowerShell
Để thay đổi tên máy in bằng lệnh PowerShell, hãy làm theo các bước sau:
1. Mở Start.
2. Tìm kiếm PowerShell, nhấp chuột phải vào kết quả trên cùng và chọn tùy chọn Run as administrator.
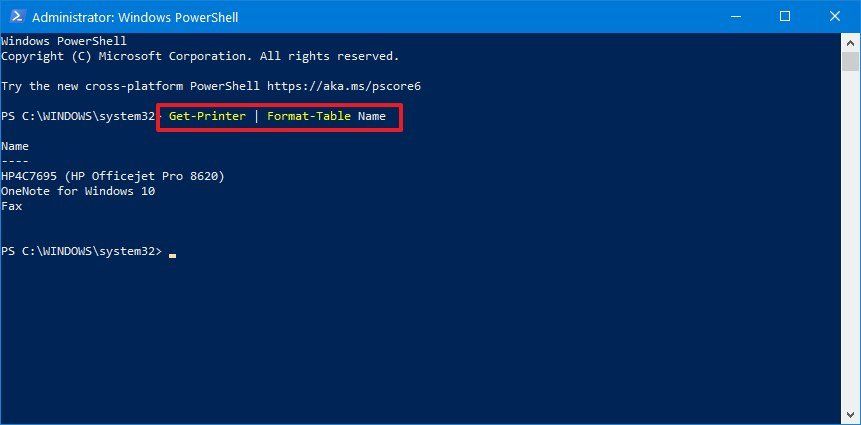
3. Nhập lệnh sau để liệt kê các máy in khả dụng và nhấn Enter:
Get-Printer | Format-Table Name
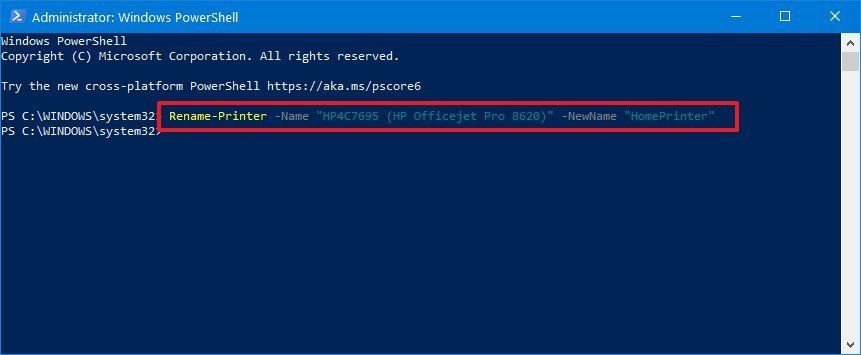
4. Nhập lệnh sau để đổi tên máy in và nhấn Enter:
Rename-Printer -Name "CURRENT-PRINTER-NAME" -NewName "NEW-PRINTER-NAME"
Ví dụ, lệnh sau đổi tên máy in thành "HomePrinter":
Rename-Printer -Name "HP4C7695 (HP Officejet Pro 8620)" -NewName "HomePrinter"
Sau khi bạn hoàn thành các bước, lệnh PowerShell sẽ thay đổi tên máy in thành tên bạn đã chỉ định.
Cách 4: Đổi tên máy in bằng Command Prompt
Mặc dù các bước không mấy dễ dàng, nhưng nếu bạn muốn làm như vậy, Command Prompt sẽ cung cấp cách thay đổi tên máy in bằng cách sử dụng script "prncnfg.vbs" trên Windows 10.
Để thay đổi tên máy in bằng Command Prompt, hãy làm theo các bước sau:
1. Mở Start.
2. Tìm kiếm PowerShell, nhấp chuột phải vào kết quả trên cùng và chọn tùy chọn Run as administrator.
3. Nhập lệnh sau để thay đổi tên máy in và nhấn Enter:
cscript %WINDIR%\System32\Printing_Admin_Scripts\en-US\prncnfg.vbs -x -p "CURRENT-PRINTER-NAME" -z "NEW-PRINTER-NAME"
Ví dụ, lệnh sau thay đổi tên máy in thành "HomePrinter":
cscript %WINDIR%\System32\Printing_Admin_Scripts\en-US\prncnfg.vbs -x -p "HP4C7695 (HP Officejet Pro 8620)" -z "HomePrinter"

Sau khi bạn hoàn thành các bước, script sẽ chạy và thay đổi tên máy in bằng tên bạn đã chỉ định trong lệnh.
Với việc thay đổi tên máy in vô cùng dễ dàng, chúng ta có thể liên kết với máy in cần làm việc nhanh chóng, tránh trường hợp kết nối nhầm với máy in khác. 4 cách đổi tên máy in trên bạn có thể áp dụng với các phiên bản hệ điều hành khác nhau.
