Cách vô hiệu hóa Microsoft Defender cho một ứng dụng cụ thể trong Windows
- Thứ sáu - 09/05/2025 22:56
- In ra
- Đóng cửa sổ này
Microsoft Defender là ứng dụng bảo mật dễ sử dụng, bảo vệ thiết bị và dữ liệu cá nhân khỏi phần mềm gián điệp, virus hoặc các mối đe dọa trực tuyến khác. Tuy nhiên, đôi khi nó có thể can thiệp vào một số tiến trình nhất định, chẳng hạn như cài đặt phần mềm của bên thứ ba, bằng cách đánh dấu sai chúng là phần mềm độc hại. Trong những tình huống như vậy, bạn có thể muốn tắt Microsoft Defender cho một ứng dụng hoặc file cụ thể.
Phương pháp 1: Thêm loại trừ vào Windows Defender
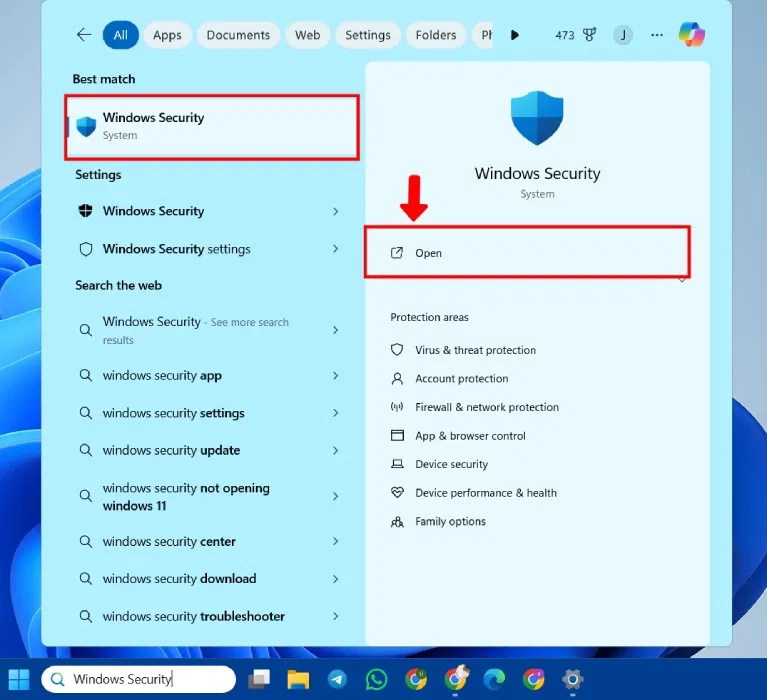
Mở Windows Security, nhấn Win + S và tìm kiếm Windows Security.
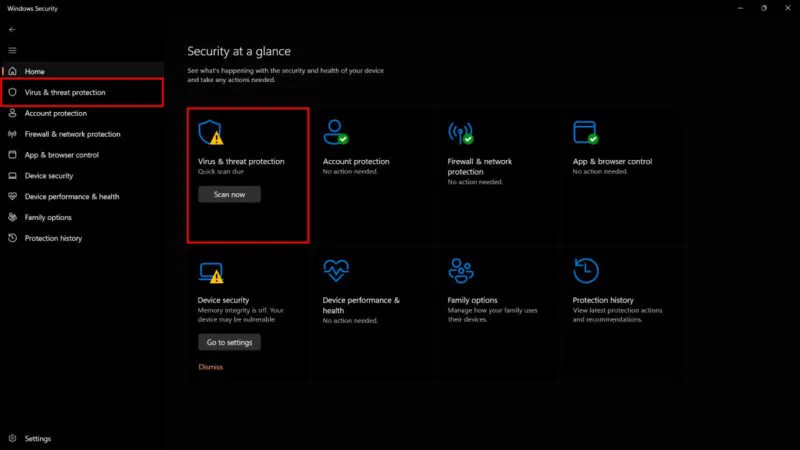
Mở Virus & threat protection từ bảng điều khiển bên trái hoặc menu chính Security at a glance.
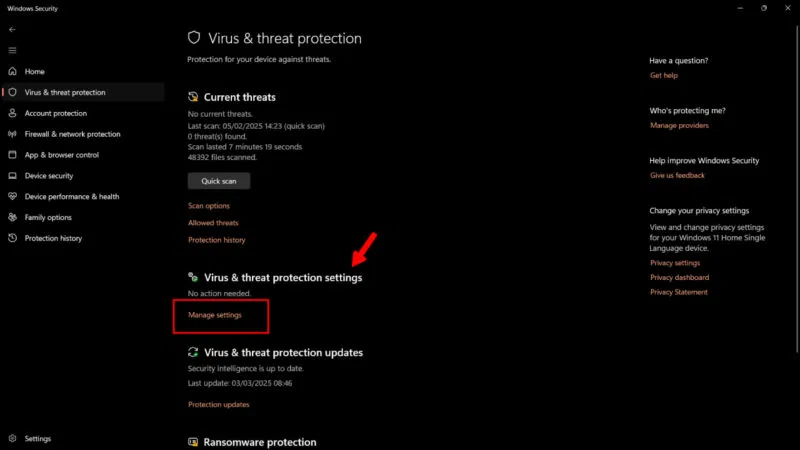
Chọn Manage settings.
Cuộn xuống phần Exclusions và nhấp vào Add or remove exclusions.
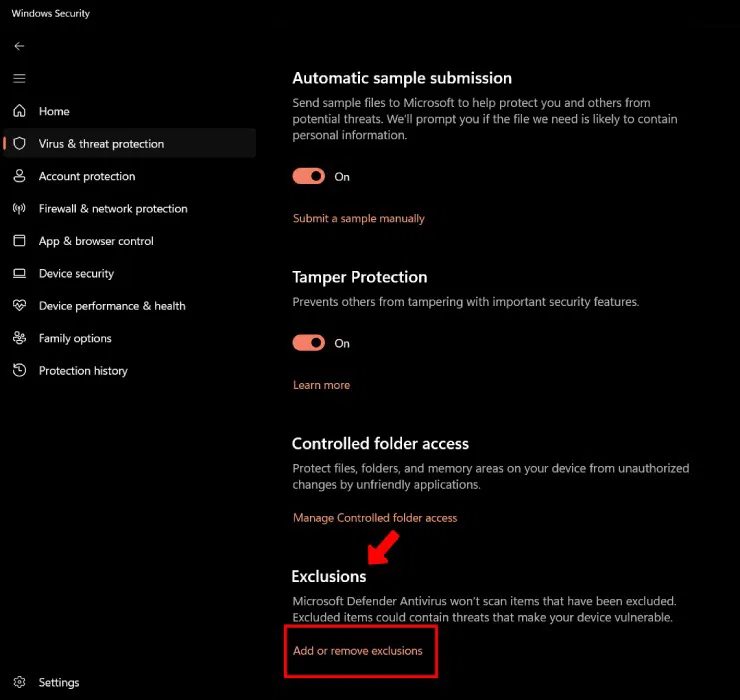
Windows User Account Controller sẽ yêu cầu bạn cấp quyền thực hiện thay đổi cho thiết bị. Nhấp vào Yes để tiếp tục.
Nhấp vào Add an exclusion để thêm các mục để loại trừ khỏi quá trình quét virus. Chọn file, thư mục hoặc thậm chí là tiến trình (tùy theo nhu cầu của bạn). Trong trường hợp cài đặt phần mềm của bên thứ ba, hãy chọn toàn bộ thư mục chứa ứng dụng.
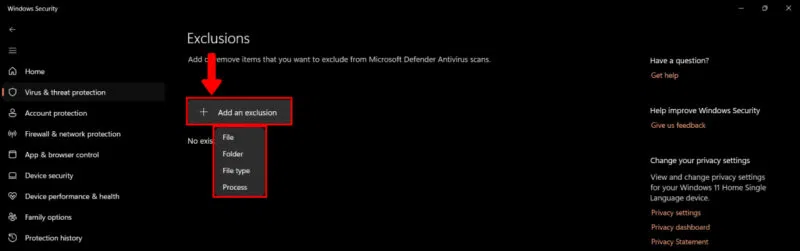
Bằng cách thêm các mục vào menu này, Microsoft Windows Defender sẽ loại trừ chúng khỏi những lần quét trong tương lai. Đảm bảo rằng bạn chỉ thêm các file từ các nguồn đáng tin cậy.
Phương pháp 2: Cung cấp Controlled Folder Access cho ứng dụng
Cung cấp Controlled Folder Access sẽ bảo vệ các file, thư mục và vùng bộ nhớ trên thiết bị và chặn các ứng dụng (bao gồm cả chương trình diệt virus) thực hiện bất kỳ thay đổi nào đối với chúng. Về cơ bản, bạn đang tạo danh sách các ứng dụng đáng tin cậy.
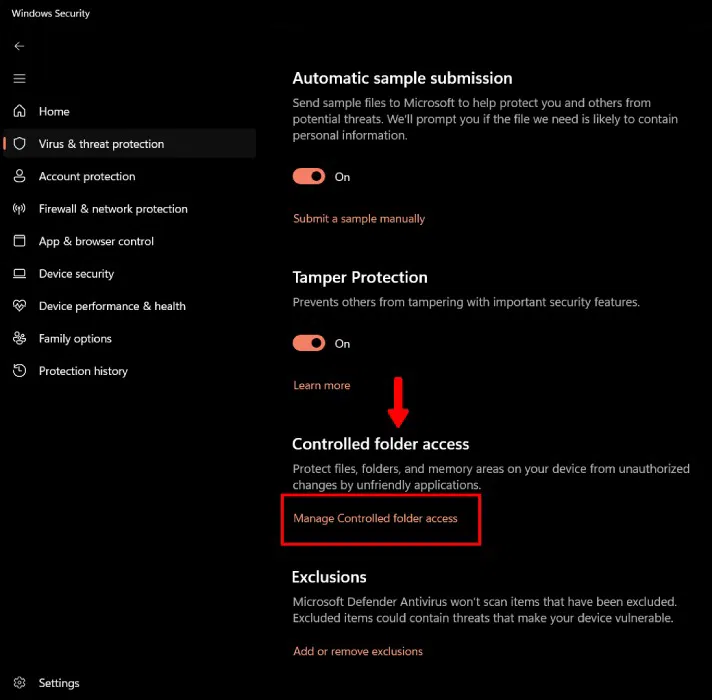
Để cung cấp Controlled Folder Access, hãy mở Manage Settings (như đã chỉ định ở trên): Windows Security -> Virus & threat protection -> Manage Settings. Chọn Manage Controlled folder access.
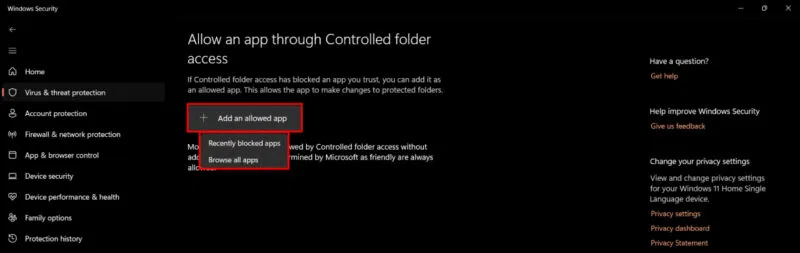
Trong phần Controlled Folder Access, hãy bật nút chuyển đổi và nhấp vào Allow an app through Controlled folder access.
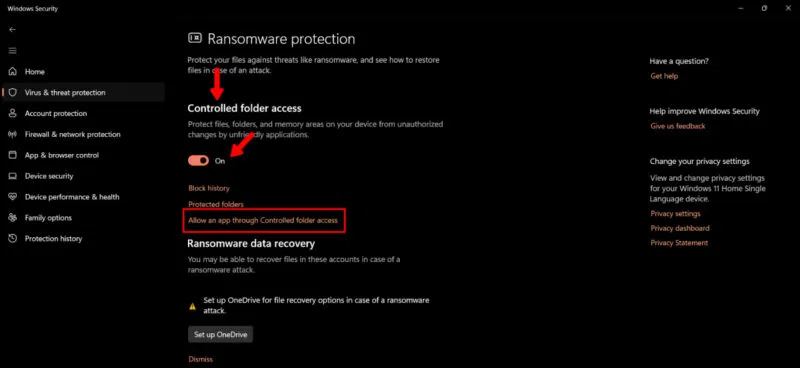
Nhấp vào Add an allowed app và chọn một trong các chức năng từ menu drop-down. Nếu ứng dụng bị Windows Security chặn, hãy chọn Recently blocked apps. Để chọn một ứng dụng mới, hãy nhấp vào Browse all apps.
Phương pháp 3: Sử dụng Registry Editor
Nếu đang sử dụng Windows 11 Home, bạn có thể cấu hình các giá trị của Registry Editor để loại trừ một ứng dụng khỏi quá trình quét của Microsoft Defender.
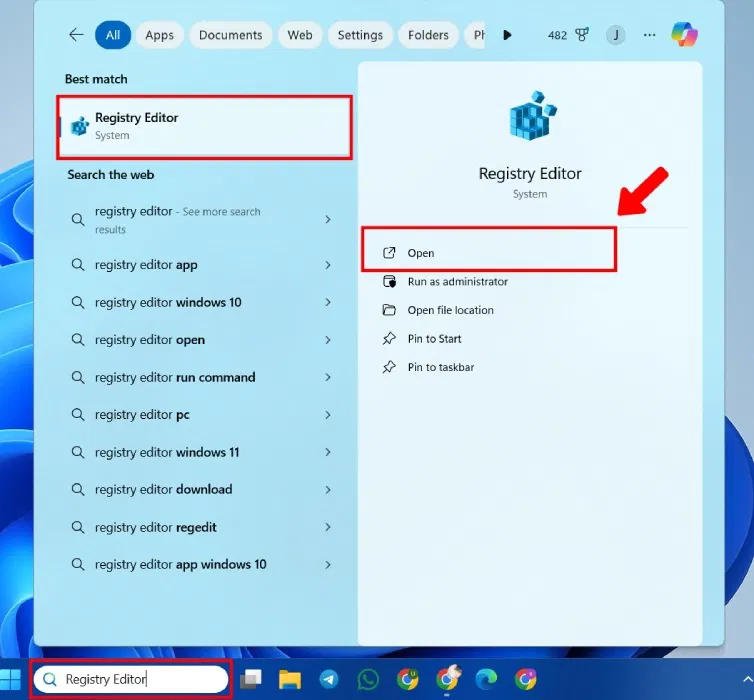
Mở Registry Editor bằng cách nhấn Windows + R và nhập regedit. Hoặc, nhập Registry Editor vào menu Start.
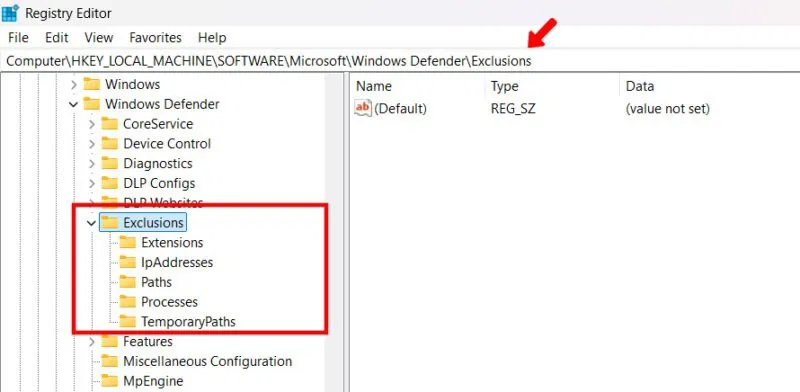
Điều hướng đến vị trí sau:
HKEY_LOCAL_MACHINE\SOFTWARE\Microsoft\Windows Defender\Exclusions
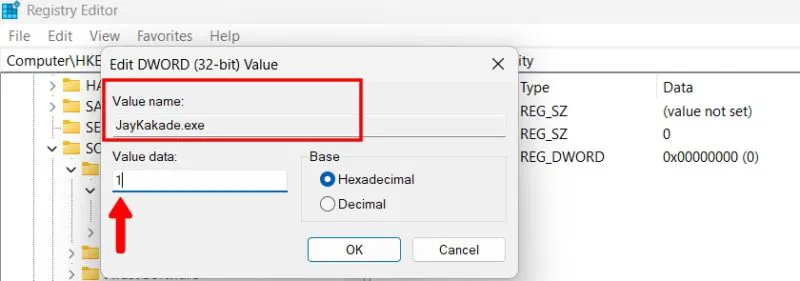
Nhấp chuột phải vào Exclusions, nhấp vào New và chọn DWORD (32-bit) Value từ menu drop-down.
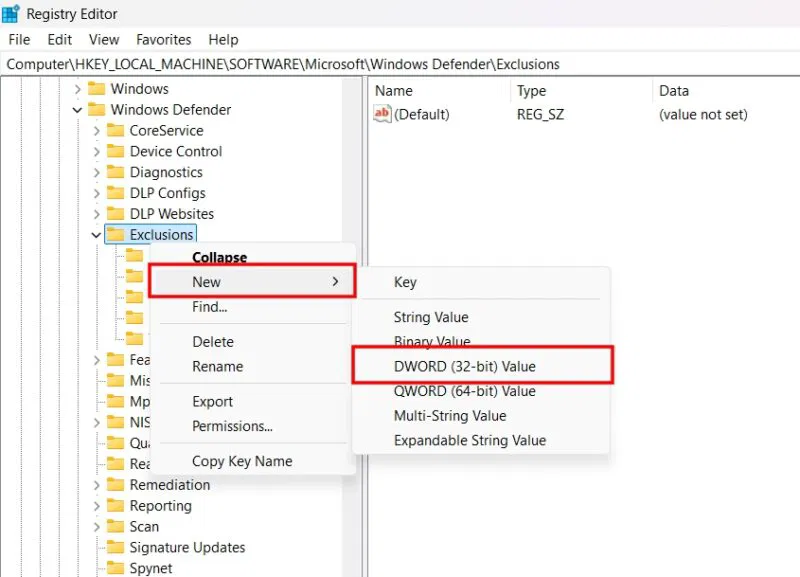
Nhập Value name sau ứng dụng của bạn. Ví dụ: JayKakade.exe. Đặt dữ liệu giá trị thành 1 và nhấp vào OK.
Phương pháp 4: Tắt tạm thời Microsoft Defender
Một trong những cách dễ nhất để cài đặt phần mềm của bên thứ ba mà không bị Windows Security can thiệp là tắt tạm thời ứng dụng này.
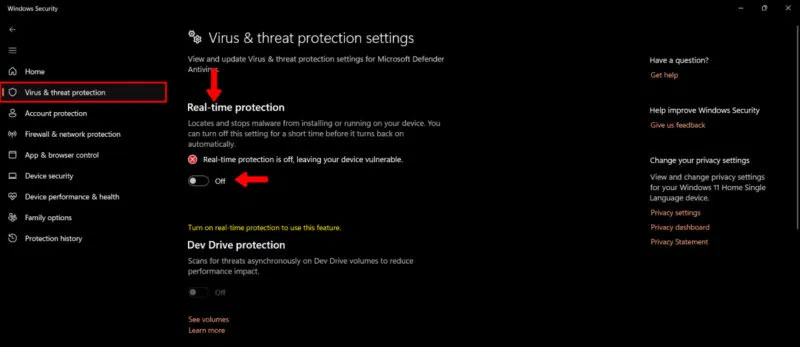
- Mở Windows Security -> Virus & threat protection -> Manage Settings (xem ở trên).
- Trong phần Real-time protection, hãy chuyển công tắc chuyển đổi sang chế độ tắt.
Biện pháp này chỉ áp dụng trong thời gian ngắn và chế độ bảo vệ theo thời gian thực sẽ tự bật. Tuy nhiên, khoảng thời gian ngắn này đủ để sửa file hoặc phần mềm bị Microsoft Defender gắn cờ không chính xác. Hãy thận trọng khi sử dụng phương pháp này vì nó không chỉ vô hiệu hóa Windows Defender mà còn vô hiệu hóa tạm thời mọi chế độ bảo vệ chống virus trên thiết bị.
Windows Defender được tích hợp sâu vào hệ điều hành Windows và do đó không thể gỡ cài đặt hoàn toàn – nhưng bạn có thể tắt nó. Có thể tắt tạm thời hoặc vĩnh viễn, nhưng việc này không được khuyến khích vì nó khiến hệ thống dễ bị nhiễm phần mềm độc hại.
