Cách thiết lập Wireguard VPN trên Linux
- Thứ ba - 07/01/2025 22:09
- In ra
- Đóng cửa sổ này
Wireguard là một daemon mạng riêng ảo (VPN) mã nguồn mở mạnh mẽ có thể chạy trên cả desktop và thiết bị di động. Nó cung cấp một giải pháp thay thế nhanh và nhẹ cho các VPN truyền thống như IPsec và OpenVPN. Bài viết hôm nay sẽ chỉ cho bạn cách cài đặt Wireguard và tạo một thiết lập VPN đơn giản bằng 3 máy Linux.
Tại sao nên sử dụng Wireguard làm giải pháp VPN?
Một trong những ưu điểm lớn nhất của Wireguard là nó là một daemon VPN nhanh và nhẹ. Không giống như các giải pháp truyền thống, Wireguard không làm tăng thêm nhiều chi phí cho mạng của bạn. Điều này dẫn đến độ trễ thấp hơn và tốc độ thông lượng tổng thể cao trên các node của bạn.
Một tính năng chính khác của Wireguard là nó là một mô-đun bên trong Linux kernel. Điều này cho phép nó chạy mà không chiếm bất kỳ tài nguyên hệ thống bổ sung nào từ máy tính của bạn, khiến nó trở thành lựa chọn lý tưởng để triển khai trên các thiết bị cấp thấp và SOC.
Cuối cùng, Wireguard cũng tận dụng các tiêu chuẩn mã hóa hiện đại và các hoạt động phát triển. Nó cũng có nhiều xác minh chính thức, xác nhận tính chính xác của mã, đảm bảo bảo mật và khả năng chống lại các cuộc tấn công của Wireguard.
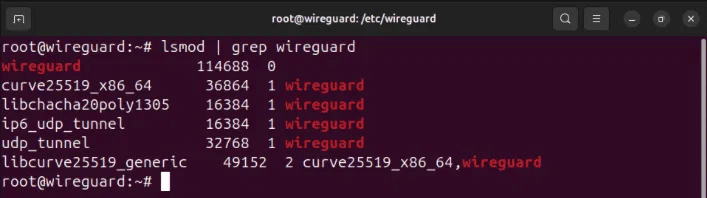
Tải Wireguard
Bước đầu tiên để thiết lập Wireguard trên Linux là tải xuống các công cụ cốt lõi của nó từ kho lưu trữ của bản phân phối. Điều này cho phép bạn kiểm soát mô-đun kernel Wireguard tích hợp bằng các lệnh userspace.
Để cài đặt các công cụ cốt lõi trong Ubuntu và Debian, hãy chạy lệnh sau:
sudo apt install wireguard wireguard-tools
Trong Fedora, bạn có thể sử dụng trình quản lý gói dnf:
sudo dnf install wireguard-tools
Đối với Arch Linux, bạn có thể chạy pacman để tải các công cụ cốt lõi của Wireguard:
sudo pacman -S wireguard-tools
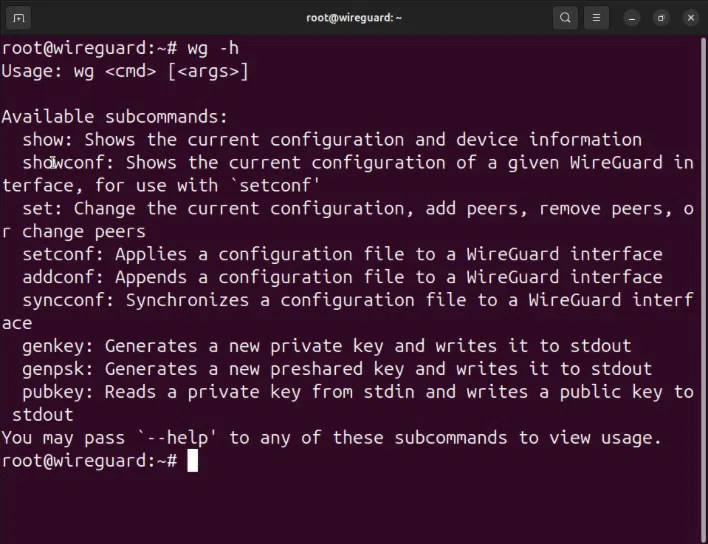
Xác nhận rằng bạn đã cài đặt đúng các công cụ Wireguard bằng cách load màn hình trợ giúp của nó:
wg -h
Thiết lập Wireguard server
Giả định: Bài viết này giả định rằng bạn đang cài đặt Wireguard server trên hệ thống Linux có địa chỉ IPv4 có thể truy cập công khai. Các hướng dẫn vẫn sẽ hoạt động trên máy chủ đằng sau một NAT, nhưng nó sẽ không tìm thấy những node bên ngoài mạng con của nó.
Với bộ công cụ cốt lõi Wireguard trên máy Linux, giờ đây bạn có thể thiết lập server node của VPN. Node này sẽ đóng vai trò là cổng Internet cho các client node trong mạng.
Bắt đầu bằng cách điều hướng đến thư mục cấu hình Wireguard và đặt quyền mặc định của nó thành "root only":
cd /etc/wireguard
sudo umask 077
Lưu ý: Một số hệ thống có thể ngăn bạn vào thư mục "/etc/wireguard" với tư cách là người dùng thông thường. Để khắc phục điều đó, hãy chuyển sang người dùng root bằng sudo -s.
Tạo public và private key cho Wireguard server:
sudo sh -c 'wg genkey | tee /etc/wireguard/server-private-key | wg pubkey > /etc/wireguard/server-public-key'
Tạo file cấu hình máy chủ bằng trình soạn thảo văn bản yêu thích:
sudo nano /etc/wireguard/wg0.conf
Dán block code sau vào file cấu hình máy chủ:
[Interface]
PrivateKey = PASTE-YOUR-SERVER-PRIVATE-KEY-HERE
Address = 10.0.0.1/32
ListenPort = 60101
PostUp = iptables -t nat -I POSTROUTING -o NETWORK-INTERFACE-HERE -j MASQUERADE
PostDown = iptables -t nat -D POSTROUTING -o NETWORK-INTERFACE-HERE -j MASQUERADE
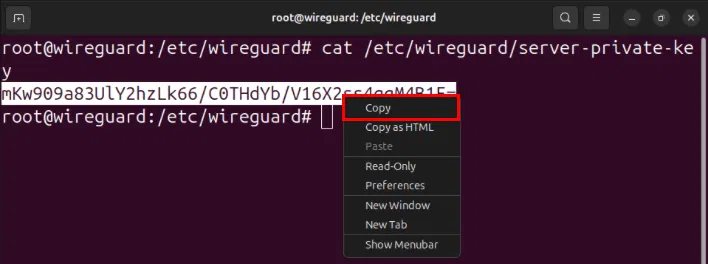
Mở một phiên terminal mới, sau đó in Wireguard private key của máy chủ:
sudo cat /etc/wireguard/server-private-key
Sao chép private key của máy chủ vào clipboard.
Thay thế giá trị của biến PrivateKey bằng key trên clipboard.

Tìm network interface có quyền truy cập Internet bằng lệnh ip:
ip route get 8.8.8.8

Đặt giá trị của flag -o trên cả hai biến PostUp và PostDown thành giao diện có quyền truy cập Internet, sau đó lưu file cấu hình.

Mở file "/etc/sysctl.conf" của máy chủ bằng trình soạn thảo văn bản yêu thích:
sudo nano /etc/sysctl.conf
Cuộn xuống dòng có chứa net.ipv4.ip_forward=1, sau đó xóa dấu thăng (#) ở phía trước.
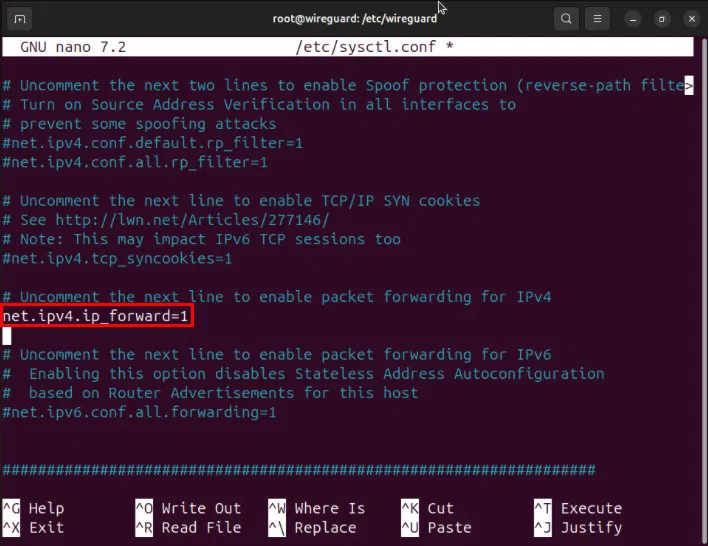
Load lại cấu hình sysctl mới bằng cách chạy: sudo sysctl -p.

Thiết lập và kết nối Wireguard client
Lúc này, bạn đã có Wireguard server được cấu hình đúng mà không có bất kỳ peer nào. Để sử dụng, bạn cần thiết lập và kết nối Wireguard client đầu tiên của mình.
Điều hướng đến thư mục cấu hình Wireguard của hệ thống client và đặt quyền mặc định của nó:
cd /etc/wireguard
sudo umask 077
Tạo cặp key Wireguard của client bằng lệnh sau:
sudo sh -c 'wg genkey | tee /etc/wireguard/client1-private-key | wg pubkey > /etc/wireguard/client1-public-key'
Tạo file cấu hình Wireguard của client bằng trình soạn thảo văn bản yêu thích:
sudo nano /etc/wireguard/wg0.conf
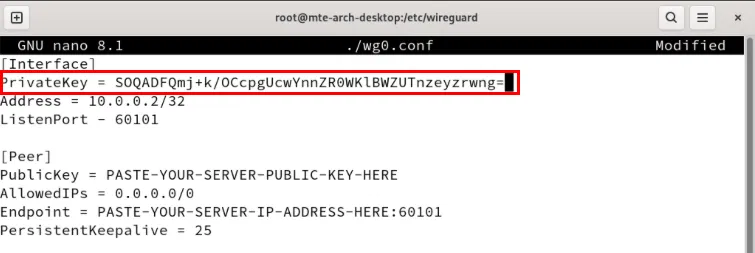
Dán block code sau vào file cấu hình client:
[Interface]
PrivateKey = PASTE-YOUR-CLIENT1-PRIVATE-KEY-HERE
Address = 10.0.0.2/32
ListenPort = 60101
[Peer]
PublicKey = PASTE-YOUR-SERVER-PUBLIC-KEY-HERE
AllowedIPs = 0.0.0.0/0
Endpoint = PASTE-YOUR-SERVER-IP-ADDRESS-HERE:60101
PersistentKeepalive = 25
Thay thế biến PrivateKey bằng private key của client.
Mở phiên terminal của Wireguard server, sau đó in public key của nó:
sudo cat /etc/wireguard/server-public-key
Đặt giá trị của biến PublicKey thành public key của máy chủ.

Thay đổi biến Endpoint thành địa chỉ IP của Wireguard server.
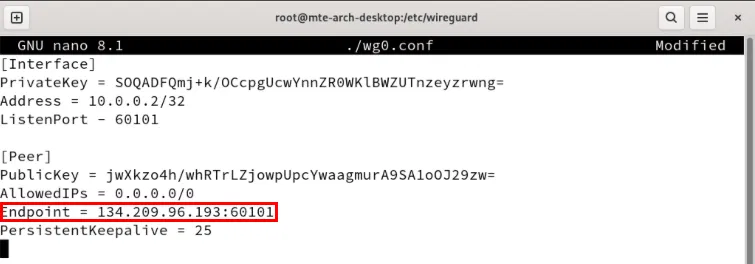
Lưu file cấu hình, sau đó sử dụng lệnh wg-quick để khởi động Wireguard client:
sudo wg-quick up wg0

Lưu ý: Lệnh này sẽ vô hiệu hóa kết nối mạng của client cho đến khi bạn khởi động Wireguard server. Để quay lại mạng ban đầu, hãy chạy sudo wg-quick down wg0.
Liên kết Wireguard server với client
Truy cập phiên terminal của Wireguard server, sau đó mở file cấu hình của máy chủ:
sudo nano /etc/wireguard/wg0.conf
Dán block code sau vào sau phần [Interface]:
[Peer]
PublicKey = PASTE-YOUR-CLIENT1-PUBLIC-KEY-HERE
AllowedIPs = 10.0.0.2/32
PersistentKeepalive = 25
Đặt biến PublicKey thành public key của Wireguard client.
![Vị trí của block [Peer] và public key của client.](https://st.quantrimang.com/photos/image/2024/08/06/thiet-lap-wireguard-vpn-tren-linux-12.jpg)
Lưu ý: Bạn có thể lấy public key bằng cách chạy sudo cat /etc/wireguard/client1-public-key trên client của mình.
Lưu file cấu hình, sau đó chạy lệnh sau để khởi động service Wireguard trên máy chủ:
sudo wg-quick up wg0
Thêm client thứ hai vào server
Một tính năng chính của mọi dịch vụ VPN là nó có thể liên kết nhiều máy từ các mạng khác nhau. Tính năng này hữu ích nếu bạn có máy tính ở nhiều vị trí khác nhau hoặc muốn host game server riêng cho bạn bè.
Để thực hiện việc này trong Wireguard, bạn cần tạo file cấu hình cho giao diện VPN mới trên máy chủ của mình. Cách dễ nhất để thực hiện việc này là sao chép cấu hình máy chủ hiện tại và đặt tên mới cho bản sao:
sudo cp /etc/wireguard/wg0.conf /etc/wireguard/wg1.conf
Mở file cấu hình mới của bạn bằng trình soạn thảo văn bản yêu thích:
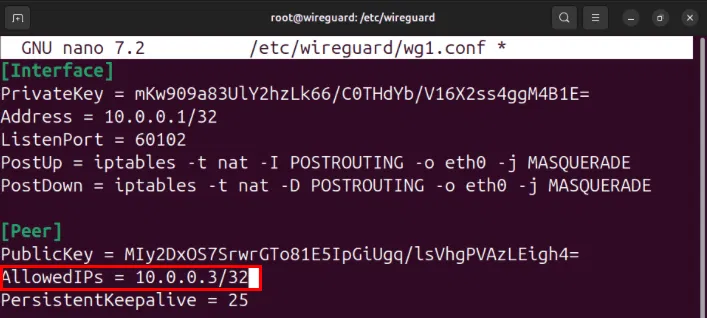
sudo nano /etc/wireguard/wg1.conf
Đặt biến ListenPort thành 60102. Thực hiện thao tác này sẽ ngăn chặn mọi xung đột cổng giữa giao diện VPN wg0 và wg1.
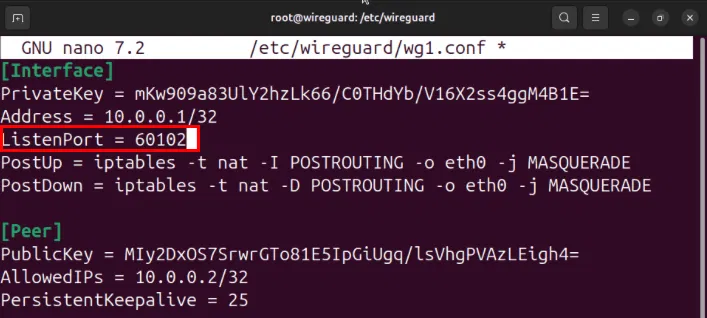
Đi đến phần [Peer] và thay đổi biến AllowedIPs từ “10.0.0.2/32” thành “10.0.0.3/32”, sau đó lưu file cấu hình của bạn.
Cấu hình Wireguard client thứ hai
Đăng nhập vào máy thứ hai, sau đó chuẩn bị thư mục cấu hình Wireguard của bạn:
cd /etc/wireguard
sudo umask 077
Tạo cặp key Wireguard mới bằng lệnh sau:
sudo sh -c 'wg genkey | tee /etc/wireguard/client2-private-key | wg pubkey > /etc/wireguard/client2-public-key'
Tạo file cấu hình mới bằng trình soạn thảo văn bản yêu thích:
sudo nano /etc/wireguard/wg0.conf
Dán block code sau vào file cấu hình mới:
[Interface]
PrivateKey = PASTE-YOUR-CLIENT2-PRIVATE-KEY-HERE
Address = 10.0.0.3/32
ListenPort = 60102
[Peer]
PublicKey = PASTE-YOUR-SERVER-PUBLIC-KEY-HERE
AllowedIPs = 0.0.0.0/0
Endpoint = PASTE-YOUR-SERVER-IP-ADDRESS-HERE:60102
PersistentKeepalive = 25
Đặt biến PrivateKey thành private key của máy thứ hai, sau đó đổi biến PublicKey thành public key của máy chủ.

Thay thế biến Endpoint bằng địa chỉ IP của máy chủ, theo sau là “:60102”.

Lưu file cấu hình của bạn, sau đó khởi động Wireguard client của máy thứ hai:
sudo wg-quick up wg0
Liên kết client thứ hai với máy chủ Wireguard
Đăng nhập lại vào máy chủ Wireguard, sau đó mở cấu hình interface VPN cho client thứ hai của bạn:
sudo nano /etc/wireguard/wg1.conf
Cuộn xuống phần [Peer], sau đó thay thế biến PublicKey bằng public key của client thứ hai.
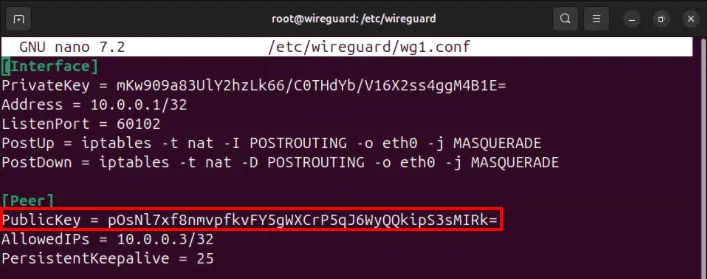
Lưu file cấu hình của bạn, sau đó khởi động interface VPN thứ hai bằng lệnh wg-quick:
sudo wg-quick up wg1
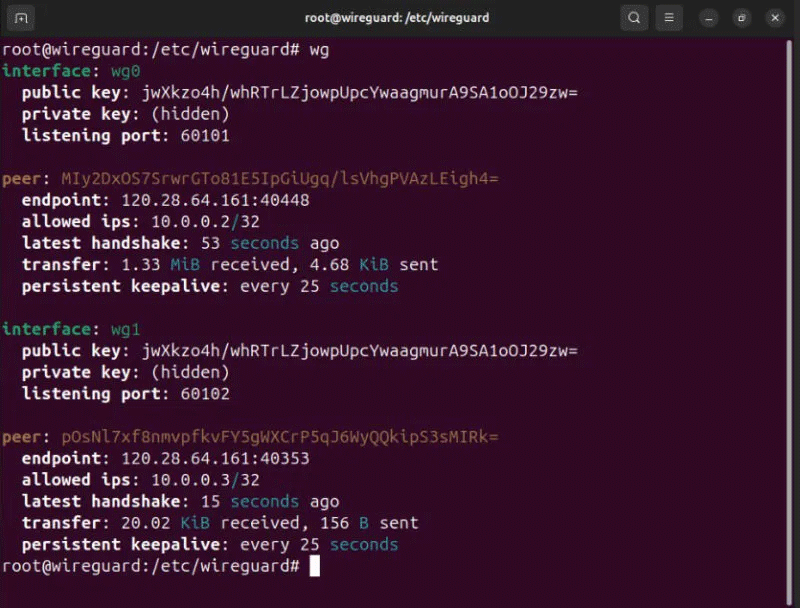
Xác nhận rằng client Wireguard đầu tiên và thứ hai của bạn đang hiển thị chính xác trên máy chủ bằng cách chạy wg.
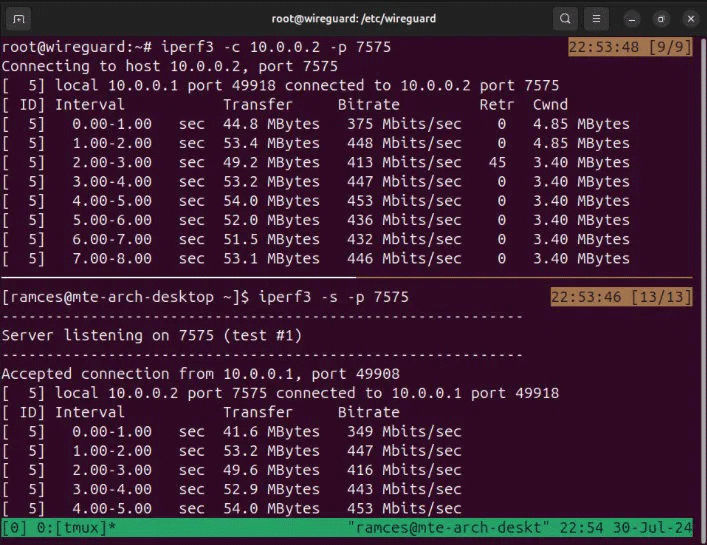
Kiểm tra mạng Wireguard
Với cả server và client trên mạng Wireguard, giờ đây bạn có thể kiểm tra khả năng kết nối và độ trễ giữa các node của mình. Để thực hiện việc này, hãy đảm bảo rằng bạn đã cài đặt các công cụ chẩn đoán mạng trên hệ thống:
sudo apt install net-tools curl
Trong Fedora, bạn chỉ cần cài đặt curl vì nó đã có sẵn các công cụ mạng ngay khi cài đặt:
sudo dnf install curl
Đối với Arch Linux, bạn có thể sử dụng pacman để cài đặt các công cụ mạng và curl:
sudo pacman -S traceroute curl
Bắt đầu bằng cách theo dõi tuyến đường của một gói tin giữa hai client. Sau đây sẽ hiển thị cách một gói tin IP đi từ “10.0.0.2” đến “10.0.0.3:”
traceroute 10.0.0.3

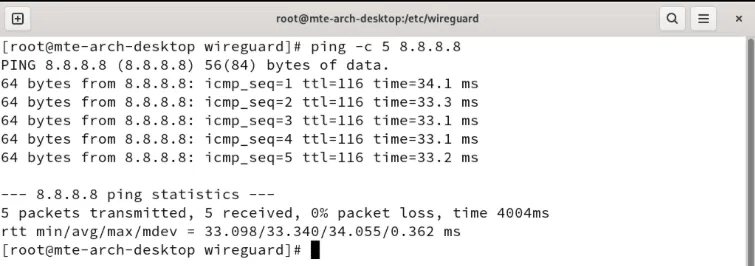
Kiểm tra xem bất kỳ node nào của bạn có thể truy cập Internet công cộng hay không bằng cách ping một địa chỉ IP chung:
ping -c 5 8.8.8.8
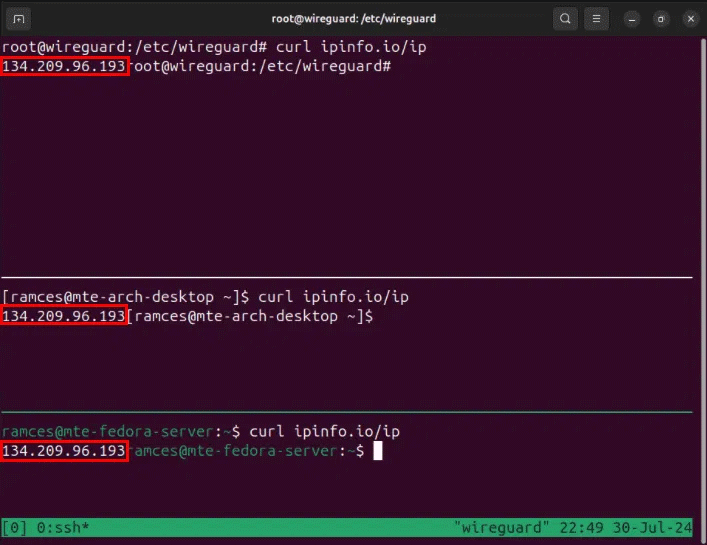
Cuối cùng, hãy xác nhận rằng các node của bạn chia sẻ cùng một địa chỉ IP public với máy chủ Wireguard của bạn:
curl ipinfo.io/ip
Học cách thiết lập mạng Wireguard trên Linux là bước đầu tiên để khám phá thế giới VPN hấp dẫn. Hãy tìm hiểu sâu hơn và xem các lựa chọn về những nhà cung cấp VPN tập trung vào bảo mật tốt nhất mà bạn có thể nhận được ngày hôm nay.
