Cách thiết lập shortcut cho applet Devices and Printers trong Windows 11
- Thứ tư - 26/10/2022 00:57
- In ra
- Đóng cửa sổ này
Devices and Printers là một applet Control Panel trong Windows 11 hiển thị các thiết bị được kết nối hoặc ghép nối với PC của bạn. Bạn có thể chọn thêm hoặc xóa máy in và các thiết bị khác ở đó. Menu Tools của nó cũng bao gồm một tùy chọn tiện dụng để ánh xạ các ổ cứng mạng.
Do đó, Devices and Printers là một applet hữu ích để quản lý các thiết bị ngoại vi được kết nối trong Windows 11, nhưng nó lại nằm sâu trong Control Panel. Bạn có thể truy cập nhanh hơn bằng cách thiết lập nhiều loại shortcut khác nhau để mở applet này. Sau đây là cách bạn có thể tạo shortcut cho Devices and Printers trong Windows 11.
Cách thiết lập shortcut desktop cho Devices and Printers
Desktop là khu vực tiêu chuẩn nhất của Windows để tạo shortcut. Bạn có thể desktop shortcut cho Devices and Printers bằng code GUID của ứng dụng đó trong trình hướng dẫn Create Shortcut. Đây là các bước để thêm shortcut Devices and Printers vào desktop Windows 11:
1. Nhấp chuột phải vào bất kỳ khoảng trống nào trên desktop nơi không có bất kỳ biểu tượng nào và chọn New.
2. Bấm vào tùy chọn menu ngữ cảnh Shortcut để xem trình hướng dẫn.
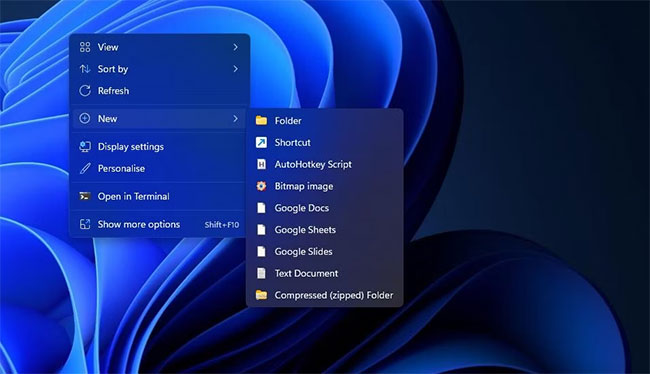
3. Sau đó nhập code GUID này vào hộp vị trí:
explorer.exe shell:::{A8A91A66-3A7D-4424-8D24-04E180695C7A}
4. Chọn Next để xem hộp Type a name.
5. Xóa tiêu đề mặc định và đầu vào Devices and Printers trong hộp văn bản.
6. Bấm Finish để thêm shortcut desktop Devices and Printers.
7. Nhấp đúp vào Devices and Printers trên màn hình để xem applet Control Panel.
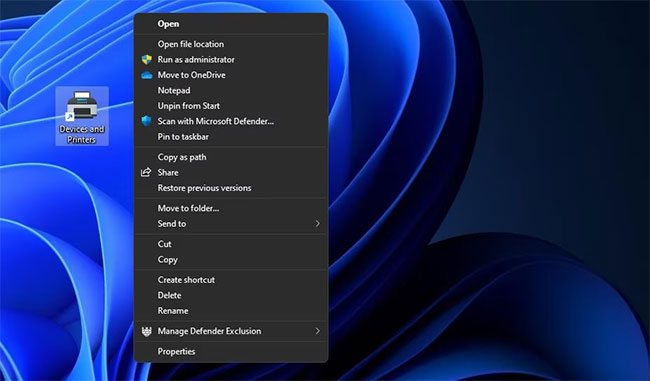
Shortcut đó sẽ có biểu tượng Explorer thư viện thư mục, biểu tượng này không lý tưởng cho applet Devices and Printers. Để thay đổi biểu tượng của nó thành một thứ gì đó tốt hơn, hãy nhấp chuột phải vào biểu tượng Devices and Shortcuts để chọn Properties. Chọn tùy chọn Change Icons để hiển thị cửa sổ bên dưới.

Vị trí explorer.exe mặc định có một vài biểu tượng để bạn lựa chọn. Tuy nhiên, bạn có thể chọn nhiều biểu tượng khác từ imageres.dll. Nhập %systemroot%\system32\imageres.dll vào hộp Look for icons và nhấn Enter. Sau đó, chọn một máy in hoặc biểu tượng thiết bị khác từ đó và nhấp vào nút OK > Apply.
Cách thiết lập shortcut Devices and Printers trên Taskbar và menu Start
Thật dễ dàng để tạo shortcut Devices and Printers trên thanh tác vụ từ shortcut trên desktop. Nhấp chuột phải vào shortcut desktop Devices and Shortcuts và chọn Show more options. Chọn tùy chọn Pin to taskbar trên menu cổ điển.
Nếu bạn thích các shortcut trên menu, thay vào đó, bạn có thể chọn Pin to Start ngay phía trên tùy chọn thanh tác vụ. Sau đó, bạn sẽ thấy shortcut Devices and Printers trong phần được ghim ở phía trước menu Start. Bạn có thể đặt shortcut đó ở đầu menu bằng cách nhấp chuột phải vào nó và chọn Move to top.
Cách thiết lập phím tắt cho Devices and Printers
Không có gì đánh bại khả năng truy cập của các phím tắt. Chúng cho phép bạn mở mọi thứ mọi lúc mọi nơi trong Windows bằng cách nhấn các tổ hợp phím tương ứng. Đây là cách bạn có thể tạo hotkey để mở applet Devices and Printers trong Windows 11:
1. Tạo shortcut desktop Devices and Printers như hướng dẫn trong phương pháp một.
2. Nhấp vào shortcut Devices and Printers một lần để chọn mà không cần mở.
3. Nhấn hotkey Alt + Enter để hiển thị cửa sổ thuộc tính của shortcut.
4. Tiếp theo, nhấp vào bên trong hộp Shortcut key để kích hoạt nó.
5. Nhấn phím D (viết tắt của device), phím này sẽ thiết lập hotkey Ctrl + Alt + D.
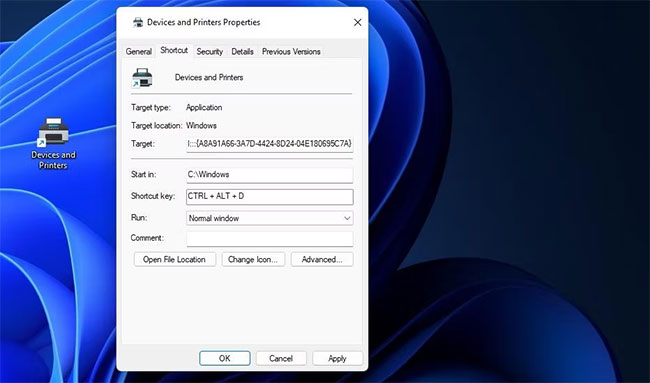
6. Chọn Apply để lưu hotkey Devices and Printers mới.
7. Bấm OK để đóng cửa sổ Devices and Printers Properties.
Hotkey Ctrl + Alt + D sẽ mở Devices and Printers bất cứ khi nào bạn nhấn nó. Bạn có thể thay đổi phím tắt đó thành một chữ cái khác nếu muốn, nhưng không thể sửa đổi phần Ctrl + Alt của hotkey này. Hãy nhớ rằng việc xóa shortcut desktop Devices and Printers cũng sẽ xóa hotkey để mở nó.
Cách thiết lập shortcut menu ngữ cảnh cho Devices and Printers
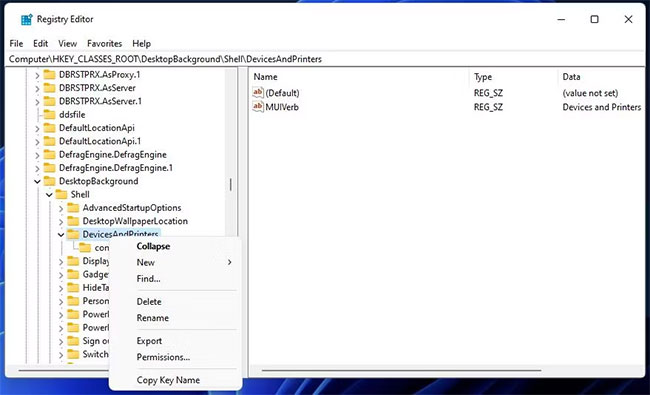
Bạn cũng có thể thêm một tùy chọn để mở Devices and Printers vào menu ngữ cảnh cổ điển của Windows 11. Tuy nhiên, việc thiết lập shortcut như vậy không đơn giản vì Windows không bao gồm bất kỳ tùy chọn tích hợp nào để tùy chỉnh menu ngữ cảnh trên desktop. Bạn sẽ cần thêm key DevicesAndPrinters vào registry theo cách thủ công như sau:
1. Mở ứng dụng Registry Editor của Windows 11.
2. Nhấp vào thanh địa chỉ ở đầu Registry Editor để xóa vị trí key hiện tại.
3. Nhập vị trí key Shell này và nhấn Enter:
HKEY_CLASSES_ROOT\DesktopBackground\Shell

4. Nhấp chuột phải vào key Shell để chọn New.
5. Chọn Key trên menu con New.
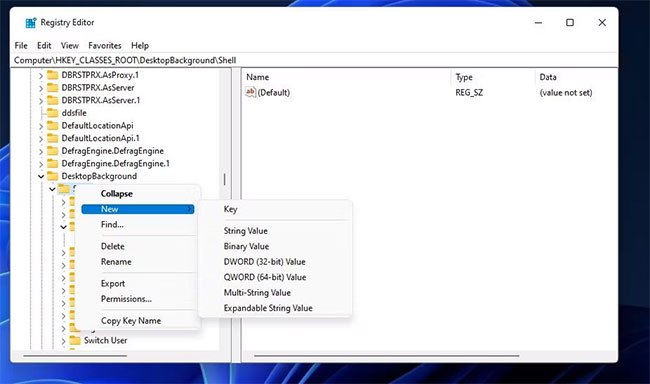
6. Sau đó, nhập DevicesAndPrinters bên trong hộp văn bản của key mới.
7. Nhấp chuột phải vào DevicesAndPrinters để chọn các tùy chọn New và String Value.
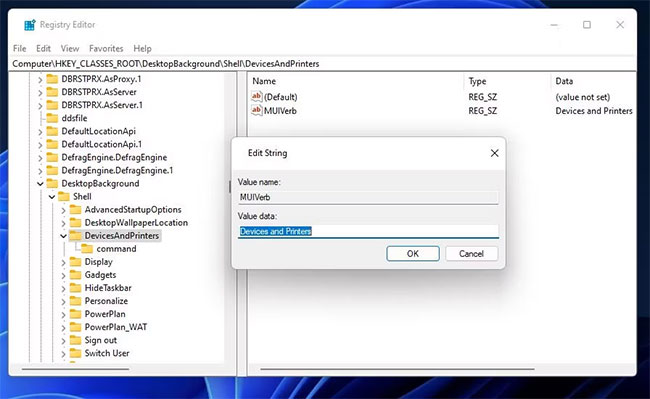
8. Nhập MUIVerb làm tiêu đề của chuỗi.
9. Nhấp đúp vào MUIVerb để xem hộp Value data của chuỗi đó.
10. Nhập Devices and Printers vào hộp Value text và chọn OK để thoát.
11. Nhấp chuột phải vào key DevicesAndPrinters một lần nữa và chọn New > Key.
12. Sau đó, nhấp chuột phải vào (Default) string của key lệnh mới và chọn Modify.
13. Nhập vị trí GUID này vào hộp Value:
explorer.exe shell:::{A8A91A66-3A7D-4424-8D24-04E180695C7A}
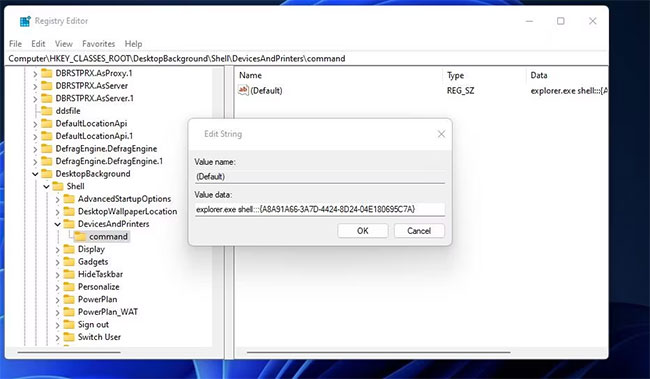
14. Chọn tùy chọn OK trong cửa sổ Edit String.
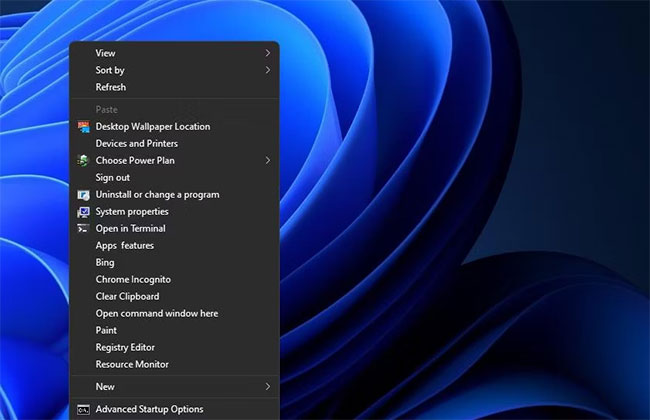
Bây giờ, hãy xem shortcut Devices and Printers mới trên menu ngữ cảnh desktop cổ điển trong Windows 11. Nhấp vào bất kỳ đâu trên khu vực desktop bằng nút chuột phải và chọn Show more options. Chọn Devices and Printers trên menu cổ điển phụ để mở applet đó.
Bạn có thể dễ dàng hoàn tác chỉnh sửa sổ registry này bằng cách xóa key của nó. Quay lại key DevicesAndPrinters bạn đã thêm trong Registry Editor. Bấm chuột phải vào DevicesAndPrinters và chọn Delete > Yes.
Cách thiết lập shortcut Devices and Printers trong File Explorer
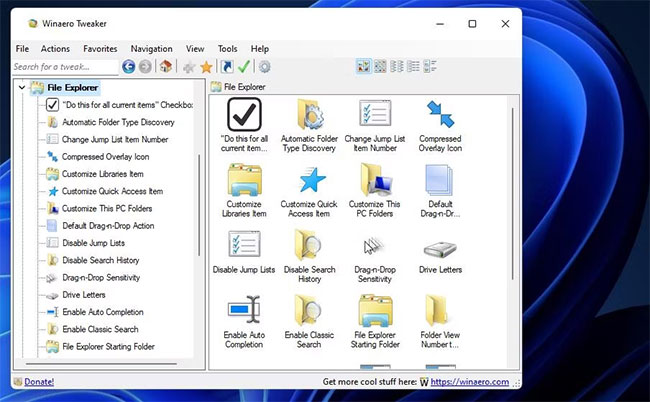
Phần This PC của File Explorer là một nơi khác mà bạn có thể thêm các shortcut để mở những thư mục và applet Control Panel như Devices and Printers. Không có bất kỳ tùy chọn nào trong Explorer để thêm shortcut ở đó. Tuy nhiên, bạn có thể thêm Devices and Printers vào This PC bằng phần mềm tùy chỉnh Winaero Tweaker miễn phí như sau:
1. Đi tới trang tải xuống Winaero Tweaker.
2. Giải nén và cài đặt phần mềm Winaero Tweaker. Hướng dẫn tùy chỉnh Windows với Winaero bao gồm hướng dẫn từng bước để cài đặt ứng dụng đó.
3. Chạy Winaero Tweaker trong Windows 11.
4. Nhấp đúp vào danh mục File Explorer settings.
5. Chọn tùy chọn Customize This PC Folders.
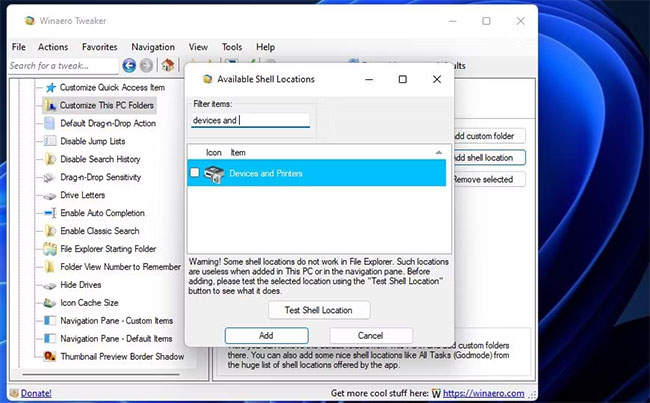
6. Nhấp vào Add shell location để truy cập cửa sổ hiển thị bên dưới.
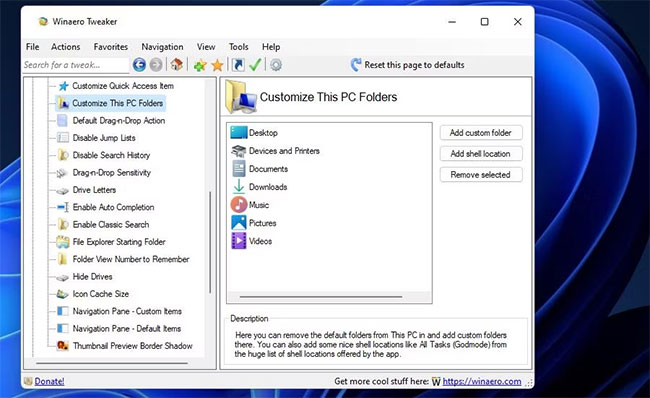
7. Chọn Devices and Printers ở đó và nhấp vào nút Add.
Bây giờ, bạn sẽ thấy Devices and Printers trong phần This PC của File Explorer. Mở thư mục Explorer và trình quản lý file, rồi nhấp đúp vào This PC trong thanh bên trái của nó. Sau đó nhấp vào Devices and Printers trong thanh bên để mở nó từ đó.
Bạn có 5 phương pháp để thêm shortcut Devices and Printers vào Windows 11. Thiết lập shortcut trên desktop, thanh tác vụ, File Explorer, menu ngữ cảnh hoặc phím tắt sẽ cho phép bạn truy cập nhanh chóng và dễ dàng vào một applet Control Panel hữu ích để quản lý các thiết bị ngoại vi. Hãy thêm bất kỳ loại shortcut Devices and Printers nào mà bạn thích.
