Cách thiết lập in hai mặt giấy trên Windows 11
- Thứ năm - 04/11/2021 00:52
- In ra
- Đóng cửa sổ này
Đôi khi, yêu cầu công việc khiến bạn phải in tài liệu trên hai mặt của một tờ giấy, hoặc chỉ đơn giản là bạn muốn tiết kiệm giấy in. Bạn hoàn toàn có thể thiết lập thuộc tính in hai mặt trên từng lệnh in riêng lẻ, cũng như áp dụng trên tất cả các tác vụ in trong tương lai. Bài viết này sẽ hướng dẫn bạn cách định cấu hình cả hai tùy chọn này trên PC Windows 11 của mình.
Tùy thuộc vào từng loại máy in mà bạn sẽ sử dụng tính năng in hai mặt thủ công hoặc in hai mặt tự động. Nếu máy in của bạn hỗ trợ in hai mặt tự động, các trang tiếp theo trong lệnh in sẽ tự động được nạp vào máy in. Ngược lại trên máy in hai mặt thủ công, bạn sẽ phải thêm các trang vào máy in của mình theo cách thủ công để in trên cả hai mặt giấy. Trong hướng dẫn này, chúng ta sẽ sử dụng máy in hai mặt thủ công.
Thiết lập in hai mặt cho một lệnh in riêng lẻ trên Windows 11
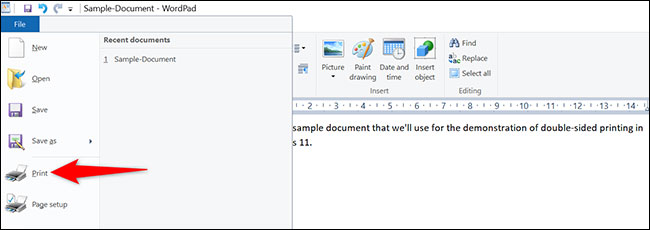
Trước tiên, hãy mở tài liệu bạn muốn in trong một ứng dụng được hỗ trợ. Ví dụ: nếu bạn muốn in tài liệu WordPad, hãy mở tài liệu đó trong ứng dụng WordPad.
Trong giao diện WordPad (hoặc bất kỳ ứng dụng nào khác mà bạn mở tài liệu của mình), bạn nhấn Ctrl + P để mở cửa sổ in. Hoặc bạn cũng có thể nhấp vào mục File > Print (trong hầu hết các ứng dụng), và cửa sổ thiết lập bản in sẽ lập tức mở ra.
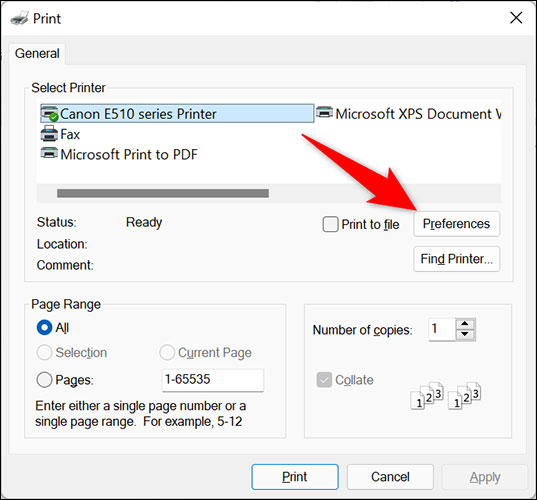
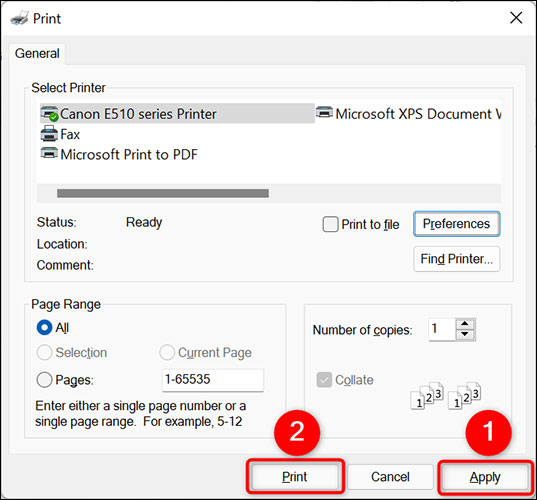
Trên cửa sổ thiết lập bản in, bấm chọn máy in mà bạn muốn sử dụng, sau đó nhấp vào nút “Preferences”.
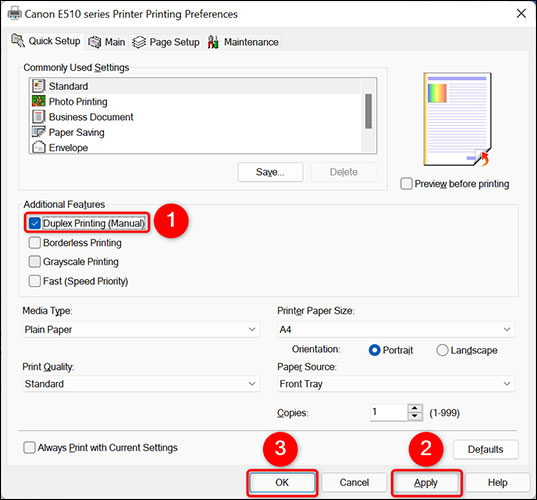
Trên cửa sổ “Preferences” mở ra, hãy kích hoạt tùy chọn “Duplex Printing (Manual)”. Sau đó, ở cuối cửa sổ này, nhấp vào “OK”.
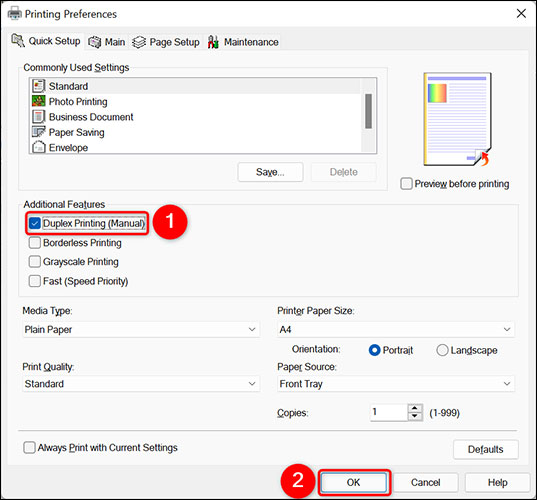
(Mẹo: Nếu máy in của bạn cung cấp tùy chọn “Duplex Printing (Automatic)”, hãy chọn nó. Đây là tùy chọn in hai mặt tự động, cho phép bạn không phải chèn các trang vào máy in theo cách thủ công như thông thường.
Bây giờ bạn đã quay lại cửa sổ “Print”. Tại đây, nhấp vào “Apply” và sau đó bấm chọn “Print” để bắt đầu quy trình in tài liệu trên cả hai mặt giấy.
Cách thiết lập in hai mặt làm tùy chọn in mặc định trên Windows 11
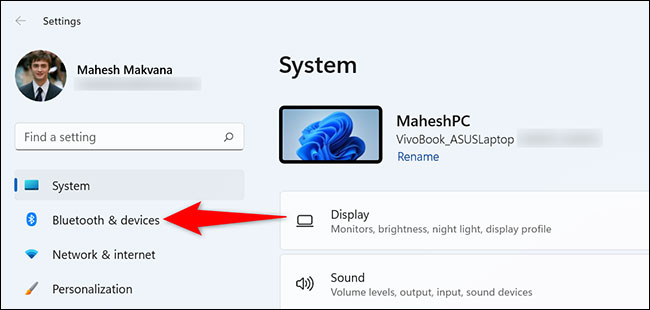
Trước tiên, hãy mở ứng dụng Settings Windows bằng cách nhấn tổ hợp phím Windows + i. Trong giao diện ứng dụng Settings hiện ra, từ danh sách bên trái, bấm chọn “Bluetooth & Devices”.
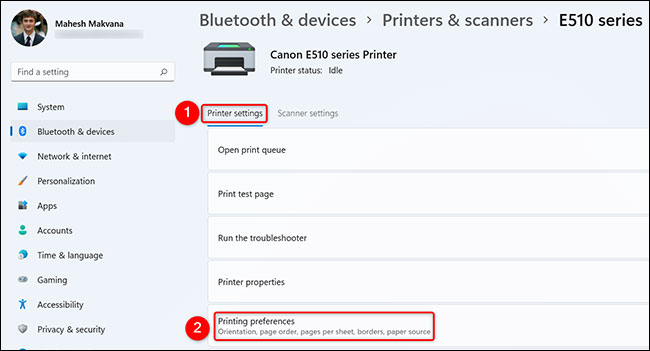
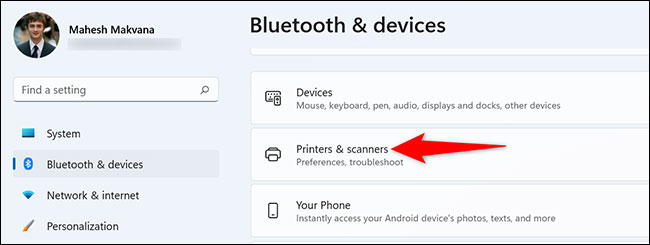
Trên trang cài đặt “Bluetooth & Devices”, bạn nhấp vào mục “Printers & Scanners”.
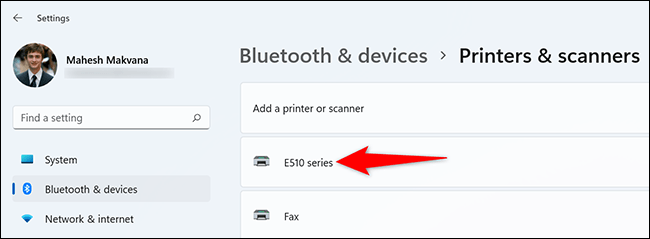
Trên trang “Printers & Scanners”, hãy chọn máy in mà bạn muốn sử dụng.
Trang thiết lập máy in sẽ mở ra. Ở đầu trang này, bạn nhấp vào tab “Printer Settings”. Sau đó chọn “Printing Preferences”.
Bạn sẽ thấy cửa sổ tùy chỉnh máy in của mình. Tại đây, hãy kích hoạt tùy chọn “Duplex Printing (Manual)”. Sau đó nhấp vào “Apply" và nhấn “OK” ở cuối cửa sổ.
Xong! Từ bây giờ, in hai mặt sẽ là tùy chọn in mặc định trên PC Windows 11 của bạn.
