Cách thêm và xóa user dễ dàng trên Ubuntu
- Thứ sáu - 01/03/2024 22:45
- In ra
- Đóng cửa sổ này
Nếu đang chia sẻ PC Ubuntu của mình với những người dùng khác, bạn nên tạo một tài khoản cho mỗi người dùng. Điều đó sẽ cho phép mỗi người dùng cá nhân hóa tài khoản của họ theo cách họ muốn. Mỗi người có thể có hình nền, cài đặt và mục yêu thích trên trình duyệt riêng. Nếu bất kỳ người dùng nào ngừng sử dụng PC của bạn, bạn cũng nên cân nhắc việc xóa tài khoản đó. Bạn có thể dễ dàng thêm hoặc xóa user trên Ubuntu thông qua terminal bằng cách thực hiện theo các bước bên dưới.
Cách thêm tài khoản người dùng mới trên Ubuntu
Trên PC Ubuntu (và thực tế là trên hầu hết các bản phân phối Linux), tài khoản người dùng có thể có các cấp độ truy cập và quyền khác nhau. Mỗi người dùng nhận được một số ID cụ thể được gọi là ID người dùng (hoặc UID) và thư mục chính của riêng họ, nơi họ có thể lưu trữ các file cá nhân của mình.
Đôi khi, bạn có thể cần thêm user mới. Việc này có thể dễ dàng thực hiện từ Terminal bằng lệnh adduser. Bạn sẽ cần quyền truy cập root để thực hiện việc này - bạn có thể nâng cao lệnh bằng sudo. Để thêm tài khoản người dùng mới trên Ubuntu, hãy làm theo các bước sau.
1. Mở một cửa sổ terminal mới.
2. Nhập sudo adduser user, thay thế user bằng tên người dùng mong muốn và nhấn Enter.
3. Bạn sẽ được nhắc tạo và xác minh mật khẩu cho người dùng mới - hãy làm theo hướng dẫn trên màn hình để thực hiện việc này.
4. Làm theo lời nhắc để điền thông tin của người dùng mới. Bạn có thể bỏ qua điều này bằng cách nhấn Enter cho mỗi lời nhắc.
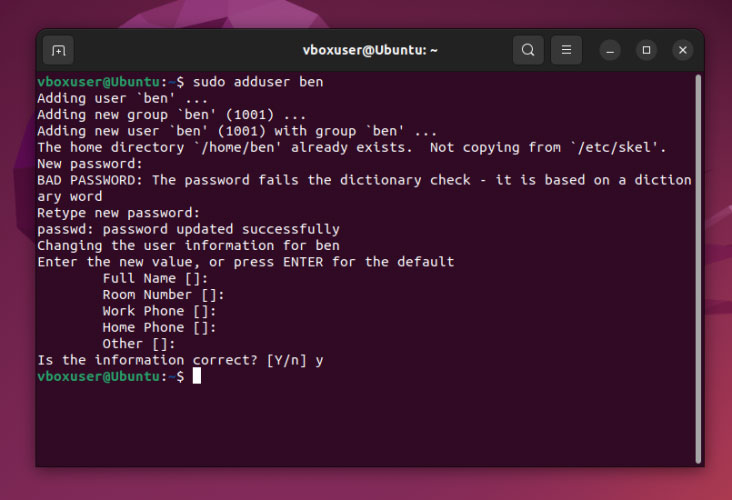
5. Sau khi hoàn tất, người dùng mới sẽ sẵn sàng sử dụng tài khoản của họ.
Cách cấp quyền truy cập root cho người dùng trên Ubuntu
Nếu gần đây bạn đã tạo một tài khoản người dùng mới và muốn cấp cho tài khoản đó quyền truy cập cấp root trên PC Ubuntu của mình, bạn có thể làm như vậy bằng cách sử dụng lệnh usermod. Cấp quyền truy cập root cho người dùng trên Ubuntu có nghĩa là thêm người dùng đó vào nhóm sudo, nghĩa là họ có thể nâng cao các lệnh của mình để chạy bằng root.
Việc cho phép người dùng chạy các lệnh dưới dạng sudo gây ra một số rủi ro nhất định vì họ sẽ có thể truy cập bất kỳ file hoặc thư mục nào trên PC của bạn và thực hiện bất kỳ thay đổi nào họ muốn đối với hệ thống của bạn. Chỉ cấp cho người dùng quyền superuser nếu bạn tin tưởng họ - nếu không, hãy để họ có quyền truy cập của người dùng thông thường.
Để cấp quyền truy cập root cho người dùng trên Ubuntu, hãy làm theo các bước sau.
- Mở một cửa sổ terminal mới.
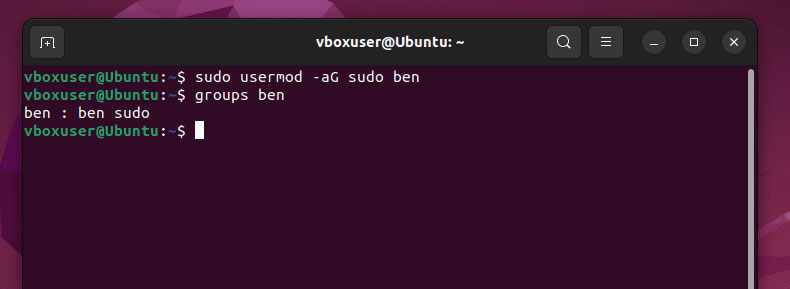
- Trong Terminal, nhập sudo usermod -aG sudo user, thay thế user bằng tên người dùng chính xác và nhấn Enter.
- Để xác minh người dùng đã được thêm vào nhóm sudo, hãy nhập groups user và nhấn Enter, thay thế user bằng tên người dùng. Điều này sẽ liệt kê rằng người dùng hiện là thành viên của nhóm sudo.
Cách xóa tài khoản người dùng trên Ubuntu
Nếu muốn xóa tài khoản người dùng Ubuntu, bạn có thể sử dụng lệnh deluser (miễn là bạn có quyền truy cập root bằng sudo). Bạn có thể sử dụng lệnh này để xóa người dùng và giữ nguyên thư mục chính của họ. Ngoài ra, nếu muốn xóa các file của họ, bạn cũng có thể sử dụng nó để xóa thư mục chính của họ.
Để xóa người dùng Ubuntu, hãy làm theo các bước sau.
1. Mở một cửa sổ terminal mới.
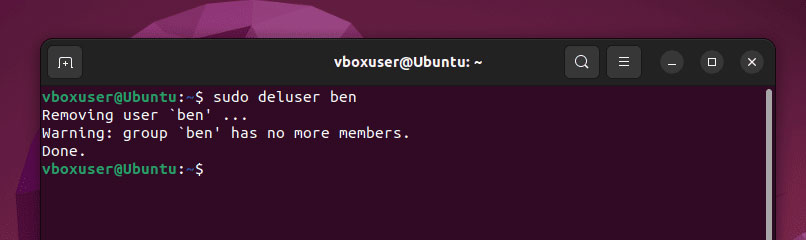
2. Nhập sudo deluser user để xóa tài khoản người dùng mà không xóa thư mục chính của họ. Thay thế user bằng tên người dùng chính xác trước khi bạn nhấn Enter và cung cấp mật khẩu của bạn nếu được nhắc làm như vậy.
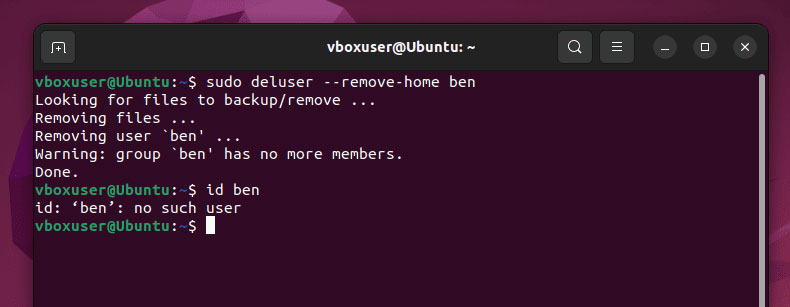
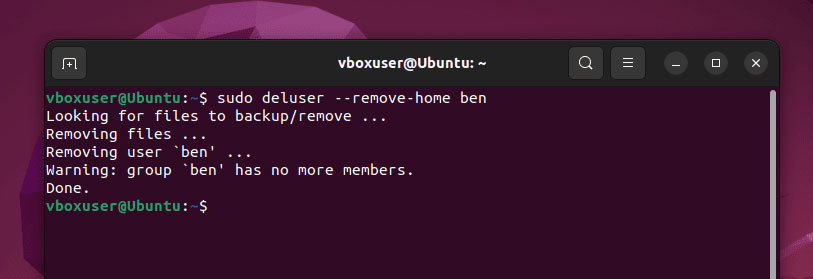
3. Nếu bạn cũng muốn xóa thư mục chính của người dùng, hãy nhập sudo deluser --remove-home user (thay thế user bằng tên người dùng chính xác) và nhấn Enter.
4. Tiếp theo, nhập id user (thay user bằng tên người dùng chính xác). Nếu lệnh thành công và trả về một giá trị thì tên người dùng vẫn tồn tại và bạn có thể cần phải lặp lại quy trình. Nếu không thành công với thông báo lỗi không có user như vậy thì tài khoản người dùng đã bị xóa thành công.
Quản lý quyền truy cập vào PC Ubuntu của bạn!
Sử dụng các bước trên, bạn sẽ có thể nhanh chóng quản lý quyền truy cập vào PC Ubuntu của mình bằng cách thêm và xóa user khi cần thiết. Việc thêm tài khoản người dùng mới rất đơn giản nhưng nếu bạn quyết định xóa một tài khoản, trước tiên hãy đảm bảo sao lưu mọi file từ thư mục người dùng của họ - bạn có thể mất chúng trong quá trình này.
Đảm bảo kiểm soát ai có quyền truy cập quản trị cấp cơ sở, tùy thuộc vào người đang dự định sử dụng PC của bạn.
