Cách thêm ngoại lệ trong Windows Defender trên Windows 10
- Thứ sáu - 23/08/2024 23:30
- In ra
- Đóng cửa sổ này
Windows Defender, được tích hợp vào Windows 10, chạy trong nền và quét các file để tìm phần mềm độc hại. Để cải thiện hiệu suất cho các tác vụ như biên dịch code hoặc chạy máy ảo, bạn có thể thêm ngoại lệ và Windows Defender sẽ không bao giờ quét các file đó.
Cảnh báo: Hãy cẩn thận về những gì bạn loại trừ. Windows Defender sẽ không quét các file và thư mục được loại trừ để tìm phần mềm độc hại.
Cách thêm ngoại lệ cho Windows Defender trong Windows Security
Bước 1:
Trước tiên, bạn cần khởi chạy Windows Security để thay đổi một số cài đặt. Mở menu Start và nhập Windows Security. Sau đó, chọn ứng dụng Windows Security.
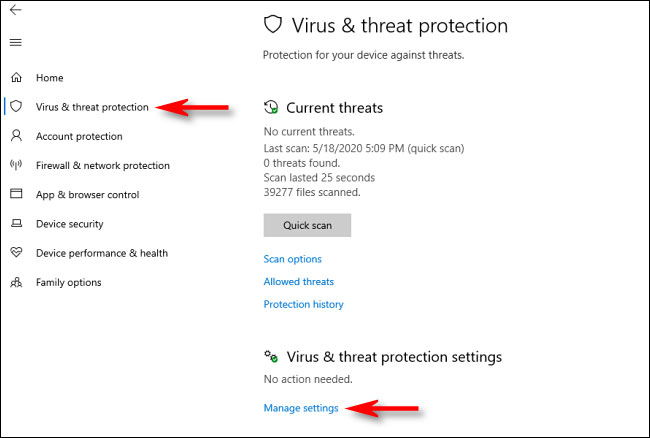
Bước 2:
Trong Windows Security, điều hướng đến Virus & Threat Protection. Sau đó, nhấp vào Manage Settings.
Bước 3:
Trong Virus & Threat Protection Settings, hãy cuộn xuống dưới cùng của trang và nhấp vào Add or Remove Exclusions.
Bước 4:
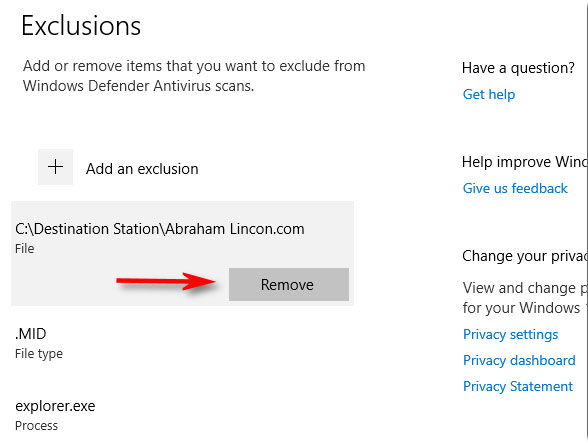
Trên trang Exclusions, bạn có thể thêm hoặc xóa các file mà mình muốn loại trừ khỏi quá trình quét của Windows Defender. Để thêm một ngoại lệ, nhấp vào nút Add An Exclusion bên cạnh biểu tượng dấu cộng lớn (+).

Bước 5:
Một menu nhỏ sẽ xuất hiện cho phép bạn xác định ngoại lệ theo File, Folder, File type hoặc Process (file, thư mục, loại file hoặc tiến trình).
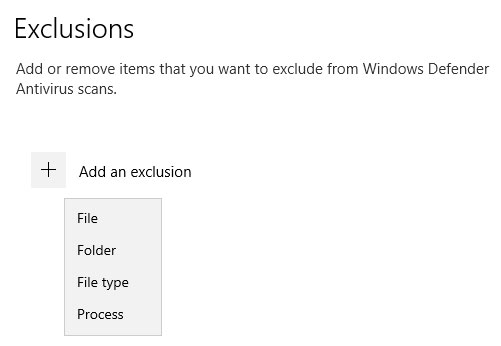
Những gì bạn chọn phụ thuộc vào loại ngoại lệ bạn đang cố gắng thực hiện. Đây là những gì mỗi tùy chọn sẽ thực hiện.
- File: Nếu bạn chọn mục này, một hộp sẽ xuất hiện cho phép bạn duyệt qua máy tính để chọn một file sẽ được loại ra khỏi các lần quét trong tương lai. Chọn file bạn thích, sau đó nhấp vào Open.
- Folder: Giống như tùy chọn File, điều này sẽ cho phép duyệt máy tính để tìm một thư mục cụ thể và loại trừ khỏi quá trình quét. Nội dung và thư mục con trong thư mục này cũng sẽ bị loại trừ.
- File type: Một hộp sẽ xuất hiện yêu cầu bạn nhập phần mở rộng file (ví dụ .MID) đại diện cho loại file mà bạn có thể loại trừ. Tất cả những file thuộc loại đó sẽ được loại trừ khỏi các lần quét trong tương lai. Điều này rất nguy hiểm, vì bạn có thể vô tình loại trừ một nhóm lớn các file độc hại tiềm tàng, chẳng hạn như những file PDF hoặc DOC.
- Process: Một cửa sổ xuất hiện sẽ yêu cầu bạn nhập tên của một tiến trình (một chương trình đang chạy, chẳng hạn như explorer.exe) để loại trừ khỏi quá trình quét. Nếu một chương trình nào đó mà bạn biết chắc là an toàn, nhưng sẽ bị Defender gắn cờ, bạn có thể nhập nó vào đây.
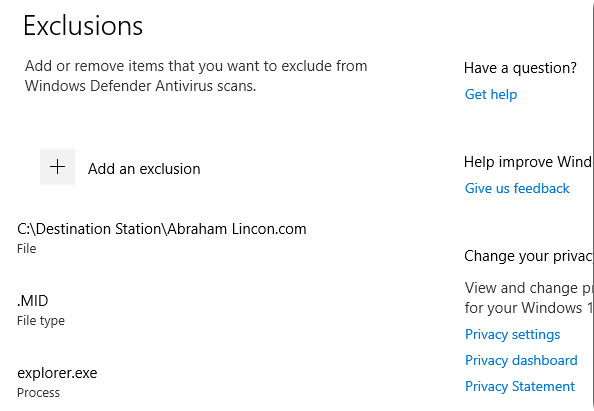
Chọn một trong các tùy chọn này và thực hiện các lựa chọn cần thiết trong hộp thoại pop-up theo sau. Khi bạn thêm một ngoại lệ, nó sẽ hiển thị trong một danh sách trên trang Exclusions.
Bước 6:
Nếu bạn muốn xóa một ngoại lệ đã xác định, hãy di con trỏ chuột lên trên mục đó cho đến khi mũi tên hướng xuống xuất hiện, sau đó nhấp vào nút Remove.
Bước 7:
Khi đã hoàn tất, hãy đóng Windows Security và cài đặt của bạn sẽ được lưu lại. Lần sau khi hệ thống thực hiện quét Defender, các mục bạn đã thêm vào danh sách loại trừ sẽ không còn gây rắc rối nữa.
Cách thêm ngoại lệ trong Windows Defender bằng PowerShell
Thêm file ngoại lệ cho Microsoft Defender Antivirus trong PowerShell
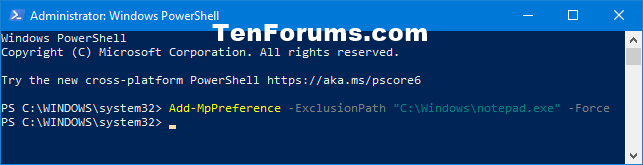
Tùy chọn này dùng để thêm một file ngoại lệ cụ thể, khiến nó không còn bị quét bởi Microsoft Defender Antivirus nữa.
1. Mở PowerShell với quyền admin.
2. Nhập lệnh bên dưới vào PowerShell và nhấn Enter.
Add-MpPreference -ExclusionPath "<đường dẫn đầy đủ của file>" -Force
3. Bây giờ, bạn có thể đóng PowerShell nếu muốn.
Thêm thư mục ngoại lệ cho Microsoft Defender Antivirus trong PowerShell
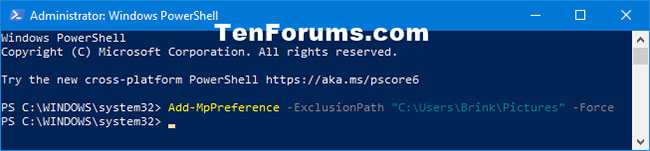
Tùy chọn này dùng để thêm một thư mục ngoại lệ cụ thể, khiến nó không còn bị quét bởi Microsoft Defender Antivirus nữa.
1. Mở PowerShell với quyền admin.
2. Nhập lệnh bên dưới vào PowerShell và nhấn Enter.
Add-MpPreference -ExclusionPath "<đường dẫn đầy đủ của file>" -Force
3. Bây giờ, bạn có thể đóng PowerShell nếu muốn.
Thêm loại file ngoại lệ cho Microsoft Defender Antivirus trong PowerShell
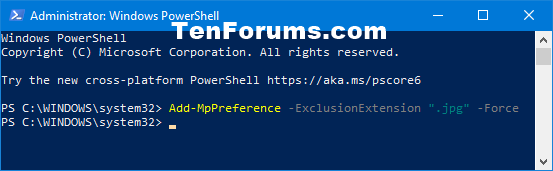
Tùy chọn này là để thêm một phần mở rộng file vào ngoại lệ, khiến tất cả các file thuộc loại đó không bị quét bởi Microsoft Defender Antivirus nữa.
1. Mở PowerShell với quyền admin.
2. Nhập lệnh bên dưới vào PowerShell và nhấn Enter.
Add-MpPreference -ExclusionExtension "<Phần mở rộng của loại file>" -Force
3. Bây giờ, bạn có thể đóng PowerShell nếu muốn.
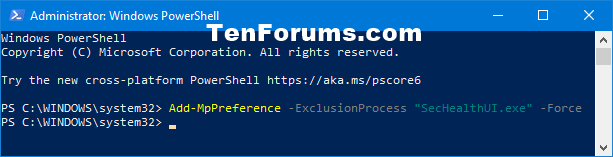
Thêm tiến trình ngoại lệ cho Microsoft Defender Antivirus trong PowerShell
Tùy chọn này dùng để thêm một tiến trình ngoại lệ, khiến không còn có bất kỳ file nào được liên kết với nó bị quét bởi Microsoft Defender Antivirus nữa.
1. Mở PowerShell với quyền admin.
2. Nhập lệnh bên dưới vào PowerShell và nhấn Enter.
Add-MpPreference -ExclusionProcess "<tên tiến trình>" -Force
3. Bây giờ, bạn có thể đóng PowerShell nếu muốn.