Cách thêm "Change Power Plan" vào menu ngữ cảnh trong Windows 10/11
- Thứ ba - 11/10/2022 00:55
- In ra
- Đóng cửa sổ này

Bạn có thể thay đổi cài đặt power plan của PC bằng các tùy chọn Power saver, Balanced, High Performance và Ultimate Performance trong Windows 11 và 10. Tuy nhiên, những tùy chọn đặc biệt đó không thể truy cập được trong Control Panel.
Một cách hay để thiết lập shortcut cho các tùy chọn đó là thêm menu con Choose Power Plan vào menu ngữ cảnh trong Windows 11/10. Sau đó, bạn sẽ có thể truy cập các cài đặt power plan đó chỉ bằng một hoặc hai lần nhấp từ màn hình. Dưới đây là hai cách bạn có thể thêm menu con bao gồm các tùy chọn power plan vào menu ngữ cảnh trong Windows 11/10.
Cách thêm tùy chọn power plan vào menu ngữ cảnh bằng script registry
Để tùy chỉnh menu ngữ cảnh trong Windows 11 và 10, bạn phải tinh chỉnh registry theo cách này hay cách khác. Bạn có thể thêm mục nhập menu con Choose Power Plan vào menu ngữ cảnh của mình bằng cách tạo và chạy script registry cho mục đích đó. Đây là cách bạn có thể thiết lập script registry như vậy với Notepad trong Windows 11/10:
1. Mở ứng dụng Windows Notepad.
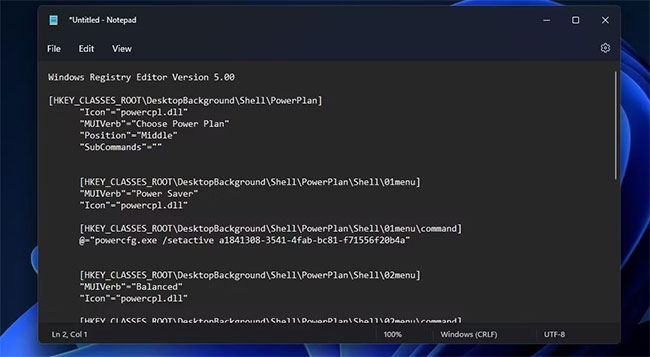
2. Chọn văn bản script này và nhấn Ctrl + C.
Windows Registry Editor Version 5.00
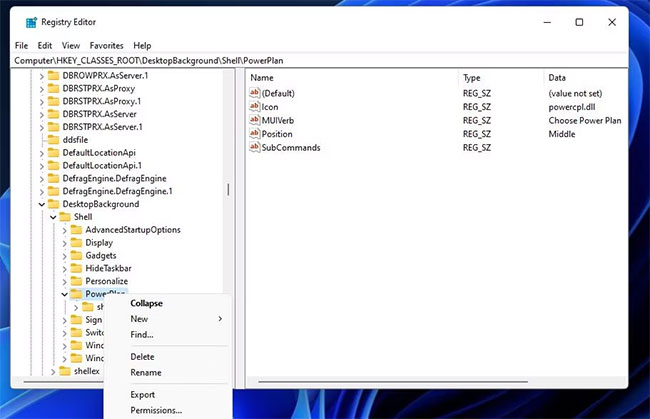
[HKEY_CLASSES_ROOT\DesktopBackground\Shell\PowerPlan]
"Icon"="powercpl.dll"
"MUIVerb"="Choose Power Plan"
"Position"="Middle"
"SubCommands"=""
[HKEY_CLASSES_ROOT\DesktopBackground\Shell\PowerPlan\Shell\01menu]
"MUIVerb"="Power Saver"
"Icon"="powercpl.dll"
[HKEY_CLASSES_ROOT\DesktopBackground\Shell\PowerPlan\Shell\01menu\command]
@="powercfg.exe /setactive a1841308-3541-4fab-bc81-f71556f20b4a"
[HKEY_CLASSES_ROOT\DesktopBackground\Shell\PowerPlan\Shell\02menu]
"MUIVerb"="Balanced"
"Icon"="powercpl.dll"
[HKEY_CLASSES_ROOT\DesktopBackground\Shell\PowerPlan\Shell\02menu\command]
@="powercfg.exe /setactive 381b4222-f694-41f0-9685-ff5bb260df2e"
[HKEY_CLASSES_ROOT\DesktopBackground\Shell\PowerPlan\Shell\03menu]
"MUIVerb"="High Performance"
"Icon"="powercpl.dll"
[HKEY_CLASSES_ROOT\DesktopBackground\Shell\PowerPlan\Shell\03menu\command]
@="powercfg.exe /setactive 8c5e7fda-e8bf-4a96-9a85-a6e23a8c635c"
[HKEY_CLASSES_ROOT\DesktopBackground\Shell\PowerPlan\Shell\04menu]
"MUIVerb"="Ultimate Performance"
"Icon"="powercpl.dll"
[HKEY_CLASSES_ROOT\DesktopBackground\Shell\PowerPlan\Shell\04menu\command]
@="powercfg.exe /setactive e9a42b02-d5df-448d-aa00-03f14749eb61"
[HKEY_CLASSES_ROOT\DesktopBackground\Shell\PowerPlan\Shell\05menu]
"MUIVerb"="Power Options"
"Icon"="powercpl.dll"
"CommandFlags"=dword:00000020
[HKEY_CLASSES_ROOT\DesktopBackground\Shell\PowerPlan\Shell\05menu\command]
@="control.exe powercfg.cpl"
3. Dán script đó vào bên trong Notepad bằng cách nhấn tổ hợp phím Ctrl + V.
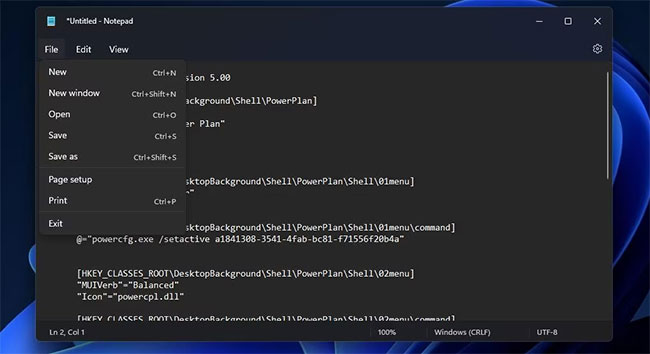
4. Chọn File trên thanh menu của Notepad.
5. Nhấp vào tùy chọn Save As của menu File.
6. Tiếp theo, nhấp vào menu drop-down Save As type và chọn All files từ đó. Gõ Power Plan Script vào hộp File name.
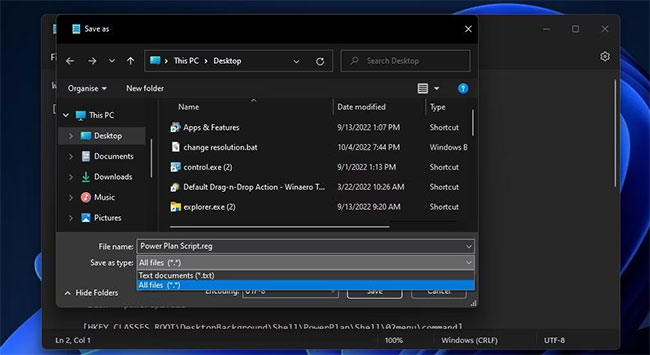
7. Nhấp vào Desktop ở bên trái cửa sổ Save As để chọn vị trí đó cho file, sau đó bấm Save để thêm script vào khu vực Windows desktop.
8. Đóng Notepad sau khi lưu file.
9. Nhấp đúp vào file Power Plan Script trên màn hình nền.
10. Chọn Yes trên hộp thoại Registry Editor xuất hiện.
11. Nhấp vào OK trên hộp thoại tiếp theo xuất hiện.
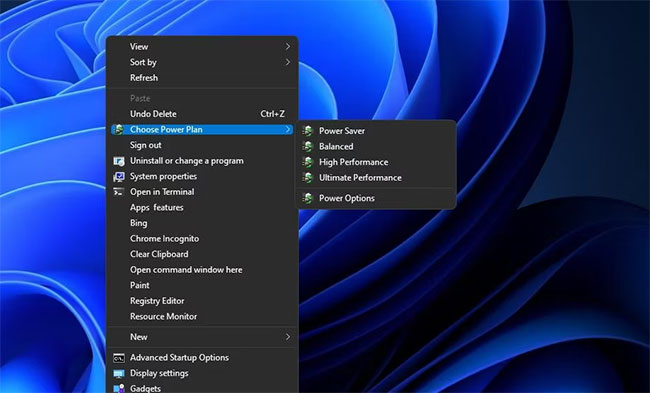
Bây giờ, bạn có thể thấy menu con Choose Power Plan mới trên menu ngữ cảnh. Bạn sẽ cần phải nhấp chuột phải vào desktop và chọn Show more options để tìm tùy chọn đó trên menu ngữ cảnh cổ điển trong Windows 11. Di chuyển con trỏ qua Choose Power Plan để chọn tùy chọn Power Plan, Balanced, High Performance hoặc Ultimate Performance.
Bạn có thể loại bỏ menu con đó bằng cách xóa registry của nó. Mở ứng dụng Registry Editor. Sau đó, xóa thanh địa chỉ ở đó để nhập đường dẫn này:
Computer\HKEY_CLASSES_ROOT\DesktopBackground\Shell\PowerPlan
Nhấp chuột phải vào key Power Plan và chọn tùy chọn Delete. Một hộp thoại sẽ mở ra yêu cầu xác nhận. Chọn tùy chọn Yes ở đó.
Cách thêm tùy chọn power plan vào menu ngữ cảnh với Winaero Tweaker
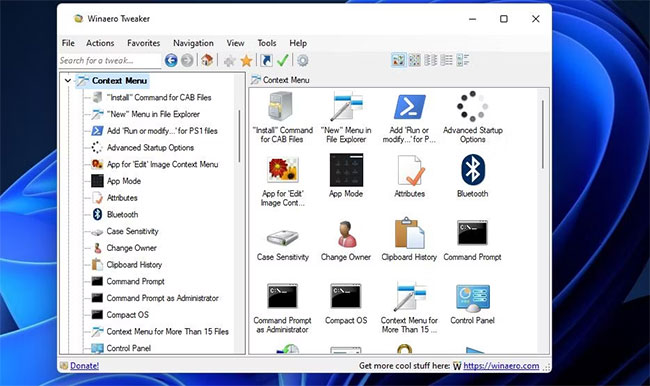
Phần mềm miễn phí Winaero Tweaker cung cấp một cách khác để thêm các tùy chọn power plan vào menu ngữ cảnh trong Windows 11/10. Phần mềm đó bao gồm hộp kiểm Add Power Options mà bạn có thể chọn để thêm menu con Switch power plan vào menu ngữ cảnh. Đây là các bước để thêm các tùy chọn power plan vào menu chuột phải với Winaero Tweaker:
1. Truy cập trang tải xuống Winaero Tweaker.
2. Chọn Download Winaero Tweaker trên trang web của phần mềm.
Lưu ý: Bạn cũng có thể tải trực tiếp phần mềm tại đây!
3. Cài đặt phần mềm đã tải xuống như được nêu trong hướng dẫn tùy chỉnh Windows với Winaero Tweaker.
4. Khởi chạy phần mềm Winaero Tweaker.
5. Nhấp đúp vào danh mục Context Menu của Winaero để chọn.
6. Nhấp vào Switch Power Plan để xem cài đặt được hiển thị ngay bên dưới.
7. Sau đó chọn Add Switch Power context menu to the Desktop.
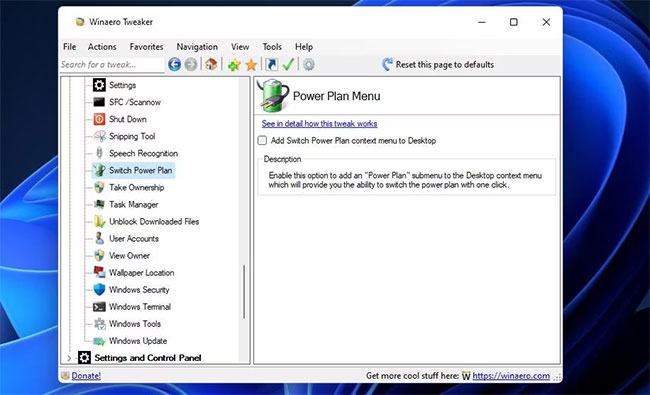
8. Bây giờ, bạn sẽ thấy menu con Switch power plan trên menu ngữ cảnh trong Windows 11/10. Menu con đó hơi khác so với menu được script thêm vào vì nó không bao gồm tùy chọn Ultimate Performance. Tuy nhiên, bạn vẫn có thể chọn các tùy chọn Power Saver, Balanced, và High Performance.

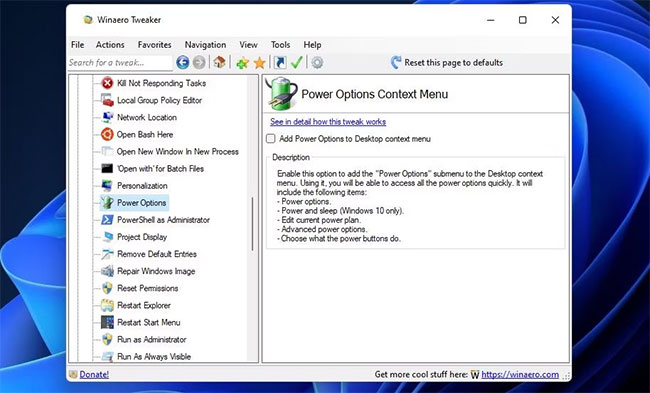
Winaero Tweaker cũng có một tùy chọn tùy chỉnh thay thế bổ sung menu phụ Power Options vào menu ngữ cảnh. Menu con đó cung cấp các shortcut để mở cài đặt nguồn của Control Panel. Bạn có thể thêm nó vào menu ngữ cảnh bằng cách chọn Power Options > Add Power Options to Desktop context menu trong Winaero Tweaker.
Giờ đây, bạn sẽ không cần lục trong Control Panel để thay đổi cài đặt power plan nữa. Thêm menu con power plan vào menu ngữ cảnh sẽ giúp các tùy chọn đó có thể truy cập trực tiếp từ desktop trong Windows 11/10. Việc này sẽ cung cấp các shortcut tiện dụng cho những người dùng thường xuyên thay đổi cài đặt power plan trên PC của họ.
