<!DOCTYPE html>
    <html lang="vi" xmlns="http://www.w3.org/1999/xhtml" prefix="og: http://ogp.me/ns#">
    <head>
<title>Cách tạo hiệu ứng phản chiếu trên mặt nước bằng Generative Fill trong Photoshop</title>
<meta name="description" content="Cách tạo hiệu ứng phản chiếu trên mặt nước bằng Generative Fill trong Photoshop - Savefile - Tin Tức -...">
<meta name="author" content=".: Nguoicodonvn2008.info - Cõi lòng người cô đơn :.">
<meta name="copyright" content=".: Nguoicodonvn2008.info - Cõi lòng người cô đơn :. [admin@nguoicodonvn2008.info]">
<meta name="robots" content="index, archive, follow, noodp">
<meta name="googlebot" content="index,archive,follow,noodp">
<meta name="msnbot" content="all,index,follow">
<meta name="generator" content="NukeViet v4.5">
<meta http-equiv="Content-Type" content="text/html; charset=utf-8">
<meta property="og:title" content="Cách tạo hiệu ứng phản chiếu trên mặt nước bằng Generative Fill trong Photoshop">
<meta property="og:type" content="website">
<meta property="og:description" content="Savefile - Tin Tức -...">
<meta property="og:site_name" content=".&#x3A; Nguoicodonvn2008.info - Cõi lòng người cô đơn &#x3A;.">
<meta property="og:url" content="https://www.nguoicodonvn2008.info/vi/news/savefile/kien-thuc-may-tinh/cach-tao-hieu-ung-phan-chieu-tren-mat-nuoc-bang-generative-fill-trong-photoshop-9278.html">
<link rel="shortcut icon" href="https://nguoicodonvn2008.info/favicon.ico">
<link rel="canonical" href="https://www.nguoicodonvn2008.info/vi/news/savefile/kien-thuc-may-tinh/cach-tao-hieu-ung-phan-chieu-tren-mat-nuoc-bang-generative-fill-trong-photoshop-9278.html">
<link rel="alternate" href="https://nguoicodonvn2008.info/vi/news/rss/" title="Tin Tức" type="application/rss+xml">
<link rel="alternate" href="https://nguoicodonvn2008.info/vi/news/rss/karaoke-dual/" title="Tin Tức - Karaoke Dual" type="application/rss+xml">
<link rel="alternate" href="https://nguoicodonvn2008.info/vi/news/rss/nhac-tre/" title="Tin Tức - Nhạc trẻ" type="application/rss+xml">
<link rel="alternate" href="https://nguoicodonvn2008.info/vi/news/rss/tru-tinh/" title="Tin Tức - Trữ tình" type="application/rss+xml">
<link rel="alternate" href="https://nguoicodonvn2008.info/vi/news/rss/nuoc-ngoai/" title="Tin Tức - Nước ngoài" type="application/rss+xml">
<link rel="alternate" href="https://nguoicodonvn2008.info/vi/news/rss/remix/" title="Tin Tức - Remix" type="application/rss+xml">
<link rel="alternate" href="https://nguoicodonvn2008.info/vi/news/rss/tam-su-tinh-yeu/" title="Tin Tức - Tâm sự tình yêu" type="application/rss+xml">
<link rel="alternate" href="https://nguoicodonvn2008.info/vi/news/rss/tho-suu-tam/" title="Tin Tức - Thơ sưu tầm" type="application/rss+xml">
<link rel="alternate" href="https://nguoicodonvn2008.info/vi/news/rss/cuoc-song/" title="Tin Tức - Cuộc sống" type="application/rss+xml">
<link rel="alternate" href="https://nguoicodonvn2008.info/vi/news/rss/phan-mem/" title="Tin Tức - Phần mềm" type="application/rss+xml">
<link rel="alternate" href="https://nguoicodonvn2008.info/vi/news/rss/kien-thuc-may-tinh/" title="Tin Tức - Kiến thức máy tính" type="application/rss+xml">
<link rel="alternate" href="https://nguoicodonvn2008.info/vi/news/rss/hoc-tap/" title="Tin Tức - Học tập" type="application/rss+xml">
<link rel="alternate" href="https://nguoicodonvn2008.info/vi/news/rss/tai-lieu/" title="Tin Tức - Tài liệu" type="application/rss+xml">
<link rel="alternate" href="https://nguoicodonvn2008.info/vi/news/rss/de-thi/" title="Tin Tức - Đề thi" type="application/rss+xml">
<link rel="preload" as="style" href="https://nguoicodonvn2008.info/assets/css/font-awesome.min.css" type="text/css">
<link rel="preload" as="style" href="https://nguoicodonvn2008.info/themes/default/css/bootstrap.non-responsive.css" type="text/css">
<link rel="preload" as="style" href="https://nguoicodonvn2008.info/themes/default/css/style.css" type="text/css">
<link rel="preload" as="style" href="https://nguoicodonvn2008.info/themes/default/css/style.non-responsive.css" type="text/css">
<link rel="preload" as="style" href="https://nguoicodonvn2008.info/themes/default/css/news.css" type="text/css">
<link rel="preload" as="style" href="https://nguoicodonvn2008.info/themes/default/css/custom.css" type="text/css">
<link rel="preload" as="script" href="https://nguoicodonvn2008.info/assets/js/jquery/jquery.min.js" type="text/javascript">
<link rel="preload" as="script" href="https://nguoicodonvn2008.info/assets/js/language/vi.js" type="text/javascript">
<link rel="preload" as="script" href="https://nguoicodonvn2008.info/assets/js/DOMPurify/purify3.js" type="text/javascript">
<link rel="preload" as="script" href="https://nguoicodonvn2008.info/assets/js/global.js" type="text/javascript">
<link rel="preload" as="script" href="https://nguoicodonvn2008.info/assets/js/site.js" type="text/javascript">
<link rel="preload" as="script" href="https://nguoicodonvn2008.info/themes/default/js/news.js" type="text/javascript">
<link rel="preload" as="script" href="https://nguoicodonvn2008.info/themes/default/js/main.js" type="text/javascript">
<link rel="preload" as="script" href="https://nguoicodonvn2008.info/themes/default/js/custom.js" type="text/javascript">
<link rel="preload" as="script" href="https://nguoicodonvn2008.info/themes/default/js/bootstrap.min.js" type="text/javascript">
<link rel="stylesheet" href="https://nguoicodonvn2008.info/assets/css/font-awesome.min.css">
<link rel="stylesheet" href="https://nguoicodonvn2008.info/themes/default/css/bootstrap.non-responsive.css">
<link rel="stylesheet" href="https://nguoicodonvn2008.info/themes/default/css/style.css">
<link rel="stylesheet" href="https://nguoicodonvn2008.info/themes/default/css/style.non-responsive.css">
<link rel="StyleSheet" href="https://nguoicodonvn2008.info/themes/default/css/news.css">
<link rel="stylesheet" href="https://nguoicodonvn2008.info/themes/default/css/custom.css">
<style type="text/css">
	body{background: #fff;}
</style>
    </head>
    <body>
<div id="print">
	<div id="hd_print">
		<h2 class="pull-left">.&#x3A; Nguoicodonvn2008.info - Cõi lòng người cô đơn &#x3A;.</h2>
		<p class="pull-right"><a title=".&#x3A; Nguoicodonvn2008.info - Cõi lòng người cô đơn &#x3A;." href="https://nguoicodonvn2008.info/">https://nguoicodonvn2008.info</a></p>
	</div>
	<div class="clear"></div>
	<hr />
	<div id="content">
		<h1>Cách tạo hiệu ứng phản chiếu trên mặt nước bằng Generative Fill trong Photoshop</h1>
		<ul class="list-inline">
			<li>Thứ bảy - 02/11/2024 01:27</li>
			<li class="hidden-print txtrequired"><em class="fa fa-print">&nbsp;</em><a title="In ra" href="javascript:;" onclick="window.print()">In ra</a></li>
			<li class="hidden-print txtrequired"><em class="fa fa-power-off">&nbsp;</em><a title="Đóng cửa sổ này" href="javascript:;" onclick="window.close()">Đóng cửa sổ này</a></li>
		</ul>
		<div class="clear"></div>
		<div id="hometext">
		</div>
				<div class="imghome">
			<img alt="Cách tạo hiệu ứng phản chiếu trên mặt nước bằng Generative Fill trong Photoshop" src="https://st.quantrimang.com/photos/image/2024/11/01/tao-hieu-ung-phan-chieu-mat-nuoc-bang-photoshop-21.jpg" width="460" class="img-thumbnail" />
		</div>
		<div class="clear"></div>
		<div id="bodytext" class="clearfix">
			<p style="text-align: justify;">Tạo hiệu ứng phản chiếu trên mặt nước bằng Photoshop từng là một quá trình tốn thời gian và đòi hỏi kỹ năng. Hoặc bạn có thể sử dụng plugin phản chiếu trên mặt nước và loay hoay với các tùy chọn khó hiểu.</p>

<p style="text-align: justify;">Nhưng với&nbsp;Generative Fill, được hỗ trợ bởi Generative AI của Adobe có tên là Firefly, bất kỳ ai cũng có thể thêm hiệu ứng phản chiếu trên mặt nước chân thực vào ảnh của mình chỉ bằng cách vẽ một vùng chọn, nhập một vài từ và nhấp vào nút Generate.</p>

<h2 style="text-align: justify;">Bước 1: Thêm khoảng trống bên dưới hình ảnh để tạo hiệu ứng phản chiếu trên mặt nước</h2>

<p style="text-align: justify;">Đầu tiên, bạn cần thêm khoảng trống bên dưới ảnh để tạo chỗ cho hiệu ứng phản chiếu trên mặt nước, nghĩa là cần mở rộng canvas.</p>

<p style="text-align: justify;">
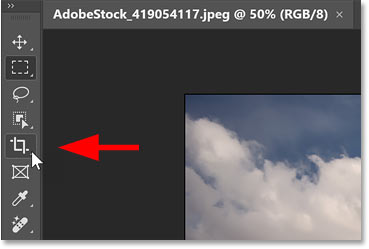
Vì vậy, hãy chọn Crop Tool từ thanh công cụ của Photoshop.</p>

<figure>
<div style="text-align: justify;"><img alt="Chọn Crop Tool trong Photoshop" data-i="0" data-src="https://st.quantrimang.com/photos/image/2024/11/01/tao-hieu-ung-phan-chieu-mat-nuoc-bang-photoshop-1.jpg" data-was-processed="true" height="249" src="https://st.quantrimang.com/photos/image/2024/11/01/tao-hieu-ung-phan-chieu-mat-nuoc-bang-photoshop-1.jpg" width="369" /></div>

<figcaption>
<div style="text-align: justify;">Chọn Crop Tool trong Photoshop</div>
</figcaption>
</figure>

<p style="text-align: justify;">
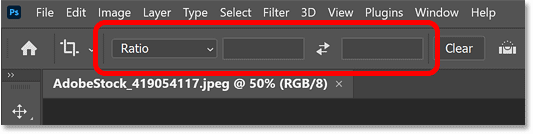
Trong Options Bar, hãy đảm bảo tỷ lệ khung hình được đặt thành&nbsp;<strong>Ratio</strong>&nbsp;và các hộp&nbsp;<strong>Width</strong>&nbsp;và&nbsp;<strong>Height</strong>&nbsp;bên cạnh tỷ lệ này để trống.</p>

<figure>
<div style="text-align: justify;"><img alt="Các tùy chọn tỷ lệ khung hình cho Crop Tool." data-i="1" data-src="https://st.quantrimang.com/photos/image/2024/11/01/tao-hieu-ung-phan-chieu-mat-nuoc-bang-photoshop-2.png" data-was-processed="true" height="134" src="https://st.quantrimang.com/photos/image/2024/11/01/tao-hieu-ung-phan-chieu-mat-nuoc-bang-photoshop-2.png" width="533" /></div>

<figcaption>
<div style="text-align: justify;">Các tùy chọn tỷ lệ khung hình cho Crop Tool.</div>
</figcaption>
</figure>

<p style="text-align: justify;">
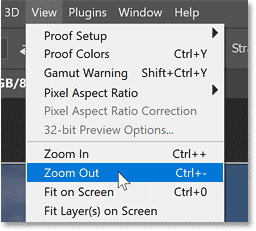
Để có thêm không gian làm việc, hãy thu nhỏ hình ảnh bằng cách vào menu&nbsp;<strong>View</strong>&nbsp;trong thanh menu và chọn&nbsp;<strong>Zoom Out</strong>.</p>

<figure>
<div style="text-align: justify;"><img alt="Chọn lệnh Zoom Out từ menu View." data-i="2" data-src="https://st.quantrimang.com/photos/image/2024/11/01/tao-hieu-ung-phan-chieu-mat-nuoc-bang-photoshop-3.png" data-was-processed="true" height="231" src="https://st.quantrimang.com/photos/image/2024/11/01/tao-hieu-ung-phan-chieu-mat-nuoc-bang-photoshop-3.png" width="256" /></div>

<figcaption>
<div style="text-align: justify;">Chọn lệnh Zoom Out từ menu View.</div>
</figcaption>
</figure>

<p style="text-align: justify;">Sau đó, mở rộng canvas bên dưới hình ảnh bằng cách nhấp và kéo crop handle dưới cùng xuống dưới.</p>

<figure>
<div style="text-align: justify;"><img alt="Kéo crop handle để thêm không gian bên dưới ảnh." data-i="3" data-src="https://st.quantrimang.com/photos/image/2024/11/01/tao-hieu-ung-phan-chieu-mat-nuoc-bang-photoshop-4.jpg" data-was-processed="true" height="506" src="https://st.quantrimang.com/photos/image/2024/11/01/tao-hieu-ung-phan-chieu-mat-nuoc-bang-photoshop-4.jpg" width="800" /></div>

<figcaption>
<div style="text-align: justify;">Kéo crop handle để thêm không gian bên dưới ảnh.</div>
</figcaption>
</figure>

<p style="text-align: justify;">
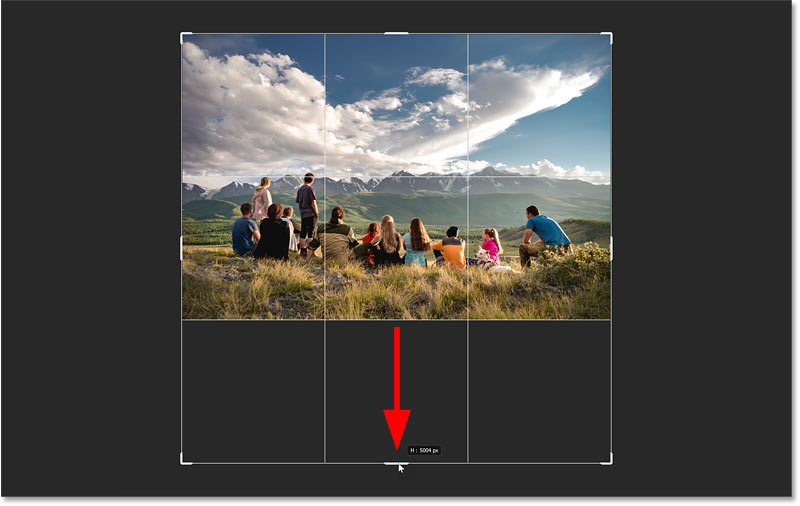
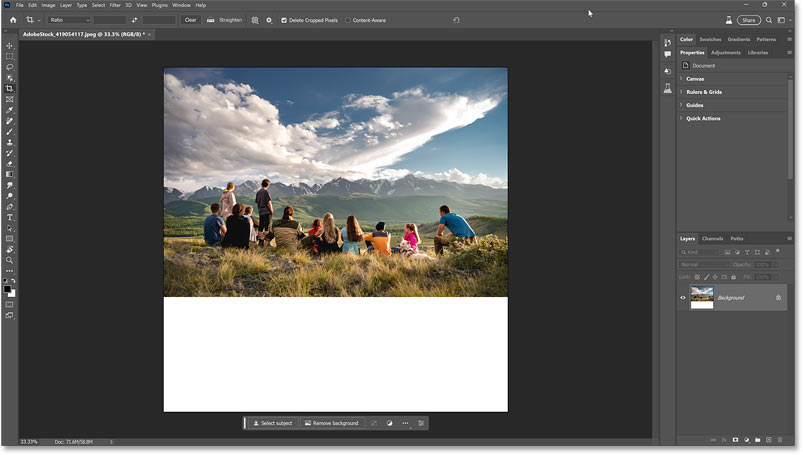
Photoshop sẽ tô vùng canvas mới bằng màu trắng khi bạn nhả nút chuột.</p>

<p style="text-align: justify;">Nhấn&nbsp;<strong>Enter</strong>&nbsp;(hoặc&nbsp;<strong>Return</strong>&nbsp;trên máy Mac) trên bàn phím để chấp nhận.</p>

<figure>
<div style="text-align: justify;"><img alt="Kết quả sau khi mở rộng canvas bên dưới hình ảnh." data-adbro-processed="true" data-i="4" data-src="https://st.quantrimang.com/photos/image/2024/11/01/tao-hieu-ung-phan-chieu-mat-nuoc-bang-photoshop-5.jpg" data-was-processed="true" height="455" src="https://st.quantrimang.com/photos/image/2024/11/01/tao-hieu-ung-phan-chieu-mat-nuoc-bang-photoshop-5.jpg" width="803" /></div>

<figcaption>
<div style="text-align: justify;">Kết quả sau khi mở rộng canvas bên dưới hình ảnh.</div>
</figcaption>
</figure>

<div style="text-align: justify;">&nbsp;</div>

<h2 style="text-align: justify;">Bước 2: Chọn vùng bên dưới ảnh</h2>

<p style="text-align: justify;">Tiếp theo, bạn cần chọn canvas mới.</p>

<p style="text-align: justify;">
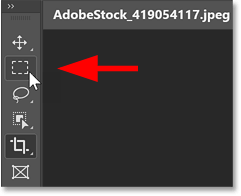
Vì vậy, hãy chuyển sang Rectangular Marquee Tool trên thanh công cụ.</p>

<figure>
<div style="text-align: justify;"><img alt="Chọn Rectangular Marquee Tool." data-i="5" data-src="https://st.quantrimang.com/photos/image/2024/11/01/tao-hieu-ung-phan-chieu-mat-nuoc-bang-photoshop-6.png" data-was-processed="true" height="196" src="https://st.quantrimang.com/photos/image/2024/11/01/tao-hieu-ung-phan-chieu-mat-nuoc-bang-photoshop-6.png" width="241" /></div>

<figcaption>
<div style="text-align: justify;">Chọn Rectangular Marquee Tool.</div>
</figcaption>
</figure>

<p style="text-align: justify;">
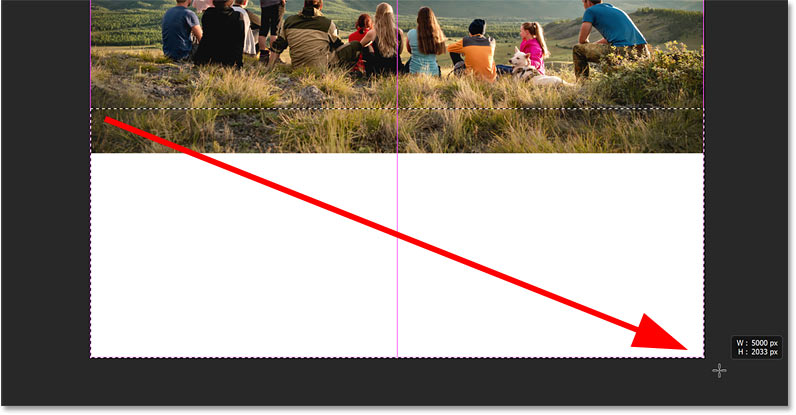
Sau đó, kéo đường viền lựa chọn xung quanh canvas ở phía dưới.</p>

<p style="text-align: justify;">Nhưng đừng chỉ chọn canvas trắng. Đảm bảo bao gồm một số hình ảnh ở trên nó để Generative Fill có đủ chỗ để chuyển đổi giữa ảnh gốc ở trên cùng và hình ảnh phản chiếu dưới nước bên dưới.</p>

<p style="text-align: justify;">Bạn không cần phải bao gồm nhiều hình ảnh. Nhưng trong trường hợp ví dụ, vì tác giả muốn hình ảnh phản chiếu dưới nước bắt đầu gần hơn với mọi người, nên sẽ bao gồm nhiều hình ảnh hơn ở đây so với bình thường.</p>

<figure>
<div style="text-align: justify;"><img alt="Chọn canvas bổ sung cộng với phần dưới cùng của hình ảnh." data-i="6" data-src="https://st.quantrimang.com/photos/image/2024/11/01/tao-hieu-ung-phan-chieu-mat-nuoc-bang-photoshop-7.jpg" data-was-processed="true" height="415" src="https://st.quantrimang.com/photos/image/2024/11/01/tao-hieu-ung-phan-chieu-mat-nuoc-bang-photoshop-7.jpg" width="796" /></div>

<figcaption>
<div style="text-align: justify;">Chọn canvas bổ sung cộng với phần dưới cùng của hình ảnh.</div>
</figcaption>
</figure>

<h2 style="text-align: justify;">
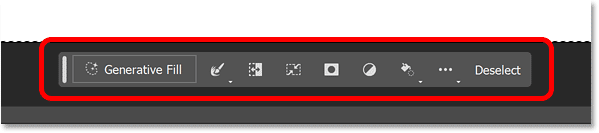
Bước 3: Nhấp vào Generative Fill trong Contextual Task Bar</h2>

<p style="text-align: justify;">Tùy chọn Generative Fill của Photoshop nằm trong Contextual Task Bar mới, một thanh ngang nhỏ hiển thị nhiều tùy chọn khác nhau tùy thuộc vào những gì bạn đang làm. Contextual Task Bar thường xuất hiện ngay bên dưới phần phác thảo lựa chọn của bạn.
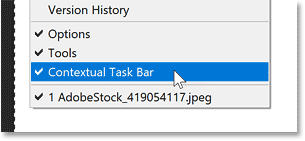
</p>

<figure>
<div style="text-align: justify;"><img alt="Contextual Task Bar mới của Photoshop." data-i="7" data-src="https://st.quantrimang.com/photos/image/2024/11/01/tao-hieu-ung-phan-chieu-mat-nuoc-bang-photoshop-8.png" data-was-processed="true" height="133" src="https://st.quantrimang.com/photos/image/2024/11/01/tao-hieu-ung-phan-chieu-mat-nuoc-bang-photoshop-8.png" width="599" /></div>

<figcaption>
<div style="text-align: justify;">Contextual Task Bar mới của Photoshop.</div>
</figcaption>
</figure>

<p style="text-align: justify;">Nếu bạn không thấy, hãy vào menu&nbsp;<strong>Window</strong>&nbsp;trong thanh menu và chọn&nbsp;<strong>Contextual Task Bar</strong>&nbsp;gần phía dưới.</p>

<figure>
<div style="text-align: justify;"><img alt="Contextual Task Bar mới của Photoshop." data-i="8" data-src="https://st.quantrimang.com/photos/image/2024/11/01/tao-hieu-ung-phan-chieu-mat-nuoc-bang-photoshop-9.png" data-was-processed="true" height="141" src="https://st.quantrimang.com/photos/image/2024/11/01/tao-hieu-ung-phan-chieu-mat-nuoc-bang-photoshop-9.png" width="305" /></div>

<figcaption>
<div style="text-align: justify;">Contextual Task Bar mới của Photoshop.</div>
</figcaption>
</figure>

<p style="text-align: justify;">Trong Taskbar, nhấp vào nút&nbsp;<strong>Generative Fill</strong>.</p>

<figure>
<div style="text-align: justify;"><img alt="Nhấp vào Generative Fill." data-i="9" data-src="https://st.quantrimang.com/photos/image/2024/11/01/tao-hieu-ung-phan-chieu-mat-nuoc-bang-photoshop-10.png" data-was-processed="true" height="133" src="https://st.quantrimang.com/photos/image/2024/11/01/tao-hieu-ung-phan-chieu-mat-nuoc-bang-photoshop-10.png" width="599" /></div>

<figcaption>
<div style="text-align: justify;">Nhấp vào Generative Fill.</div>
</figcaption>
</figure>

<h2 style="text-align: justify;">
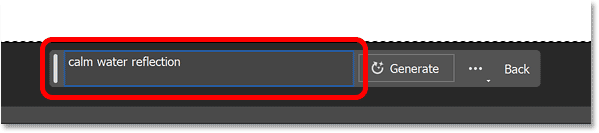
Bước 4: Nhập prompt tạo hiệu ứng phản chiếu trên mặt nước</h2>

<p style="text-align: justify;">Một hộp nhập prompt sẽ xuất hiện, nơi bạn có thể nhập mô tả về những gì bạn muốn Photoshop thêm vào ảnh. Trong trường hợp này, chúng ta sẽ thêm hiệu ứng phản chiếu trên mặt nước.</p>

<p style="text-align: justify;">Với Generative Fill, các prompt ngắn gọn và đơn giản có xu hướng hoạt động tốt nhất. Dùng danh từ (người, địa điểm, đồ vật) và tính từ (từ mô tả người, địa điểm hoặc đồ vật). Ngoài ra, tránh dùng các từ như thêm, xóa hoặc tạo vì Photoshop tự tính toán được.</p>

<p style="text-align: justify;">
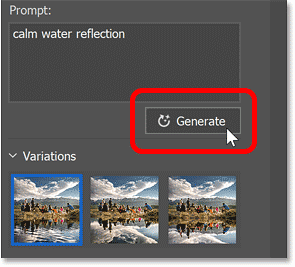
Vì vậy, trong hộp nhập prompt, chỉ cần nhập &quot;<strong>calm water reflection</strong>&quot;. Bạn cũng có thể thử hiệu ứng phản chiếu mặt nước tĩnh lặng với gợn sóng, phản chiếu mặt hồ hoặc thứ gì đó tương tự. Cả 3 prompt đều cho kết quả tuyệt vời.</p>

<figure>
<div style="text-align: justify;"><img alt="Nhập calm water reflection vào hộp nhắc." data-i="10" data-src="https://st.quantrimang.com/photos/image/2024/11/01/tao-hieu-ung-phan-chieu-mat-nuoc-bang-photoshop-11.png" data-was-processed="true" height="133" src="https://st.quantrimang.com/photos/image/2024/11/01/tao-hieu-ung-phan-chieu-mat-nuoc-bang-photoshop-11.png" width="599" /></div>

<figcaption>
<div style="text-align: justify;">Nhập calm water reflection vào hộp nhắc.</div>
</figcaption>
</figure>

<h2 style="text-align: justify;">Bước 5: Nhấp vào nút&nbsp;Generate</h2>

<p style="text-align: justify;">Sau đó, bên cạnh hộp nhắc, hãy nhấp vào nút Generate.</p>

<figure>
<div style="text-align: justify;"><img alt="Nhấp vào nút Generate." data-i="11" data-src="https://st.quantrimang.com/photos/image/2024/11/01/tao-hieu-ung-phan-chieu-mat-nuoc-bang-photoshop-12.png" data-was-processed="true" height="133" src="https://st.quantrimang.com/photos/image/2024/11/01/tao-hieu-ung-phan-chieu-mat-nuoc-bang-photoshop-12.png" width="599" /></div>

<figcaption>
<div style="text-align: justify;">Nhấp vào nút Generate.</div>
</figcaption>
</figure>

<p style="text-align: justify;">
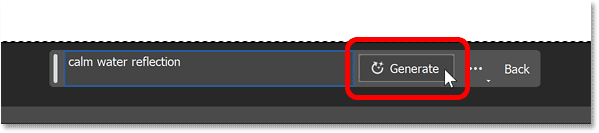
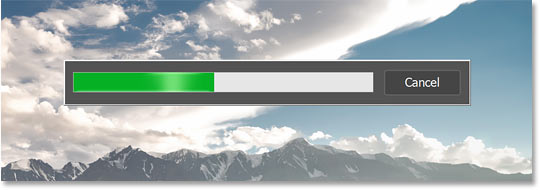
Photoshop gửi file qua Internet đến máy chủ của Adobe, nơi nội dung AI được tạo và thanh tiến trình sẽ xuất hiện trong khi bạn đợi. Thông thường mất 10-15 giây.</p>

<figure>
<div style="text-align: justify;"><img alt="Thanh tiến trình Generative Fill." data-i="12" data-src="https://st.quantrimang.com/photos/image/2024/11/01/tao-hieu-ung-phan-chieu-mat-nuoc-bang-photoshop-13.jpg" data-was-processed="true" height="190" src="https://st.quantrimang.com/photos/image/2024/11/01/tao-hieu-ung-phan-chieu-mat-nuoc-bang-photoshop-13.jpg" width="540" /></div>

<figcaption>
<div style="text-align: justify;">Thanh tiến trình Generative Fill.</div>
</figcaption>
</figure>

<h3 style="text-align: justify;">
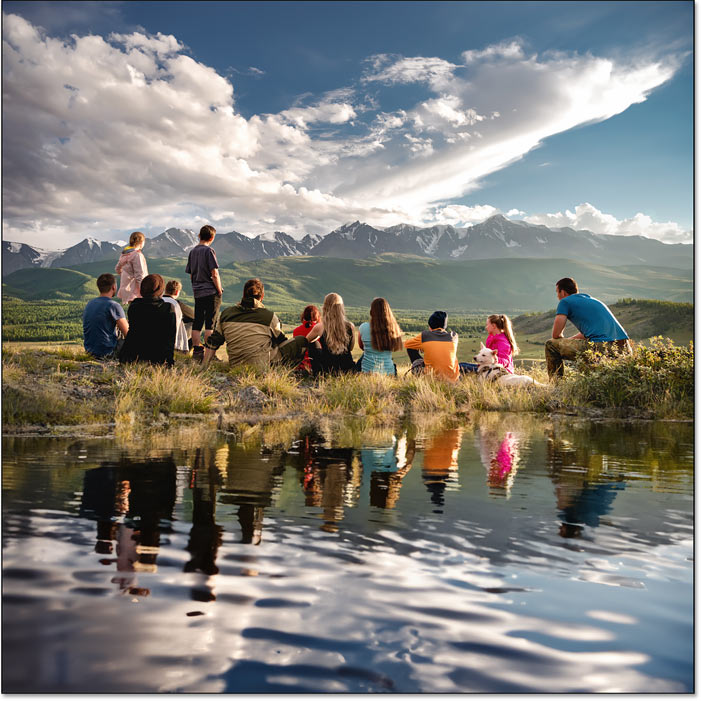
Hiệu ứng phản chiếu trên mặt nước ban đầu sẽ xuất hiện</h3>

<p style="text-align: justify;">
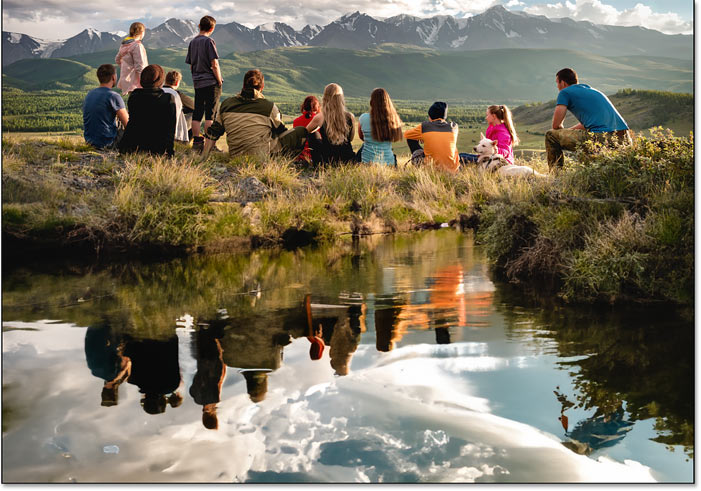
Khi hoàn tất, hiệu ứng phản chiếu trên mặt nước do AI tạo của bạn sẽ xuất hiện. Và kết quả có thể trông rất ngoạn mục.</p>

<p style="text-align: justify;">
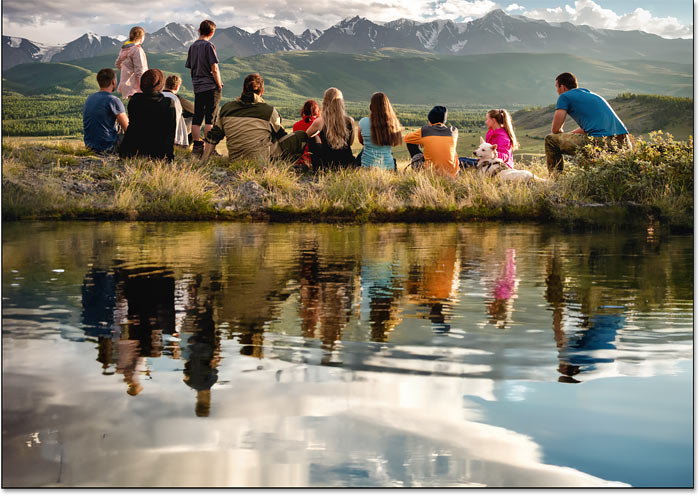
Với hình ảnh ví dụ, hãy chú ý cách mặt nước phản chiếu mây, người, cỏ và hầu như mọi thứ trong ảnh gốc ở trên, cũng như cách hiệu ứng phản chiếu bị biến dạng bởi những gợn sóng trên bề mặt nước (mặc dù tác giả không đề cập đến những gợn sóng trong prompt của mình).</p>

<p style="text-align: justify;">Generative Fill thậm chí còn thêm một chút đường viền nơi nước và ảnh gốc gặp nhau. Hãy tưởng tượng xem sẽ mất bao lâu để tạo ra thứ gì đó như thế này theo cách thủ công. Nhưng với Generative Fill, tất cả những gì bạn cần chỉ là một prompt văn bản đơn giản.</p>

<figure>
<div style="text-align: justify;"><img alt="Hiệu ứng phản chiếu trên mặt nước ban đầu được tạo bởi Generative Fill trong Photoshop." data-i="13" data-src="https://st.quantrimang.com/photos/image/2024/11/01/tao-hieu-ung-phan-chieu-mat-nuoc-bang-photoshop-14.jpg" data-was-processed="true" height="701" src="https://st.quantrimang.com/photos/image/2024/11/01/tao-hieu-ung-phan-chieu-mat-nuoc-bang-photoshop-14.jpg" width="701" /></div>

<figcaption>
<div style="text-align: justify;">Hiệu ứng phản chiếu trên mặt nước ban đầu được tạo bởi Generative Fill trong Photoshop.</div>
</figcaption>
</figure>

<div style="text-align: justify;">&nbsp;</div>

<h3 style="text-align: justify;">
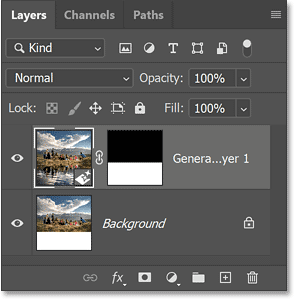
Layer Generative mới của Photoshop</h3>

<p style="text-align: justify;">Trong bảng Layers, một loại layer mới có tên là layer Generative xuất hiện phía trên hình ảnh. Các layer Generative giữ nội dung do AI tạo ra và tách biệt với ảnh gốc của bạn để hiệu ứng được thêm vào mà không bị phá hủy.</p>

<figure>
<div style="text-align: justify;"><img alt="Layer Generative mới trong bảng Layers của Photoshop." data-i="14" data-src="https://st.quantrimang.com/photos/image/2024/11/01/tao-hieu-ung-phan-chieu-mat-nuoc-bang-photoshop-15.png" data-was-processed="true" height="300" src="https://st.quantrimang.com/photos/image/2024/11/01/tao-hieu-ung-phan-chieu-mat-nuoc-bang-photoshop-15.png" width="295" /></div>

<figcaption>
<div style="text-align: justify;">Layer Generative mới trong bảng Layers của Photoshop.</div>
</figcaption>
</figure>

<h2 style="text-align: justify;">
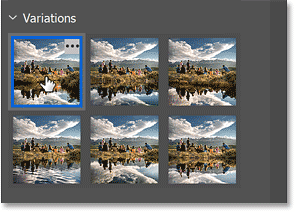
Bước 6: Chọn từ 3 biến thể của hiệu ứng phản chiếu trên mặt nước</h2>

<p style="text-align: justify;">Generative Fill tạo ra 3 biến thể của hiệu ứng phản chiếu trên mặt nước mà bạn có thể chọn và bạn sẽ tìm thấy chúng trong bảng&nbsp;<strong>Properties</strong>. Nhấp vào hình thu nhỏ để dùng thử.</p>

<p style="text-align: justify;">
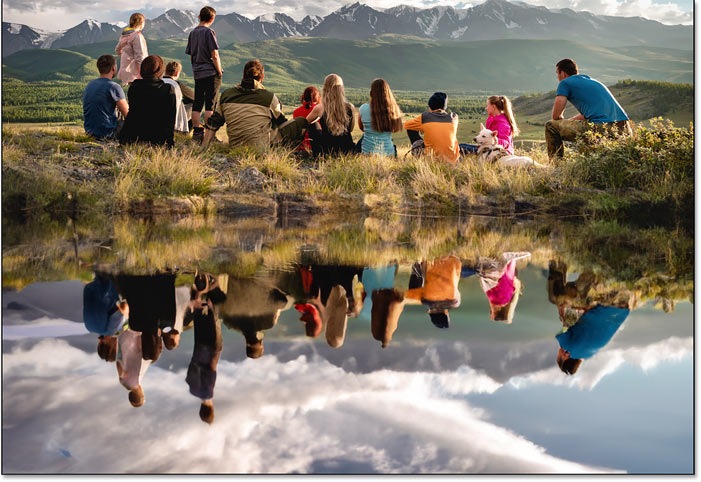
Một số biến thể sẽ đẹp hơn những biến thể khác. Ví dụ sẽ chọn một trong hai biến thể còn lại.</p>

<figure>
<div style="text-align: justify;"><img alt="Chọn một biến thể phản chiếu trên mặt nước khác." data-i="15" data-src="https://st.quantrimang.com/photos/image/2024/11/01/tao-hieu-ung-phan-chieu-mat-nuoc-bang-photoshop-16.png" data-was-processed="true" height="352" src="https://st.quantrimang.com/photos/image/2024/11/01/tao-hieu-ung-phan-chieu-mat-nuoc-bang-photoshop-16.png" width="295" /></div>

<figcaption>
<div style="text-align: justify;">Chọn một biến thể phản chiếu trên mặt nước khác.</div>
</figcaption>
</figure>

<p style="text-align: justify;">Nhưng kết quả này thiếu các gợn sóng trên mặt nước và hình ảnh phản chiếu của mọi người trông thật kỳ lạ. Kết quả ban đầu đẹp hơn.</p>

<figure>
<div style="text-align: justify;"><img alt="Không phải kết quả nào cũng có thể giữ lại." data-i="16" data-src="https://st.quantrimang.com/photos/image/2024/11/01/tao-hieu-ung-phan-chieu-mat-nuoc-bang-photoshop-17.jpg" data-was-processed="true" height="482" src="https://st.quantrimang.com/photos/image/2024/11/01/tao-hieu-ung-phan-chieu-mat-nuoc-bang-photoshop-17.jpg" width="701" /></div>

<figcaption>
<div style="text-align: justify;">Không phải kết quả nào cũng có thể giữ lại.</div>
</figcaption>
</figure>

<h2 style="text-align: justify;">Bước 7: Tạo thêm biến thể (tùy chọn)</h2>

<p style="text-align: justify;">Nếu bạn không thích bất kỳ hiệu ứng phản chiếu trên mặt nước ban đầu nào, hãy nhấp vào nút&nbsp;<strong>Generate</strong>&nbsp;trong bảng&nbsp;<strong>Properties</strong>&nbsp;để tạo thêm 3 biến thể. Bạn có thể nhấp vào&nbsp;<strong>Generate</strong>&nbsp;nhiều lần tùy ý và bạn sẽ không mất các biến thể đã có.</p>

<figure>
<div style="text-align: justify;"><img alt="Nhấp vào nút Generate trong bảng Properties." data-i="17" data-src="https://st.quantrimang.com/photos/image/2024/11/01/tao-hieu-ung-phan-chieu-mat-nuoc-bang-photoshop-18.png" data-was-processed="true" height="267" src="https://st.quantrimang.com/photos/image/2024/11/01/tao-hieu-ung-phan-chieu-mat-nuoc-bang-photoshop-18.png" width="295" /></div>

<figcaption>
<div style="text-align: justify;">Nhấp vào nút Generate trong bảng Properties.</div>
</figcaption>
</figure>

<p style="text-align: justify;">Các biến thể mới sẽ xuất hiện phía trên những biến thể trước đó. Ví dụ sẽ chọn biến thể đầu tiên.</p>

<figure>
<div style="text-align: justify;"><img alt="Chọn một trong các kết quả mới." data-i="18" data-src="https://st.quantrimang.com/photos/image/2024/11/01/tao-hieu-ung-phan-chieu-mat-nuoc-bang-photoshop-19.png" data-was-processed="true" height="212" src="https://st.quantrimang.com/photos/image/2024/11/01/tao-hieu-ung-phan-chieu-mat-nuoc-bang-photoshop-19.png" width="295" /></div>

<figcaption>
<div style="text-align: justify;">Chọn một trong các kết quả mới.</div>
</figcaption>
</figure>

<p style="text-align: justify;">Điều này khá thú vị. Generative Fill đã thêm một con lạch phía sau những người cong về bên phải. Một lần nữa, phải mất bao lâu để tạo được kết quả tương tự theo cách thủ công? Có thể là nhiều giờ, nhiều ngày hoặc thậm chí không bao giờ. Tuy nhiên, đối với Generative Fill, chỉ mất vài giây.</p>

<figure>
<div style="text-align: justify;"><img alt="Generative Fill đã thêm một con lạch vào hình ảnh trông rất tuyệt." data-i="19" data-src="https://st.quantrimang.com/photos/image/2024/11/01/tao-hieu-ung-phan-chieu-mat-nuoc-bang-photoshop-20.jpg" data-was-processed="true" height="491" src="https://st.quantrimang.com/photos/image/2024/11/01/tao-hieu-ung-phan-chieu-mat-nuoc-bang-photoshop-20.jpg" width="701" /></div>

<figcaption>
<div style="text-align: justify;">Generative Fill đã thêm một con lạch vào hình ảnh trông rất tuyệt.</div>
</figcaption>
</figure>

<div style="text-align: justify;">&nbsp;</div>

<p style="text-align: justify;">Nhưng biến thể cuối cùng là biến thể tốt nhất, do cách những gợn sóng lan ra từ bờ.</p>

<p style="text-align: justify;">Có một số điểm gây mất tập trung nhỏ trong nước, nhưng bạn có thể dễ dàng loại bỏ chúng bằng Remove Tool mới của Photoshop, công cụ này cũng được hỗ trợ bởi AI (giống như mọi thứ khác hiện nay).</p>

<p style="text-align: justify;">Nhìn chung, những hình ảnh phản chiếu trên mặt nước do Generative Fill tạo ra gần như không thể tin được, cả về vẻ ngoài đáng kinh ngạc và cách tạo ra chúng dễ đến mức khó tin.</p>

<figure>
<div style="text-align: justify;"><img alt="Hình ảnh phản chiếu trên mặt nước đẹp nhất do Generative Fill tạo ra trong Photoshop." data-i="20" data-src="https://st.quantrimang.com/photos/image/2024/11/01/tao-hieu-ung-phan-chieu-mat-nuoc-bang-photoshop-21.jpg" data-was-processed="true" height="496" src="https://st.quantrimang.com/photos/image/2024/11/01/tao-hieu-ung-phan-chieu-mat-nuoc-bang-photoshop-21.jpg" width="700" /></div>

<figcaption>
<div style="text-align: justify;">Hình ảnh phản chiếu trên mặt nước đẹp nhất do Generative Fill tạo ra trong Photoshop.</div>
</figcaption>
</figure>

<div style="text-align: justify;">&nbsp;</div>
		</div>
				<div id="author">
						<p>
				<strong>Nguồn tin:</strong>
				Quantrimang.com:
			</p>
		</div>
	</div>
	<div id="footer" class="clearfix">
		<div id="url">
			<strong>URL của bản tin này: </strong><a href="https://www.nguoicodonvn2008.info/vi/news/savefile/kien-thuc-may-tinh/cach-tao-hieu-ung-phan-chieu-tren-mat-nuoc-bang-generative-fill-trong-photoshop-9278.html" title="Cách tạo hiệu ứng phản chiếu trên mặt nước bằng Generative Fill trong Photoshop">https://www.nguoicodonvn2008.info/vi/news/savefile/kien-thuc-may-tinh/cach-tao-hieu-ung-phan-chieu-tren-mat-nuoc-bang-generative-fill-trong-photoshop-9278.html</a>

		</div>
		<div class="clear"></div>
		<div class="copyright">
			&copy; .&#x3A; Nguoicodonvn2008.info - Cõi lòng người cô đơn &#x3A;.
		</div>
		<div id="contact">
			<a href="mailto:admin@nguoicodonvn2008.info">admin@nguoicodonvn2008.info</a>
		</div>
	</div>
</div>
        <div id="timeoutsess" class="chromeframe">
            Bạn đã không sử dụng Site, <a onclick="timeoutsesscancel();" href="https://nguoicodonvn2008.info/#">Bấm vào đây để duy trì trạng thái đăng nhập</a>. Thời gian chờ: <span id="secField"> 60 </span> giây
        </div>
        <div id="openidResult" class="nv-alert" style="display:none"></div>
        <div id="openidBt" data-result="" data-redirect=""></div>
		</script>
		<div class="car-top">
  <span><img src="https://nguoicodonvn2008.info/themes/default/images/car.png" alt=""></span>
</div>
<script src="https://nguoicodonvn2008.info/assets/js/jquery/jquery.min.js"></script>
<script>var nv_base_siteurl="/",nv_lang_data="vi",nv_lang_interface="vi",nv_name_variable="nv",nv_fc_variable="op",nv_lang_variable="language",nv_module_name="news",nv_func_name="savefile",nv_is_user=0, nv_my_ofs=-4,nv_my_abbr="EDT",nv_cookie_prefix="nv4c_e856T",nv_check_pass_mstime=1738000,nv_area_admin=0,nv_safemode=0,theme_responsive=0,nv_recaptcha_ver=2,nv_recaptcha_sitekey="",nv_recaptcha_type="image",XSSsanitize=1;</script>
<script src="https://nguoicodonvn2008.info/assets/js/language/vi.js"></script>
<script src="https://nguoicodonvn2008.info/assets/js/DOMPurify/purify3.js"></script>
<script src="https://nguoicodonvn2008.info/assets/js/global.js"></script>
<script src="https://nguoicodonvn2008.info/assets/js/site.js"></script>
<script src="https://nguoicodonvn2008.info/themes/default/js/news.js"></script>
<script src="https://nguoicodonvn2008.info/themes/default/js/main.js"></script>
<script src="https://nguoicodonvn2008.info/themes/default/js/custom.js"></script>
<script type="application/ld+json">
        {
            "@context": "https://schema.org",
            "@type": "Organization",
            "url": "https://nguoicodonvn2008.info",
            "logo": "https://nguoicodonvn2008.info/uploads/angel.gif"
        }
        </script>
<script src="https://nguoicodonvn2008.info/themes/default/js/bootstrap.min.js"></script>
<script type="text/javascript">
var $scrolltop = $('.car-top');
$scrolltop.on('click', function () {
    $('html,body').animate({
        scrollTop: 0
    }, 800);
    $(this).addClass("car-run");
    setTimeout(function(){ $scrolltop.removeClass('car-run');}, 1000);
    return false;
});
$(window).on('scroll', function ()
{ 
    if($(window).scrollTop() >= 200)
    {
        $scrolltop.addClass("show");
        $scrolltop.addClass("car-down");
    }
    else
    {
       $scrolltop.removeClass("show");
       setTimeout(function(){ $scrolltop.removeClass('car-down');}, 300);
    }
});
</script>
</body>
</html>