<!DOCTYPE html>
    <html lang="vi" xmlns="http://www.w3.org/1999/xhtml" prefix="og: http://ogp.me/ns#">
    <head>
<title>Cách tạo ảnh GIF từ video bằng VLC và GIMP</title>
<meta name="description" content="Cách tạo ảnh GIF từ video bằng VLC và GIMP - Savefile - Tin Tức -...">
<meta name="author" content=".: Nguoicodonvn2008.info - Cõi lòng người cô đơn :.">
<meta name="copyright" content=".: Nguoicodonvn2008.info - Cõi lòng người cô đơn :. [admin@nguoicodonvn2008.info]">
<meta name="robots" content="index, archive, follow, noodp">
<meta name="googlebot" content="index,archive,follow,noodp">
<meta name="msnbot" content="all,index,follow">
<meta name="generator" content="NukeViet v4.5">
<meta http-equiv="Content-Type" content="text/html; charset=utf-8">
<meta property="og:title" content="Cách tạo ảnh GIF từ video bằng VLC và GIMP">
<meta property="og:type" content="website">
<meta property="og:description" content="Savefile - Tin Tức - https&#x3A;&#x002F;&#x002F;www.nguoicodonvn2008.info&#x002F;vi&#x002F;news&#x002F;savefile&#x002F;kien-thuc-may-tinh&#x002F;cach-tao-anh-gif-tu-video-bang-vlc-va-gimp-7961.html">
<meta property="og:site_name" content=".&#x3A; Nguoicodonvn2008.info - Cõi lòng người cô đơn &#x3A;.">
<meta property="og:url" content="https://www.nguoicodonvn2008.info/vi/news/savefile/kien-thuc-may-tinh/cach-tao-anh-gif-tu-video-bang-vlc-va-gimp-7961.html">
<link rel="shortcut icon" href="https://nguoicodonvn2008.info/favicon.ico">
<link rel="canonical" href="https://www.nguoicodonvn2008.info/vi/news/savefile/kien-thuc-may-tinh/cach-tao-anh-gif-tu-video-bang-vlc-va-gimp-7961.html">
<link rel="alternate" href="https://nguoicodonvn2008.info/vi/news/rss/" title="Tin Tức" type="application/rss+xml">
<link rel="alternate" href="https://nguoicodonvn2008.info/vi/news/rss/karaoke-dual/" title="Tin Tức - Karaoke Dual" type="application/rss+xml">
<link rel="alternate" href="https://nguoicodonvn2008.info/vi/news/rss/nhac-tre/" title="Tin Tức - Nhạc trẻ" type="application/rss+xml">
<link rel="alternate" href="https://nguoicodonvn2008.info/vi/news/rss/tru-tinh/" title="Tin Tức - Trữ tình" type="application/rss+xml">
<link rel="alternate" href="https://nguoicodonvn2008.info/vi/news/rss/nuoc-ngoai/" title="Tin Tức - Nước ngoài" type="application/rss+xml">
<link rel="alternate" href="https://nguoicodonvn2008.info/vi/news/rss/remix/" title="Tin Tức - Remix" type="application/rss+xml">
<link rel="alternate" href="https://nguoicodonvn2008.info/vi/news/rss/tam-su-tinh-yeu/" title="Tin Tức - Tâm sự tình yêu" type="application/rss+xml">
<link rel="alternate" href="https://nguoicodonvn2008.info/vi/news/rss/tho-suu-tam/" title="Tin Tức - Thơ sưu tầm" type="application/rss+xml">
<link rel="alternate" href="https://nguoicodonvn2008.info/vi/news/rss/cuoc-song/" title="Tin Tức - Cuộc sống" type="application/rss+xml">
<link rel="alternate" href="https://nguoicodonvn2008.info/vi/news/rss/phan-mem/" title="Tin Tức - Phần mềm" type="application/rss+xml">
<link rel="alternate" href="https://nguoicodonvn2008.info/vi/news/rss/kien-thuc-may-tinh/" title="Tin Tức - Kiến thức máy tính" type="application/rss+xml">
<link rel="alternate" href="https://nguoicodonvn2008.info/vi/news/rss/hoc-tap/" title="Tin Tức - Học tập" type="application/rss+xml">
<link rel="alternate" href="https://nguoicodonvn2008.info/vi/news/rss/tai-lieu/" title="Tin Tức - Tài liệu" type="application/rss+xml">
<link rel="alternate" href="https://nguoicodonvn2008.info/vi/news/rss/de-thi/" title="Tin Tức - Đề thi" type="application/rss+xml">
<link rel="preload" as="style" href="https://nguoicodonvn2008.info/assets/css/font-awesome.min.css" type="text/css">
<link rel="preload" as="style" href="https://nguoicodonvn2008.info/themes/default/css/bootstrap.non-responsive.css" type="text/css">
<link rel="preload" as="style" href="https://nguoicodonvn2008.info/themes/default/css/style.css" type="text/css">
<link rel="preload" as="style" href="https://nguoicodonvn2008.info/themes/default/css/style.non-responsive.css" type="text/css">
<link rel="preload" as="style" href="https://nguoicodonvn2008.info/themes/default/css/news.css" type="text/css">
<link rel="preload" as="style" href="https://nguoicodonvn2008.info/themes/default/css/custom.css" type="text/css">
<link rel="preload" as="script" href="https://nguoicodonvn2008.info/assets/js/jquery/jquery.min.js" type="text/javascript">
<link rel="preload" as="script" href="https://nguoicodonvn2008.info/assets/js/language/vi.js" type="text/javascript">
<link rel="preload" as="script" href="https://nguoicodonvn2008.info/assets/js/DOMPurify/purify3.js" type="text/javascript">
<link rel="preload" as="script" href="https://nguoicodonvn2008.info/assets/js/global.js" type="text/javascript">
<link rel="preload" as="script" href="https://nguoicodonvn2008.info/assets/js/site.js" type="text/javascript">
<link rel="preload" as="script" href="https://nguoicodonvn2008.info/themes/default/js/news.js" type="text/javascript">
<link rel="preload" as="script" href="https://nguoicodonvn2008.info/themes/default/js/main.js" type="text/javascript">
<link rel="preload" as="script" href="https://nguoicodonvn2008.info/themes/default/js/custom.js" type="text/javascript">
<link rel="preload" as="script" href="https://nguoicodonvn2008.info/themes/default/js/bootstrap.min.js" type="text/javascript">
<link rel="stylesheet" href="https://nguoicodonvn2008.info/assets/css/font-awesome.min.css">
<link rel="stylesheet" href="https://nguoicodonvn2008.info/themes/default/css/bootstrap.non-responsive.css">
<link rel="stylesheet" href="https://nguoicodonvn2008.info/themes/default/css/style.css">
<link rel="stylesheet" href="https://nguoicodonvn2008.info/themes/default/css/style.non-responsive.css">
<link rel="StyleSheet" href="https://nguoicodonvn2008.info/themes/default/css/news.css">
<link rel="stylesheet" href="https://nguoicodonvn2008.info/themes/default/css/custom.css">
<style type="text/css">
	body{background: #fff;}
</style>
    </head>
    <body>
<div id="print">
	<div id="hd_print">
		<h2 class="pull-left">.&#x3A; Nguoicodonvn2008.info - Cõi lòng người cô đơn &#x3A;.</h2>
		<p class="pull-right"><a title=".&#x3A; Nguoicodonvn2008.info - Cõi lòng người cô đơn &#x3A;." href="https://nguoicodonvn2008.info/">https://nguoicodonvn2008.info</a></p>
	</div>
	<div class="clear"></div>
	<hr />
	<div id="content">
		<h1>Cách tạo ảnh GIF từ video bằng VLC và GIMP</h1>
		<ul class="list-inline">
			<li>Thứ hai - 15/01/2024 22:50</li>
			<li class="hidden-print txtrequired"><em class="fa fa-print">&nbsp;</em><a title="In ra" href="javascript:;" onclick="window.print()">In ra</a></li>
			<li class="hidden-print txtrequired"><em class="fa fa-power-off">&nbsp;</em><a title="Đóng cửa sổ này" href="javascript:;" onclick="window.close()">Đóng cửa sổ này</a></li>
		</ul>
		<div class="clear"></div>
		<div id="hometext">
		</div>
				<div class="imghome">
			<img alt="Cách tạo ảnh GIF từ video bằng VLC và GIMP" src="https://st.quantrimang.com/photos/image/2024/01/16/tao-anh-gif-tu-video-bang-vlc-va-gimp-5.jpg" width="460" class="img-thumbnail" />
		</div>
		<div class="clear"></div>
		<div id="bodytext" class="clearfix">
			<p style="text-align: justify;">Không thể phủ nhận rằng GIF là một sức mạnh chính trong sự hài hước trên Internet. Chúng đặc biệt hữu ích trên web vì chúng cho phép bạn sử dụng một dạng hoạt ảnh nhẹ có thể mang lại sức sống cho nội dung của bạn mà không phải trả chi phí hiệu suất đi kèm với video. Hướng dẫn này trình bày cách tạo ảnh GIF từ video bằng hai chương trình nguồn mở: VLC và GIMP.</p>

<h2 style="text-align: justify;">Các bước sơ bộ</h2>

<p style="text-align: justify;">Trước khi có thể làm bất cứ điều gì, bạn cần cài đặt cả VLC và GIMP. Cả hai đều miễn phí và dễ dàng truy cập cho Windows, macOS và Linux.</p>

<h3 style="text-align: justify;">Windows và macOS</h3>

<p style="text-align: justify;">Bạn có thể dễ dàng tải xuống VLC và GIMP cho Windows và macOS trực tiếp từ các nhà phát triển tương ứng. Tải xuống cả hai và cài đặt chúng. Bạn cũng cần FFMPEG, một chương trình nguồn mở khác, để chia video của bạn thành các khung hình. Đây là một công cụ chuyển đổi âm thanh và video dòng lệnh.</p>

<p style="text-align: justify;">Trên Windows, hãy thêm tiện ích này vào Windows PATH (<strong>C:\ffmeg\bin.</strong>). Ngoài ra, hãy đảm bảo bạn di chuyển thư mục cài đặt FFMPEG sang ổ C:\.</p>

<p style="text-align: justify;">Trên máy Mac, bạn cũng sẽ phải thêm thư mục FFMPEG vào file đường dẫn thông qua cửa sổ terminal bằng lệnh sau. Thay thế &#91;FFMPEG directory&#93; bằng đường dẫn đến thư mục FFMPEG.</p>

<div class="codebar" style="text-align: justify;"></div>

<pre class="language- language-none prettyprint" id="pre0">
<code>export PATH=$PATH:&#91;FFMPEG directory&#93;</code></pre>

<p style="text-align: justify;">Tuy nhiên, bạn sẽ không nhận được những phần mềm bloatware vô nghĩa trong trình cài đặt.</p>

<h3 style="text-align: justify;">Linux</h3>

<p style="text-align: justify;">Trên Linux, bạn có thể cài đặt VLC, FFMPEG và GIMP thông qua trình quản lý gói nếu bạn chưa có chúng. Tải xuống các chương trình từ các trang dành cho nhà phát triển tương ứng của chúng.</p>

<p style="text-align: justify;"><strong>Ubuntu/Debian</strong></p>

<div class="codebar" style="text-align: justify;"></div>

<pre class="language- language-none prettyprint" id="pre1">
<code>sudo apt install vlc gimp ffmpeg</code></pre>

<p style="text-align: justify;"><strong>Fedora</strong></p>

<div class="codebar" style="text-align: justify;"></div>

<pre class="language- language-none prettyprint" id="pre2">
<code>sudo dnf install https://download1.rpmfusion.org/free/fedora/rpmfusion-free-release-$(rpm -E %fedora).noarch.rpm https://download1.rpmfusion.org/nonfree/fedora/rpmfusion-nonfree-release-$(rpm -E %fedora).noarch.rpm
sudo dnf install vlc gimp ffmpeg</code></pre>

<p style="text-align: justify;"><strong>Arch Linux</strong></p>

<div class="codebar" style="text-align: justify;"></div>

<pre class="language- language-none prettyprint" id="pre3">
<code>sudo pacman -S vlc gimp ffmpeg</code></pre>

<h2 style="text-align: justify;">1. Tạo clip bằng VLC</h2>

<p style="text-align: justify;">Để tạo ảnh GIF từ một video bằng các chương trình bạn vừa tải xuống, bạn sẽ cần một video mà bạn nên cắt thành nhiều khung hình để tạo ảnh GIF. VLC có một số cách để cắt video, nhưng đây là cách đơn giản nhất.</p>

<p style="text-align: justify;">
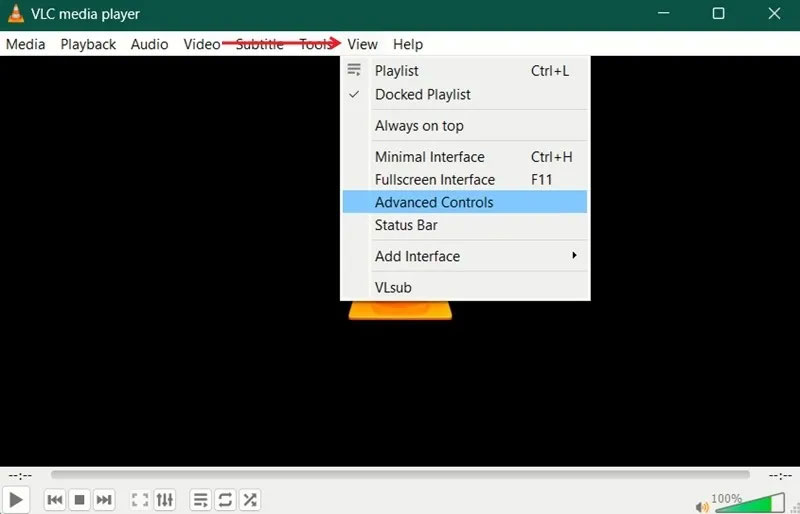
VLC có khả năng ghi tích hợp để bạn tạo clip từ video hiện có. Bước đầu tiên là kích hoạt các tính năng điều khiển ghi.</p>

<p style="text-align: justify;">Trên menu chính phía trên cùng của VLC, nhấp vào <strong>View</strong>. Chọn hộp bên cạnh <strong>Advanced Controls</strong>. Các tính năng điều khiển sẽ xuất hiện ở cuối cửa sổ VLC phía trên những chức năng điều khiển VLC thông thường.</p>

<figure>
<div style="text-align: justify;"><img alt="Kích hoạt Advanced Controls trong VLC." class="lazy loaded lightbox" data-i="0" data-src="https://st.quantrimang.com/photos/image/2024/01/16/tao-anh-gif-tu-video-bang-vlc-va-gimp-1.jpg" data-was-processed="true" height="514" src="https://st.quantrimang.com/photos/image/2024/01/16/tao-anh-gif-tu-video-bang-vlc-va-gimp-1.jpg" style="height: 447px; width: 696px;" width="800" /></div>

<figcaption>
<div style="text-align: justify;">Kích hoạt Advanced Controls trong VLC.</div>
</figcaption>
</figure>

<p style="text-align: justify;">Mở video mà bạn muốn trích xuất clip của mình. Sử dụng thanh trượt để tìm kiếm phần bạn muốn chuyển đổi thành ảnh GIF trong video và xác định điểm bắt đầu của clip. Đặt thanh trượt ngay tại nơi bạn muốn bắt đầu ghi.</p>

<p style="text-align: justify;">Khi bạn đã đến nơi muốn bắt đầu clip, hãy nhấp vào nút vòng tròn màu đỏ ở cuối để bắt đầu quay. Cho phép video phát đến nơi bạn muốn clip của mình kết thúc. Sau đó, nhấn nút ghi lại để dừng.
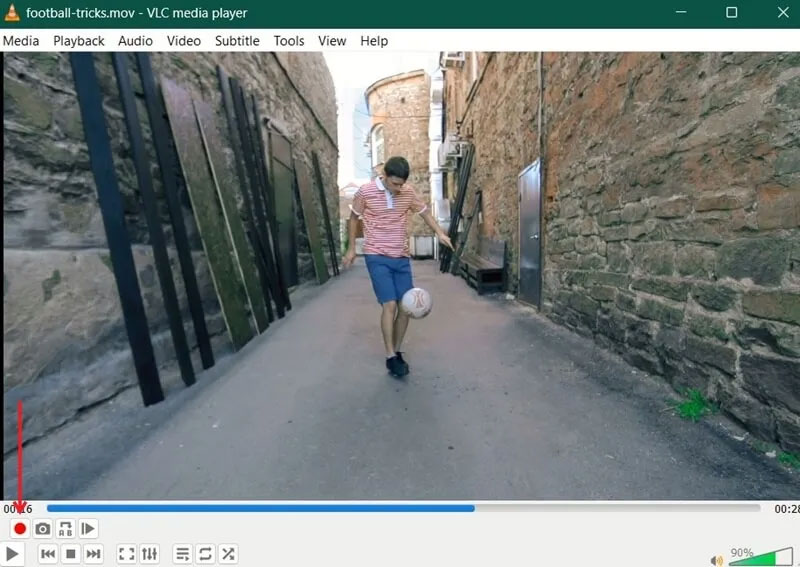
</p>

<figure>
<div class="adbro-animated adbro-md" id="adbro" style="position: relative; display: block; overflow: hidden; width: 696px; height: 493px; top: 0px; margin-bottom: -493px; margin-right: auto; margin-left: auto; z-index: 1; text-align: justify;">&nbsp;</div>

<div style="text-align: justify;"><img alt="Trích xuất một phần clip bằng VLC." class="lazy loaded lightbox" data-adbro-processed="true" data-i="1" data-src="https://st.quantrimang.com/photos/image/2024/01/16/tao-anh-gif-tu-video-bang-vlc-va-gimp-2.jpg" data-was-processed="true" height="567" src="https://st.quantrimang.com/photos/image/2024/01/16/tao-anh-gif-tu-video-bang-vlc-va-gimp-2.jpg" style="height: 493px; width: 696px;" width="800" /></div>

<figcaption>
<div style="text-align: justify;">Trích xuất một phần clip bằng VLC.</div>
</figcaption>
</figure>

<p style="text-align: justify;">Clip của bạn sẽ được đặt tương ứng ở <strong>C:/Users/Username/Videos</strong> hoặc <strong>~/Videos</strong> dành cho Windows và Linux. Đôi khi Linux cũng sẽ đặt nó trong thư mục <strong>/home</strong> của bạn. Video sẽ bắt đầu bằng <strong>vlc-record</strong>, tiếp theo là ngày. Bạn có thể đổi tên clip bất cứ điều gì bạn muốn.</p>

<h2 style="text-align: justify;">2. Tách các khung hình bằng FFMPEG</h2>

<p style="text-align: justify;">GIMP không hoạt động trực tiếp với các file video, vì vậy bạn sẽ cần chuyển clip của mình thành khung hình. Đó là lúc FFMPEG xuất hiện. Công cụ này có thể chuyển đổi tất cả các loại đa phương tiện nhưng sẽ chia clip của bạn thành những khung hình riêng lẻ.</p>

<p style="text-align: justify;">Trước khi tiếp tục, bài viết khuyên bạn nên di chuyển video bạn đã tạo ở bước trước sang thư mục <strong>FFMPEG</strong> trên C:\. Tạo một thư mục con mới có tên là <strong>frame</strong>.</p>

<p style="text-align: justify;"><a data-type="internal" href="https://quantrimang.com/cong-nghe/4-cach-truy-cap-nhanh-toi-mot-terminal-trong-linux-69438" title="5 cách truy cập nhanh tới một Terminal trong Linux">Mở một cửa sổ terminal</a> trong thư mục đó. Trong môi trường desktop Windows và hầu hết Linux, nhấp chuột phải vào cửa sổ để nhận menu cho phép bạn mở cửa sổ terminal. Trên máy Mac, sử dụng tìm kiếm Spotlight để mở cửa sổ terminal.</p>

<p style="text-align: justify;">
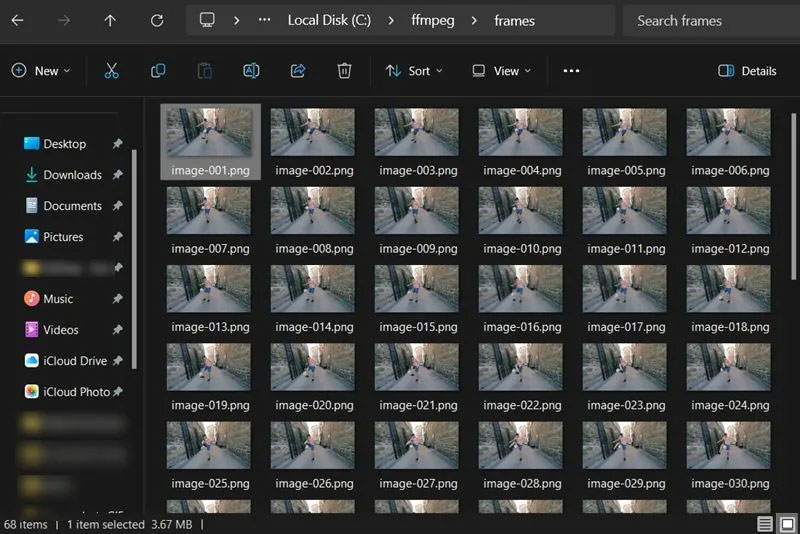
Trong cửa sổ đó, gõ lệnh sau để sử dụng FFMPEG để chia nhỏ clip của bạn. Đảm bảo bạn thay thế <strong>name-of-clip.mp4</strong> bằng tên thực của video cũng như định dạng cụ thể của video. Trong ví dụ này, bài viết đã đổi tên mẫu video clip của mình và nó ở định dạng AVI.</p>

<div class="codebar" style="text-align: justify;"></div>

<pre class="language- language-none prettyprint" id="pre4">
<code>ffmpeg -i name-of-clip.mp4 -r 15 frames/image-%3d.png</code></pre>

<figure>
<div style="text-align: justify;"><img alt="Thực thi lệnh trong PowerShell." class="lazy loaded lightbox" data-i="2" data-src="https://st.quantrimang.com/photos/image/2024/01/16/tao-anh-gif-tu-video-bang-vlc-va-gimp-3.jpg" data-was-processed="true" height="420" src="https://st.quantrimang.com/photos/image/2024/01/16/tao-anh-gif-tu-video-bang-vlc-va-gimp-3.jpg" style="height: 365px; width: 696px;" width="800" /></div>

<figcaption>
<div style="text-align: justify;">Thực thi lệnh trong PowerShell.</div>
</figcaption>
</figure>

<p style="text-align: justify;">
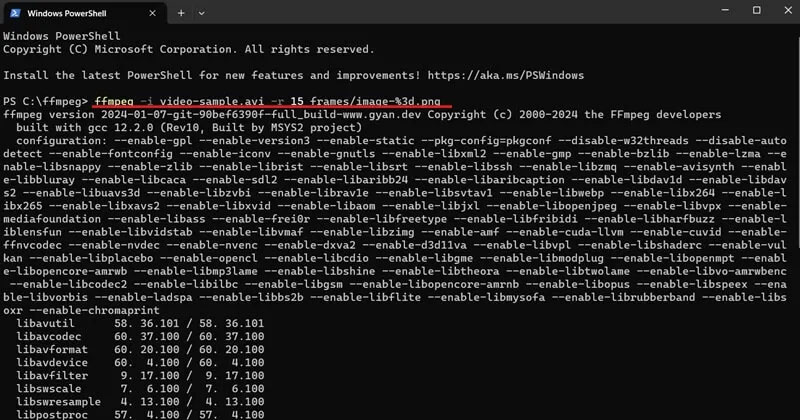
Có thể mất vài phút nhưng FFMPEG sẽ chia file của bạn thành các khung hình với tốc độ 15 khung hình mỗi giây và đặt các hình ảnh thu được vào thư mục <strong>frames</strong> mà bạn đã tạo.</p>

<figure>
<div style="text-align: justify;"><img alt="Chế độ xem thư mục frames trong ổ C:\." class="lazy lightbox loaded" data-i="3" data-src="https://st.quantrimang.com/photos/image/2024/01/16/tao-anh-gif-tu-video-bang-vlc-va-gimp-4.jpg" data-was-processed="true" height="534" src="https://st.quantrimang.com/photos/image/2024/01/16/tao-anh-gif-tu-video-bang-vlc-va-gimp-4.jpg" style="height: 464px; width: 696px;" width="800" /></div>

<figcaption>
<div style="text-align: justify;">Chế độ xem thư mục frames trong ổ C:\.</div>
</figcaption>
</figure>

<h2 style="text-align: justify;">3. Biến clip thành GIF bằng GIMP</h2>

<p style="text-align: justify;">Cuối cùng, bạn đã sẵn sàng mở GIMP và bắt đầu ghép ảnh GIF của mình lại với nhau. Phần này rất đơn giản nhưng bạn có thể thêm vào bao nhiêu tùy thích.</p>

<p style="text-align: justify;">Mở GIMP. Nhấp vào <strong>File -&gt; Open as Layers</strong>.</p>

<p style="text-align: justify;">Duyệt đến thư mục mà bạn đã hướng các khung hình xuất ra từ FFMPEG. Chọn tất cả các khung hình. Bạn có thể sử dụng <strong>Ctrl + click chuột</strong> hoặc <strong>Shift + click chuột </strong>để chọn nhiều hình hơn cùng lúc. Khi bạn có tất cả, hãy xác nhận bằng nút <strong>Open</strong>.</p>

<p style="text-align: justify;">GIMP sẽ tạo một dự án mới và đặt từng khung hình của bạn làm layer riêng. Các layer này sẽ được sử dụng để tạo lại video dưới dạng hoạt ảnh khi bạn xuất nó sang GIF.</p>

<p style="text-align: justify;">Ngoài ra, hãy đảm bảo rằng các layer của bạn theo đúng thứ tự. Nếu không, hãy sử dụng các mũi tên nhỏ ở cuối không gian layer để di chuyển chúng xung quanh.</p>

<h3 style="text-align: justify;">Chỉnh sửa khung hình</h3>

<p style="text-align: justify;">Phần này là hoàn toàn tùy chọn. Nếu bạn chỉ muốn tạo ảnh GIF cho clip mà không cần chỉnh sửa thì bạn không cần phải làm gì ở đây. Phần này chỉ trình bày ngắn gọn những việc cần làm khi bạn muốn thêm nội dung nào đó như văn bản vào hình ảnh của mình.</p>

<p style="text-align: justify;">
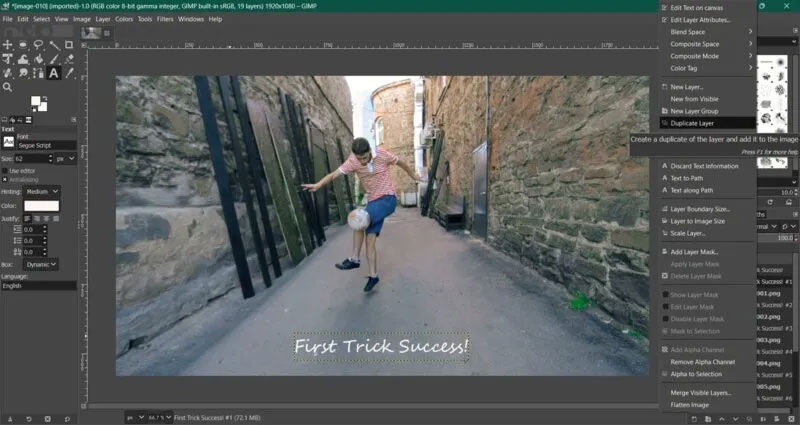
Hãy coi các layer của bạn như những trang trong một cuốn sách lật. Mọi thứ bạn thêm vào sẽ xuất hiện trong khung GIF đó. Để thêm văn bản hoặc nội dung tương tự trên nhiều khung hình, bạn cần sao chép văn bản đó và hợp nhất nó vào từng khung.</p>

<p style="text-align: justify;">Bạn có thể thực hiện việc này bằng cách nhấp chuột phải vào layer văn bản và chọn tùy chọn <strong>Duplicate Layer</strong>. Khi layer văn bản mới xuất hiện, nhấp chuột phải vào nó và chọn <strong>Merge down</strong>. Bạn sẽ cần phải làm điều này cho từng khung hình của mình.</p>

<figure>
<div style="text-align: justify;"><img alt="Nhấp vào tùy chọn Duplicate Layer trong menu ngữ cảnh của layer văn bản." class="lazy loaded lightbox" data-i="4" data-src="https://st.quantrimang.com/photos/image/2024/01/16/tao-anh-gif-tu-video-bang-vlc-va-gimp-5.jpg" data-was-processed="true" height="425" src="https://st.quantrimang.com/photos/image/2024/01/16/tao-anh-gif-tu-video-bang-vlc-va-gimp-5.jpg" style="height: 369px; width: 696px;" width="800" /></div>

<figcaption>
<div style="text-align: justify;">Nhấp vào tùy chọn Duplicate Layer trong menu ngữ cảnh của layer văn bản.</div>
</figcaption>
</figure>

<p style="text-align: justify;">Điều này cũng đúng nếu bạn muốn thêm hoạt ảnh hoặc bất kỳ thứ gì khác. Hãy nhớ rằng GIMP sẽ coi mỗi layer là một khung trong hoạt ảnh, vì vậy mọi thứ bạn thêm vào cần phải được hợp nhất vào một layer hiện có.
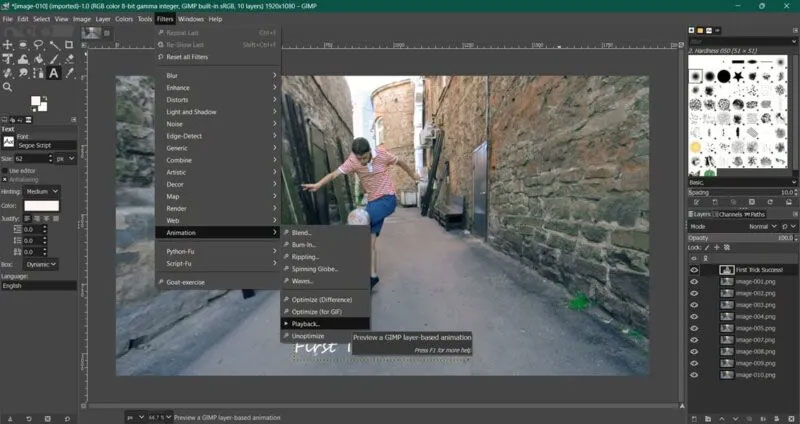
</p>

<h3 style="text-align: justify;">Xem trước GIF</h3>

<p style="text-align: justify;">Khi bạn đã thêm tất cả các yếu tố bổ sung vào GIF, bạn có thể xem trước tác phẩm của mình bằng cách nhấp vào <strong>Filters -&gt; Animation -&gt; Playblack</strong>. Nhấn nút <strong>Play</strong> để xem ảnh GIF của bạn hoạt động.</p>

<figure>
<div style="text-align: justify;"><img alt="Chọn tùy chọn Play cho GIF trong chương trình GIMP." class="lazy lightbox loaded" data-i="5" data-src="https://st.quantrimang.com/photos/image/2024/01/16/tao-anh-gif-tu-video-bang-vlc-va-gimp-6.jpg" data-was-processed="true" height="424" src="https://st.quantrimang.com/photos/image/2024/01/16/tao-anh-gif-tu-video-bang-vlc-va-gimp-6.jpg" style="height: 368px; width: 696px;" width="800" /></div>

<figcaption>
<div style="text-align: justify;">Chọn tùy chọn Play cho GIF trong chương trình GIMP.</div>
</figcaption>
</figure>

<p style="text-align: justify;">
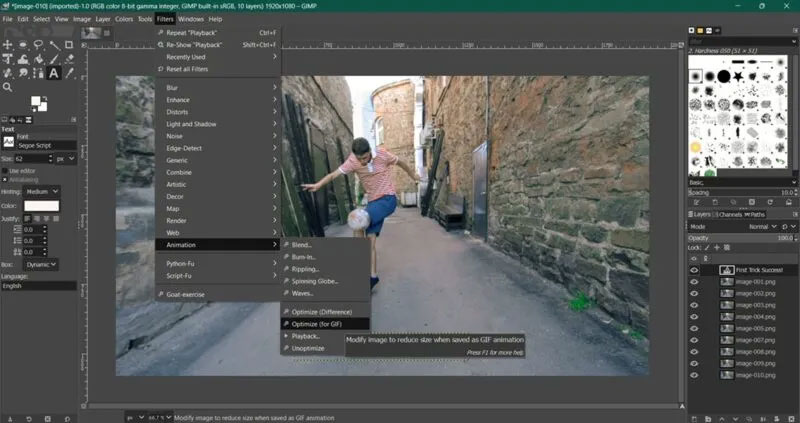
Nếu bạn thích những gì mình thấy, hãy nhấp vào <strong>Filters -&gt; Animation</strong> <strong>-&gt;</strong> <strong>Optimize your GIF</strong>. Đây là một trong những bước cuối cùng trước khi lưu GIF của bạn.</p>

<figure>
<div style="text-align: justify;"><img alt="Tối ưu hóa GIF trong GIMP." class="lazy lightbox loaded" data-i="6" data-src="https://st.quantrimang.com/photos/image/2024/01/16/tao-anh-gif-tu-video-bang-vlc-va-gimp-7.jpg" data-was-processed="true" height="423" src="https://st.quantrimang.com/photos/image/2024/01/16/tao-anh-gif-tu-video-bang-vlc-va-gimp-7.jpg" style="height: 368px; width: 696px;" width="800" /></div>

<figcaption>
<div style="text-align: justify;">Tối ưu hóa GIF trong GIMP.</div>
</figcaption>
</figure>

<h3 style="text-align: justify;">Lưu ảnh GIF</h3>

<p style="text-align: justify;">
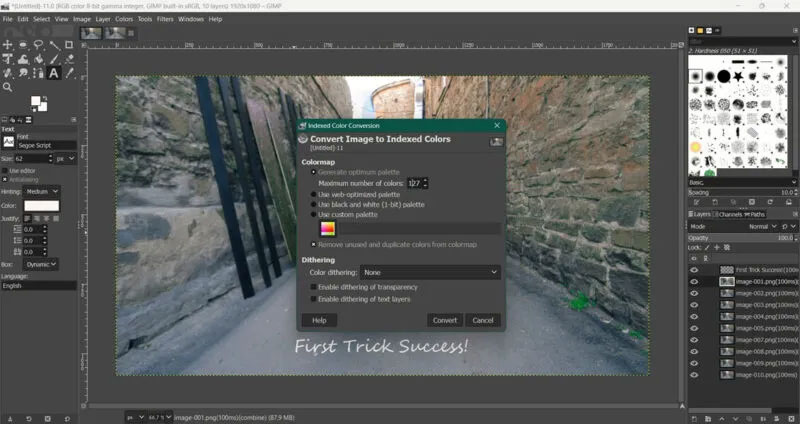
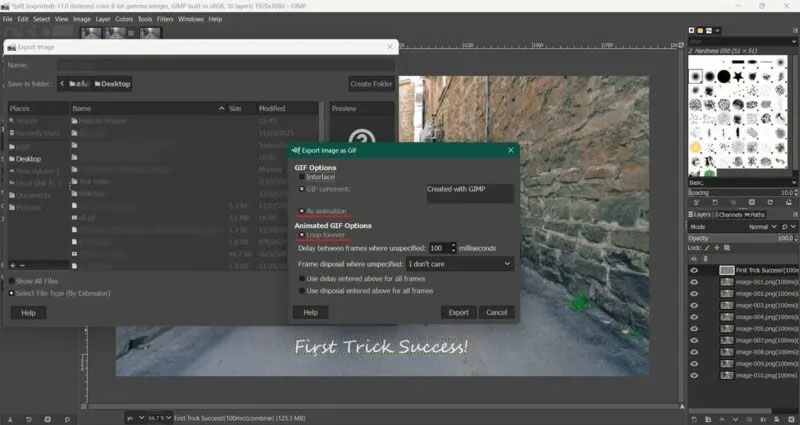
Trước khi có thể xuất GIF của mình, bạn sẽ cần chuyển đổi nó từ <strong>RGB</strong> sang <strong>Indexed</strong>. Nó hoạt động tốt hơn với ảnh GIF và nó sẽ cho phép bạn giảm kích thước file của mình. Vào <strong>Image -&gt; Mode</strong> và chuyển từ <strong>RGB</strong> sang <strong>Indexed.</strong> Đặt bảng màu tối đa thành <strong>127</strong>.</p>

<figure>
<div style="text-align: justify;"><img alt="Chuyển đổi hình ảnh sang Indexed trong GIMP." class="lazy lightbox loaded" data-i="7" data-src="https://st.quantrimang.com/photos/image/2024/01/16/tao-anh-gif-tu-video-bang-vlc-va-gimp-8.jpg" data-was-processed="true" height="424" src="https://st.quantrimang.com/photos/image/2024/01/16/tao-anh-gif-tu-video-bang-vlc-va-gimp-8.jpg" style="height: 368px; width: 696px;" width="800" /></div>

<figcaption>
<div style="text-align: justify;">Chuyển đổi hình ảnh sang Indexed trong GIMP.</div>
</figcaption>
</figure>

<p style="text-align: justify;">Cuối cùng, bạn đã sẵn sàng xuất GIF của mình. Đi tới <strong>File -&gt; Export As</strong> và đặt tên cho tác phẩm của bạn ở trên cùng. Đừng quên thêm phần mở rộng <strong>.GIF</strong> ở cuối. Trong cửa sổ tiếp theo, đánh dấu vào ô bên cạnh <strong>As animation</strong> để tự động chọn tùy chọn <strong>Loop Forever.</strong></p>

<figure>
<div style="text-align: justify;"><img alt="Lưu GIF mới bằng GIMP." class="lazy lightbox loaded" data-i="8" data-src="https://st.quantrimang.com/photos/image/2024/01/16/tao-anh-gif-tu-video-bang-vlc-va-gimp-9.jpg" data-was-processed="true" src="https://st.quantrimang.com/photos/image/2024/01/16/tao-anh-gif-tu-video-bang-vlc-va-gimp-9.jpg" /></div>

<figcaption>
<div style="text-align: justify;">Lưu GIF mới bằng GIMP.</div>
</figcaption>
</figure>

<p style="text-align: justify;">Chúc mừng! Bạn có một ảnh GIF đang hoạt động được tạo trực tiếp từ file video của mình. Tất nhiên, bạn có thể lặp lại quy trình này với hầu hết mọi file video và tạo tất cả các loại ảnh GIF từ mọi nơi.</p>

<p style="text-align: justify;">Nếu bạn muốn tránh cài đặt các chương trình mới trên PC hoặc muốn tạo GIF bằng thiết bị di động của mình, hãy đọc tiếp để tìm hiểu về các phương pháp thay thế để tạo GIF.</p>
		</div>
				<div id="author">
						<p>
				<strong>Nguồn tin:</strong>
				Quantrimang.com
			</p>
		</div>
	</div>
	<div id="footer" class="clearfix">
		<div id="url">
			<strong>URL của bản tin này: </strong><a href="https://www.nguoicodonvn2008.info/vi/news/savefile/kien-thuc-may-tinh/cach-tao-anh-gif-tu-video-bang-vlc-va-gimp-7961.html" title="Cách tạo ảnh GIF từ video bằng VLC và GIMP">https://www.nguoicodonvn2008.info/vi/news/savefile/kien-thuc-may-tinh/cach-tao-anh-gif-tu-video-bang-vlc-va-gimp-7961.html</a>

		</div>
		<div class="clear"></div>
		<div class="copyright">
			&copy; .&#x3A; Nguoicodonvn2008.info - Cõi lòng người cô đơn &#x3A;.
		</div>
		<div id="contact">
			<a href="mailto:admin@nguoicodonvn2008.info">admin@nguoicodonvn2008.info</a>
		</div>
	</div>
</div>
        <div id="timeoutsess" class="chromeframe">
            Bạn đã không sử dụng Site, <a onclick="timeoutsesscancel();" href="https://nguoicodonvn2008.info/#">Bấm vào đây để duy trì trạng thái đăng nhập</a>. Thời gian chờ: <span id="secField"> 60 </span> giây
        </div>
        <div id="openidResult" class="nv-alert" style="display:none"></div>
        <div id="openidBt" data-result="" data-redirect=""></div>
		</script>
		<div class="car-top">
  <span><img src="https://nguoicodonvn2008.info/themes/default/images/car.png" alt=""></span>
</div>
<script src="https://nguoicodonvn2008.info/assets/js/jquery/jquery.min.js"></script>
<script>var nv_base_siteurl="/",nv_lang_data="vi",nv_lang_interface="vi",nv_name_variable="nv",nv_fc_variable="op",nv_lang_variable="language",nv_module_name="news",nv_func_name="savefile",nv_is_user=0, nv_my_ofs=-4,nv_my_abbr="EDT",nv_cookie_prefix="nv4c_e856T",nv_check_pass_mstime=1738000,nv_area_admin=0,nv_safemode=0,theme_responsive=0,nv_recaptcha_ver=2,nv_recaptcha_sitekey="",nv_recaptcha_type="image",XSSsanitize=1;</script>
<script src="https://nguoicodonvn2008.info/assets/js/language/vi.js"></script>
<script src="https://nguoicodonvn2008.info/assets/js/DOMPurify/purify3.js"></script>
<script src="https://nguoicodonvn2008.info/assets/js/global.js"></script>
<script src="https://nguoicodonvn2008.info/assets/js/site.js"></script>
<script src="https://nguoicodonvn2008.info/themes/default/js/news.js"></script>
<script src="https://nguoicodonvn2008.info/themes/default/js/main.js"></script>
<script src="https://nguoicodonvn2008.info/themes/default/js/custom.js"></script>
<script type="application/ld+json">
        {
            "@context": "https://schema.org",
            "@type": "Organization",
            "url": "https://nguoicodonvn2008.info",
            "logo": "https://nguoicodonvn2008.info/uploads/angel.gif"
        }
        </script>
<script src="https://nguoicodonvn2008.info/themes/default/js/bootstrap.min.js"></script>
<script type="text/javascript">
var $scrolltop = $('.car-top');
$scrolltop.on('click', function () {
    $('html,body').animate({
        scrollTop: 0
    }, 800);
    $(this).addClass("car-run");
    setTimeout(function(){ $scrolltop.removeClass('car-run');}, 1000);
    return false;
});
$(window).on('scroll', function ()
{ 
    if($(window).scrollTop() >= 200)
    {
        $scrolltop.addClass("show");
        $scrolltop.addClass("car-down");
    }
    else
    {
       $scrolltop.removeClass("show");
       setTimeout(function(){ $scrolltop.removeClass('car-down');}, 300);
    }
});
</script>
</body>
</html>