Cách sửa lỗi "We Couldn't Create a New Partition" trong Windows 10
- Thứ bảy - 13/07/2024 03:04
- In ra
- Đóng cửa sổ này
Microsoft Windows khá dễ cài đặt, ngay cả khi bạn là người dùng mới làm quen. Tuy nhiên, điều này không có nghĩa là sẽ không xảy ra lỗi trong quá trình này.
Trong Windows 10, một trong những trở ngại cài đặt phổ biến nhất là lỗi "We couldn't create a new partition". Có nhiều lý do khiến lỗi này xuất hiện. Tuy nhiên, bạn có thể dễ dàng khắc phục nó bằng cách sử dụng các phương pháp sau.
Ngắt kết nối tất cả các thiết bị lưu trữ bên ngoài và bên trong khác
Một trong những lý do phổ biến nhất đằng sau lỗi phân vùng là do nhiễu từ các thiết bị ngoại vi được kết nối khác. Vì vậy, bước đầu tiên bạn nên làm khi chẩn đoán lỗi là loại bỏ tất cả các thiết bị lưu trữ bên ngoài và bên trong, ngoại trừ ổ cứng chính (HDD) và USB bạn đang sử dụng để cài đặt Windows.
Điều này bao gồm ổ cứng ngoài, ổ SSD, USB và thẻ SD. Để tránh nhầm lẫn, hãy tháo mọi thiết bị USB WiFi và Bluetooth adaptor bên ngoài.
Nếu việc tháo ổ cứng bên trong quá phức tạp, bạn có thể vô hiệu hóa chúng bằng cách sử dụng BIOS. Mặc dù các bước sẽ khác nhau tùy theo từng nhà sản xuất bo mạch, nhưng quy trình sẽ tương tự như sau:
Bước 1: Nhấn F2 hoặc DEL ngay lúc bạn nhìn thấy logo của nhà sản xuất khi bật nguồn máy tính. Các phím chính xác sẽ khác nhau tùy theo từng nhà sản xuất.
Bước 2: Khi bạn đã vào trong BIOS, hãy tìm menu liệt kê tất cả các thiết bị được kết nối với máy tính.
Bước 3: Tắt tất cả các thiết bị lưu trữ ngoại trừ thiết bị mà bạn sẽ cài đặt Windows.
Bước 4: Khởi động lại máy tính.
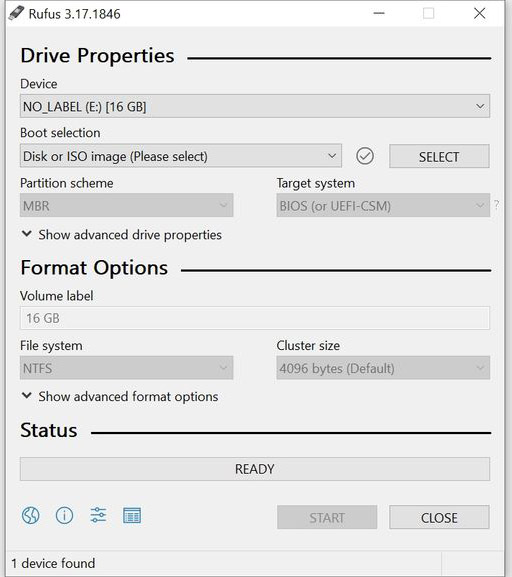
Cách sử dụng phần mềm của bên thứ ba để tạo thiết bị boot Windows
Đôi khi, lỗi "We Couldn't Create a New Partition" có thể do thiết bị boot Windows được tạo không đúng cách. Đây thường là lỗi của công cụ Windows Media Creation. Để loại bỏ khả năng này, hãy tạo thiết bị có khả năng boot bằng phần mềm của bên thứ ba. Có rất nhiều chương trình để tạo USB boot Windows từ ISO.
Cách đặt ổ cứng làm thiết bị boot đầu tiên
Thông thường, khi cài đặt Windows, USB hoặc CD sẽ là thiết bị boot đầu tiên. Nhưng có những trường hợp làm điều này có thể dẫn đến việc Windows nhầm USB hoặc CD với ổ cứng, dẫn đến lỗi "We Couldn't Create a New Partition".
May mắn thay, điều này có thể dễ dàng giải quyết bằng cách chọn ổ cứng làm thiết bị boot đầu tiên:
Bước 1: Ngắt kết nối USB hoặc CD chứa Windows khỏi máy tính.
Bước 2: Vào BIOS của bo mạch chủ.
Bước 3: Bây giờ, hãy tìm menu boot trong BIOS. Bạn có thể tham khảo sách hướng dẫn sử dụng bo mạch chủ để tìm kiếm dễ dàng.
Bước 4: Trong menu liệt kê các thiết bị boot, hãy đảm bảo rằng ổ cứng ở trên cùng, tức đây là thiết bị boot đầu tiên.
Bước 5: Sau khi thực hiện việc này, hãy kết nối USB hoặc CD Windows và khởi động lại máy tính.
Bước 6: Ngay sau khi máy tính của bạn khởi động lại, hãy nhấn F8, F10, F11 hoặc F12 để vào menu boot. Tùy thuộc vào bo mạch chủ, nó có thể là bất kỳ phím nào đã nói ở trên. Hãy tham khảo sách hướng dẫn.
Bước 7: Chọn USB hoặc CD làm thiết bị boot từ menu này.
Bước 8: Tiến hành cài đặt Windows.
Sử dụng Diskpart để tạo phân vùng mới
Tiện ích Diskpart có thể được sử dụng để tạo phân vùng mới trong khi cài đặt Windows. Nó được chạy bằng Command Prompt trong quá trình cài đặt Windows.
Hãy nhớ sao lưu dữ liệu trước khi thực hiện các bước sau, vì chúng sẽ xóa sạch hoàn toàn ổ cứng.
Đây là cách bạn có thể sử dụng Diskpart để tạo một phân vùng mới:
Bước 1: Ngay sau khi bạn gặp lỗi "We couldn't create a new partition", hãy đóng trình hướng dẫn thiết lập. Sau đó nhấp vào tùy chọn Repair.
Bước 2: Bây giờ, hãy chuyển đến Advanced Tools và sau đó nhấp vào Command Prompt.
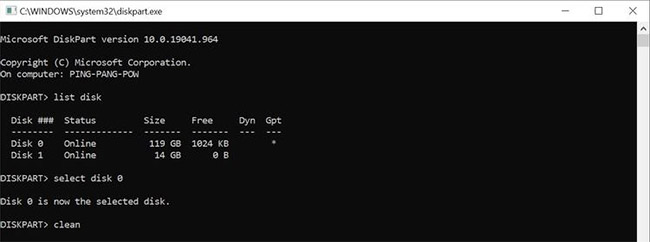
Bước 3: Trong bảng điều khiển Command Prompt, nhập start diskpart và nhấn Enter.
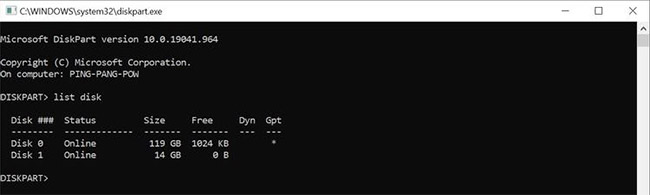
Bước 4: Sau đó, gõ list disk và nhấn Enter. Thao tác này sẽ hiển thị danh sách các ổ cứng (HDD) được kết nối với máy tính của bạn.
Bước 5: Tìm số có liên quan bên cạnh ổ cứng bạn muốn phân vùng. Gõ select disk x (ở đây, thay x bằng số ổ cứng của bạn).
Bước 6: Bây giờ, bạn sẽ phải nhập một chuỗi lệnh được liệt kê bên dưới.
- clean
- create partition primary
- active
- format fs=ntfs quick
- assign
Bước 7: Sau khi quá trình hoàn tất, hãy đóng Command Prompt. Bạn có thể gõ exit trong bảng điều khiển để làm như vậy.
Bước 8: Khởi động lại quá trình cài đặt Windows.
Cách chuyển đổi phân vùng Windows sang định dạng GPT
Phân vùng GPT có ít hạn chế hơn so với định dạng MBR mặc định. Vì vậy, rất đáng để chuyển đổi phân vùng sang định dạng GPT và sau đó cài đặt Windows. Ở đây, bạn cũng sẽ phải sử dụng tiện ích Diskpart. Lưu ý duy nhất là việc chuyển đổi định dạng phân vùng từ MBR sang GPT sẽ xóa tất cả các file, vì vậy hãy đảm bảo bạn sao lưu tất cả dữ liệu quan trọng trước khi tiếp tục.
Đây là cách bạn có thể chuyển đổi phân vùng Windows của mình sang định dạng GPT:
Bước 1: Làm theo các bước 1 và 2 từ phần trên để mở Command Prompt.
Bước 2: Nhập start diskpart trong bảng điều khiển Command Prompt và nhấn Enter.
Bước 3: Sau đó, gõ list disk và nhấn Enter.
Bước 4: Bây giờ, hãy nhập select disk x, trong đó x tương ứng với số bên cạnh danh sách ổ cứng.
Bước 5: Bạn sẽ phải xóa hoàn toàn ổ cứng trước khi tiếp tục. Để làm như vậy, hãy nhập clean và nhấn Enter.
Bước 6: Cuối cùng, gõ convert gpt và nhấn Enter.
Bước 7: Chờ quá trình hoàn tất, sau đó thử cài đặt lại Windows.
Sử dụng các phương pháp được liệt kê ở trên, bạn có thể dễ dàng sửa lỗi "We Couldn't Create a New Partition" và cài đặt Windows một cách suôn sẻ. Tuy nhiên, bạn cũng có thể gặp phải các lỗi cài đặt Windows phổ biến khác. Vì vậy, tốt nhất là nên nắm được các bước bạn có thể thực hiện để giải quyết chúng.
