Cách sửa lỗi "The User Profile Service failed the logon" trên Windows 10
- Thứ năm - 22/02/2024 22:40
- In ra
- Đóng cửa sổ này
Hầu hết các lỗi Windows xảy ra sau khi bạn đăng nhập vào máy tính. Tuy nhiên, lỗi "User Profile Service Failed the Logon" hoàn toàn không cho phép bạn đăng nhập, đó là lý do tại sao việc giải quyết lỗi này khó hơn các lỗi khác của Windows.
Lỗi "User Profile Service Failed the Logon" xảy ra do file NTUSER.DAT bị hỏng, mục registry hoặc file hệ thống lõi bị hỏng hoặc User Profile Service bị cấu hình không đúng. Tuy nhiên, bạn có thể sử dụng các bước sau để chẩn đoán và khắc phục sự cố một cách hiệu quả.
Kích hoạt tài khoản admin tích hợp bằng Windows Recovery Environment
Điều đầu tiên bạn nên làm là kích hoạt tài khoản admin tích hợp nếu bạn không thể đăng nhập bằng tài khoản của mình. Tất cả các bản sửa lỗi khác sẽ không thể thực hiện được nếu không có tài khoản ẩn này.
Có nhiều cách để kích hoạt tài khoản admin tích hợp trong Windows, nhưng các phương pháp truyền thống sẽ không hoạt động ở đây. Vì vậy, chúng ta sẽ sử dụng Windows Recovery Environment (WinRE) để mở một phiên bản của Command Prompt và sửa đổi registry để kích hoạt tài khoản.
Cảnh báo: Trước khi tiếp tục các bước được đề cập bên dưới, hãy sao lưu thủ công registry hệ thống lên USB bằng tùy chọn Export trong Registry Editor, nếu có thể.
Thực hiện theo các bước sau để kích hoạt tài khoản admin:
1. Bấm vào biểu tượng Nguồn.
2. Giữ phím Shift và nhấp vào tùy chọn Restart.
3. Sau khi PC của bạn khởi động lại, hãy nhấp vào Continue.
4. Chọn Troubleshoot.
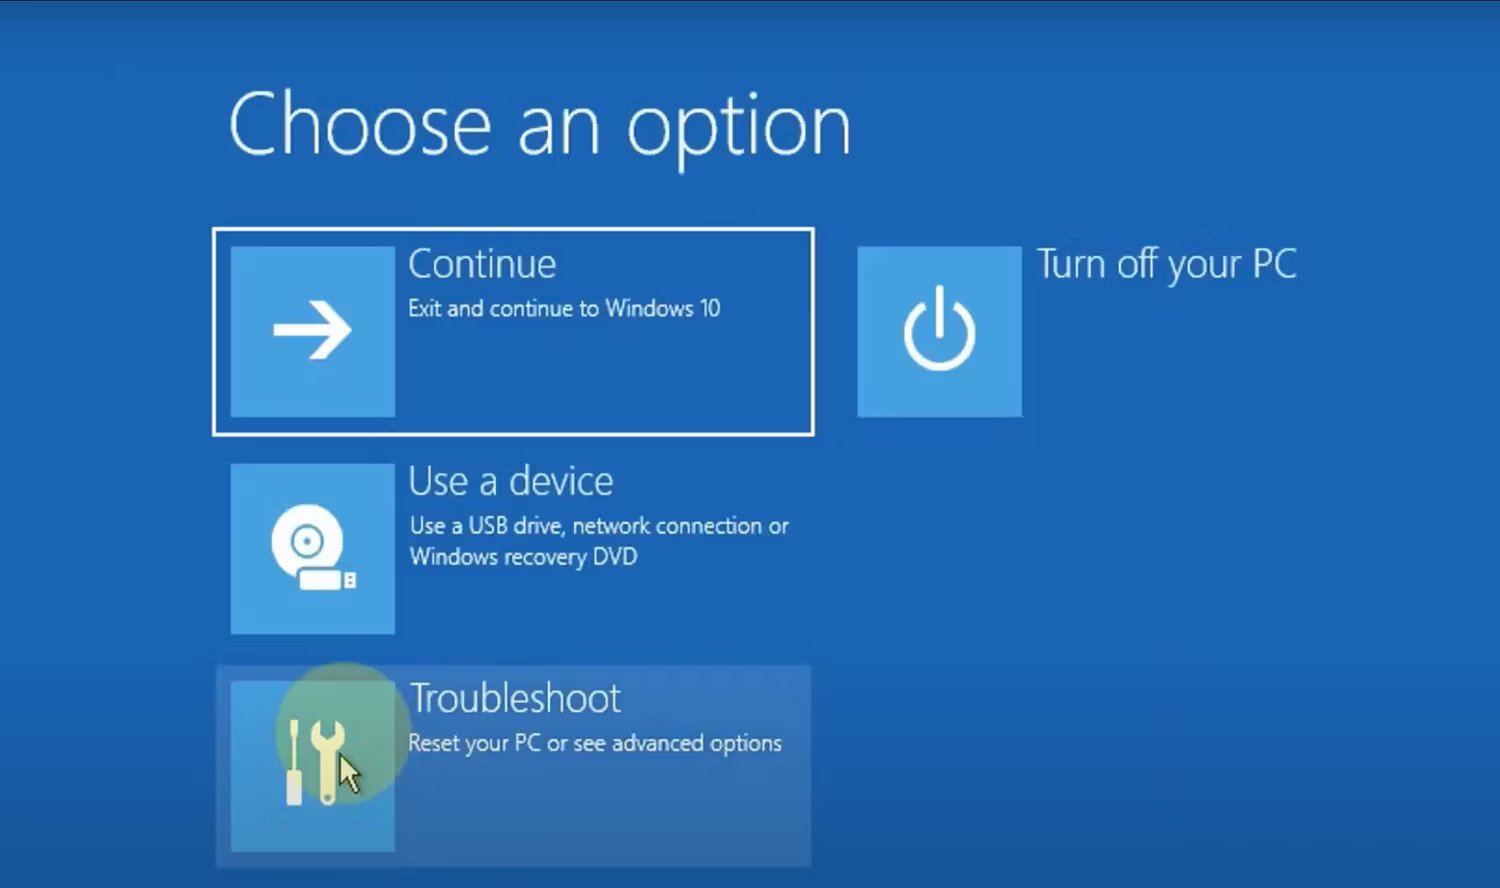
5. Nhấp vào Advanced Options > Command Prompt.
6. Gõ regedit vào cửa sổ Command Prompt và nhấn Enter.
7. Bấm vào key HKEY_LOCAL_MACHINE ở bên trái.
8. Bấm vào File > Load Hive.
9. Chọn tùy chọn This PC.
10. Bấm vào Windows > System 32 > config.
11. Tìm file SAM và nhấp đúp vào nó.
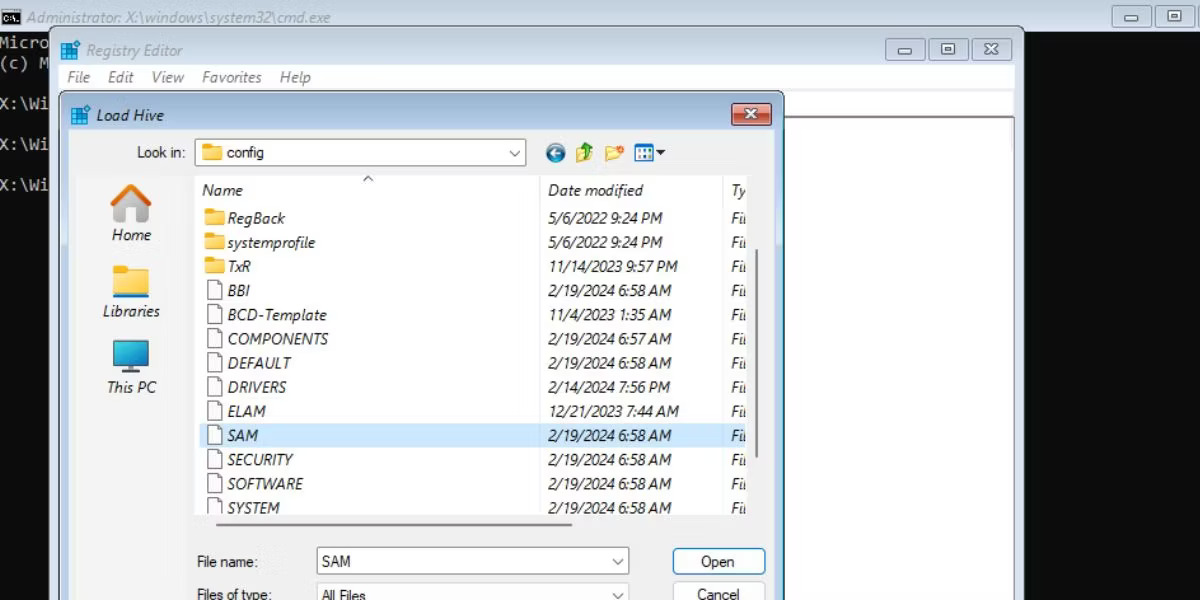
12. Đặt tên cho key là REM_SAM và nhấp vào OK.
13. Điều hướng đến registry key sau:
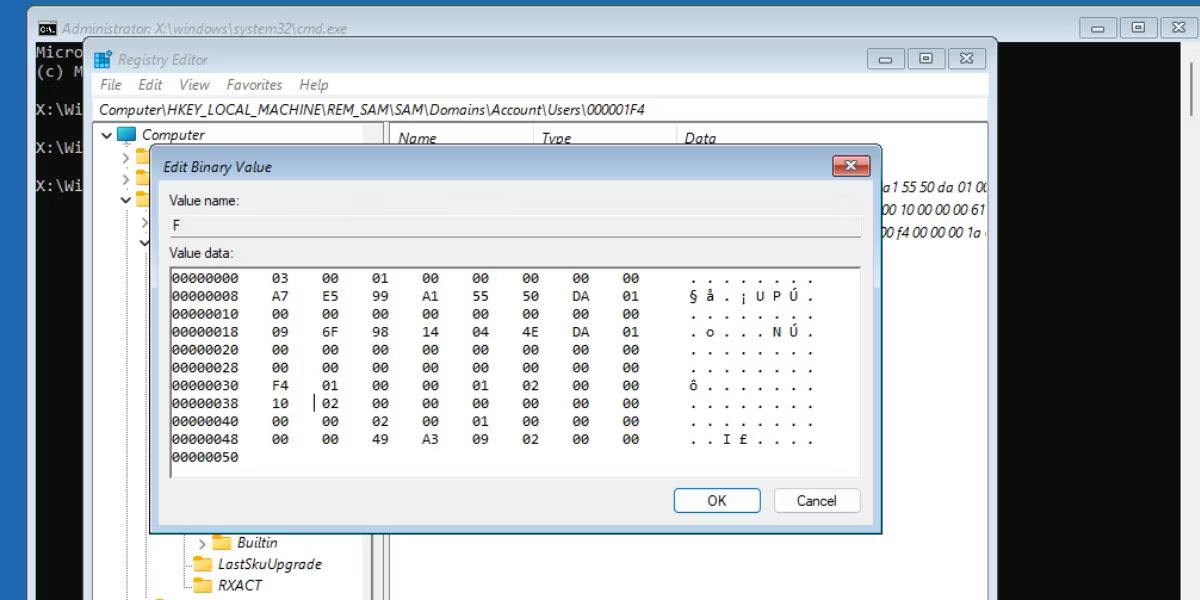
HKEY_LOCAL_MACHINE\REM_SAM\SAM\Domains\Account\Users\000001F4
14. Nhấp đúp vào giá trị nhị phân F.
15. Đi đến mục 00000038 ở hàng đầu tiên.
16. Sửa đổi giá trị 11 ở cột thứ hai của hàng 00000038 thành 10.
17. Bấm vào OK.
18. Thoát khỏi cửa sổ chỉnh sửa registry.
19. Đóng Command Prompt.
20. Nhấp vào Continue để khởi động vào màn hình khóa. Bạn sẽ thấy một tài khoản admin bổ sung trên màn hình khóa.
Khởi động vào Safe Mode
Sau khi kích hoạt tài khoản admin tích hợp, điều đầu tiên bạn nên làm là khởi động Windows vào Safe Mode. Về cơ bản, Safe Mode khởi động Windows với các tính năng và chương trình tối thiểu cần thiết để hoạt động.
Thay thế file NTUSER.DAT
File NTUSER.DAT lưu trữ dữ liệu về tài khoản người dùng và nếu nó bị hỏng, bạn phải thay thế file này. Đăng nhập vào tài khoản admin mà bạn đã kích hoạt trước đó. Sau đó lặp lại các bước sau:
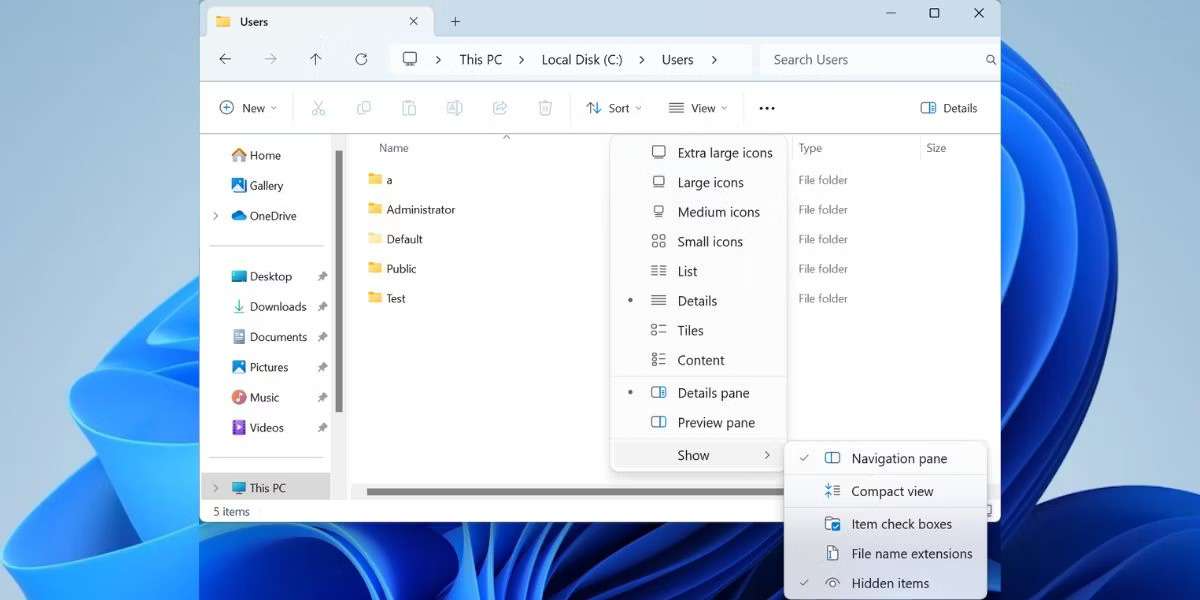
1. Nhấn Win + E để mở File Explorer.
2. Nhấp vào View > Show > Hidden items.
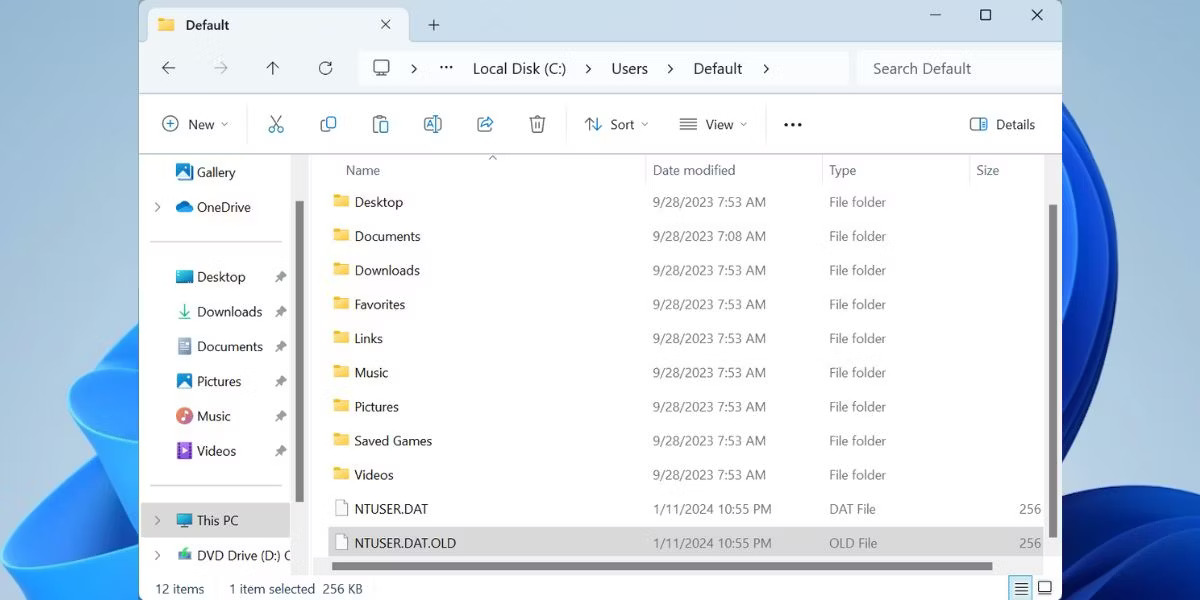
3. Mở thư mục Default. Nhấp vào file NTUSER.DAT và đổi tên thành “NTUSER.DAT.OLD”.
4. Nhấn Backspace. Chuyển đến thư mục Administrator và sao chép file NTUSER.DAT.
5. Truy cập lại thư mục Default và dán file đã sao chép vào đó.
6. Khởi động lại PC của bạn để áp dụng các thay đổi.
Sử dụng SFC để quét các file bị hỏng
Nguyên nhân rất có thể gây ra lỗi "User Profile Service Failed the Logon" là do file người dùng bị hỏng. Điều này có thể xảy ra do nhiều lý do khác nhau, từ việc quét phần mềm diệt virus khi khởi động cho đến việc mất điện đột ngột khi bật nguồn máy tính.
May mắn thay, Windows có một số tiện ích tích hợp sẵn có thể giúp bạn tự động tìm và sửa các file Windows bị hỏng. Một tiện ích như vậy được gọi là System File Checker (SFC) và nó được thực thi bằng Command Prompt.
Khôi phục máy tính về trạng thái trước đó
Windows có một tính năng hữu ích được gọi là System Restore cho phép bạn khôi phục các thay đổi đối với máy tính của mình và khôi phục nó về thời điểm trước đó.
Trước khi tiếp tục, bạn nên biết rằng tính năng này không được bật theo mặc định và bạn phải tạo điểm khôi phục theo cách thủ công trừ khi bạn cấu hình Windows để tạo điểm khôi phục hàng ngày.
Nếu bạn nhớ đã tạo điểm khôi phục trước khi lỗi xuất hiện, hãy làm theo các bước sau:
- Nhấn phím Windows + R để khởi chạy hộp thoại Run.
- Trong hộp Run, gõ rstrui.exe và nhấn Enter.
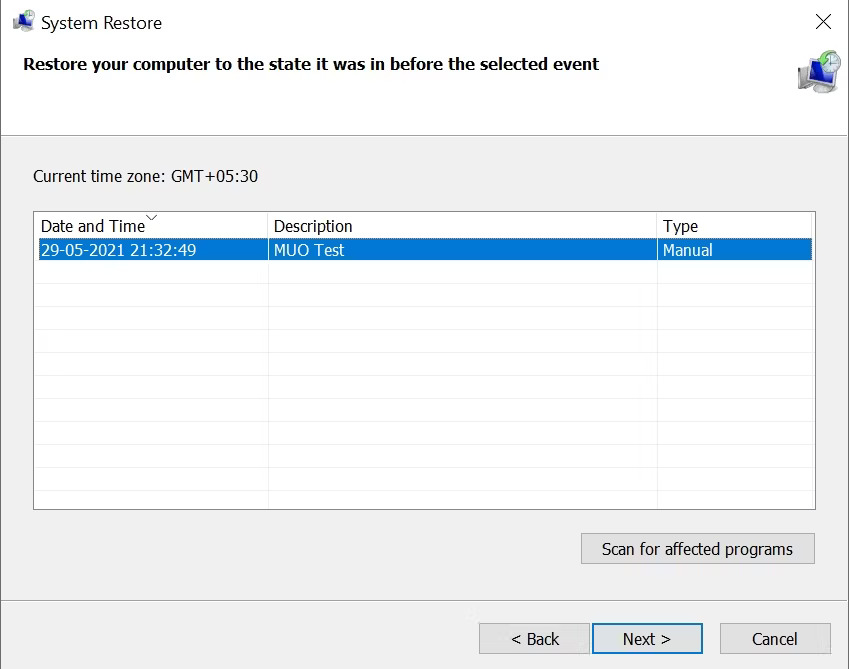
- Trên hộp thoại System Restore, nhấp vào Next.
- Chọn một điểm khôi phục từ danh sách.
- Trên cửa sổ tiếp theo, kiểm tra kỹ mọi thứ và nhấp vào Finish.
- Windows sẽ tự khôi phục về trạng thái trước đó và bây giờ bạn có thể đăng nhập mà không gặp bất kỳ rắc rối nào.
Bạn nên sao lưu mọi dữ liệu hoặc ứng dụng quan trọng mà họ có thể đã cài đặt sau khi tạo điểm khôi phục.
Thay đổi cấu hình registry
Một cách khác để khắc phục lỗi "User Profile Service Failed the Logon" là thực hiện một số thay đổi đối với registry. Đây là phương pháp khắc phục sự cố nâng cao và bạn nên tạo điểm khôi phục hệ thống trước khi tiếp tục.
Hãy thực hiện như sau để cấu hình registry đúng cách:
1. Khởi động vào Safe Mode bằng các bước trong phần đầu tiên của bài viết này.
2. Nhấn phím Windows + R để mở lời nhắc Run. Gõ regedit và nhấn Enter.
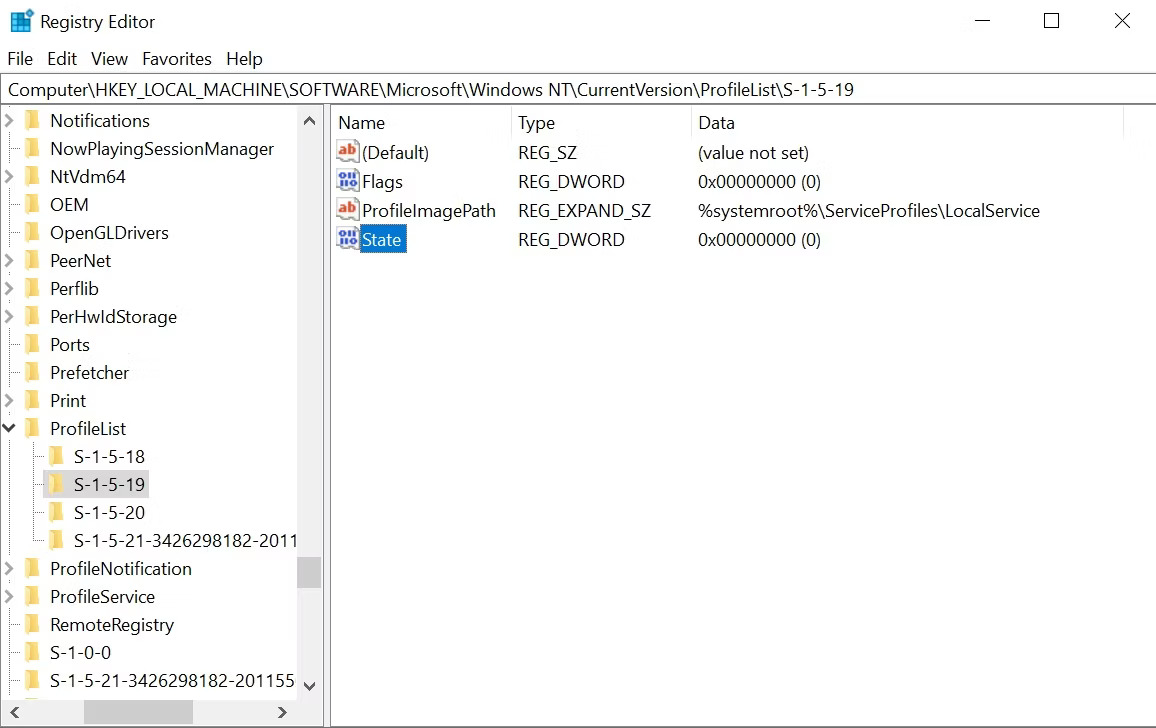
3. Trong Registry Editor, sử dụng thanh điều hướng ở bên trái, đi tới:
HKEY_LOCAL_MACHINE\Software\Microsoft\Windows NT\Current Version\Profile List
4. Tại đây, bạn sẽ thấy hai file có cùng tên, nhưng một file sẽ có phần mở rộng .bak.
5. Nhấp chuột phải vào file có phần mở rộng .bak và chọn Rename. Xóa phần mở rộng .bak nhưng không chạm vào tên file và nhấn Enter.
6. Bây giờ, nhấp chuột phải vào file ban đầu không có phần mở rộng .bak và thêm .bak vào cuối file.
7. Trong thư mục chứa file đã được đổi tên từ bước 5, nhấp chuột phải vào State, sau đó chọn Modify.
8. Thay đổi giá trị trong Value data từ 8000 thành 0 (không).
9. Sau đó, nhấp chuột phải vào mục RefCount và thay đổi giá trị trong Value data thành 0 (không).
10. Xác nhận các thay đổi và đóng Registry Editor.
11. Khởi động lại máy tính của bạn và đăng nhập.
Điều gì sẽ xảy ra nếu bạn không tìm thấy file .bak trong Registry Editor?
Điều này khó xảy ra nhưng máy tính của bạn có thể chưa tạo file có phần mở rộng .bak. Trong trường hợp này, hãy mở Windows Explorer và truy cập:
C:\Users\Default\AppData\Local\Application Data
Nếu bạn tìm thấy một thư mục khác có tên Application Data trong thư mục bạn đang sử dụng, hãy xóa nó và khởi động lại máy tính của bạn. Nó sẽ khắc phục vấn đề.
Kích hoạt User Profile Service
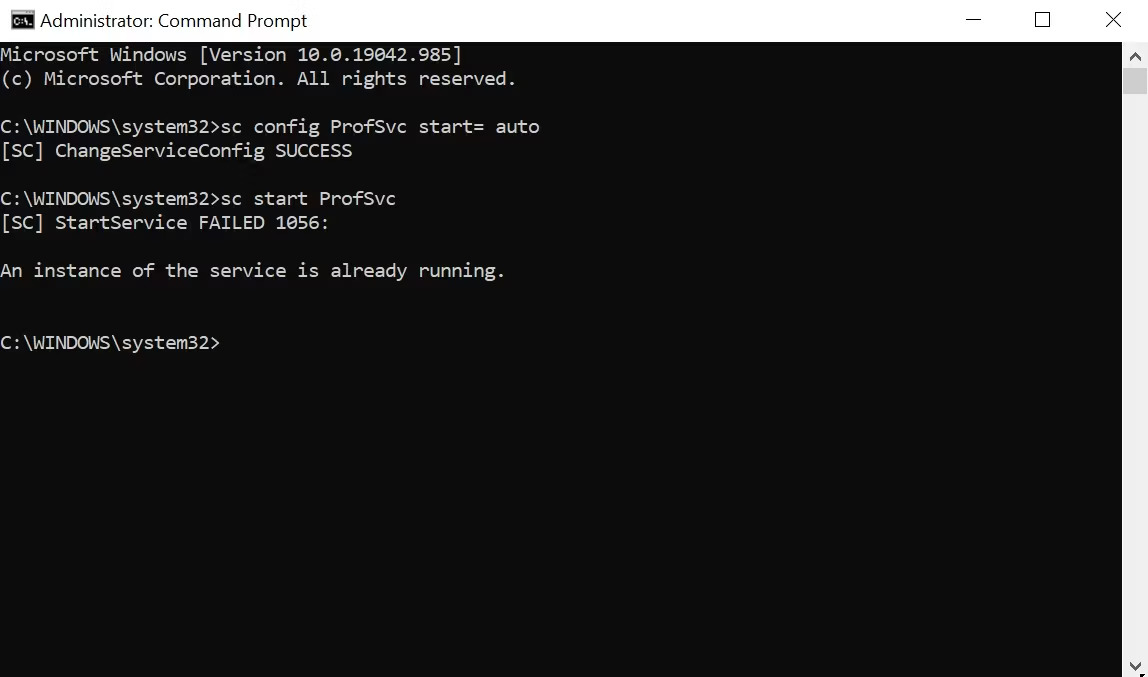
Trong một số trường hợp nhất định, User Profile Service có thể bị vô hiệu hóa. Thông thường, ứng dụng của bên thứ ba là thủ phạm. May mắn thay, bạn có thể kích hoạt nó bằng cách chạy một lệnh đơn giản trong cửa sổ Command Prompt:
- Khởi động máy tính của bạn vào Safe Mode.
- Trong thanh tìm kiếm menu Start, nhập cmd. Từ kết quả tìm kiếm, nhấp chuột phải vào Command Prompt > Run as administrator.
- Trong cửa sổ Command Prompt, gõ sc config ProfSvc start= auto và nhấn Enter.
- Sau đó, gõ sc start ProfSvc và nhấn Enter.
- Đóng Command Prompt và khởi động lại máy tính của bạn.
Một số phương pháp này cũng hữu ích trong việc chẩn đoán nhiều lỗi phổ biến khác của Windows. Vì vậy, sẽ rất hữu ích nếu bạn ghi nhớ chúng khi gặp các sự cố khác trên máy tính của mình.
Chúc các bạn thành công!
