Cách sửa lỗi "Shell Infrastructure Host Has Stopped Working" trong Windows
- Thứ hai - 01/11/2021 00:45
- In ra
- Đóng cửa sổ này
Thiết bị Windows của bạn có hiển thị lỗi “Shell Infrastructure Host has stopped working” không? Trong hầu hết các trường hợp, sự cố này xảy ra khi chạy ứng dụng trên tài khoản khách Windows. Nhưng tại sao bạn lại gặp phải lỗi này và làm thế nào để giải quyết nó? Cùng Quantrimang.com tìm câu trả lời qua bài viết sau đây nhé!
1. Đăng nhập vào Windows với quyền admin

Đối với hầu hết người dùng, lỗi này thường xuất hiện khi sử dụng tài khoản khách. Vì vậy, một cách khắc phục nhanh chóng là thử và đăng nhập vào hệ thống với tư cách là admin.
Nếu bạn đã đăng nhập vào tài khoản khách, đây là cách bạn có thể chuyển sang tài khoản admin:
Bước 1: Nhấn Ctrl + Alt + Delete để mở cửa sổ Security Options.
Bước 2: Chọn Switch User và sau đó làm theo hướng dẫn trên màn hình để đăng nhập vào tài khoản Administrator.
Nếu đang sử dụng PC của người khác, bạn có thể yêu cầu họ cấp cho bạn quyền truy cập admin.
2. Tạo tài khoản khách mới
Bạn không muốn đăng nhập vào hệ thống với tư cách là admin? Nếu vậy, bạn có thể tạo một tài khoản khách mới. Và nếu bạn quyết định xóa tài khoản khách có vấn đề, trước tiên hãy đảm bảo sao chép hoặc sao lưu các file quan trọng.
Nếu không, đây là cách bạn có thể tạo tài khoản khách mới trên Windows:
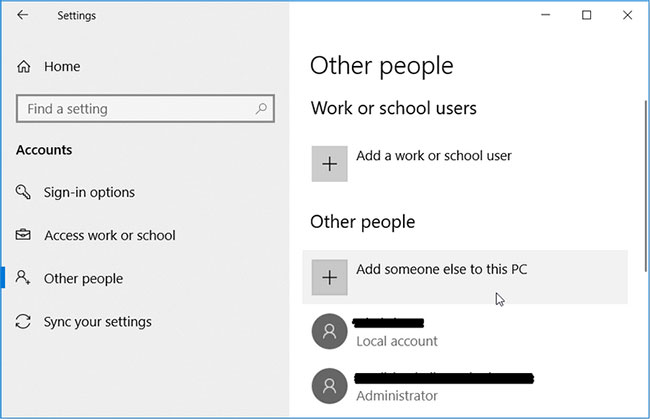
Bước 1: Điều hướng đến menu Start > PC Settings > Accounts.
Bước 2: Nhấp vào Other people ở bên trái.
Bước 3: Tiếp theo, nhấp vào Add someone else to this PC ở bên phải.
Trong cửa sổ tiếp theo, nhấp vào I don’t have this person’s sign-in information. Tiếp theo, hãy làm theo các bước sau để hoàn tất việc thiết lập tài khoản:
Bước 1: Nhấp vào Get a new email address và nhập thông tin chi tiết.
Bước 2: Tạo mật khẩu, điền ngày tháng năm sinh của bạn và chọn quốc gia cư trú.
Bước 3: Nhấp vào Next khi bạn hoàn tất và làm theo hướng dẫn trên màn hình để hoàn tất quá trình.
3. Cài đặt lại hoặc sửa chữa các chương trình Microsoft Visual C++
PC phụ thuộc vào gói thư viện runtime Microsoft Visual C++ để hoạt động bình thường. Khi các gói này bị thiếu hoặc bị hỏng, bạn có thể gặp phải nhiều vấn đề khác nhau liên quan đến hệ thống. Trong trường hợp này, sửa chữa hoặc cài đặt lại các chương trình Microsoft Visual C++ có thể giải quyết sự cố này.
Hãy xem cách bạn có thể sửa chữa các chương trình Microsoft Visual C++:
Bước 1: Nhấn Win + R để mở hộp thoại Run.
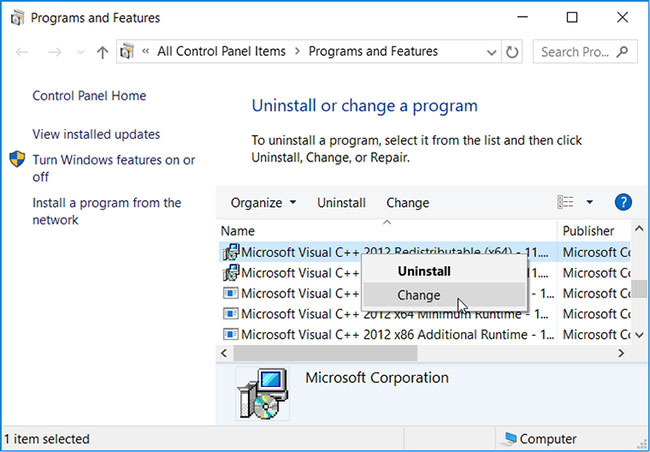
Bước 2: Nhập appwiz.cpl và nhấn Enter để mở cửa sổ Programs and Features.
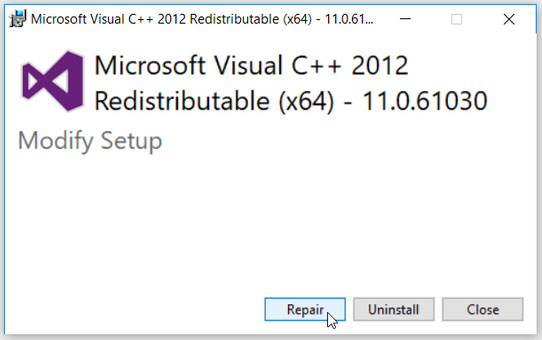
Bước 3: Bấm chuột phải vào từng chương trình Microsoft Visual C++ rồi chọn Change.
Trong cửa sổ tiếp theo, nhấp vào nút Repair. Từ đó, hãy làm theo hướng dẫn trên màn hình và khởi động lại PC khi bạn hoàn tất.
Nếu sự cố vẫn tiếp diễn, hãy cài đặt lại chương trình Microsoft Visual C++ bằng cách làm theo các bước sau:
Bước 1: Mở cửa sổ Programs and Features theo các bước trước đó.
Bước 2: Nhấp chuột phải vào từng chương trình Microsoft Visual C++ và nhấn vào nút Uninstall.
Bước 3: Khi bạn hoàn tất, hãy cài đặt lại các chương trình Microsoft Visual C++.
Làm theo hướng dẫn trên màn hình để hoàn tất quá trình.
4. Cấu hình cài đặt khởi động cho PC
Lỗi Shell Infrastructure có thể xuất hiện tùy thuộc vào cách bạn đã cấu hình cài đặt khởi động của PC. Trong trường hợp này, hãy xem xét cài đặt Normal Startup và Selective Startup có thể giúp ích như thế nào.
Trước tiên, hãy cấu hình cài đặt Normal Startup. Thao tác này sẽ load tất cả các driver và service của thiết bị bất cứ khi nào bạn khởi động lại PC.
Bây giờ, đây là cách bạn có thể cấu hình cài đặt Normal Startup:
Bước 1: Nhấn Win + R để mở hộp thoại Run.
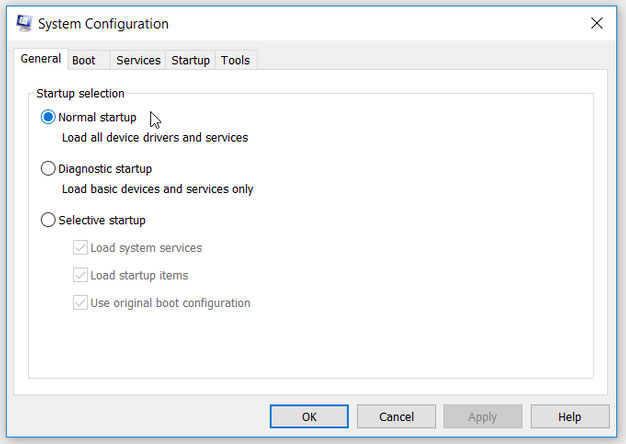
Bước 2: Nhập msconfig và nhấn Enter để mở cửa sổ System Configuration.
Bước 3: Điều hướng đến tab General và chọn tùy chọn Normal Startup.
Bước 4: Nhấn Apply > OK.
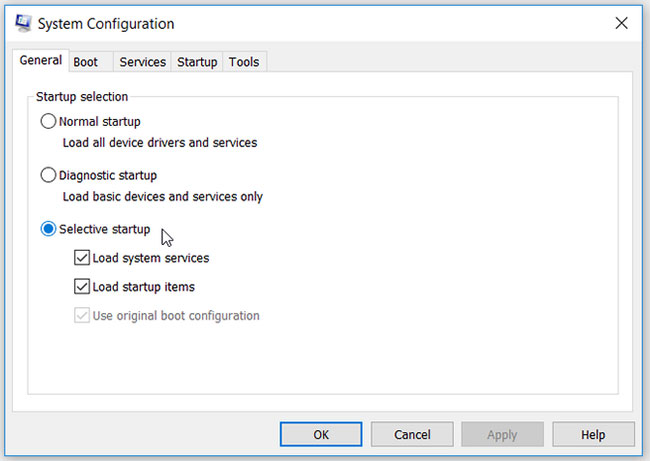
Nếu không, bạn có thể cấu hình cài đặt Selective Startup. Điều này sẽ cho phép bạn chọn các service mà bạn muốn hệ thống load bất cứ khi nào PC của bạn khởi động.
Dưới đây là cách bạn có thể cấu hình cài đặt Selective Startup:
Bước 1: Mở cửa sổ System Configuration theo các bước trước đó.
Bước 2: Điều hướng đến tab General và chọn tùy chọn Selective Startup.
Bước 3: Tiếp theo, tích vào các hộp Load system services và Load startup items bên dưới tùy chọn này.
Bước 4: Nhấp vào Apply > OK để lưu các thay đổi này. Khởi động lại PC khi bạn hoàn tất.
Nếu sự cố vẫn tiếp diễn, đây là những gì bạn có thể làm:
Bước 1: Mở cửa sổ System Configuration theo các bước trước đó.
Bước 2: Chọn tùy chọn Selective Startup và sau đó chọn tất cả các hộp bên dưới tùy chọn này.
Bước 3: Nhấp vào Apply > OK.
5. Chạy các trình gỡ rối Windows
Trình gỡ rối tích hợp sẵn của Windows cũng có thể giúp bạn giải quyết vấn đề này. Nếu lỗi này là do sự cố bảo trì hệ thống, thì trình khắc phục sự cố System Maintenance có thể giúp ích. Nhưng nếu sự cố là do các vấn đề liên quan đến phần cứng, thì bạn có thể sử dụng trình khắc phục sự cố Hardware and Devices.
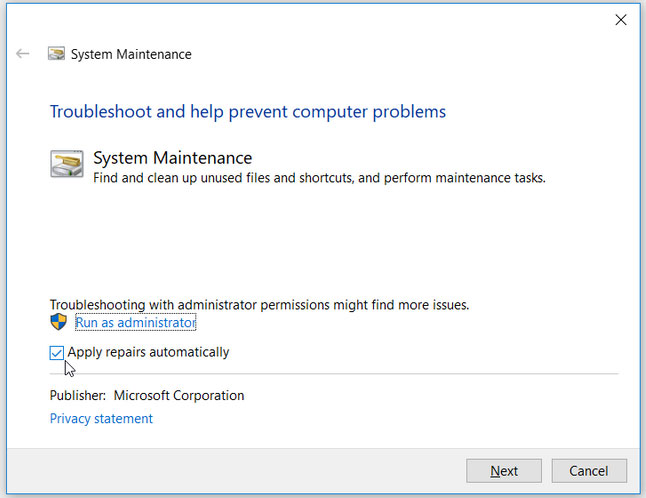
Để bắt đầu, hãy xem cách bạn có thể chạy trình khắc phục sự cố System Maintenance:
Bước 1: Nhấn Win + R để mở hộp thoại Run.
Bước 2: Nhập msdt.exe -id MaintenanceDiagnostic và nhấn Enter để mở trình khắc phục sự cố System Maintenance.
Bước 3: Bấm vào tùy chọn Advanced và sau đó chọn hộp Apply repairs automatically.
Bước 4: Nhấp vào Next và làm theo hướng dẫn trên màn hình để hoàn tất quá trình.
Nếu sự cố vẫn tiếp diễn, hãy chạy trình khắc phục sự cố Hardware and Devices bằng cách làm theo các bước sau:
Bước 1: Điều hướng đến menu Start > PC Settings > Update & Security, sau đó chọn tùy chọn Troubleshoot.
Bước 2: Nhấp vào trình khắc phục sự cố Hardware and Devices ở bên phải và nhấn nút Run the troubleshooter.
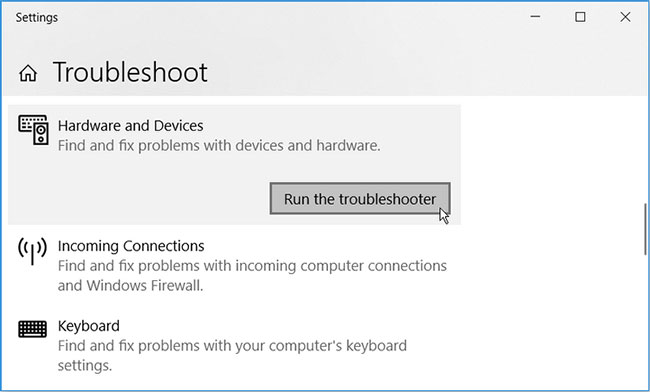
Làm theo hướng dẫn trên màn hình, sau đó khởi động lại PC.
6. Sử dụng công cụ SFC
Trong trường hợp sự cố này là do file hệ thống bị hỏng, thì công cụ System File Scanner (SFC) có thể giúp ích. Công cụ này cho phép bạn tìm và sửa chữa tất cả các file bị hỏng trên PC của mình với một vài bước nhanh chóng.
Chúc bạn khắc phục lỗi thành công!
