Cách sửa lỗi "Problem Occurred While Creating the Recovery Drive" trên Windows
- Thứ tư - 26/01/2022 21:23
- In ra
- Đóng cửa sổ này
Windows cho phép bạn tạo ổ khôi phục có hoặc không có file hệ thống. Tuy nhiên, nếu bạn chọn sao lưu các file hệ thống vào ổ khôi phục, đôi khi, bạn có thể gặp phải lỗi "We can’t create the recovery drive" (không thể tạo ổ khôi phục).
Thông báo lỗi tiếp tục cho biết "A problem occurred while creating the recovery drive” (đã xảy ra sự cố khi tạo ổ khôi phục). Nếu bạn gặp sự cố này, đây là cách khắc phục lỗi và tạo thành công ổ khôi phục.
Nguyên nhân nào gây ra lỗi "We can’t create the recovery drive"
Lỗi này thường xảy ra khi bạn chọn sao lưu các file hệ thống vào ổ khôi phục. Nếu bạn bỏ chọn tùy chọn sao lưu file hệ thống, ổ khôi phục sẽ hoàn tất mà không có lỗi.
Lý do cho lỗi này có thể khác nhau. Nhưng thường bao gồm các bad sector trong USB, những service nền xung đột và trục trặc tạm thời.
Cách sửa lỗi Problem Occurred While Creating the Recovery Drive trên Windows
1. Thực hiện format hoàn toàn USB
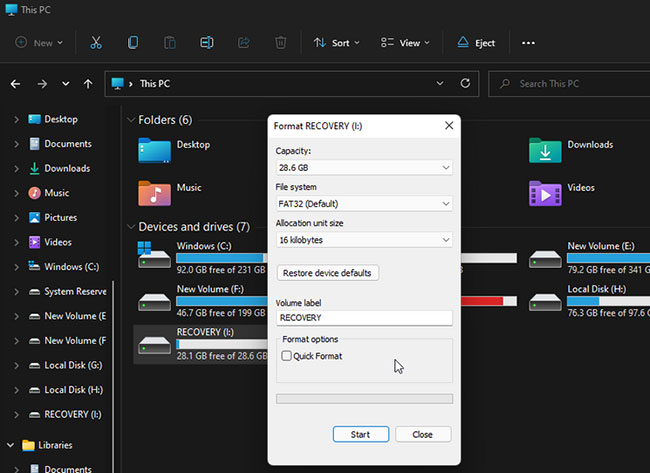
Bạn có thể khắc phục lỗi này bằng cách format USB của mình. Tuy nhiên, mẹo ở đây là thực hiện định dạng đầy đủ.
Windows, theo mặc định, chọn tùy chọn Quick Format để hoàn thành việc format nhanh chóng. Nhưng tùy chọn này không kiểm tra ổ của bạn để tìm các bad sector, điều này thường có thể gây ra lỗi khi sao chép file.
Nếu bạn bỏ chọn tùy chọn Quick Format, Windows sẽ thực hiện quá trình format đầy đủ, kiểm tra các bad sector và đánh dấu chúng là không sử dụng được. Đây là cách thực hiện.
B1: Mở File Explorer và nhấp chuột phải vào USB bạn định sử dụng làm ổ khôi phục.
B2: Chọn tùy chọn Format.
B3: Trong cửa sổ Format, bỏ chọn Quick Format trong Format options.
B4: Nhấp vào Start để format USB. Quá trình này sẽ mất một lúc để hoàn thành, vì vậy hãy đợi cho đến khi quá trình hoàn tất.
Sau khi hoàn tất, hãy chạy công cụ ổ khôi phục và xem lỗi có được giải quyết hay không.
2. Quét virus máy tính
Nếu bạn nhận thấy quá trình ổ khôi phục dừng đột ngột ngay sau khi thông báo Microsoft Security xuất hiện trong Notification Center, hãy kiểm tra xem hệ thống có bị nhiễm virus hay không.
Nhấp vào thông báo bảo mật và thực hiện các hành động được đề xuất để xóa phần mềm độc hại. Nếu không có hành động nào, hãy thực hiện quét toàn bộ bằng Microsoft Defender để loại mọi phần mềm độc hại ẩn.
Microsoft Defender sẽ quét ổ đã chọn để tìm phần mềm độc hại. Nếu tìm thấy, hãy thực hiện các hành động được khuyến nghị để làm sạch hệ thống.
Mặc dù Microsoft Defender là một công cụ bảo mật mạnh, nhưng hãy cân nhắc sử dụng phần mềm diệt virus của bên thứ ba dành cho Windows như Malwarebytes để quét hệ thống và tìm các mối đe dọa tiềm ẩn.
Sau khi dọn dẹp phần mềm độc hại trong hệ thống, hãy tạo ổ khôi phục và xem liệu nó có hoàn tất mà không gặp lỗi "We can’t create a recovery drive" hay không.
3. Thêm, xóa file và sau đó tạo ổ khôi phục
Nếu sự cố vẫn tiếp diễn, thì sau đây là một giải pháp kỳ quặc cho sự cố này. Bạn có thể sao chép một file ngẫu nhiên vào USB. Sau đó, xóa file và chạy tiện ích ổ khôi phục để hoàn tất quá trình mà không gặp lỗi. Đây là cách để làm điều đó.
B1: Đảm bảo rằng USB được định dạng chính xác.
B2: Tiếp theo, sao chép một file ngẫu nhiên và dán vào USB trong File Explorer.
B3: Nhấp chuột phải vào file đã sao chép và chọn Delete.
B4: Sau khi file bị xóa, hãy khởi chạy công cụ Recovery Drive và tiếp tục quá trình tạo ổ khôi phục.
4. Sử dụng phương pháp hai bước để bỏ qua lỗi
Một giải pháp khác để khắc phục lỗi "A problem occurred while creating the recovery drive" là sử dụng phương pháp hai bước. Nó liên quan đến việc tạo ổ khôi phục hai lần. Trước tiên, bạn sẽ cần phải hoàn tất quá trình mà không cần sao lưu các file hệ thống. Sau đó, lặp lại quá trình với tùy chọn sao lưu file hệ thống và hy vọng quá trình này sẽ hoàn tất thành công.
B1: Nhấn phím Win, nhập recovery drive và khởi chạy công cụ.
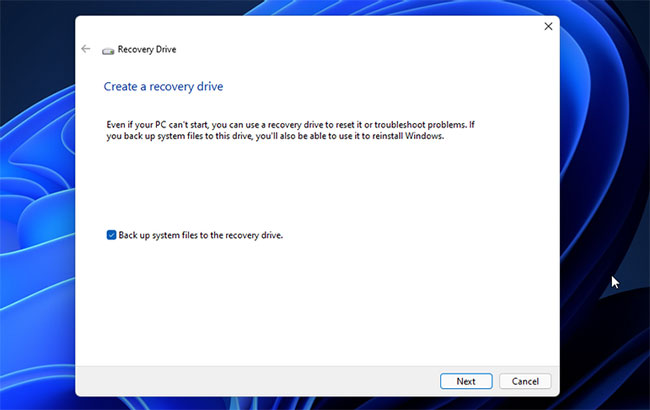
B2: Trong trình hướng dẫn Recovery Drive, hãy bỏ chọn tùy chọn Back up system files to the recovery drive.
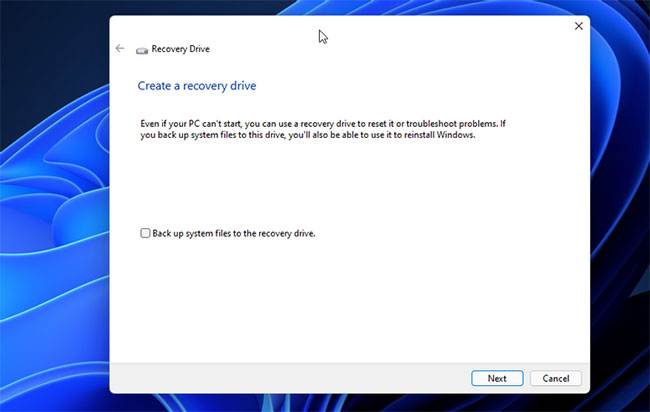
B3: Nhấn Next.
B4: Chọn USB mà bạn định sử dụng làm ổ khôi phục.
B5: Nhấn Next để tiếp tục.
B6: Nhấp vào nút Create để xác nhận hành động. Tiện ích sẽ định dạng ổ và sao chép các file cần thiết vào thiết bị lưu trữ.
B7: Bất kể bạn thấy lỗi hay quá trình hoàn tất thành công, đừng nhấp vào nút Finish hoặc Close.
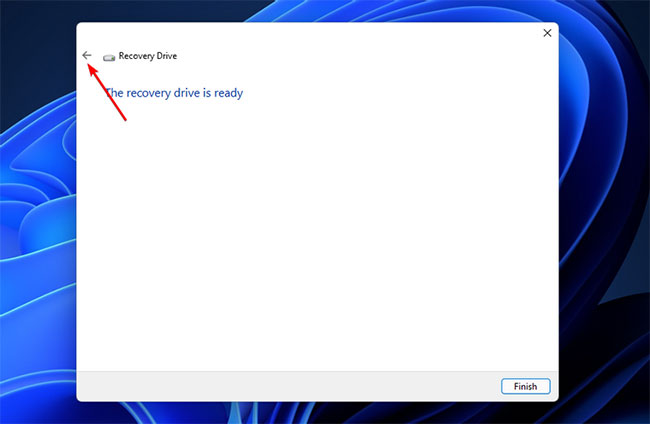
B8: Thay vào đó, hãy nhấp vào nút Back (ở góc trên cùng bên trái). Ngoài ra, nhấn phím Alt + B để quay lại cửa sổ Create a recovery drive.
B9: Tại đây, chọn tùy chọn Back up system files to the recovery drive và nhấp vào Next.
B10: Tiếp theo, chọn USB của bạn và nhấp vào Next.
B11: Nhấp vào Create để bắt đầu quá trình và tạo ổ khôi phục mà không gặp bất kỳ lỗi nào.
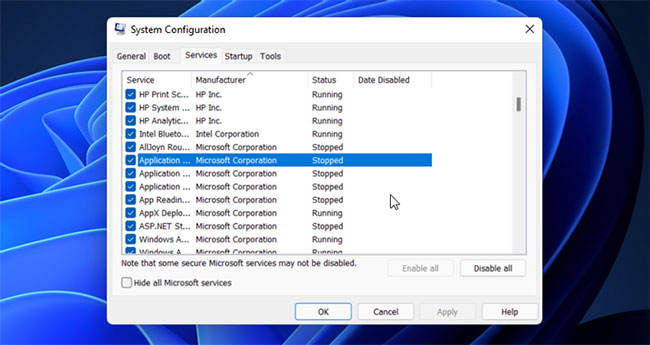
5. Tạm thời vô hiệu hóa các service của Microsoft
Bạn có thể vô hiệu hóa một số service Microsoft Word và Excel theo cách thủ công để giải quyết lỗi ổ khôi phục. Như được biết, service Application Virtualization dường như xung đột với quy trình. Vì vậy, việc vô hiệu hóa các service này sẽ giúp bạn tạo ổ khôi phục mà không gây ra lỗi.
B1: Nhấn Win + R để mở Run.
B2: Gõ msconfig và bấm OK để mở System Configuration.
B3: Trong cửa sổ System Configuration, mở tab Services.
B4: Tiếp theo, xác định vị trí và bỏ chọn các service sau:
- Application Virtualization Services Agent
- Application Virtualization Client
- Client Virtualization Handler
B5: Khi bạn đã bỏ chọn các service, hãy nhấp vào Apply để tắt các service và lưu thay đổi.
Khởi động lại PC, chạy tiện ích ổ khôi phục và kiểm tra lại. Lưu ý rằng, bất kể kết quả như thế nào, hãy bật 3 service mà bạn đã vô hiệu hóa trước đó trong System Configuration và khởi động lại PC để tránh bất kỳ sự cố nào với các ứng dụng Microsoft Office.
6. Tạo một USB boot
Nếu lỗi vẫn tiếp diễn, hãy cân nhắc việc tạo USB boot Windows để thay thế. Ổ khôi phục cung cấp các công cụ sửa chữa và những file bổ sung để cài đặt lại Windows nếu bạn chọn sao lưu các file hệ thống.
Với USB boot Windows, bạn có thể nhận được một bộ công cụ tương tự và hơn thế nữa. Không giống như ổ khôi phục, phương tiện cài đặt có khả năng boot mang lại sự linh hoạt hơn vì bạn có thể tiếp tục thêm và sử dụng các file khác vào thiết bị lưu trữ.
