Cách sửa lỗi BackgroundTaskHost.exe trên Windows 11
- Thứ năm - 17/02/2022 23:57
- In ra
- Đóng cửa sổ này
Backgroundtaskhost.exe là một tiến trình hợp lệ và là một phần của hệ điều hành Microsoft Windows. Tuy nhiên, khi làm việc trên máy tính hoặc khởi chạy ứng dụng, bạn có thể gặp lỗi BackgroundTaskHost.exe.
Đây là lỗi hệ thống và thông báo lỗi có thể khác nhau tùy thuộc vào người dùng. Do đó, rất khó để xác định nguyên nhân gây ra lỗi. Sau đây, Quantrimang.com sẽ chỉ cho bạn một số bước khắc phục sự cố này trong Windows 11.
Nguyên nhân nào gây ra lỗi BackgroundTaskHost.exe?
Khi lỗi này xuất hiện, bạn có thể thấy một trong các thông báo lỗi sau:
- BackgroundTaskHost.exe - System Failure
- BackgroundTaskHost.exe – Application Error
Những lỗi này có thể xảy ra do sửa đổi registry không chính xác, xung đột ứng dụng của bên thứ ba và lỗi file hệ thống. Thật không may, không có giải pháp toàn diện để khắc phục sự cố này.
Cách sửa lỗi BackgroundTaskHost.exe trên Windows 11
Bài viết đã liệt kê một số bước khắc phục sự cố hệ thống để giúp bạn giải quyết lỗi này trên máy tính Windows 11 của mình.
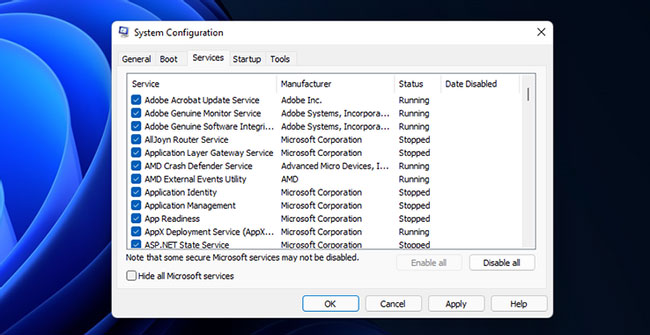
1. Thực hiện Clean Boot
Trong chế độ Clean Boot, Windows khởi động với một bộ driver và chương trình khởi động tối thiểu để xác định xem xung đột ứng dụng của bên thứ ba có đang gây ra lỗi BackgroundTaskHost.exe trong Windows 11 hay không.
Bạn có thể thực hiện Clean Boot Windows 11 từ System Configuration. Sau khi khởi động lại, Windows sẽ khởi chạy trong môi trường Clean Boot. Tiếp tục sử dụng hệ thống và kiểm tra xem lỗi có xảy ra không. Nếu có, hãy tiến hành phương pháp khắc phục sự cố tiếp theo.
Nếu không, hãy kiểm tra hệ thống của bạn để tìm các ứng dụng được cài đặt gần đây. Để thực hiện việc này, hãy đi tới Settings > Apps > Apps & features. Nhấp vào menu drop-down Sort by và chọn Install date. Gỡ cài đặt các ứng dụng được cài đặt gần đây nhất, chẳng hạn như Dell Assistant, có thể gây ra sự cố này và khởi động lại PC.
Ngoài ra, hãy kiểm tra lịch sử cập nhật trong Windows 11 trên máy tính của bạn. Các bản cập nhật Windows không hợp lệ thường có thể khiến hệ thống hoạt động không chính xác. Nếu xác định được một bản cập nhật đã gây ra sự cố, bạn có thể gỡ cài đặt các bản cập nhật Windows để khắc phục lỗi.
2. Chạy công cụ System File Checker và DISM
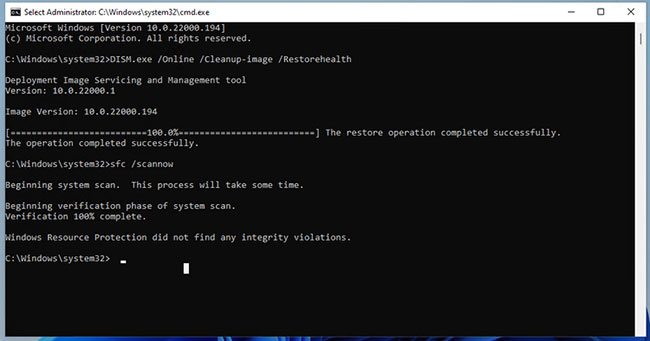
Công cụ System File Checker là một tiện ích Command Prompt được tích hợp sẵn. Nó cho phép bạn quét Windows để tìm lỗi file hệ thống và thay thế nó bằng các file mới được lưu trữ trên hệ thống.
Deployment Image Servicing and Management (DISM) là một tiện ích dòng lệnh khác mà bạn có thể chạy để sửa chữa Windows Image.
3. Thực hiện khôi phục hệ thống
Windows 11, giống như phiên bản tiền nhiệm, tạo ra một điểm khôi phục mới bất cứ khi nào bạn thực hiện một thay đổi quan trọng đối với hệ thống của mình. Điểm khôi phục cho phép bạn hoàn tác các thay đổi gần đây nhất và khôi phục PC về thời điểm mà nó hoạt động không gặp lỗi trước đó.
Đây là một tùy chọn khôi phục tuyệt vời khi bạn gặp lỗi sau khi thực hiện các sửa đổi hệ thống có thể đã làm hỏng những file hệ thống.
Lưu ý rằng điểm khôi phục không được kích hoạt theo mặc định trên tất cả các hệ thống. Do đó, nếu bạn chưa kích hoạt nó theo cách thủ công, khả năng bạn có điểm khôi phục là rất ít.
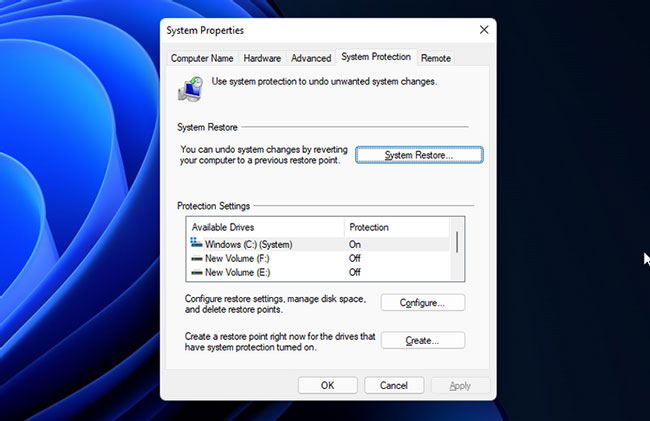
B1: Nhấn phím Win, nhập system restore trong tìm kiếm của Windows và nhấp vào Create a Restore Point.
B2: Trong cửa sổ System Properties, nhấp vào nút System Restore.
B3: Nếu có một điểm khôi phục được đề xuất, hãy chọn nó và nhấp vào Next. Nếu không, hãy chọn Choose a different restore point và nhấn vào Next.
B4: System Restore sẽ hiển thị tất cả các điểm khôi phục có sẵn. Chọn cái gần đây và nhấp vào Next.
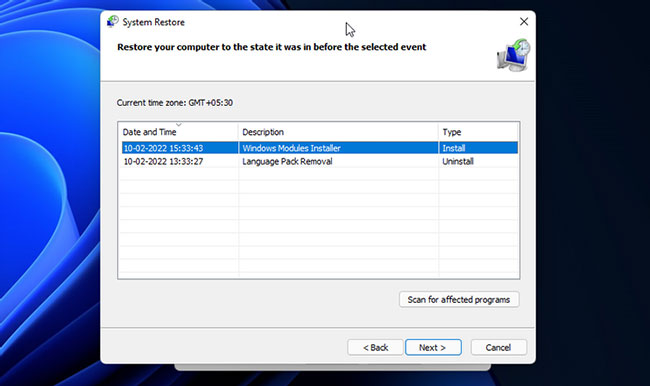
B5: Nhấp vào Scan for affected programs để xem các chương trình và driver có thể bị xóa và khôi phục trong quá trình này.
B6: Đọc mô tả hiển thị trạng thái nó sẽ khôi phục máy tính của bạn. Nhấp vào Finish để bắt đầu quá trình khôi phục hệ thống.
Quá trình này sẽ mất một chút thời gian, vì vậy hãy đợi cho đến khi nó hoàn tất. PC của bạn sẽ khởi động lại sau khi quá trình hoàn tất.
Sau khi hoàn tất, bạn sẽ được chào đón bằng một thông báo thành công, xác nhận việc khôi phục hệ thống đã diễn ra tốt đẹp. Nếu lỗi vẫn tiếp diễn, hãy thử các điểm khôi phục khác có sẵn để khắc phục sự cố.
4. Thực hiện In-place Repair Upgrade
Các lỗi hệ thống nghiêm trọng thường yêu cầu cài đặt sạch để khắc phục sự cố. Tuy nhiên, việc thực hiện cài đặt mới rất phức tạp vì nó sẽ xóa tất cả các file và ứng dụng, buộc bạn phải bắt đầu lại từ đầu.
Đây là nơi Windows Repair phát huy tác dụng. Bạn có thể thực hiện In-place Repair Upgrade để cài đặt lại Windows 11 mà không cần xóa ứng dụng. Đây là một giải pháp tiện dụng để khắc phục nhiều sự cố Windows nghiêm trọng yêu cầu cài đặt lại.
5. Reset máy tính Windows 11
Nếu quá trình cài đặt lại không có tác dụng, bạn có thể reset lại máy tính Windows 11 của mình về cài đặt mặc định ban đầu để khắc phục lỗi.
Reset This PC này là một tùy chọn khôi phục có sẵn trong hệ điều hành Windows. Nó cho phép bạn reset PC về mặc định ban đầu bằng cách xóa các ứng dụng của bên thứ ba mà không ảnh hưởng đến những file và thư mục cá nhân của bạn.
PC có thể khởi động lại một vài lần trong quá trình này, vì vậy hãy để nó ở chế độ chờ. Sau phần còn lại, bạn có thể thiết lập PC Windows 11 của mình bằng tài khoản người dùng cục bộ hoặc tài khoản Microsoft.
