<!DOCTYPE html>
    <html lang="vi" xmlns="http://www.w3.org/1999/xhtml" prefix="og: http://ogp.me/ns#">
    <head>
<title>Cách sử dụng Google Authenticator trên PC chạy Windows</title>
<meta name="description" content="Cách sử dụng Google Authenticator trên PC chạy Windows - Savefile - Tin Tức -...">
<meta name="author" content=".: Nguoicodonvn2008.info - Cõi lòng người cô đơn :.">
<meta name="copyright" content=".: Nguoicodonvn2008.info - Cõi lòng người cô đơn :. [admin@nguoicodonvn2008.info]">
<meta name="robots" content="index, archive, follow, noodp">
<meta name="googlebot" content="index,archive,follow,noodp">
<meta name="msnbot" content="all,index,follow">
<meta name="generator" content="NukeViet v4.5">
<meta http-equiv="Content-Type" content="text/html; charset=utf-8">
<meta property="og:title" content="Cách sử dụng Google Authenticator trên PC chạy Windows">
<meta property="og:type" content="website">
<meta property="og:description" content="Savefile - Tin Tức - https&#x3A;&#x002F;&#x002F;www.nguoicodonvn2008.info&#x002F;vi&#x002F;news&#x002F;savefile&#x002F;kien-thuc-may-tinh&#x002F;cach-su-dung-google-authenticator-tren-pc-chay-windows-10511.html">
<meta property="og:site_name" content=".&#x3A; Nguoicodonvn2008.info - Cõi lòng người cô đơn &#x3A;.">
<meta property="og:url" content="https://www.nguoicodonvn2008.info/vi/news/savefile/kien-thuc-may-tinh/cach-su-dung-google-authenticator-tren-pc-chay-windows-10511.html">
<link rel="shortcut icon" href="https://nguoicodonvn2008.info/favicon.ico">
<link rel="canonical" href="https://www.nguoicodonvn2008.info/vi/news/savefile/kien-thuc-may-tinh/cach-su-dung-google-authenticator-tren-pc-chay-windows-10511.html">
<link rel="alternate" href="https://nguoicodonvn2008.info/vi/news/rss/" title="Tin Tức" type="application/rss+xml">
<link rel="alternate" href="https://nguoicodonvn2008.info/vi/news/rss/karaoke-dual/" title="Tin Tức - Karaoke Dual" type="application/rss+xml">
<link rel="alternate" href="https://nguoicodonvn2008.info/vi/news/rss/nhac-tre/" title="Tin Tức - Nhạc trẻ" type="application/rss+xml">
<link rel="alternate" href="https://nguoicodonvn2008.info/vi/news/rss/tru-tinh/" title="Tin Tức - Trữ tình" type="application/rss+xml">
<link rel="alternate" href="https://nguoicodonvn2008.info/vi/news/rss/nuoc-ngoai/" title="Tin Tức - Nước ngoài" type="application/rss+xml">
<link rel="alternate" href="https://nguoicodonvn2008.info/vi/news/rss/remix/" title="Tin Tức - Remix" type="application/rss+xml">
<link rel="alternate" href="https://nguoicodonvn2008.info/vi/news/rss/tam-su-tinh-yeu/" title="Tin Tức - Tâm sự tình yêu" type="application/rss+xml">
<link rel="alternate" href="https://nguoicodonvn2008.info/vi/news/rss/tho-suu-tam/" title="Tin Tức - Thơ sưu tầm" type="application/rss+xml">
<link rel="alternate" href="https://nguoicodonvn2008.info/vi/news/rss/cuoc-song/" title="Tin Tức - Cuộc sống" type="application/rss+xml">
<link rel="alternate" href="https://nguoicodonvn2008.info/vi/news/rss/phan-mem/" title="Tin Tức - Phần mềm" type="application/rss+xml">
<link rel="alternate" href="https://nguoicodonvn2008.info/vi/news/rss/kien-thuc-may-tinh/" title="Tin Tức - Kiến thức máy tính" type="application/rss+xml">
<link rel="alternate" href="https://nguoicodonvn2008.info/vi/news/rss/hoc-tap/" title="Tin Tức - Học tập" type="application/rss+xml">
<link rel="alternate" href="https://nguoicodonvn2008.info/vi/news/rss/tai-lieu/" title="Tin Tức - Tài liệu" type="application/rss+xml">
<link rel="alternate" href="https://nguoicodonvn2008.info/vi/news/rss/de-thi/" title="Tin Tức - Đề thi" type="application/rss+xml">
<link rel="preload" as="style" href="https://nguoicodonvn2008.info/assets/css/font-awesome.min.css" type="text/css">
<link rel="preload" as="style" href="https://nguoicodonvn2008.info/themes/default/css/bootstrap.non-responsive.css" type="text/css">
<link rel="preload" as="style" href="https://nguoicodonvn2008.info/themes/default/css/style.css" type="text/css">
<link rel="preload" as="style" href="https://nguoicodonvn2008.info/themes/default/css/style.non-responsive.css" type="text/css">
<link rel="preload" as="style" href="https://nguoicodonvn2008.info/themes/default/css/news.css" type="text/css">
<link rel="preload" as="style" href="https://nguoicodonvn2008.info/themes/default/css/custom.css" type="text/css">
<link rel="preload" as="script" href="https://nguoicodonvn2008.info/assets/js/jquery/jquery.min.js" type="text/javascript">
<link rel="preload" as="script" href="https://nguoicodonvn2008.info/assets/js/language/vi.js" type="text/javascript">
<link rel="preload" as="script" href="https://nguoicodonvn2008.info/assets/js/DOMPurify/purify3.js" type="text/javascript">
<link rel="preload" as="script" href="https://nguoicodonvn2008.info/assets/js/global.js" type="text/javascript">
<link rel="preload" as="script" href="https://nguoicodonvn2008.info/assets/js/site.js" type="text/javascript">
<link rel="preload" as="script" href="https://nguoicodonvn2008.info/themes/default/js/news.js" type="text/javascript">
<link rel="preload" as="script" href="https://nguoicodonvn2008.info/themes/default/js/main.js" type="text/javascript">
<link rel="preload" as="script" href="https://nguoicodonvn2008.info/themes/default/js/custom.js" type="text/javascript">
<link rel="preload" as="script" href="https://nguoicodonvn2008.info/themes/default/js/bootstrap.min.js" type="text/javascript">
<link rel="stylesheet" href="https://nguoicodonvn2008.info/assets/css/font-awesome.min.css">
<link rel="stylesheet" href="https://nguoicodonvn2008.info/themes/default/css/bootstrap.non-responsive.css">
<link rel="stylesheet" href="https://nguoicodonvn2008.info/themes/default/css/style.css">
<link rel="stylesheet" href="https://nguoicodonvn2008.info/themes/default/css/style.non-responsive.css">
<link rel="StyleSheet" href="https://nguoicodonvn2008.info/themes/default/css/news.css">
<link rel="stylesheet" href="https://nguoicodonvn2008.info/themes/default/css/custom.css">
<style type="text/css">
	body{background: #fff;}
</style>
    </head>
    <body>
<div id="print">
	<div id="hd_print">
		<h2 class="pull-left">.&#x3A; Nguoicodonvn2008.info - Cõi lòng người cô đơn &#x3A;.</h2>
		<p class="pull-right"><a title=".&#x3A; Nguoicodonvn2008.info - Cõi lòng người cô đơn &#x3A;." href="https://nguoicodonvn2008.info/">https://nguoicodonvn2008.info</a></p>
	</div>
	<div class="clear"></div>
	<hr />
	<div id="content">
		<h1>Cách sử dụng Google Authenticator trên PC chạy Windows</h1>
		<ul class="list-inline">
			<li>Thứ năm - 05/06/2025 08:45</li>
			<li class="hidden-print txtrequired"><em class="fa fa-print">&nbsp;</em><a title="In ra" href="javascript:;" onclick="window.print()">In ra</a></li>
			<li class="hidden-print txtrequired"><em class="fa fa-power-off">&nbsp;</em><a title="Đóng cửa sổ này" href="javascript:;" onclick="window.close()">Đóng cửa sổ này</a></li>
		</ul>
		<div class="clear"></div>
		<div id="hometext">
		</div>
				<div class="imghome">
			<img alt="Cách sử dụng Google Authenticator trên PC chạy Windows" src="https://st.quantrimang.com/photos/image/2025/06/05/dung-google-authenticator-tren-pc-windows-16.jpg" width="460" class="img-thumbnail" />
		</div>
		<div class="clear"></div>
		<div id="bodytext" class="clearfix">
			<p style="text-align: justify;">Mặc dù rất phổ biến, nhưng không có ứng dụng Google chính thức nào để sử dụng Google Authenticator trên PC chạy Windows. Tuy nhiên, có một số giải pháp thay thế để tránh phải liên tục mang theo điện thoại bên mình để đăng nhập.</p>

<h2 style="text-align: justify;"><span style="color:rgb(231, 76, 60);">https://winauth.github.io/winauth/download.html</span></h2>

<h2 id="mcetoc_1isvk3tpb12l" style="text-align: justify;">Xuất mã 2FA của Google sang PC</h2>

<p style="text-align: justify;">Để sử dụng Google Authenticator trên PC chạy Windows, hãy tạo &quot;mã bí mật&quot; cho Google Authenticator. Đây là trình tạo seed code được sử dụng để tạo mã hoạt động với&nbsp;Google.</p>

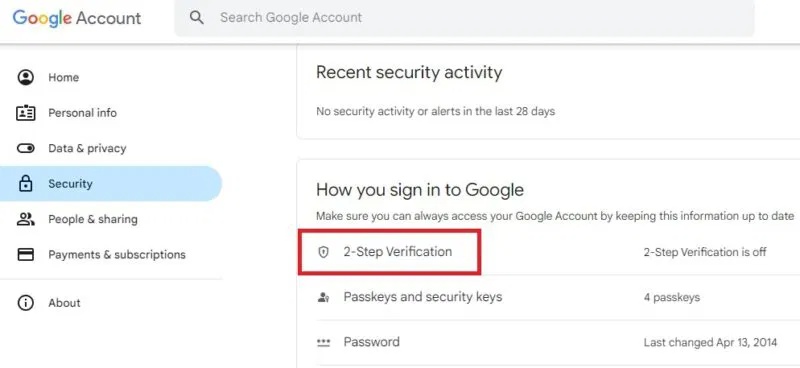
<p style="text-align: justify;">Truy cập trang bảo mật Tài khoản Google. Cuộn xuống phần&nbsp;<strong>How you sign in to Google</strong>&nbsp;và chọn&nbsp;<strong>2-Step Verification</strong>.<br />
<span style="color:rgb(192, 57, 43);"><strong>https://myaccount.google.com/security?pli=1</strong></span></p>

<figure>
<div style="text-align: justify;"><img alt="Chọn xác minh 2 bước trong tài khoản Google" data-i="0" data-src="https://st.quantrimang.com/photos/image/2025/06/05/dung-google-authenticator-tren-pc-windows-1.jpg" data-was-processed="true" height="368" src="https://st.quantrimang.com/photos/image/2025/06/05/dung-google-authenticator-tren-pc-windows-1.jpg" width="800" /></div>

<figcaption>
<div style="text-align: justify;">Chọn xác minh 2 bước trong tài khoản Google</div>
</figcaption>
</figure>

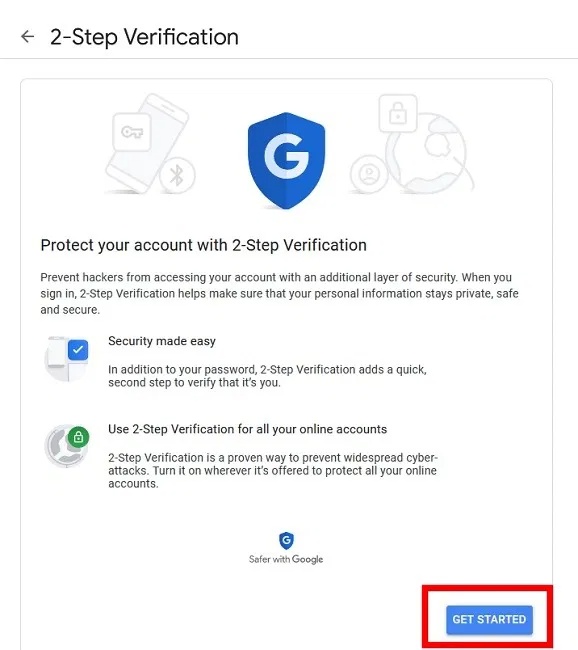
<p style="text-align: justify;">Nếu Google biết bạn có điện thoại được kết nối với tài khoản của mình, Google sẽ hướng dẫn bạn các bước để thiết lập dịch vụ thông báo qua điện thoại cơ bản. Nhấn&nbsp;<strong>Get Started</strong>.</p>

<figure>
<div style="text-align: justify;"><img alt="Thiết lập Google Authenticator." data-i="1" data-src="https://st.quantrimang.com/photos/image/2025/06/05/dung-google-authenticator-tren-pc-windows-2.jpg" data-was-processed="true" height="650" src="https://st.quantrimang.com/photos/image/2025/06/05/dung-google-authenticator-tren-pc-windows-2.jpg" width="578" /></div>

<figcaption>
<div style="text-align: justify;">Thiết lập Google Authenticator.</div>
</figcaption>
</figure>

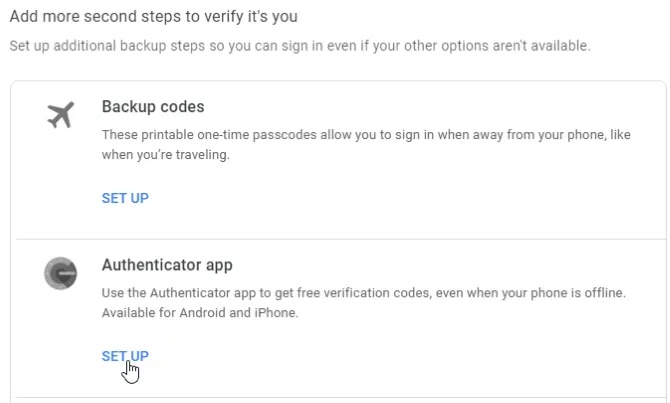
<p style="text-align: justify;">Sau khi hoàn tất các bước, bạn sẽ có cơ hội thiết lập ứng dụng Authenticator. Mặc dù không tải xuống ứng dụng thực tế, nhưng chúng ta cần giả vờ rằng mình đang nhận được khóa bí mật. Nhấp vào&nbsp;<strong>Set up</strong>.</p>

<figure>
<div style="text-align: justify;"><img alt="Thiết lập ứng dụng Authenticator để nhận mã bí mật." data-i="2" data-src="https://st.quantrimang.com/photos/image/2025/06/05/dung-google-authenticator-tren-pc-windows-3.jpg" data-was-processed="true" height="403" src="https://st.quantrimang.com/photos/image/2025/06/05/dung-google-authenticator-tren-pc-windows-3.jpg" width="670" /></div>

<figcaption>
<div style="text-align: justify;">Thiết lập ứng dụng Authenticator để nhận mã bí mật.</div>
</figcaption>
</figure>

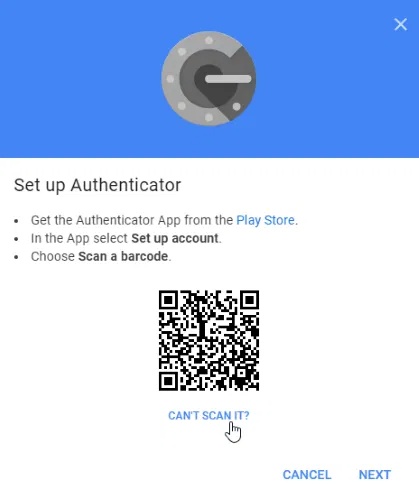
<p style="text-align: justify;">Nhấn&nbsp;<strong>+ Set up authenticator</strong>. Thực hiện theo các lời nhắc cho đến khi ứng dụng yêu cầu bạn quét mã QR. Bên dưới mã, nhấp vào&nbsp;<strong>Can’t scan it?</strong></p>

<figure>
<div style="text-align: justify;"><img alt="Nhấp vào liên kết Can’t scan it?" data-i="3" data-src="https://st.quantrimang.com/photos/image/2025/06/05/dung-google-authenticator-tren-pc-windows-4.jpg" data-was-processed="true" height="500" src="https://st.quantrimang.com/photos/image/2025/06/05/dung-google-authenticator-tren-pc-windows-4.jpg" width="419" /></div>

<figcaption>
<div style="text-align: justify;">Nhấp vào liên kết Can’t scan it?</div>
</figcaption>
</figure>

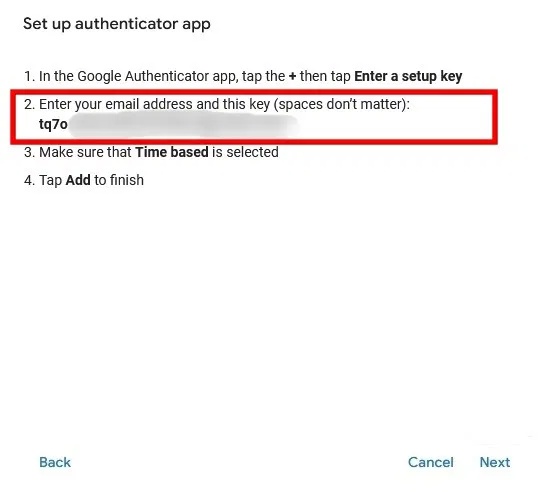
<p style="text-align: justify;">Tìm khóa bí mật và sao chép. Đây là thông tin bạn sẽ nhập vào các ứng dụng của bên thứ ba khi chúng yêu cầu khóa. Tuy nhiên, hãy đảm bảo giữ bí mật. Nếu người khác có được thông tin này, họ có thể sử dụng thông tin đó để truy cập vào tài khoản Google của bạn!</p>

<figure>
<div style="text-align: justify;"><img alt="Sao chép mã Google Authenticator để sử dụng trong các ứng dụng khác." data-i="4" data-src="https://st.quantrimang.com/photos/image/2025/06/05/dung-google-authenticator-tren-pc-windows-5.jpg" data-was-processed="true" height="492" src="https://st.quantrimang.com/photos/image/2025/06/05/dung-google-authenticator-tren-pc-windows-5.jpg" width="542" /></div>

<figcaption>
<div style="text-align: justify;">Sao chép mã Google Authenticator để sử dụng trong các ứng dụng khác.</div>
</figcaption>
</figure>

<p style="text-align: justify;">Bây giờ, chúng ta đã có mã, hãy xem bạn có thể sử dụng mã đó ở đâu. Để trang bảo mật Google của bạn mở trên PC để tham khảo khi thiết lập ứng dụng và sử dụng Google Authenticator. Tiếp theo, bạn cần một ứng dụng trên máy tính hoặc trình duyệt hỗ trợ TOTP (Timed One-Time Passwords).</p>

<h2 id="mcetoc_1isvk3tpb12m" style="text-align: justify;">1.&nbsp;WinAuth</h2>

<div style="text-align: justify;"><span style="color:rgb(192, 57, 43);"><strong>https://winauth.github.io/winauth/download.html</strong></span></div>

<p style="text-align: justify;">Nếu lo lắng về việc ứng dụng của bên thứ ba đánh cắp hoặc làm rò rỉ mã của bạn, hãy thử WinAuth. Điểm hấp dẫn chính của nó là ứng dụng nguồn mở có thể tải xuống PC. Mã của bạn không được lưu trữ trên đám mây để người khác hack.</p>

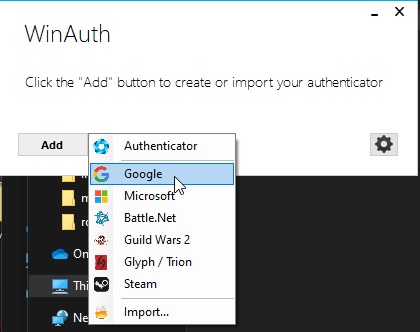
<p style="text-align: justify;">Sau khi WinAuth chạy trên PC, hãy thêm tài khoản Google mới.</p>

<figure>
<div style="text-align: justify;"><img alt="Chọn Google từ danh sách tài khoản WinAuth." data-i="5" data-src="https://st.quantrimang.com/photos/image/2025/06/05/dung-google-authenticator-tren-pc-windows-6.jpg" data-was-processed="true" height="332" src="https://st.quantrimang.com/photos/image/2025/06/05/dung-google-authenticator-tren-pc-windows-6.jpg" width="420" /></div>

<figcaption>
<div style="text-align: justify;">Chọn Google từ danh sách tài khoản WinAuth.</div>
</figcaption>
</figure>

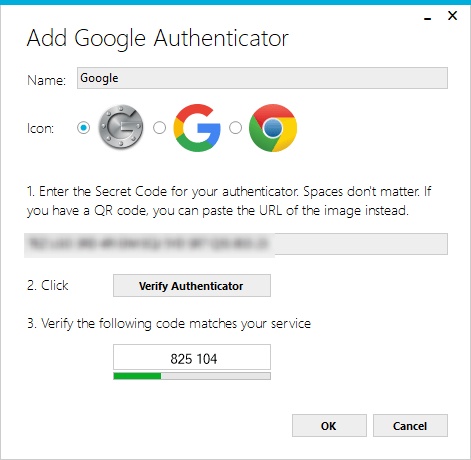
<p style="text-align: justify;">Nhập mã bí mật của bạn từ ứng dụng Authenticator, sau đó nhấp vào nút&nbsp;<strong>Verify Authenticator</strong>.</p>

<figure>
<div style="text-align: justify;"><img alt="Nhập mã bí mật của bạn vào WinAuth" data-i="6" data-src="https://st.quantrimang.com/photos/image/2025/06/05/dung-google-authenticator-tren-pc-windows-7.jpg" data-was-processed="true" height="460" src="https://st.quantrimang.com/photos/image/2025/06/05/dung-google-authenticator-tren-pc-windows-7.jpg" width="471" /></div>

<figcaption>
<div style="text-align: justify;">Nhập mã bí mật của bạn vào WinAuth</div>
</figcaption>
</figure>

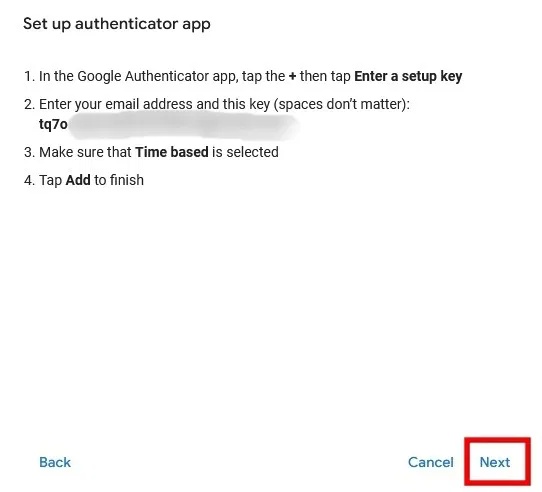
<p style="text-align: justify;">Hãy xem mã đã được tạo dưới nút&nbsp;<strong>Verify Authenticator</strong>&nbsp;và ghi nhớ mã đó để sử dụng sau. Quay lại trang cài đặt bảo mật Google, nơi cửa sổ pop-up có mã bí mật vẫn sẽ mở. Nhấn&nbsp;<strong>Next.</strong></p>

<figure>
<div style="text-align: justify;"><img alt="Chuyển đến bước tiếp theo khi thiết lập xác minh 2 bước trong tài khoản Google " data-i="7" data-src="https://st.quantrimang.com/photos/image/2025/06/05/dung-google-authenticator-tren-pc-windows-8.jpg" data-was-processed="true" height="492" src="https://st.quantrimang.com/photos/image/2025/06/05/dung-google-authenticator-tren-pc-windows-8.jpg" width="542" /></div>

<figcaption>
<div style="text-align: justify;">Chuyển đến bước tiếp theo khi thiết lập xác minh 2 bước trong tài khoản Google</div>
</figcaption>
</figure>

<p style="text-align: justify;">Nhập mã gồm 6 chữ số do WinAuth tạo ra và nhấn&nbsp;<strong>Verify.</strong></p>

<p style="text-align: justify;">Nếu mọi thứ được thực hiện chính xác, Google sẽ hiển thị cho bạn một thông báo xác nhận ứng dụng đã được cấu hình thành công. Nhấp vào&nbsp;<strong>OK</strong>&nbsp;để lưu các thay đổi trong tài khoản Google của bạn.</p>

<p style="text-align: justify;">Quay lại cửa sổ WinAuth, nhấp vào&nbsp;<strong>OK</strong>&nbsp;để lưu các thay đổi trong ứng dụng WinAuth.</p>

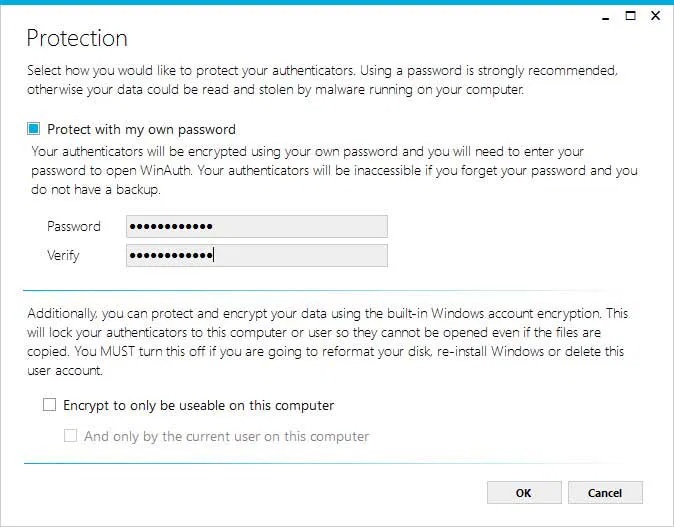
<p style="text-align: justify;">Ngay sau khi bạn nhấp vào<strong>&nbsp;OK</strong>, WinAuth sẽ mở cửa sổ&nbsp;<strong>Protection</strong>&nbsp;cho phép bạn đặt mật khẩu để mã hóa các file được WinAuth lưu. Điều này đảm bảo mọi truy cập trái phép sẽ bị chặn. Nhập mật khẩu hai lần và nhấp vào&nbsp;<strong>OK</strong>&nbsp;để lưu các thay đổi.</p>

<figure>
<div style="text-align: justify;"><img alt="Thiết lập mật khẩu để sử dụng với WinAuth để sử dụng Google Authenticator trên PC chạy Windows." data-i="8" data-src="https://st.quantrimang.com/photos/image/2025/06/05/dung-google-authenticator-tren-pc-windows-9.jpg" data-was-processed="true" height="527" src="https://st.quantrimang.com/photos/image/2025/06/05/dung-google-authenticator-tren-pc-windows-9.jpg" width="674" /></div>

<figcaption>
<div style="text-align: justify;">Thiết lập mật khẩu để sử dụng với WinAuth để sử dụng Google Authenticator trên PC chạy Windows.</div>
</figcaption>
</figure>

<p style="text-align: justify;">Ngoài ra, hãy thiết lập WinAuth để mã hóa các file để chỉ có thể sử dụng trên máy tính hiện tại, nhưng sử dụng bảo vệ bằng mật khẩu khả thi hơn nhiều.</p>

<p style="text-align: justify;">Giờ đây, bạn có thể sử dụng Google Authenticator trên PC chạy Windows của mình bằng WinAuth.</p>

<h2 id="mcetoc_1isvk3tpb12n" style="text-align: justify;">2.&nbsp;WinOTP Authenticator</h2>

<div style="text-align: justify;"><span style="color:rgb(231, 76, 60);"><strong>https://apps.microsoft.com/detail/9nf2rgqkx1mv?hl=en-US&amp;gl=US</strong></span></div>

<p style="text-align: justify;">WinOTP Authenticator chỉ dành riêng cho Windows và bạn có thể tải xuống trực tiếp từ Microsoft Store. Đây là một&nbsp;giải pháp thay thế tốt cho Authy, hiện không còn hỗ trợ desktop nữa mà chỉ hỗ trợ thiết bị di động.</p>

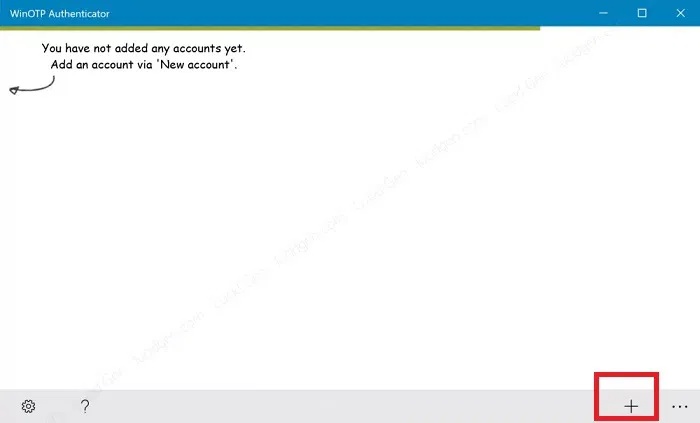
<p style="text-align: justify;">Nhấp vào nút&nbsp;<strong>+</strong>&nbsp;ở cuối để thêm dịch vụ mới.</p>

<figure>
<div style="text-align: justify;"><img alt="Thêm dịch vụ mới vào WinOTP Authenticator" data-i="9" data-src="https://st.quantrimang.com/photos/image/2025/06/05/dung-google-authenticator-tren-pc-windows-10.jpg" data-was-processed="true" height="423" src="https://st.quantrimang.com/photos/image/2025/06/05/dung-google-authenticator-tren-pc-windows-10.jpg" width="700" /></div>

<figcaption>
<div style="text-align: justify;">Thêm dịch vụ mới vào WinOTP Authenticator</div>
</figcaption>
</figure>

<p style="text-align: justify;">Mặc dù ứng dụng khẳng định có thể đọc mã QR, nhưng nó có thể không hiệu quả trong một số trường hợp.</p>

<figure>
<div style="text-align: justify;"><img alt="Nhập thông tin chi tiết về dịch vụ Google của bạn vào WinOTP Authenticator" data-i="10" data-src="https://st.quantrimang.com/photos/image/2025/06/05/dung-google-authenticator-tren-pc-windows-11.jpg" data-was-processed="true" height="361" src="https://st.quantrimang.com/photos/image/2025/06/05/dung-google-authenticator-tren-pc-windows-11.jpg" width="700" /></div>

<figcaption>
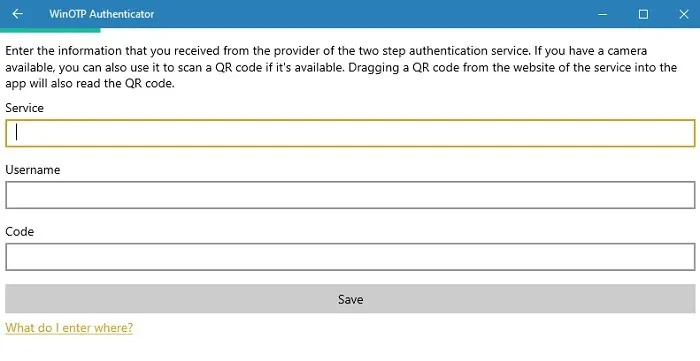
<div style="text-align: justify;">Nhập thông tin chi tiết về dịch vụ Google của bạn vào WinOTP Authenticator</div>
</figcaption>
</figure>

<p style="text-align: justify;">Nhập tên dịch vụ, tên người dùng và mã của bạn, vậy là xong. Đối với tên dịch vụ và tên người dùng, bạn có thể chọn tên mình muốn, nhưng hãy đảm bảo rằng bạn có thể phân biệt được các dịch vụ.</p>

<h2 id="mcetoc_1isvk3tpb12o" style="text-align: justify;">3.&nbsp;2 Factor Authenticator</h2>

<div style="text-align: justify;"><span style="color:rgb(231, 76, 60);"><strong>https://apps.microsoft.com/detail/9nblggh5k7jn?hl=en-US&amp;gl=US</strong></span></div>

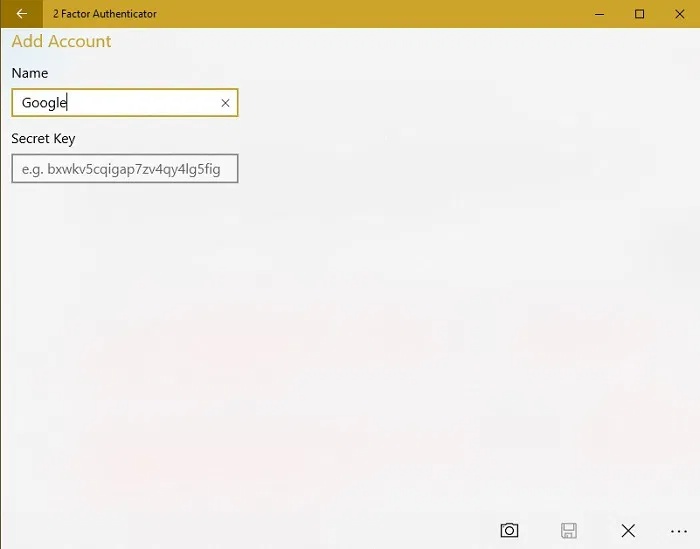
<p style="text-align: justify;">Hiện tại, 2 Factor Authenticator chỉ hỗ trợ tài khoản Google, Microsoft,&nbsp;LastPass&nbsp;và&nbsp;Facebook, nhưng nó hoạt động tốt như một trình xác thực Google trên PC.</p>

<p style="text-align: justify;">Nhấn vào biểu tượng&nbsp;<strong>+&nbsp;</strong>ở cuối để thêm tài khoản mới. Nhập tên cho tài khoản, chẳng hạn như &quot;Google&quot;, sau đó nhập khóa bí mật của bạn.</p>

<figure>
<div style="text-align: justify;"><img alt="Nhập khóa bí mật của Google vào 2 Factor Authenticator" data-i="11" data-src="https://st.quantrimang.com/photos/image/2025/06/05/dung-google-authenticator-tren-pc-windows-12.jpg" data-was-processed="true" height="549" src="https://st.quantrimang.com/photos/image/2025/06/05/dung-google-authenticator-tren-pc-windows-12.jpg" width="700" /></div>

<figcaption>
<div style="text-align: justify;">Nhập khóa bí mật của Google vào 2 Factor Authenticator</div>
</figcaption>
</figure>

<p style="text-align: justify;">Bạn cũng có thể sử dụng biểu tượng camera để quét&nbsp;mã QR, nếu có. Cách này hiệu quả hơn WinOTP Authenticator – nhưng không hoàn hảo.</p>

<h2 id="mcetoc_1isvk3tpb12p" style="text-align: justify;">4.&nbsp;GAuth Authenticator</h2>

<div style="text-align: justify;"><span style="color:rgb(192, 57, 43);"><strong>https://chromewebstore.google.com/detail/gauth-authenticator/ilgcnhelpchnceeipipijaljkblbcobl?pli=1</strong></span></div>

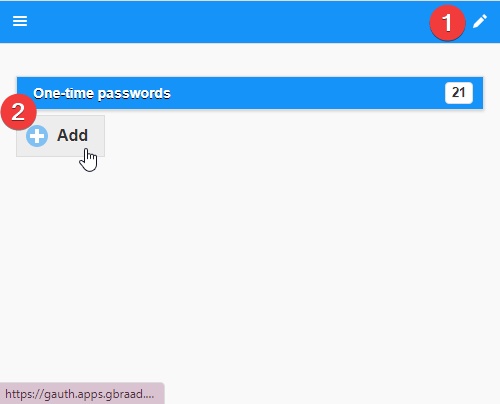
<p style="text-align: justify;">Nếu bạn muốn sử dụng Google Authenticator trong trình duyệt trên PC Windows, hãy thử GAuth Authenticator. Để thêm trình xác thực của bạn vào GAuth, hãy nhấp vào bút chì ở góc trên bên phải. Nhấn vào&nbsp;<strong>Add</strong>.</p>

<figure>
<div style="text-align: justify;"><img alt="Thêm tài khoản vào GAuth" data-i="12" data-src="https://st.quantrimang.com/photos/image/2025/06/05/dung-google-authenticator-tren-pc-windows-13.jpg" data-was-processed="true" height="404" src="https://st.quantrimang.com/photos/image/2025/06/05/dung-google-authenticator-tren-pc-windows-13.jpg" width="500" /></div>

<figcaption>
<div style="text-align: justify;">Thêm tài khoản vào GAuth</div>
</figcaption>
</figure>

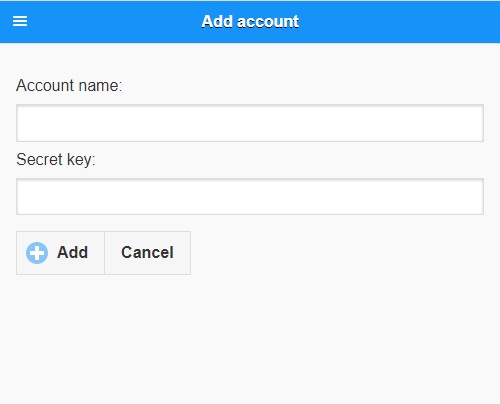
<p style="text-align: justify;">Nhập tên tài khoản (trong trường hợp này là “Google”) và khóa bí mật.</p>

<figure>
<div style="text-align: justify;"><img alt="Thêm khóa bí mật của bạn vào tài khoản GAuth." data-i="13" data-src="https://st.quantrimang.com/photos/image/2025/06/05/dung-google-authenticator-tren-pc-windows-14.jpg" data-was-processed="true" height="404" src="https://st.quantrimang.com/photos/image/2025/06/05/dung-google-authenticator-tren-pc-windows-14.jpg" width="500" /></div>

<figcaption>
<div style="text-align: justify;">Thêm khóa bí mật của bạn vào tài khoản GAuth.</div>
</figcaption>
</figure>

<h2 id="mcetoc_1isvk3tpb12q" style="text-align: justify;">5.&nbsp;<a href="https://quantrimang.com/url?u=aHR0cHM6Ly9rZWVwYXNzeGMub3JnLw%3D%3D" rel="nofollow noopener" target="_blank">KeePassXC</a></h2>

<p style="text-align: justify;">Nếu bạn muốn có Google Authenticator hoàn toàn cục bộ trên PC, KeePassXC sẽ hoạt động tốt. Mặc dù ứng dụng này chủ yếu được biết đến như một&nbsp;<a data-type="internal" href="https://quantrimang.com/cong-nghe/trinh-quan-ly-mat-khau-tot-nhat-cho-windows-11-198604" title="4 trình quản lý mật khẩu tốt nhất cho Windows 11">trình quản lý mật khẩu</a>, nhưng nó cũng có thể tạo và lưu trữ TOTP. Tuy nhiên, bạn nên lưu trữ mật khẩu của mình trong một cơ sở dữ liệu và TOTP của mình trong cơ sở dữ liệu thứ hai. Nếu không, khi bất kỳ ai có quyền truy cập vào ứng dụng KeePassXC, họ sẽ có quyền truy cập vào mật khẩu và mã 2FA của bạn ở một nơi.</p>

<p style="text-align: justify;">Sau khi cài đặt, hãy nhấn&nbsp;<strong>Create database</strong>&nbsp;để tạo cơ sở dữ liệu mới cho các mã của bạn. Nhập tên cơ sở dữ liệu, chọn cài đặt của bạn và mật khẩu để bảo mật.</p>

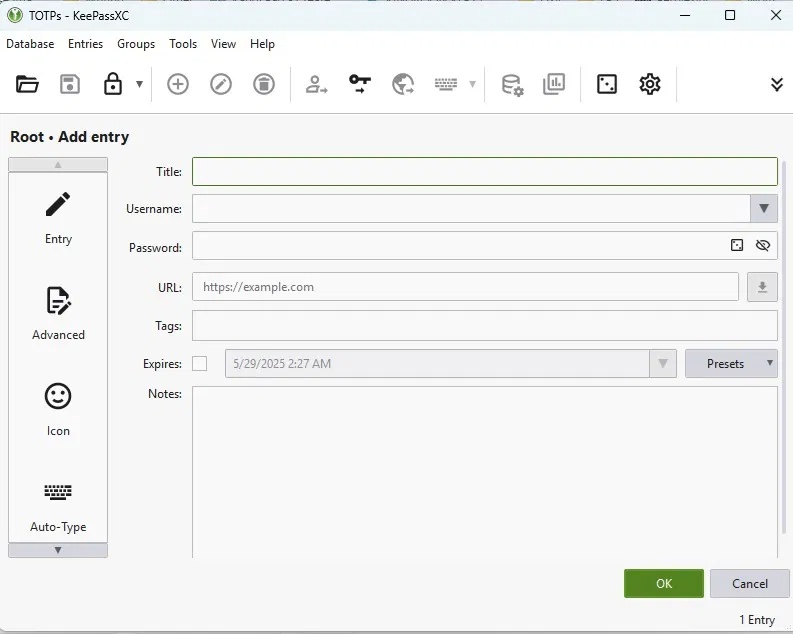
<p style="text-align: justify;">Tiếp theo, nhấn nút&nbsp;<strong>+&nbsp;</strong>để thêm mục nhập mới. Điền bất kỳ thông tin chi tiết có liên quan nào. Nếu bạn muốn giữ riêng mật khẩu và TOTP, chỉ cần nhập tiêu đề và URL. Nhấn&nbsp;<strong>OK</strong>&nbsp;để lưu cài đặt.</p>

<figure>
<div style="text-align: justify;"><img alt="Thiết lập mục nhập KeePassXC." data-i="14" data-src="https://st.quantrimang.com/photos/image/2025/06/05/dung-google-authenticator-tren-pc-windows-15.jpg" data-was-processed="true" height="634" src="https://st.quantrimang.com/photos/image/2025/06/05/dung-google-authenticator-tren-pc-windows-15.jpg" width="793" /></div>

<figcaption>
<div style="text-align: justify;">Thiết lập mục nhập KeePassXC.</div>
</figcaption>
</figure>

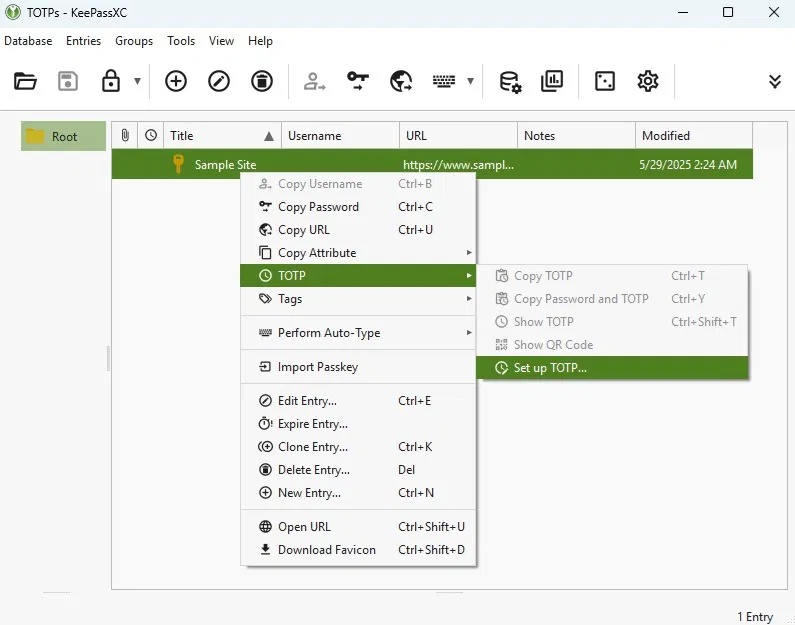
<p style="text-align: justify;">Nhấp chuột phải vào mục nhập mới của bạn và chọn&nbsp;<strong>TOTP -&gt; Setup TOTP</strong>.</p>

<figure>
<div style="text-align: justify;"><img alt="Thêm tùy chọn TOTP mới vào mục nhập." data-i="15" data-src="https://st.quantrimang.com/photos/image/2025/06/05/dung-google-authenticator-tren-pc-windows-16.jpg" data-was-processed="true" height="625" src="https://st.quantrimang.com/photos/image/2025/06/05/dung-google-authenticator-tren-pc-windows-16.jpg" width="795" /></div>

<figcaption>
<div style="text-align: justify;">Thêm tùy chọn TOTP mới vào mục nhập.</div>
</figcaption>
</figure>

<p style="text-align: justify;">Nhập khóa bí mật mà bạn nhận được từ Google Authenticator và nhấn&nbsp;<strong>OK.</strong>&nbsp;Sau đó, hãy truy cập KeePassXC để xem mã của bạn bất kỳ lúc nào.</p>

<h2 id="mcetoc_1isvk3tpb12r" style="text-align: justify;">Mẹo sử dụng Google Authenticator trên PC chạy Windows</h2>

<p style="text-align: justify;">Để có trải nghiệm tốt nhất, có một số mẹo bạn nên biết:</p>

<ul>
	<li style="text-align: justify;">Thiết lập tài khoản đồng thời trên cả hai thiết bị. Nếu không, bạn sẽ cần tắt 2FA trên bất kỳ tài khoản nào mình đã thiết lập và thêm lại chúng vào cả hai thiết bị.</li>
	<li style="text-align: justify;">Nếu bạn không thể thiết lập tài khoản cùng lúc, hãy chụp ảnh màn hình khóa hoặc mã QR mà tài khoản cung cấp cho bạn trong quá trình thiết lập. Ngay khi bạn ở trên PC, hãy nhập thông tin vào ứng dụng xác thực trên máy tính hoặc trình duyệt của mình.</li>
	<li style="text-align: justify;">Giữ lại những ảnh chụp màn hình này làm bản sao lưu mã của bạn, nhưng vui lòng lưu ảnh chụp màn hình trên USB hoặc ổ cứng ngoài thay vì điện thoại vì lý do bảo mật. Việc sao lưu khóa/mã QR giúp bạn tránh phải bắt đầu lại từ đầu bất cứ khi nào có PC mới.&nbsp;Google Password Manager, cùng với các trình quản lý mật khẩu khác, sẽ giúp bạn dễ dàng di chuyển mật khẩu.</li>
</ul>
		</div>
				<div id="author">
						<p>
				<strong>Nguồn tin:</strong>
				Quantrimang.com:
			</p>
		</div>
	</div>
	<div id="footer" class="clearfix">
		<div id="url">
			<strong>URL của bản tin này: </strong><a href="https://www.nguoicodonvn2008.info/vi/news/savefile/kien-thuc-may-tinh/cach-su-dung-google-authenticator-tren-pc-chay-windows-10511.html" title="Cách sử dụng Google Authenticator trên PC chạy Windows">https://www.nguoicodonvn2008.info/vi/news/savefile/kien-thuc-may-tinh/cach-su-dung-google-authenticator-tren-pc-chay-windows-10511.html</a>

		</div>
		<div class="clear"></div>
		<div class="copyright">
			&copy; .&#x3A; Nguoicodonvn2008.info - Cõi lòng người cô đơn &#x3A;.
		</div>
		<div id="contact">
			<a href="mailto:admin@nguoicodonvn2008.info">admin@nguoicodonvn2008.info</a>
		</div>
	</div>
</div>
        <div id="timeoutsess" class="chromeframe">
            Bạn đã không sử dụng Site, <a onclick="timeoutsesscancel();" href="https://nguoicodonvn2008.info/#">Bấm vào đây để duy trì trạng thái đăng nhập</a>. Thời gian chờ: <span id="secField"> 60 </span> giây
        </div>
        <div id="openidResult" class="nv-alert" style="display:none"></div>
        <div id="openidBt" data-result="" data-redirect=""></div>
		</script>
		<div class="car-top">
  <span><img src="https://nguoicodonvn2008.info/themes/default/images/car.png" alt=""></span>
</div>
<script src="https://nguoicodonvn2008.info/assets/js/jquery/jquery.min.js"></script>
<script>var nv_base_siteurl="/",nv_lang_data="vi",nv_lang_interface="vi",nv_name_variable="nv",nv_fc_variable="op",nv_lang_variable="language",nv_module_name="news",nv_func_name="savefile",nv_is_user=0, nv_my_ofs=-4,nv_my_abbr="EDT",nv_cookie_prefix="nv4c_e856T",nv_check_pass_mstime=1738000,nv_area_admin=0,nv_safemode=0,theme_responsive=0,nv_recaptcha_ver=2,nv_recaptcha_sitekey="",nv_recaptcha_type="image",XSSsanitize=1;</script>
<script src="https://nguoicodonvn2008.info/assets/js/language/vi.js"></script>
<script src="https://nguoicodonvn2008.info/assets/js/DOMPurify/purify3.js"></script>
<script src="https://nguoicodonvn2008.info/assets/js/global.js"></script>
<script src="https://nguoicodonvn2008.info/assets/js/site.js"></script>
<script src="https://nguoicodonvn2008.info/themes/default/js/news.js"></script>
<script src="https://nguoicodonvn2008.info/themes/default/js/main.js"></script>
<script src="https://nguoicodonvn2008.info/themes/default/js/custom.js"></script>
<script type="application/ld+json">
        {
            "@context": "https://schema.org",
            "@type": "Organization",
            "url": "https://nguoicodonvn2008.info",
            "logo": "https://nguoicodonvn2008.info/uploads/angel.gif"
        }
        </script>
<script src="https://nguoicodonvn2008.info/themes/default/js/bootstrap.min.js"></script>
<script type="text/javascript">
var $scrolltop = $('.car-top');
$scrolltop.on('click', function () {
    $('html,body').animate({
        scrollTop: 0
    }, 800);
    $(this).addClass("car-run");
    setTimeout(function(){ $scrolltop.removeClass('car-run');}, 1000);
    return false;
});
$(window).on('scroll', function ()
{ 
    if($(window).scrollTop() >= 200)
    {
        $scrolltop.addClass("show");
        $scrolltop.addClass("car-down");
    }
    else
    {
       $scrolltop.removeClass("show");
       setTimeout(function(){ $scrolltop.removeClass('car-down');}, 300);
    }
});
</script>
</body>
</html>