<!DOCTYPE html>
    <html lang="vi" xmlns="http://www.w3.org/1999/xhtml" prefix="og: http://ogp.me/ns#">
    <head>
<title>Cách sử dụng Device Manager để khắc phục sự cố Windows 10</title>
<meta name="description" content="Cách sử dụng Device Manager để khắc phục sự cố Windows 10 - Savefile - Tin Tức -...">
<meta name="author" content=".: Nguoicodonvn2008.info - Cõi lòng người cô đơn :.">
<meta name="copyright" content=".: Nguoicodonvn2008.info - Cõi lòng người cô đơn :. [admin@nguoicodonvn2008.info]">
<meta name="robots" content="index, archive, follow, noodp">
<meta name="googlebot" content="index,archive,follow,noodp">
<meta name="msnbot" content="all,index,follow">
<meta name="generator" content="NukeViet v4.5">
<meta http-equiv="Content-Type" content="text/html; charset=utf-8">
<meta property="og:title" content="Cách sử dụng Device Manager để khắc phục sự cố Windows 10">
<meta property="og:type" content="website">
<meta property="og:description" content="Savefile - Tin Tức - https&#x3A;&#x002F;&#x002F;www.nguoicodonvn2008.info&#x002F;vi&#x002F;news&#x002F;savefile&#x002F;kien-thuc-may-tinh&#x002F;cach-su-dung-device-manager-de-khac-phuc-su-co-windows-10-5597.html">
<meta property="og:site_name" content=".&#x3A; Nguoicodonvn2008.info - Cõi lòng người cô đơn &#x3A;.">
<meta property="og:url" content="https://www.nguoicodonvn2008.info/vi/news/savefile/kien-thuc-may-tinh/cach-su-dung-device-manager-de-khac-phuc-su-co-windows-10-5597.html">
<link rel="shortcut icon" href="https://nguoicodonvn2008.info/favicon.ico">
<link rel="canonical" href="https://www.nguoicodonvn2008.info/vi/news/savefile/kien-thuc-may-tinh/cach-su-dung-device-manager-de-khac-phuc-su-co-windows-10-5597.html">
<link rel="alternate" href="https://nguoicodonvn2008.info/vi/news/rss/" title="Tin Tức" type="application/rss+xml">
<link rel="alternate" href="https://nguoicodonvn2008.info/vi/news/rss/karaoke-dual/" title="Tin Tức - Karaoke Dual" type="application/rss+xml">
<link rel="alternate" href="https://nguoicodonvn2008.info/vi/news/rss/nhac-tre/" title="Tin Tức - Nhạc trẻ" type="application/rss+xml">
<link rel="alternate" href="https://nguoicodonvn2008.info/vi/news/rss/tru-tinh/" title="Tin Tức - Trữ tình" type="application/rss+xml">
<link rel="alternate" href="https://nguoicodonvn2008.info/vi/news/rss/nuoc-ngoai/" title="Tin Tức - Nước ngoài" type="application/rss+xml">
<link rel="alternate" href="https://nguoicodonvn2008.info/vi/news/rss/remix/" title="Tin Tức - Remix" type="application/rss+xml">
<link rel="alternate" href="https://nguoicodonvn2008.info/vi/news/rss/tam-su-tinh-yeu/" title="Tin Tức - Tâm sự tình yêu" type="application/rss+xml">
<link rel="alternate" href="https://nguoicodonvn2008.info/vi/news/rss/tho-suu-tam/" title="Tin Tức - Thơ sưu tầm" type="application/rss+xml">
<link rel="alternate" href="https://nguoicodonvn2008.info/vi/news/rss/cuoc-song/" title="Tin Tức - Cuộc sống" type="application/rss+xml">
<link rel="alternate" href="https://nguoicodonvn2008.info/vi/news/rss/phan-mem/" title="Tin Tức - Phần mềm" type="application/rss+xml">
<link rel="alternate" href="https://nguoicodonvn2008.info/vi/news/rss/kien-thuc-may-tinh/" title="Tin Tức - Kiến thức máy tính" type="application/rss+xml">
<link rel="alternate" href="https://nguoicodonvn2008.info/vi/news/rss/hoc-tap/" title="Tin Tức - Học tập" type="application/rss+xml">
<link rel="alternate" href="https://nguoicodonvn2008.info/vi/news/rss/tai-lieu/" title="Tin Tức - Tài liệu" type="application/rss+xml">
<link rel="alternate" href="https://nguoicodonvn2008.info/vi/news/rss/de-thi/" title="Tin Tức - Đề thi" type="application/rss+xml">
<link rel="preload" as="style" href="https://nguoicodonvn2008.info/assets/css/font-awesome.min.css" type="text/css">
<link rel="preload" as="style" href="https://nguoicodonvn2008.info/themes/default/css/bootstrap.non-responsive.css" type="text/css">
<link rel="preload" as="style" href="https://nguoicodonvn2008.info/themes/default/css/style.css" type="text/css">
<link rel="preload" as="style" href="https://nguoicodonvn2008.info/themes/default/css/style.non-responsive.css" type="text/css">
<link rel="preload" as="style" href="https://nguoicodonvn2008.info/themes/default/css/news.css" type="text/css">
<link rel="preload" as="style" href="https://nguoicodonvn2008.info/themes/default/css/custom.css" type="text/css">
<link rel="preload" as="script" href="https://nguoicodonvn2008.info/assets/js/jquery/jquery.min.js" type="text/javascript">
<link rel="preload" as="script" href="https://nguoicodonvn2008.info/assets/js/language/vi.js" type="text/javascript">
<link rel="preload" as="script" href="https://nguoicodonvn2008.info/assets/js/DOMPurify/purify3.js" type="text/javascript">
<link rel="preload" as="script" href="https://nguoicodonvn2008.info/assets/js/global.js" type="text/javascript">
<link rel="preload" as="script" href="https://nguoicodonvn2008.info/assets/js/site.js" type="text/javascript">
<link rel="preload" as="script" href="https://nguoicodonvn2008.info/themes/default/js/news.js" type="text/javascript">
<link rel="preload" as="script" href="https://nguoicodonvn2008.info/themes/default/js/main.js" type="text/javascript">
<link rel="preload" as="script" href="https://nguoicodonvn2008.info/themes/default/js/custom.js" type="text/javascript">
<link rel="preload" as="script" href="https://nguoicodonvn2008.info/themes/default/js/bootstrap.min.js" type="text/javascript">
<link rel="stylesheet" href="https://nguoicodonvn2008.info/assets/css/font-awesome.min.css">
<link rel="stylesheet" href="https://nguoicodonvn2008.info/themes/default/css/bootstrap.non-responsive.css">
<link rel="stylesheet" href="https://nguoicodonvn2008.info/themes/default/css/style.css">
<link rel="stylesheet" href="https://nguoicodonvn2008.info/themes/default/css/style.non-responsive.css">
<link rel="StyleSheet" href="https://nguoicodonvn2008.info/themes/default/css/news.css">
<link rel="stylesheet" href="https://nguoicodonvn2008.info/themes/default/css/custom.css">
<style type="text/css">
	body{background: #fff;}
</style>
    </head>
    <body>
<div id="print">
	<div id="hd_print">
		<h2 class="pull-left">.&#x3A; Nguoicodonvn2008.info - Cõi lòng người cô đơn &#x3A;.</h2>
		<p class="pull-right"><a title=".&#x3A; Nguoicodonvn2008.info - Cõi lòng người cô đơn &#x3A;." href="https://nguoicodonvn2008.info/">https://nguoicodonvn2008.info</a></p>
	</div>
	<div class="clear"></div>
	<hr />
	<div id="content">
		<h1>Cách sử dụng Device Manager để khắc phục sự cố Windows 10</h1>
		<ul class="list-inline">
			<li>Thứ năm - 12/05/2022 00:57</li>
			<li class="hidden-print txtrequired"><em class="fa fa-print">&nbsp;</em><a title="In ra" href="javascript:;" onclick="window.print()">In ra</a></li>
			<li class="hidden-print txtrequired"><em class="fa fa-power-off">&nbsp;</em><a title="Đóng cửa sổ này" href="javascript:;" onclick="window.close()">Đóng cửa sổ này</a></li>
		</ul>
		<div class="clear"></div>
		<div id="hometext">
		</div>
				<div class="imghome">
			<img alt="Cách sử dụng Device Manager để khắc phục sự cố Windows 10" src="https://st.quantrimang.com/photos/image/2022/05/10/su-dung-device-manager-khac-phuc-su-co-windows-10-3.jpg" width="460" class="img-thumbnail" />
		</div>
		<div class="clear"></div>
		<div id="bodytext" class="clearfix">
			<p style="text-align: justify;">Sẽ rất hữu ích nếu coi&nbsp;Windows Device Manager&nbsp;như một người quản lý văn phòng trong đời thực. Người quản lý - phần lớn - không trực tiếp tham gia vào bất kỳ quá trình phát triển sản phẩm hữu hình nào nhưng chịu trách nhiệm quản lý nhân viên, Device Manager cũng đóng một vai trò tương tự.</p>

<p style="text-align: justify;">Trong hướng dẫn ngắn này, Quantrimang.com sẽ cùng bạn đọc tìm hiểu cách sử dụng Device Manager để khắc phục sự cố Windows 10.</p>

<h2 style="text-align: justify;">Cách cập nhật driver bằng Device Manager</h2>

<p style="text-align: justify;">Device Manager cũng rất hữu ích khi bạn phải cập nhật driver lỗi thời, đặc biệt là khi Windows Update ngừng hoạt động.</p>

<p style="text-align: justify;">Trước tiên, hãy&nbsp;mở Windows Device Manager, sau đó làm theo các bước:</p>

<p style="text-align: justify;">1. Nhấp vào danh mục phần cứng mà bạn muốn cập nhật. (Giả sử bạn muốn cập nhật một trong các driver của&nbsp;<strong>System device</strong>, nhấp vào&nbsp;<strong>System device</strong>&nbsp;và chọn một driver cụ thể).</p>

<p style="text-align: justify;">2. Nhấp chuột phải vào driver và chọn&nbsp;<strong>Update driver.</strong></p>

<p style="text-align: justify;">3. Bây giờ, chọn&nbsp;<strong>Search automatically for drivers</strong>&nbsp;và để quá trình hoàn tất.</p>

<p style="text-align: justify;">
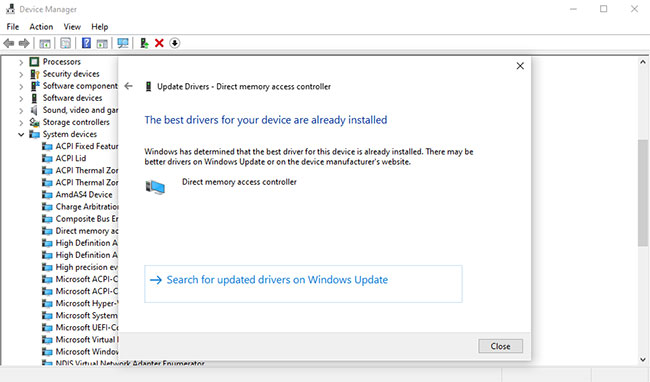
Sau đó, Device Manager sẽ tìm kiếm bản cập nhật driver mới nhất trên PC của bạn và cài đặt nó. Nhưng nếu Device Manager nhận thấy rằng bạn đã có phiên bản cập nhật nhất của driver, nó sẽ cung cấp cho bạn thông báo. Trong trường hợp ví dụ, thiết bị đã chạy phiên bản mới nhất, như bạn có thể thấy bên dưới.</p>

<figure>
<div style="text-align: justify;"><img alt="Thiết bị đã chạy phiên bản mới nhất" data-i="0" data-src="https://st.quantrimang.com/photos/image/2022/05/10/su-dung-device-manager-khac-phuc-su-co-windows-10-1.jpg" data-was-processed="true" height="382" src="https://st.quantrimang.com/photos/image/2022/05/10/su-dung-device-manager-khac-phuc-su-co-windows-10-1.jpg" width="650" /></div>

<figcaption>
<div style="text-align: justify;">Thiết bị đã chạy phiên bản mới nhất</div>
</figcaption>
</figure>

<p style="text-align: justify;">Nhưng nếu bạn khẳng định rằng driver chưa được cập nhật, thì bạn có thể tải xuống trực tiếp từ trang web của nhà sản xuất và cài đặt bằng Device Manager.</p>

<h2 style="text-align: justify;">Kiểm tra trạng thái của phần cứng đã cài đặt</h2>

<p style="text-align: justify;">Không phải là một ý kiến ​​tồi khi kiểm tra Device Manager nếu phần cứng máy tính của bạn đang hoạt động bất thường.</p>

<p style="text-align: justify;">
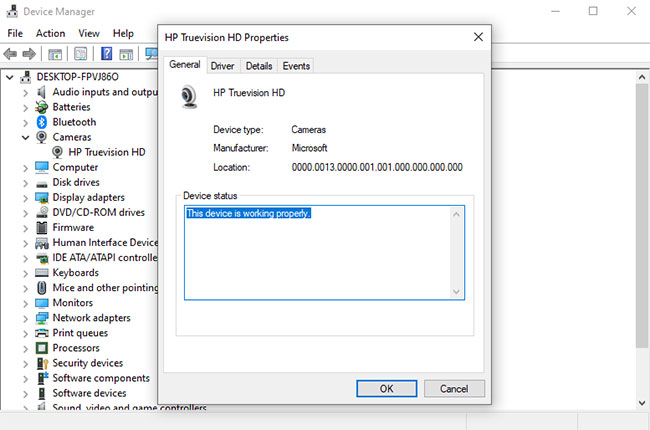
Sau khi bạn mở Device Manager, hãy mở rộng loại thiết bị mà bạn muốn kiểm tra. Từ đó, nhấp chuột phải vào một driver cụ thể và mở phần&nbsp;<strong>Properties.</strong></p>

<p style="text-align: justify;">Sau đó, từ tab&nbsp;<strong>General</strong>&nbsp;trong hộp thoại, hãy nhìn vào hộp&nbsp;<strong>Device Status</strong>&nbsp;để xác nhận trạng thái của nó. Nếu trạng thái thiết bị là &quot;hoạt động bình thường&quot;, thì phần cứng không gặp bất kỳ sự cố nào do lỗi driver và bạn có thể tìm các nguyên nhân khác.</p>

<figure>
<div style="text-align: justify;"><img alt="Kiểm tra trạng thái của phần cứng đã cài đặt" data-i="1" data-src="https://st.quantrimang.com/photos/image/2022/05/10/su-dung-device-manager-khac-phuc-su-co-windows-10-2.jpg" data-was-processed="true" height="430" src="https://st.quantrimang.com/photos/image/2022/05/10/su-dung-device-manager-khac-phuc-su-co-windows-10-2.jpg" width="650" /></div>

<figcaption>
<div style="text-align: justify;">Kiểm tra trạng thái của phần cứng đã cài đặt</div>
</figcaption>
</figure>

<p style="text-align: justify;">Tuy nhiên, nếu có sự cố với thành phần, bạn sẽ thấy mô tả hoặc mã lỗi liên quan đến sự cố. Tuy nhiên, bản thân mô tả hoặc mã lỗi sẽ không cung cấp cho bạn bất kỳ thông tin nào về cách khắc phục chính driver.</p>

<h2 style="text-align: justify;">Xử lý driver bị hỏng bằng Device Manager</h2>

<p style="text-align: justify;">Cũng như không có một cách duy nhất để xử lý các công việc phức tạp của cuộc sống, Windows 10 cũng có một số phương pháp để sửa trình điều khiển thiết bị bị hỏng của bạn. Một trong những phương pháp như vậy là thông qua Device Manager.</p>

<p style="text-align: justify;">Nếu driver thiết bị bị hỏng, bạn có thể sử dụng Windows Device Manager để gỡ cài đặt thiết bị bị lỗi và sau đó cài đặt lại phiên bản sạch.</p>

<p style="text-align: justify;">1. Mở Device Manager, nhấp chuột phải vào driver bị hỏng và chọn&nbsp;<strong>Uninstall device.</strong></p>

<p style="text-align: justify;">2. Bây giờ,&nbsp;khởi động lại PC&nbsp;của bạn.</p>

<p style="text-align: justify;">Sau khi khởi động lại, Windows sẽ tự động phát hiện cấu hình hệ thống của bạn, tìm và cài đặt lại các driver đã gỡ bỏ. Tuy nhiên, nếu quá trình cài đặt lại không diễn ra, bạn sẽ phải thực hiện thủ công thông qua Device Manager.</p>

<p style="text-align: justify;">Tải xuống driver theo cách thủ công từ nhà sản xuất phần cứng của bạn trực tuyến. Nếu bạn nhận được&nbsp;file ZIP, hãy giải nén nó, sau đó làm theo các bước bên dưới:</p>

<p style="text-align: justify;">1. Mở Device Manager, nhấp chuột phải vào driver cụ thể.
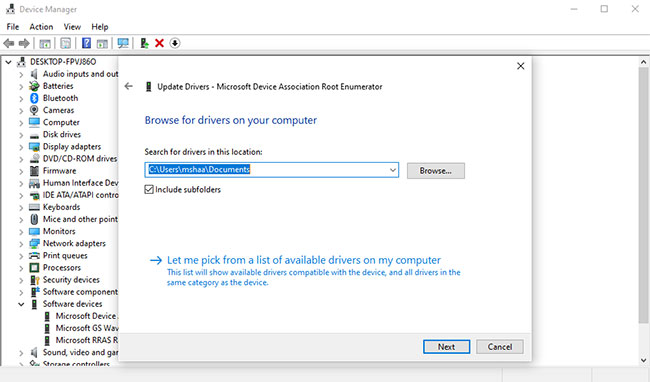
</p>

<p style="text-align: justify;">2. Bây giờ hãy nhấp vào&nbsp;<strong>Update driver &gt; Browse my computer for drivers</strong>.</p>

<figure>
<div style="text-align: justify;"><img alt="Xử lý driver bị hỏng bằng Device Manager" data-i="2" data-src="https://st.quantrimang.com/photos/image/2022/05/10/su-dung-device-manager-khac-phuc-su-co-windows-10-3.jpg" data-was-processed="true" height="382" src="https://st.quantrimang.com/photos/image/2022/05/10/su-dung-device-manager-khac-phuc-su-co-windows-10-3.jpg" width="650" /></div>

<figcaption>
<div style="text-align: justify;">Xử lý driver bị hỏng bằng Device Manager</div>
</figcaption>
</figure>

<p style="text-align: justify;">Chọn file driver mà bạn đã tải xuống từ trang web của nhà sản xuất và nhấp vào&nbsp;<strong>Next.</strong>&nbsp;Driver cập nhật nhất sẽ sớm được cài đặt trên PC của bạn. Khởi động lại PC một lần để các thay đổi có hiệu lực.</p>

<p style="text-align: justify;">Windows Device Manager giúp việc quản lý phần cứng Windows của bạn trở nên dễ dàng và thuận tiện hơn. Trong những năm qua, Microsoft đã giới thiệu một loạt các công cụ như vậy để cải thiện hiệu suất của hệ điều hành Windows 10, điều mà hãng này hy vọng sẽ tiếp tục làm được trong tương lai.</p>
		</div>
				<div id="author">
						<p>
				<strong>Nguồn tin:</strong>
				Quantrimang.com
			</p>
		</div>
	</div>
	<div id="footer" class="clearfix">
		<div id="url">
			<strong>URL của bản tin này: </strong><a href="https://www.nguoicodonvn2008.info/vi/news/savefile/kien-thuc-may-tinh/cach-su-dung-device-manager-de-khac-phuc-su-co-windows-10-5597.html" title="Cách sử dụng Device Manager để khắc phục sự cố Windows 10">https://www.nguoicodonvn2008.info/vi/news/savefile/kien-thuc-may-tinh/cach-su-dung-device-manager-de-khac-phuc-su-co-windows-10-5597.html</a>

		</div>
		<div class="clear"></div>
		<div class="copyright">
			&copy; .&#x3A; Nguoicodonvn2008.info - Cõi lòng người cô đơn &#x3A;.
		</div>
		<div id="contact">
			<a href="mailto:admin@nguoicodonvn2008.info">admin@nguoicodonvn2008.info</a>
		</div>
	</div>
</div>
        <div id="timeoutsess" class="chromeframe">
            Bạn đã không sử dụng Site, <a onclick="timeoutsesscancel();" href="https://nguoicodonvn2008.info/#">Bấm vào đây để duy trì trạng thái đăng nhập</a>. Thời gian chờ: <span id="secField"> 60 </span> giây
        </div>
        <div id="openidResult" class="nv-alert" style="display:none"></div>
        <div id="openidBt" data-result="" data-redirect=""></div>
		</script>
		<div class="car-top">
  <span><img src="https://nguoicodonvn2008.info/themes/default/images/car.png" alt=""></span>
</div>
<script src="https://nguoicodonvn2008.info/assets/js/jquery/jquery.min.js"></script>
<script>var nv_base_siteurl="/",nv_lang_data="vi",nv_lang_interface="vi",nv_name_variable="nv",nv_fc_variable="op",nv_lang_variable="language",nv_module_name="news",nv_func_name="savefile",nv_is_user=0, nv_my_ofs=-4,nv_my_abbr="EDT",nv_cookie_prefix="nv4c_e856T",nv_check_pass_mstime=1738000,nv_area_admin=0,nv_safemode=0,theme_responsive=0,nv_recaptcha_ver=2,nv_recaptcha_sitekey="",nv_recaptcha_type="image",XSSsanitize=1;</script>
<script src="https://nguoicodonvn2008.info/assets/js/language/vi.js"></script>
<script src="https://nguoicodonvn2008.info/assets/js/DOMPurify/purify3.js"></script>
<script src="https://nguoicodonvn2008.info/assets/js/global.js"></script>
<script src="https://nguoicodonvn2008.info/assets/js/site.js"></script>
<script src="https://nguoicodonvn2008.info/themes/default/js/news.js"></script>
<script src="https://nguoicodonvn2008.info/themes/default/js/main.js"></script>
<script src="https://nguoicodonvn2008.info/themes/default/js/custom.js"></script>
<script type="application/ld+json">
        {
            "@context": "https://schema.org",
            "@type": "Organization",
            "url": "https://nguoicodonvn2008.info",
            "logo": "https://nguoicodonvn2008.info/uploads/angel.gif"
        }
        </script>
<script src="https://nguoicodonvn2008.info/themes/default/js/bootstrap.min.js"></script>
<script type="text/javascript">
var $scrolltop = $('.car-top');
$scrolltop.on('click', function () {
    $('html,body').animate({
        scrollTop: 0
    }, 800);
    $(this).addClass("car-run");
    setTimeout(function(){ $scrolltop.removeClass('car-run');}, 1000);
    return false;
});
$(window).on('scroll', function ()
{ 
    if($(window).scrollTop() >= 200)
    {
        $scrolltop.addClass("show");
        $scrolltop.addClass("car-down");
    }
    else
    {
       $scrolltop.removeClass("show");
       setTimeout(function(){ $scrolltop.removeClass('car-down');}, 300);
    }
});
</script>
</body>
</html>