Cách reset Win 7, restore Windows 7 nhanh nhất
- Thứ sáu - 22/04/2022 00:56
- In ra
- Đóng cửa sổ này
Có rất nhiều lý do chính đáng để reset lại hệ điều hành. Có lẽ bạn muốn xóa tất cả dữ liệu cá nhân trên máy tính Windows của mình trước khi bán nó, máy tính đã bị nhiễm virus có hại khi duyệt web và không có cách nào khác để loại bỏ virus đó, hoặc hiệu suất PC đã giảm sau nhiều năm sử dụng.
Nếu bạn muốn giải quyết các sự cố trong hệ điều hành Microsoft, cải thiện hiệu suất và xóa file, bạn nên reset lại Windows 7. Quantrimang sẽ hướng dẫn bạn cách thực hiện trong bài viết sau đây.
Bạn có những tùy chọn nào để reset lại Windows 7?
Nếu muốn tiến hành reset lại và đưa Windows 7 về cài đặt gốc, bạn có một số tùy chọn. Việc quyết định tùy chọn nào tốt nhất sẽ phụ thuộc vào kết quả bạn đang tìm kiếm. Hệ thống Windows cho phép bạn reset lại mà không làm mất dữ liệu cá nhân để quay lại cài đặt gốc hoặc reset lại bằng trình quản lý tải xuống.
Khi thực hiện reset, bạn có tùy chọn chỉ cần reset lại các file hệ thống hoặc đưa Windows trở lại những điểm khôi phục hệ thống đã xác định trước. Những khả năng này sẽ có ích nếu bạn muốn khôi phục hệ thống về trạng thái cũ. Và cuối cùng, hệ thống cũng có thể trở lại trạng thái như lúc máy mới tinh (tình trạng xuất xưởng). Tuy nhiên, điều đó cũng có nghĩa là bạn sẽ mất tất cả các file và chương trình, trừ khi bạn đã sao lưu chúng. Trong phần tiếp theo, bài viết sẽ đi qua từng tùy chọn ở trên một cách chi tiết.
Ghi chú:
Microsoft đã ngừng hỗ trợ chính thức cho Windows 7 vào ngày 14 tháng 1 năm 2020. Hỗ trợ kỹ thuật và các bản cập nhật bảo mật không còn khả dụng cho sản phẩm này nữa. Hỗ trợ chuyên nghiệp dành cho các công ty, đi kèm chi phí riêng, là một trường hợp ngoại lệ và sẽ vẫn có hiệu lực cho đến năm 2023.
Nếu không nằm trong nhóm đối tượng này, bạn nên chuyển sang phiên bản Windows mới hơn.
Reset lại Windows 7 từ điểm khôi phục đã tạo trước đó
Ưu điểm: Thao tác nhanh, có thể giữ lại dữ liệu trước thời điểm tạo điểm khôi phục.
Nhược điểm: Phải tạo điểm khôi phục trước đó.
Chỉ có thể thực sự reset lại hệ điều hành Windows 7 bằng cách cài đặt lại nó. Đôi khi không thể tránh được việc cài đặt lại. Phần mềm có hại, sự cố phần cứng hoặc các vấn đề về hiệu suất thường yêu cầu phải reset lại toàn bộ. Đồng thời, các file quan trọng cần được lưu giữ. Trong trường hợp này, hệ thống và các file cá nhân có thể được sao lưu rất dễ dàng bằng công cụ do Windows cung cấp.
Tốt nhất, bạn nên thực hiện sao lưu định kỳ để các file mong muốn được bảo mật và bạn có thể refresh hệ điều hành của mình bất kỳ lúc nào bạn cần. Việc reset lại bằng công cụ sao lưu này hoạt động như sau:
1. Cách tạo Restore point để khôi phục Windows 7
Thông thường, máy tính Windows của bạn sẽ tự động tạo ra các điểm khôi phục (restore point) nếu như bạn kích hoạt tính năng System Restore. Tuy nhiên, nếu bạn tắt tính năng này đi thì bạn sẽ phải tự tạo một điểm khôi phục mỗi khi thực hiện các thay đổi có thể dẫn tới lỗi cho hệ điều hành.
Để tạo điểm khôi phục, các bạn làm theo những bước sau:
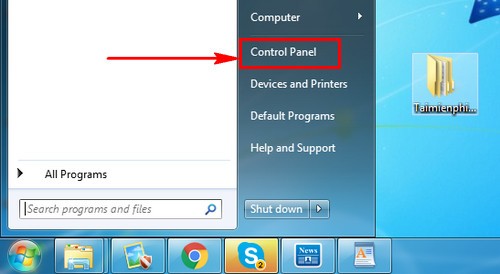
Bước 1: Nhấn Start sau đó chọn Control Panel.
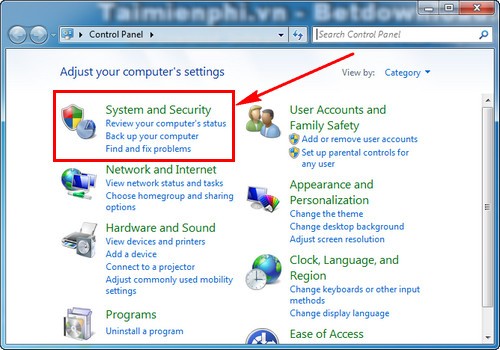
Bước 2: Truy cập System and Security.
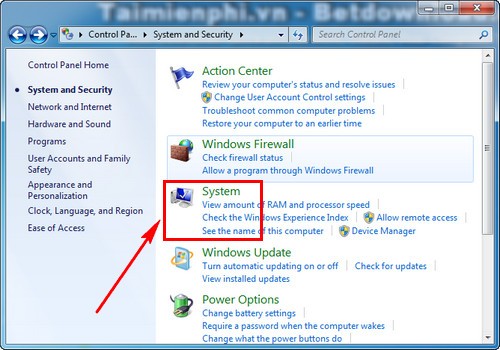
Bước 3: Các bạn nhấn vào System.
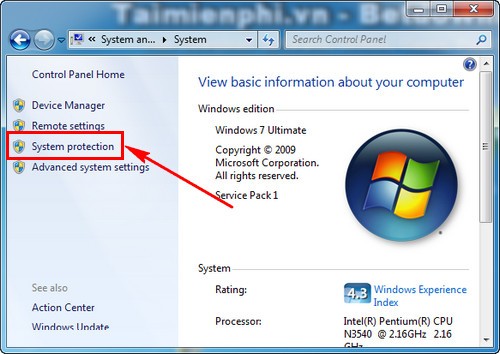
Bước 4: Chọn System Protection ở thanh bên trái cửa sổ.
Bước 5a: Trong cửa sổ System Properties, các bạn chọn ổ C sau đó nhấn vào Create ở phần "Create a restore point right now...".
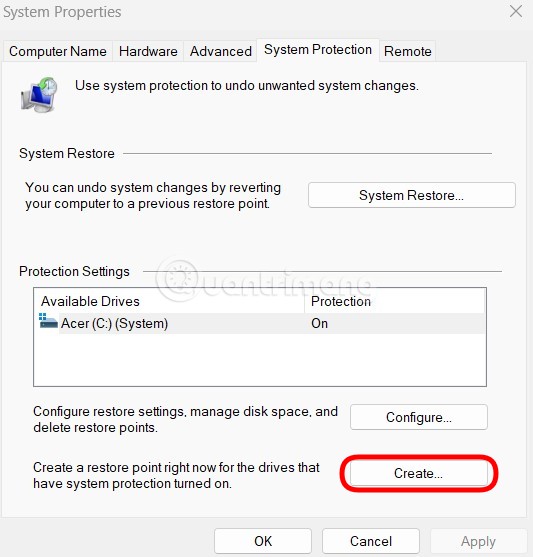
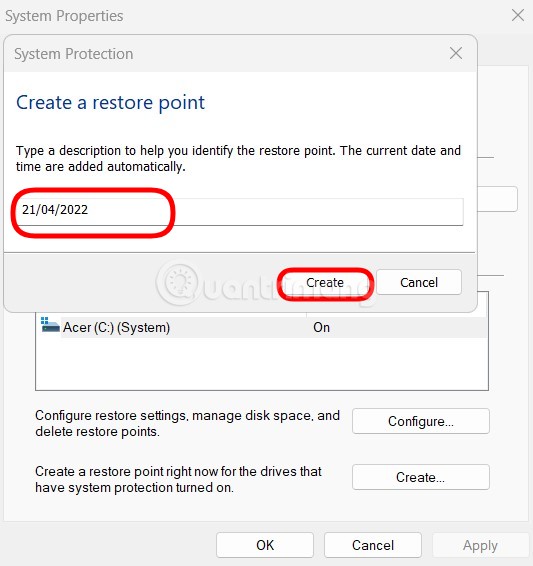
Bước 6a: Bạn đặt tên cho điểm khôi phục (nhớ điền ngày tháng để dễ theo dõi) rồi nhấn Create. Bạn chờ một lúc để hệ thống hoàn tất việc tạo điểm khôi phục.
2. Khôi phục lại Windows 7 từ điểm khôi phục
Bạn thực hiện theo các bước từ 1 tới 4 trong phần 1. Tiếp theo, từ bước 5 bạn thực hiện như sau:
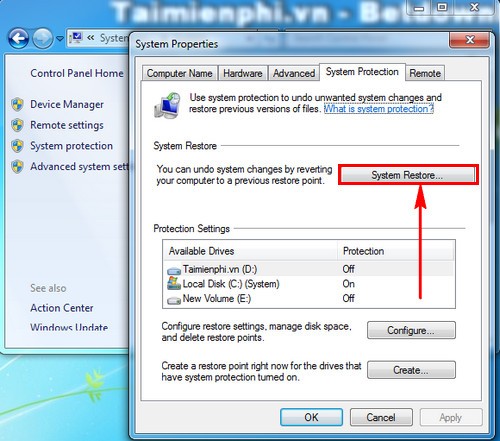
Bước 5b: Trong cửa sổ System Properties, bạn nhấn vào nút System Restore.
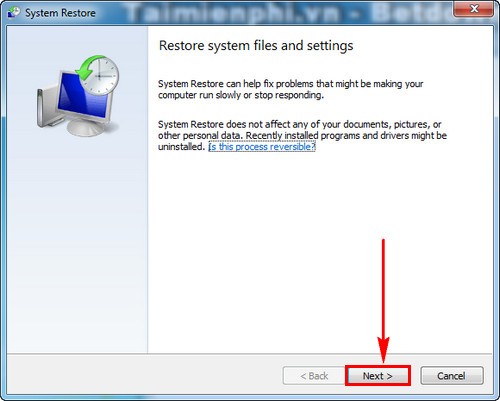
Bước 6b: Bạn nhấn Next để tiếp tục.
Bước 7: Tại cửa sổ này, bạn chọn điểm khôi phục mà bạn cảm thấy ổn nhất sau đó nhấn Next.
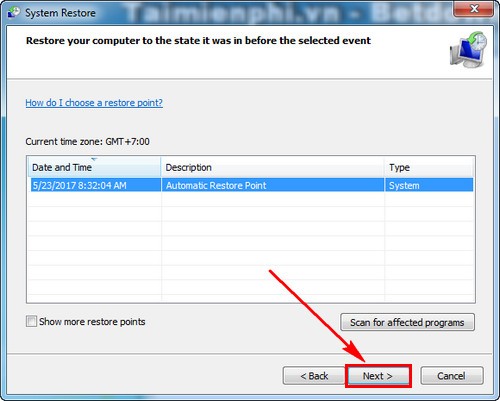
Bước 8: Bạn nhấn Finish sau đó chờ hệ thống tự động khôi phục lại về thời điểm trước đó.
Reset lại Windows 7 bằng trình quản lý tải xuống
Windows Media Creation Tool giúp bạn có thể reset lại hệ điều hành, nhưng hiện tại, nó chỉ khả dụng cho Windows 10 và Windows 8.1. Nếu Windows 7 cần được reset, bạn sẽ cần trình quản lý tải xuống hoạt động giống như Windows ISO Downloader.
Chương trình có thể không được phát triển bởi chính Microsoft, nhưng vẫn sử dụng các bản tải xuống được cấp phép chính thức từ Microsoft. Với sự trợ giúp của công cụ này, bạn sẽ tạo ra bản sao của Windows 7 có thể được chuyển đến một nhà cung cấp dữ liệu hoặc mở bằng cách sử dụng cài đặt VirtualBox.
Hướng dẫn reset Win 7 bằng ISO Downloader
1. Cài đặt Windows ISO Downloader.: https://download.com.vn/windows-iso-downloader-109644
2. Trên trang web của Microsoft, bạn có thể chọn phiên bản hệ điều hành để tải xuống công cụ ISO.
3. Các liên kết tải xuống bây giờ sẽ được tạo cho cả phiên bản 32-bit và 64-bit.
4. Bắt đầu tải xuống.
5. Lưu ý rằng bạn cần phải có giấy phép để sử dụng, vì nó được tải xuống hợp pháp qua Microsoft.
Để reset Windows 7, bạn vẫn cần tải xuống và cài đặt Windows 7 USB/DVD Download Tool. Bây giờ, bạn đã có mọi thứ mình cần để tạo phương tiện cài đặt/khôi phục cho Windows 7. Để thực hiện việc này, hãy tiến hành như sau:
1. Mở chương trình Windows 7 USB/DVD Download Tool.
2. Sau đó, bạn có thể chọn file ISO đã tải xuống ở bước đầu tiên và nhấp vào Next để tiếp tục.
3. Bây giờ, chọn một phương tiện mà bạn muốn lưu file ISO. Để làm điều này, hãy nhấp vào “USB device” hoặc “DVD”.
4. Kết nối phương tiện lưu trữ tương ứng với thiết bị và chọn “Begin copying”.
5. Phương tiện lưu trữ bây giờ sẽ trở thành phương tiện khôi phục có thể boot (cắm trước khi bật máy tính). Khi boot, bạn có thể truy cập phiên bản Windows 7 được tái tạo trên phương tiện và bắt đầu khôi phục hệ thống. Điều này đặc biệt hữu ích nếu hệ điều hành bị hỏng đến mức bạn không thể khởi động Windows theo cách bình thường từ ổ cứng được nữa.
Khôi phục cài đặt gốc cho Windows 7 - có hoặc không có đĩa cài đặt
Nếu bạn vẫn có đĩa CD cài đặt gốc cho Windows 7, chỉ cần khởi động từ đĩa như sau:
1. Mở menu boot khi máy tính khởi động - tùy thuộc vào máy tính hoặc phiên bản BIOS, sử dụng các phím F12, F8, DEL hoặc ESC.
2. Trong các tùy chọn boot, hãy chọn ổ CD/DVD nơi đĩa được lưu trữ.
3. Bây giờ, tiến hành cài đặt lại Windows hoàn chỉnh. Để thực hiện việc này, hãy làm theo hướng dẫn trên đĩa CD cài đặt.
4. Quá trình cài đặt có thể mất một chút thời gian.
Nếu cài đặt Windows 7 do nhà sản xuất lưu được lưu trữ trên máy tính, cũng có thể khôi phục về cài đặt gốc mà không cần đĩa CD theo hướng dẫn sau.
1. Chọn danh mục “System and Security” trong Control Panel.
2. Trong phần “Backup and restore”, bạn có thể tìm thấy “Recover system settings on your computer”.
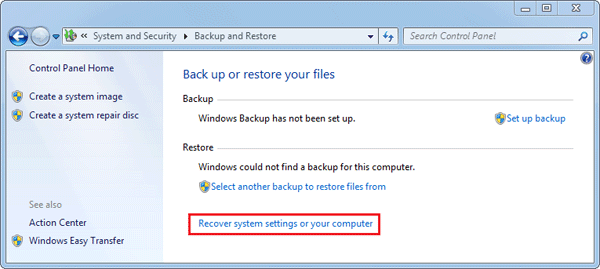
Sau đó nhấp vào “Advanced recovery settings”.
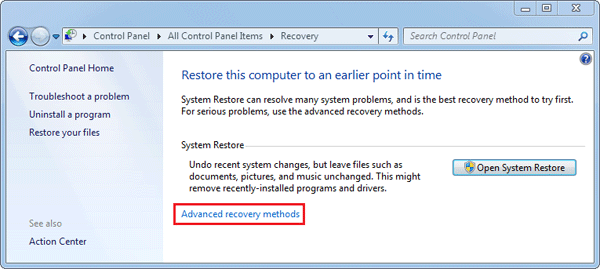
3. Sau đó, bạn cần nhấp vào “Return your computer to factory condition”.
4. Reset máy tính theo hướng dẫn.
Ghi chú:
Nếu bạn khôi phục cài đặt gốc cho Windows 7, tất cả các file cá nhân sẽ bị mất.
Phương pháp này không hoạt động nếu tùy chọn “Return your computer to factory condition” không xuất hiện. Trong trường hợp này, bạn có thể reset lại ở chế độ khôi phục. Các bước sau cũng cần thiết:
1. Khởi động lại ở chế độ khôi phục: Khi khởi động lại, bạn sẽ nhận được thông tin về cách truy cập chế độ ở cuối màn hình - thông thường sử dụng phím F- như F11 hoặc F9.
2. Trong chế độ khôi phục, sử dụng các nút mũi tên để chọn tùy chọn “Recovery”.
3. Bây giờ, hãy nhấp vào “Next”, xác nhận bằng cách nhấp lại vào “Next” và nếu có thể, hãy ngắt kết nối bàn phím và chuột khỏi máy tính.
4. Sau đó, cài đặt gốc sẽ bắt đầu được khôi phục.
Khôi phục cài đặt gốc từ phân vùng khôi phục
Một số máy tính có thể có phân vùng khôi phục cho phép người dùng khôi phục hệ thống về cài đặt gốc mặc định. Làm theo hướng dẫn bên dưới để biết cách thực hiện:
1. Trên bàn phím, nhấn phím có logo Windows và phím E cùng lúc để mở File Explorer.
2. Nhấp chuột phải vào Computer, sau đó chọn Manage.

3. Nhấp vào Storage, sau đó chọn Disk Management.
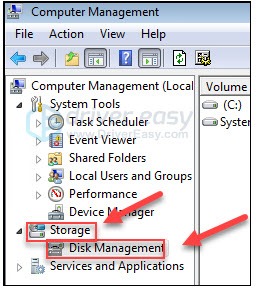
4. Kiểm tra xem bạn có phân vùng khôi phục trên máy tính của mình hay không.
Lưu ý: Nếu bạn tìm thấy phân vùng khôi phục, hãy thực hiện theo hướng dẫn bên dưới. Nếu bạn không có phân vùng khôi phục, hãy chuyển sang phương pháp khác

5. Tắt máy tính, sau đó ngắt kết nối tất cả các thiết bị ngoại vi khỏi máy tính (ngoại trừ màn hình, bàn phím và chuột).
6. Nhấn nút nguồn để bật máy tính, sau đó, trước khi logo Windows xuất hiện, hãy nhấn liên tục phím khôi phục trên bàn phím.
Lưu ý: Phím khôi phục có thể khác nhau tùy thuộc vào từng máy. Dưới đây là cách truy cập phân vùng khôi phục cho các thương hiệu phổ biến nhất:
| Thương hiệu | Lệnh |
| Acer | F10 hoặc Alt + F10 hoặc Ctrl + F |
| Advent | F10 |
| Asus | F9 |
| Dell | Ctrl + F11 |
| HP/Compaq | F11 |
| IBM – Lenovo | F11 |
| LG | F11 |
| MSI | F3 |
| Samsung | F4 |
| Sony Vaio | F8 hoặc F10 |
| Toshiba | F8 hoặc F0 |
Lưu ý: Nếu bạn không thể tìm thấy phím chức năng tương ứng cho máy tính của mình, hãy tham khảo trang web của nhà sản xuất máy tính để biết thêm thông tin.
7. Làm theo hướng dẫn trên màn hình để reset máy tính.
Khôi phục cài đặt gốc cho laptop Dell Windows 7
Làm theo các bước dưới đây:
1. Trước tiên, hãy sao lưu máy tính, lưu tất cả các file và tài liệu quan trọng vào ổ cứng ngoài. Nếu bạn khôi phục cài đặt gốc cho laptop Windows 7, tất cả dữ liệu cá nhân sẽ bị xóa khỏi máy tính của bạn.
2. Tắt laptop đúng cách và ngắt kết nối tất cả các thiết bị ngoại vi như máy in, máy scan, cáp mạng và USB, v.v...
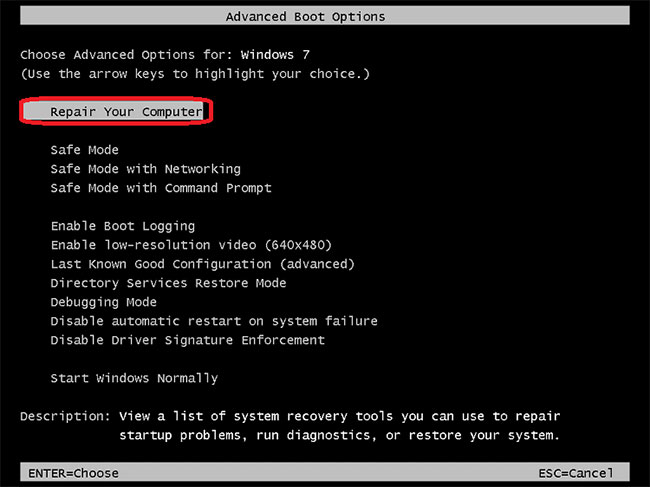
3. Bật nguồn laptop bằng cách nhấn nút nguồn và liên tục nhấn F8 cho đến khi thấy logo Dell xuất hiện trên màn hình. Bây giờ, bạn sẽ thấy menu Advanced Boot Options. Nếu menu Advanced Boot Options không xuất hiện, hãy khởi động lại máy tính và lặp lại quá trình trên.
4. Sau khi mở menu Advanced Boot Options, sử dụng các phím mũi tên trên bàn phím, chọn tùy chọn "Repair Your Computer", rồi nhấn nút Enter. Thao tác này sẽ mở menu System Recovery Options.
5. Sau khi nhấp vào tùy chọn "Repair your Computer", hãy chọn bố cục bàn phím và nhấp vào nút Next.
6. Bây giờ, đăng nhập với quyền admin hoặc người dùng cục bộ và nhấp vào nút OK.
7. Bạn sẽ thấy hai tùy chọn. Bây giờ, chọn "Dell Factory Image Restore" hoặc "Dell Factory Tools" và sau đó nhấp vào nút Next.
8. Đây là menu Confirm Data Deletion. Chọn tùy chọn Yes, reformat the hard drive and restore system software to factory condition và nhấp vào nút Next.
9. Bây giờ, Windows 7 đang khôi phục cài đặt gốc. Quá trình sẽ mất một khoảng thời gian để hoàn thành. Sau khi hoàn tất thiết lập, bạn sẽ thấy thông báo rằng máy tính đã được khôi phục về tình trạng mới xuất xưởng.
10. Nhấp vào nút Finish và laptop sẽ khởi động lại.
Khôi phục cài đặt gốc cho laptop HP chạy Windows 7
Làm theo các bước dưới đây:
1. Lặp lại hai bước trên của phương pháp khôi phục cài đặt gốc laptop Dell chạy Windows 7 ở trên. Sao lưu máy tính, tắt laptop đúng cách và ngắt kết nối tất cả các thiết bị ngoại vi như máy in, máy quét, cáp mạng, USB, v.v...
2. Bây giờ, bật nguồn laptop bằng cách nhấp vào nút nguồn. Nhấp chuột vào menu Start. Nếu bạn tìm thấy bất kỳ vấn đề nào trong quá trình khởi động Windows và không thể nhấp vào menu Start, hãy khởi động lại máy tính và ngay lập tức nhấn phím F11 liên tục. Bây giờ, máy tính của bạn đang mở cửa sổ Recovery Manager.
3. Sau khi nhấp vào menu Start, hãy nhấp vào nút All Programs và sau đó chọn Recovery Manager.
4. Bây giờ, nhấp vào tùy chọn Recovery Manager, bạn sẽ được yêu cầu nhập mật khẩu admin. Nhập mật khẩu admin và tiếp tục.
5. Bây giờ, cửa sổ User Account Control sẽ hỏi bạn có muốn chương trình thực hiện thay đổi đối với máy tính của mình hay không, hãy chọn Yes. Cửa sổ Recovery Manager sẽ hiển thị trên màn hình.
6. Trên cửa sổ Recovery Manager, chọn tùy chọn System Recovery trong phần I need help immediately.
7. Sau khi nhấp vào System Recovery, một cửa sổ mới sẽ xuất hiện và hỏi bạn có muốn máy tính được khôi phục về tình trạng ban đầu của nhà sản xuất hay không. Chọn Yes, rồi nhấp vào nút Next. Bây giờ, máy tính sẽ khởi động lại và bạn sẽ thấy lại cửa sổ Recovery Manager trên màn hình.
8. Nhấp vào nút System Recovery và sau đó nhấp vào Recover without backing up your files.
9. Bây giờ, nhấp vào nút OK để xác nhận rằng bạn muốn khôi phục cài đặt gốc và sau đó nhấp vào nút Finish.
10. Bây giờ, quá trình khôi phục cài đặt gốc cho laptop HP Windows 7 đã hoàn tất.
Chúc bạn thực hiện thành công!
