<!DOCTYPE html>
    <html lang="vi" xmlns="http://www.w3.org/1999/xhtml" prefix="og: http://ogp.me/ns#">
    <head>
<title>Cách reset thư mục SoftwareDistribution và Catroot2 trên PC Windows 11</title>
<meta name="description" content="Cách reset thư mục SoftwareDistribution và Catroot2 trên PC Windows 11 - Savefile - Tin Tức -...">
<meta name="author" content=".: Nguoicodonvn2008.info - Cõi lòng người cô đơn :.">
<meta name="copyright" content=".: Nguoicodonvn2008.info - Cõi lòng người cô đơn :. [admin@nguoicodonvn2008.info]">
<meta name="robots" content="index, archive, follow, noodp">
<meta name="googlebot" content="index,archive,follow,noodp">
<meta name="msnbot" content="all,index,follow">
<meta name="generator" content="NukeViet v4.5">
<meta http-equiv="Content-Type" content="text/html; charset=utf-8">
<meta property="og:title" content="Cách reset thư mục SoftwareDistribution và Catroot2 trên PC Windows 11">
<meta property="og:type" content="website">
<meta property="og:description" content="Savefile - Tin Tức -...">
<meta property="og:site_name" content=".&#x3A; Nguoicodonvn2008.info - Cõi lòng người cô đơn &#x3A;.">
<meta property="og:url" content="https://www.nguoicodonvn2008.info/vi/news/savefile/kien-thuc-may-tinh/cach-reset-thu-muc-softwaredistribution-va-catroot2-tren-pc-windows-11-7727.html">
<link rel="shortcut icon" href="https://nguoicodonvn2008.info/favicon.ico">
<link rel="canonical" href="https://www.nguoicodonvn2008.info/vi/news/savefile/kien-thuc-may-tinh/cach-reset-thu-muc-softwaredistribution-va-catroot2-tren-pc-windows-11-7727.html">
<link rel="alternate" href="https://nguoicodonvn2008.info/vi/news/rss/" title="Tin Tức" type="application/rss+xml">
<link rel="alternate" href="https://nguoicodonvn2008.info/vi/news/rss/karaoke-dual/" title="Tin Tức - Karaoke Dual" type="application/rss+xml">
<link rel="alternate" href="https://nguoicodonvn2008.info/vi/news/rss/nhac-tre/" title="Tin Tức - Nhạc trẻ" type="application/rss+xml">
<link rel="alternate" href="https://nguoicodonvn2008.info/vi/news/rss/tru-tinh/" title="Tin Tức - Trữ tình" type="application/rss+xml">
<link rel="alternate" href="https://nguoicodonvn2008.info/vi/news/rss/nuoc-ngoai/" title="Tin Tức - Nước ngoài" type="application/rss+xml">
<link rel="alternate" href="https://nguoicodonvn2008.info/vi/news/rss/remix/" title="Tin Tức - Remix" type="application/rss+xml">
<link rel="alternate" href="https://nguoicodonvn2008.info/vi/news/rss/tam-su-tinh-yeu/" title="Tin Tức - Tâm sự tình yêu" type="application/rss+xml">
<link rel="alternate" href="https://nguoicodonvn2008.info/vi/news/rss/tho-suu-tam/" title="Tin Tức - Thơ sưu tầm" type="application/rss+xml">
<link rel="alternate" href="https://nguoicodonvn2008.info/vi/news/rss/cuoc-song/" title="Tin Tức - Cuộc sống" type="application/rss+xml">
<link rel="alternate" href="https://nguoicodonvn2008.info/vi/news/rss/phan-mem/" title="Tin Tức - Phần mềm" type="application/rss+xml">
<link rel="alternate" href="https://nguoicodonvn2008.info/vi/news/rss/kien-thuc-may-tinh/" title="Tin Tức - Kiến thức máy tính" type="application/rss+xml">
<link rel="alternate" href="https://nguoicodonvn2008.info/vi/news/rss/hoc-tap/" title="Tin Tức - Học tập" type="application/rss+xml">
<link rel="alternate" href="https://nguoicodonvn2008.info/vi/news/rss/tai-lieu/" title="Tin Tức - Tài liệu" type="application/rss+xml">
<link rel="alternate" href="https://nguoicodonvn2008.info/vi/news/rss/de-thi/" title="Tin Tức - Đề thi" type="application/rss+xml">
<link rel="preload" as="style" href="https://nguoicodonvn2008.info/assets/css/font-awesome.min.css" type="text/css">
<link rel="preload" as="style" href="https://nguoicodonvn2008.info/themes/default/css/bootstrap.non-responsive.css" type="text/css">
<link rel="preload" as="style" href="https://nguoicodonvn2008.info/themes/default/css/style.css" type="text/css">
<link rel="preload" as="style" href="https://nguoicodonvn2008.info/themes/default/css/style.non-responsive.css" type="text/css">
<link rel="preload" as="style" href="https://nguoicodonvn2008.info/themes/default/css/news.css" type="text/css">
<link rel="preload" as="style" href="https://nguoicodonvn2008.info/themes/default/css/custom.css" type="text/css">
<link rel="preload" as="script" href="https://nguoicodonvn2008.info/assets/js/jquery/jquery.min.js" type="text/javascript">
<link rel="preload" as="script" href="https://nguoicodonvn2008.info/assets/js/language/vi.js" type="text/javascript">
<link rel="preload" as="script" href="https://nguoicodonvn2008.info/assets/js/DOMPurify/purify3.js" type="text/javascript">
<link rel="preload" as="script" href="https://nguoicodonvn2008.info/assets/js/global.js" type="text/javascript">
<link rel="preload" as="script" href="https://nguoicodonvn2008.info/assets/js/site.js" type="text/javascript">
<link rel="preload" as="script" href="https://nguoicodonvn2008.info/themes/default/js/news.js" type="text/javascript">
<link rel="preload" as="script" href="https://nguoicodonvn2008.info/themes/default/js/main.js" type="text/javascript">
<link rel="preload" as="script" href="https://nguoicodonvn2008.info/themes/default/js/custom.js" type="text/javascript">
<link rel="preload" as="script" href="https://nguoicodonvn2008.info/themes/default/js/bootstrap.min.js" type="text/javascript">
<link rel="stylesheet" href="https://nguoicodonvn2008.info/assets/css/font-awesome.min.css">
<link rel="stylesheet" href="https://nguoicodonvn2008.info/themes/default/css/bootstrap.non-responsive.css">
<link rel="stylesheet" href="https://nguoicodonvn2008.info/themes/default/css/style.css">
<link rel="stylesheet" href="https://nguoicodonvn2008.info/themes/default/css/style.non-responsive.css">
<link rel="StyleSheet" href="https://nguoicodonvn2008.info/themes/default/css/news.css">
<link rel="stylesheet" href="https://nguoicodonvn2008.info/themes/default/css/custom.css">
<style type="text/css">
	body{background: #fff;}
</style>
    </head>
    <body>
<div id="print">
	<div id="hd_print">
		<h2 class="pull-left">.&#x3A; Nguoicodonvn2008.info - Cõi lòng người cô đơn &#x3A;.</h2>
		<p class="pull-right"><a title=".&#x3A; Nguoicodonvn2008.info - Cõi lòng người cô đơn &#x3A;." href="https://nguoicodonvn2008.info/">https://nguoicodonvn2008.info</a></p>
	</div>
	<div class="clear"></div>
	<hr />
	<div id="content">
		<h1>Cách reset thư mục SoftwareDistribution và Catroot2 trên PC Windows 11</h1>
		<ul class="list-inline">
			<li>Thứ hai - 06/11/2023 08:47</li>
			<li class="hidden-print txtrequired"><em class="fa fa-print">&nbsp;</em><a title="In ra" href="javascript:;" onclick="window.print()">In ra</a></li>
			<li class="hidden-print txtrequired"><em class="fa fa-power-off">&nbsp;</em><a title="Đóng cửa sổ này" href="javascript:;" onclick="window.close()">Đóng cửa sổ này</a></li>
		</ul>
		<div class="clear"></div>
		<div id="hometext">
		</div>
				<div class="imghome">
			<img alt="Cách reset thư mục SoftwareDistribution và Catroot2 trên PC Windows 11" src="https://st.quantrimang.com/photos/image/2023/11/06/reset-thu-muc-catroot2-tren-windows-8.jpg" width="460" class="img-thumbnail" />
		</div>
		<div class="clear"></div>
		<div id="bodytext" class="clearfix">
			<p style="text-align: justify;">Người dùng báo cáo rộng rãi lỗi cập nhật Windows 11 trên các diễn đàn hỗ trợ. Các bản cập nhật không cài đặt được vì những lỗi như vậy. Bạn thường có thể sửa lỗi cập nhật bằng cách reset thư mục catroot 2 và Windows SoftwareDistribution như được trình bày bên dưới.</p>

<h2 style="text-align: justify;">Thư mục SoftwareDistribution và Catroot2 là gì?</h2>

<p style="text-align: justify;">Thư mục SoftwareDistribution là thư mục lưu trữ các file cần thiết để cài đặt các bản cập nhật Windows trên PC. Nó là một kho lưu trữ tạm thời các file cập nhật. Vì vậy, thư mục SoftwareDistribution là một thành phần quan trọng để cập nhật Windows.</p>

<p style="text-align: justify;">Catroot 2 là thư mục lưu trữ dữ liệu chữ ký cho các bản cập nhật Windows 11. Đó là những file mà service Cryptographic cần để xác minh bản cập nhật.</p>

<p style="text-align: justify;">Cả hai thư mục đều chứa các file cần thiết để cài đặt những bản cập nhật Windows. Sự cố cài đặt bản cập nhật Windows có thể xảy ra do dữ liệu trong các thư mục đó bị hỏng. Những lỗi đó thường xuất hiện trong Settings với các mã như 0x800f0922 khi người dùng chọn thủ công để kiểm tra và cài đặt các bản cập nhật.</p>

<p style="text-align: justify;">Do đó, reset các thư mục đó là phương pháp khắc phục sự cố cài đặt bản cập nhật Windows 11. Việc reset các thư mục SoftwareDistribution và Catroot2 sẽ loại bỏ dữ liệu bị hỏng mà chúng có thể chứa, sau đó build lại chúng. Bạn có thể reset các thư mục đó bằng cách xóa nội dung hoặc đổi tên chúng.</p>

<h2 style="text-align: justify;">Cách reset thư mục SoftwareDistribution và Catroot2 bằng cách xóa nội dung của chúng</h2>

<p style="text-align: justify;">Phương pháp reset thư mục SoftwareDistribution và Catroot2 này liên quan đến việc xóa dữ liệu trong đó theo cách thủ công thông qua File Explorer. Bạn cũng cần phải tắt và kích hoạt lại một số service nhất định thông qua Command Prompt để đảm bảo chúng không sử dụng các file trong đó. Xóa các file trong thư mục SoftwareDistribution và Catroot2 như sau:</p>

<div style="text-align: justify;"><iframe allowtransparency="true" data-google-container-id="a!2" data-google-query-id="CJf1qrjBr4IDFWARrQYd0r8L9g" data-load-complete="true" frameborder="0" height="0" hspace="0" id="aswift_1" marginheight="0" marginwidth="0" name="aswift_1" sandbox="" scrolling="no" vspace="0" width="694"></iframe></div>

<p style="text-align: justify;">1. Mở tiện ích tìm file có thể truy cập bằng&nbsp;<strong>Windows + S</strong>.</p>

<p style="text-align: justify;">2. Xác định vị trí Command Prompt bằng cách nhập từ khóa&nbsp;<strong>cmd</strong>&nbsp;vào hộp văn bản tìm kiếm.</p>

<p style="text-align: justify;">3.&nbsp;Mở Command Prompt với quyền admin&nbsp;bằng cách nhấp vào tùy chọn&nbsp;<strong>Run as administrator</strong>&nbsp;ở bên phải công cụ tìm kiếm.</p>

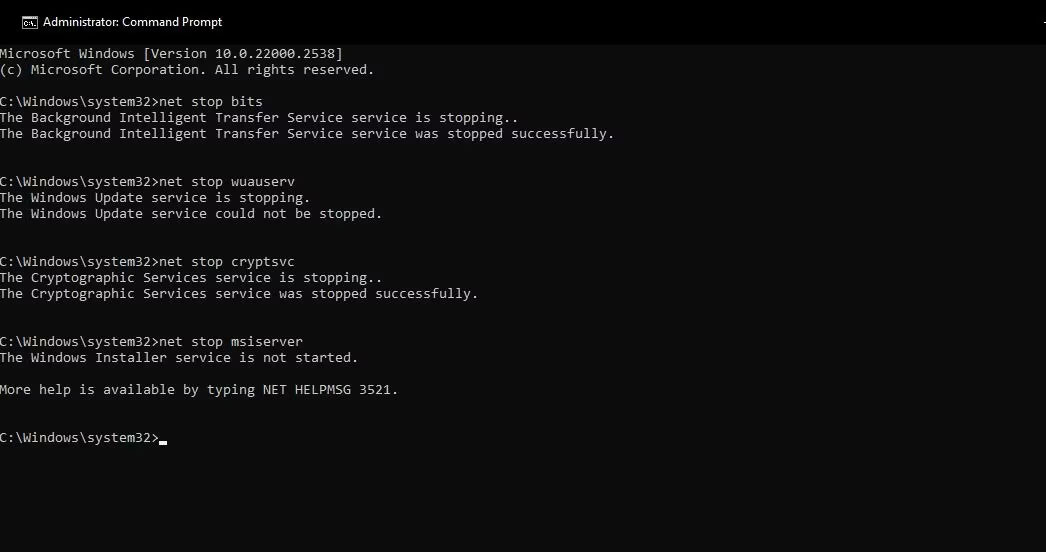
<p style="text-align: justify;">4. Nhập và thực hiện các lệnh riêng biệt sau để tắt các service cần thiết để cập nhật Windows 11:</p>

<pre id="pre0">
<code>net stop bits

net stop wuauserv

net stop cryptsvc

net stop msiserver</code></pre>

<p style="text-align: justify;">5. Nhấn phím&nbsp;<strong>Windows + E</strong>&nbsp;trên bàn phím để&nbsp;<a data-type="internal" href="https://quantrimang.com/cong-nghe/cach-mo-file-explorer-tren-windows-11-184094" title="Tổng hợp các cách mở File Explorer trên Windows 11">truy cập File Explorer</a>.</p>

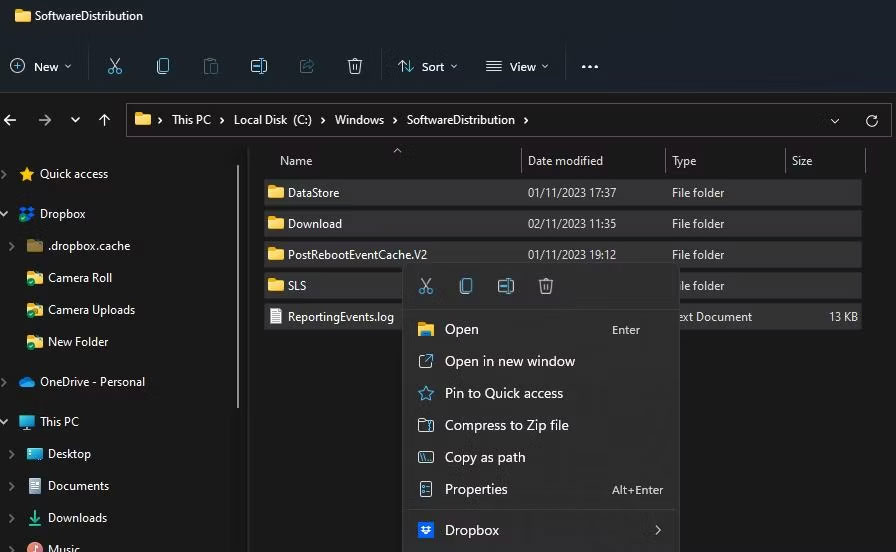
<p style="text-align: justify;">6. Mở thư mục&nbsp;<strong>SoftwareDistribution</strong>&nbsp;tại đường dẫn này:</p>

<pre id="pre1">
<code>C:\Windows\SoftwareDistribution</code></pre>

<p style="text-align: justify;">7. Nhấn&nbsp;<strong>Ctrl + A</strong>&nbsp;để chọn tất cả các file trong thư mục SoftwareDistribution.</p>

<p style="text-align: justify;">8. Nhấp chuột phải và chọn&nbsp;<strong>Delete</strong>&nbsp;(nút thùng rác) để xóa nội dung đã chọn.</p>

<figure>
<div style="text-align: justify;"><img alt="Thư mục SoftwareDistribution" data-i="0" data-src="https://st.quantrimang.com/photos/image/2023/11/06/reset-thu-muc-catroot2-tren-windows-1.jpg" data-was-processed="true" height="552" src="https://st.quantrimang.com/photos/image/2023/11/06/reset-thu-muc-catroot2-tren-windows-1.jpg" width="896" /></div>

<figcaption>
<div style="text-align: justify;">Thư mục SoftwareDistribution</div>
</figcaption>
</figure>

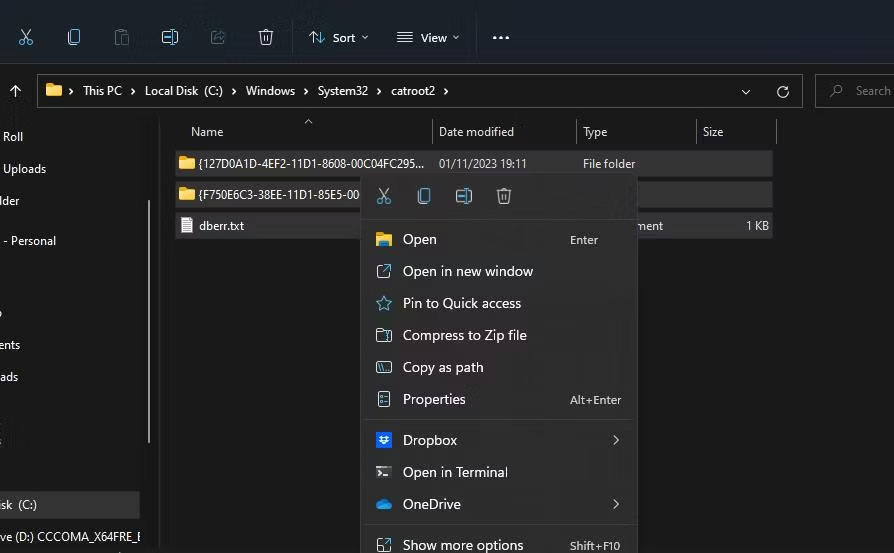
<p style="text-align: justify;">9. Mở thư mục&nbsp;<strong>catroot2</strong>&nbsp;bằng cách nhập đường dẫn này vào thanh địa chỉ của Explorer:</p>

<pre id="pre2">
<code>C:\Windows\System32\catroot2</code></pre>

<p style="text-align: justify;">10. Lặp lại bước 7 và 8 ở trên để xóa mọi thứ trong thư mục đó.</p>

<figure>
<div style="text-align: justify;"><img alt="Thư mục catroot2" data-adbro-processed="true" data-i="1" data-src="https://st.quantrimang.com/photos/image/2023/11/06/reset-thu-muc-catroot2-tren-windows-2.jpg" data-was-processed="true" height="553" src="https://st.quantrimang.com/photos/image/2023/11/06/reset-thu-muc-catroot2-tren-windows-2.jpg" width="894" /></div>

<figcaption>
<div style="text-align: justify;">Thư mục catroot2</div>
</figcaption>
</figure>

<div style="text-align: justify;"><iframe allowtransparency="true" data-google-container-id="a!3" data-google-query-id="CNynjL3Br4IDFXERrQYdQOEEug" data-load-complete="true" frameborder="0" height="0" hspace="0" id="aswift_2" marginheight="0" marginwidth="0" name="aswift_2" sandbox="" scrolling="no" vspace="0" width="694"></iframe></div>

<p style="text-align: justify;">11. Quay lại Command Prompt và thực hiện các lệnh riêng biệt này để khởi động lại những service bị vô hiệu hóa.</p>

<pre id="pre3">
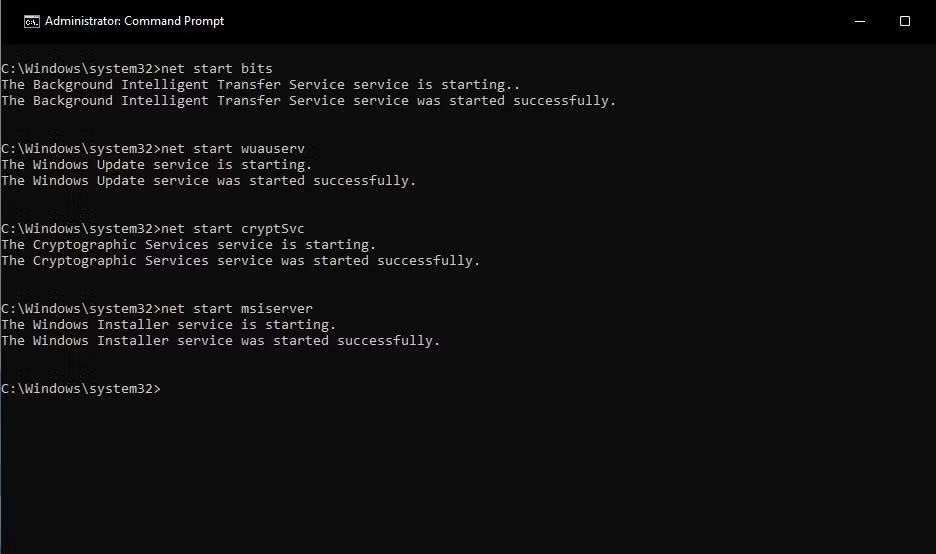
<code>net start bits

net start wuauserv

net start cryptSvc

net start msiserver</code></pre>

<p style="text-align: justify;">12.&nbsp;Khởi động lại PC&nbsp;và kiểm tra các bản cập nhật sau khi xóa các thư mục đó.</p>

<h2 style="text-align: justify;">Reset thư mục SoftwareDistribution và Catroot2 bằng cách đổi tên chúng</h2>

<p style="text-align: justify;">Đổi tên thư mục SoftwareDistribution và Catroot2 là một phương pháp thay thế để reset các thư mục đó. Windows sẽ tạo lại các thư mục đó sau khi bạn đổi tên chúng. Bạn có thể đổi tên các thư mục SoftwareDistribution và catroot2 bằng Command Prompt như thế này:</p>

<p style="text-align: justify;">1. Chạy Command Prompt với quyền admin.</p>

<p style="text-align: justify;">2. Lặp lại bước 4 của phương pháp trước để thực thi lệnh vô hiệu hóa các service.</p>

<figure>
<div style="text-align: justify;"><img alt="Lệnh vô hiệu hóa các service" data-i="2" data-src="https://st.quantrimang.com/photos/image/2023/11/06/reset-thu-muc-catroot2-tren-windows-3.jpg" data-was-processed="true" height="552" src="https://st.quantrimang.com/photos/image/2023/11/06/reset-thu-muc-catroot2-tren-windows-3.jpg" width="1046" /></div>

<figcaption>
<div style="text-align: justify;">Lệnh vô hiệu hóa các service</div>
</figcaption>
</figure>

<p style="text-align: justify;">3. Nhập lệnh này để đổi tên thư mục SoftwareDistribution và nhấn&nbsp;<strong>Return</strong>:</p>

<pre id="pre4">
<code>ren %systemroot%\softwaredistribution softwaredistribution.bak</code></pre>

<figure>
<div style="text-align: justify;"><img alt="Lệnh đổi tên thư mục SoftwareDistribution" data-i="3" data-src="https://st.quantrimang.com/photos/image/2023/11/06/reset-thu-muc-catroot2-tren-windows-4.jpg" data-was-processed="true" height="156" src="https://st.quantrimang.com/photos/image/2023/11/06/reset-thu-muc-catroot2-tren-windows-4.jpg" width="996" /></div>

<figcaption>
<div style="text-align: justify;">Lệnh đổi tên thư mục SoftwareDistribution</div>
</figcaption>
</figure>

<p style="text-align: justify;">4. Nhập và thực hiện lệnh đổi tên này cho thư mục catroot2:</p>

<pre id="pre5">
<code>ren %systemroot%\system32\catroot2 catroot2.bak</code></pre>

<figure>
<div style="text-align: justify;"><img alt="Lệnh ren catroot2" data-i="4" data-src="https://st.quantrimang.com/photos/image/2023/11/06/reset-thu-muc-catroot2-tren-windows-5.jpg" data-was-processed="true" height="147" src="https://st.quantrimang.com/photos/image/2023/11/06/reset-thu-muc-catroot2-tren-windows-5.jpg" width="995" /></div>

<figcaption>
<div style="text-align: justify;">Lệnh ren catroot2</div>
</figcaption>
</figure>

<p style="text-align: justify;">5. Lặp lại bước 11 của phương pháp trước bằng cách thực thi 4 lệnh để khởi động lại các service đã tắt.</p>

<figure>
<div style="text-align: justify;"><img alt="Lệnh net start" data-i="5" data-src="https://st.quantrimang.com/photos/image/2023/11/06/reset-thu-muc-catroot2-tren-windows-6.jpg" data-was-processed="true" height="554" src="https://st.quantrimang.com/photos/image/2023/11/06/reset-thu-muc-catroot2-tren-windows-6.jpg" width="936" /></div>

<figcaption>
<div style="text-align: justify;">Lệnh net start</div>
</figcaption>
</figure>

<div style="text-align: justify;"><iframe allowtransparency="true" data-google-container-id="a!4" data-google-query-id="CLv9mL_Br4IDFcQTrQYdvH8CUg" data-load-complete="true" frameborder="0" height="0" hspace="0" id="aswift_3" marginheight="0" marginwidth="0" name="aswift_3" sandbox="" scrolling="no" vspace="0" width="694"></iframe></div>

<p style="text-align: justify;">6. Thoát Command Prompt và khởi động lại PC.</p>

<h2 style="text-align: justify;">Cách reset thư mục SoftwareDistribution và Catroot2 với FixWin 11</h2>

<p style="text-align: justify;">FixWin 11 là một trong những công cụ sửa chữa Windows miễn phí tốt nhất bao gồm các tùy chọn khắc phục sự cố. Trong số đó có hai tùy chọn để reset thư mục catroot2 và SoftwareDistribution. Đây là cách bạn có thể chọn các tùy chọn sửa lỗi nhanh đó trong FixWin 11:</p>

<p style="text-align: justify;">1.&nbsp;Mở trang FixWin 11&nbsp;này trên trang web Softpedia.</p>

<p style="text-align: justify;">2. Nhấp vào nút&nbsp;<strong>Free Download</strong>&nbsp;cho FixWin.</p>

<p style="text-align: justify;">3. Chọn&nbsp;<strong>Secure Download (US)</strong>&nbsp;để lấy kho lưu trữ ZIP của FixWin.</p>

<p style="text-align: justify;">4. Kích hoạt cửa sổ File Explorer và đi tới thư mục tải xuống của trình duyệt.</p>

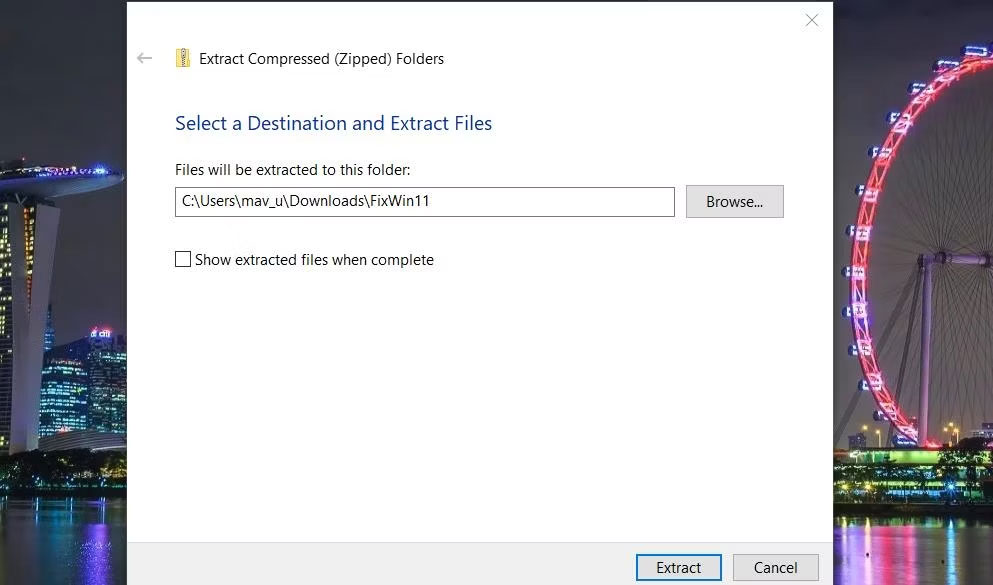
<p style="text-align: justify;">5. Giải nén kho lưu trữ FixWin bằng cách thực hiện các bước trong bài viết này về&nbsp;cách giải nén file ZIP trên Windows.</p>

<figure>
<div style="text-align: justify;"><img alt="Giải nén kho lưu trữ ZIP nén" data-i="6" data-src="https://st.quantrimang.com/photos/image/2023/11/06/reset-thu-muc-catroot2-tren-windows-7.jpg" data-was-processed="true" height="585" src="https://st.quantrimang.com/photos/image/2023/11/06/reset-thu-muc-catroot2-tren-windows-7.jpg" width="993" /></div>

<figcaption>
<div style="text-align: justify;">Giải nén kho lưu trữ ZIP nén</div>
</figcaption>
</figure>

<p style="text-align: justify;">6. Nhấp đúp vào file&nbsp;<strong>FixWin 11.1.exe</strong>&nbsp;trong thư mục giải nén cho FixWin.</p>

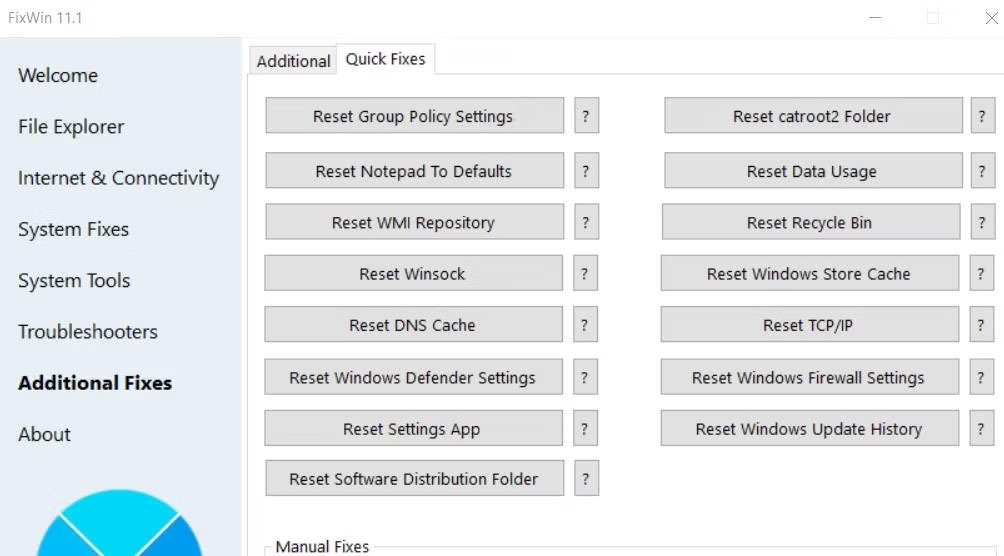
<p style="text-align: justify;">7. Nhấp vào&nbsp;<strong>Additional Fixes</strong>&nbsp;ở bên trái cửa sổ FixWin.</p>

<p style="text-align: justify;">8. Chọn tab&nbsp;<strong>Quick</strong>&nbsp;<strong>Fixes</strong>.</p>

<p style="text-align: justify;">9. Nhấn nút&nbsp;<strong>Reset Software Distribution folder</strong>.</p>

<figure>
<div style="text-align: justify;"><img alt="Tab Quick Fixes" data-i="7" data-src="https://st.quantrimang.com/photos/image/2023/11/06/reset-thu-muc-catroot2-tren-windows-8.jpg" data-was-processed="true" height="556" src="https://st.quantrimang.com/photos/image/2023/11/06/reset-thu-muc-catroot2-tren-windows-8.jpg" width="1004" /></div>

<figcaption>
<div style="text-align: justify;">Tab Quick Fixes</div>
</figcaption>
</figure>

<p style="text-align: justify;">10. Nhấp vào tùy chọn&nbsp;<strong>Reset catroo2 Folder</strong>.</p>

<p style="text-align: justify;">11. Thoát FixWin và khởi động lại PC sau khi chọn các tùy chọn đó.</p>

<div style="text-align: justify;">&nbsp;</div>
		</div>
				<div id="author">
						<p>
				<strong>Nguồn tin:</strong>
				Quantrimang.com
			</p>
		</div>
	</div>
	<div id="footer" class="clearfix">
		<div id="url">
			<strong>URL của bản tin này: </strong><a href="https://www.nguoicodonvn2008.info/vi/news/savefile/kien-thuc-may-tinh/cach-reset-thu-muc-softwaredistribution-va-catroot2-tren-pc-windows-11-7727.html" title="Cách reset thư mục SoftwareDistribution và Catroot2 trên PC Windows 11">https://www.nguoicodonvn2008.info/vi/news/savefile/kien-thuc-may-tinh/cach-reset-thu-muc-softwaredistribution-va-catroot2-tren-pc-windows-11-7727.html</a>

		</div>
		<div class="clear"></div>
		<div class="copyright">
			&copy; .&#x3A; Nguoicodonvn2008.info - Cõi lòng người cô đơn &#x3A;.
		</div>
		<div id="contact">
			<a href="mailto:admin@nguoicodonvn2008.info">admin@nguoicodonvn2008.info</a>
		</div>
	</div>
</div>
        <div id="timeoutsess" class="chromeframe">
            Bạn đã không sử dụng Site, <a onclick="timeoutsesscancel();" href="https://nguoicodonvn2008.info/#">Bấm vào đây để duy trì trạng thái đăng nhập</a>. Thời gian chờ: <span id="secField"> 60 </span> giây
        </div>
        <div id="openidResult" class="nv-alert" style="display:none"></div>
        <div id="openidBt" data-result="" data-redirect=""></div>
		</script>
		<div class="car-top">
  <span><img src="https://nguoicodonvn2008.info/themes/default/images/car.png" alt=""></span>
</div>
<div id="run_cronjobs" style="visibility:hidden;display:none;"><img alt="cron" src="/index.php?second=cronjobs&amp;p=b7I5tK4D" width="1" height="1" /></div>
<script src="https://nguoicodonvn2008.info/assets/js/jquery/jquery.min.js"></script>
<script>var nv_base_siteurl="/",nv_lang_data="vi",nv_lang_interface="vi",nv_name_variable="nv",nv_fc_variable="op",nv_lang_variable="language",nv_module_name="news",nv_func_name="savefile",nv_is_user=0, nv_my_ofs=-4,nv_my_abbr="EDT",nv_cookie_prefix="nv4c_e856T",nv_check_pass_mstime=1738000,nv_area_admin=0,nv_safemode=0,theme_responsive=0,nv_recaptcha_ver=2,nv_recaptcha_sitekey="",nv_recaptcha_type="image",XSSsanitize=1;</script>
<script src="https://nguoicodonvn2008.info/assets/js/language/vi.js"></script>
<script src="https://nguoicodonvn2008.info/assets/js/DOMPurify/purify3.js"></script>
<script src="https://nguoicodonvn2008.info/assets/js/global.js"></script>
<script src="https://nguoicodonvn2008.info/assets/js/site.js"></script>
<script src="https://nguoicodonvn2008.info/themes/default/js/news.js"></script>
<script src="https://nguoicodonvn2008.info/themes/default/js/main.js"></script>
<script src="https://nguoicodonvn2008.info/themes/default/js/custom.js"></script>
<script type="application/ld+json">
        {
            "@context": "https://schema.org",
            "@type": "Organization",
            "url": "https://nguoicodonvn2008.info",
            "logo": "https://nguoicodonvn2008.info/uploads/angel.gif"
        }
        </script>
<script src="https://nguoicodonvn2008.info/themes/default/js/bootstrap.min.js"></script>
<script type="text/javascript">
var $scrolltop = $('.car-top');
$scrolltop.on('click', function () {
    $('html,body').animate({
        scrollTop: 0
    }, 800);
    $(this).addClass("car-run");
    setTimeout(function(){ $scrolltop.removeClass('car-run');}, 1000);
    return false;
});
$(window).on('scroll', function ()
{ 
    if($(window).scrollTop() >= 200)
    {
        $scrolltop.addClass("show");
        $scrolltop.addClass("car-down");
    }
    else
    {
       $scrolltop.removeClass("show");
       setTimeout(function(){ $scrolltop.removeClass('car-down');}, 300);
    }
});
</script>
</body>
</html>