<!DOCTYPE html>
    <html lang="vi" xmlns="http://www.w3.org/1999/xhtml" prefix="og: http://ogp.me/ns#">
    <head>
<title>Cách nhập dữ liệu Excel vào tập lệnh Python bằng Pandas</title>
<meta name="description" content="Cách nhập dữ liệu Excel vào tập lệnh Python bằng Pandas - Savefile - Tin Tức -...">
<meta name="author" content=".: Nguoicodonvn2008.info - Cõi lòng người cô đơn :.">
<meta name="copyright" content=".: Nguoicodonvn2008.info - Cõi lòng người cô đơn :. [admin@nguoicodonvn2008.info]">
<meta name="robots" content="index, archive, follow, noodp">
<meta name="googlebot" content="index,archive,follow,noodp">
<meta name="msnbot" content="all,index,follow">
<meta name="generator" content="NukeViet v4.5">
<meta http-equiv="Content-Type" content="text/html; charset=utf-8">
<meta property="og:title" content="Cách nhập dữ liệu Excel vào tập lệnh Python bằng Pandas">
<meta property="og:type" content="website">
<meta property="og:description" content="Savefile - Tin Tức - https&#x3A;&#x002F;&#x002F;www.nguoicodonvn2008.info&#x002F;vi&#x002F;news&#x002F;savefile&#x002F;kien-thuc-may-tinh&#x002F;cach-nhap-du-lieu-excel-vao-tap-lenh-python-bang-pandas-1137.html">
<meta property="og:site_name" content=".&#x3A; Nguoicodonvn2008.info - Cõi lòng người cô đơn &#x3A;.">
<meta property="og:url" content="https://www.nguoicodonvn2008.info/vi/news/savefile/kien-thuc-may-tinh/cach-nhap-du-lieu-excel-vao-tap-lenh-python-bang-pandas-1137.html">
<link rel="shortcut icon" href="https://nguoicodonvn2008.info/favicon.ico">
<link rel="canonical" href="https://www.nguoicodonvn2008.info/vi/news/savefile/kien-thuc-may-tinh/cach-nhap-du-lieu-excel-vao-tap-lenh-python-bang-pandas-1137.html">
<link rel="alternate" href="https://nguoicodonvn2008.info/vi/news/rss/" title="Tin Tức" type="application/rss+xml">
<link rel="alternate" href="https://nguoicodonvn2008.info/vi/news/rss/karaoke-dual/" title="Tin Tức - Karaoke Dual" type="application/rss+xml">
<link rel="alternate" href="https://nguoicodonvn2008.info/vi/news/rss/nhac-tre/" title="Tin Tức - Nhạc trẻ" type="application/rss+xml">
<link rel="alternate" href="https://nguoicodonvn2008.info/vi/news/rss/tru-tinh/" title="Tin Tức - Trữ tình" type="application/rss+xml">
<link rel="alternate" href="https://nguoicodonvn2008.info/vi/news/rss/nuoc-ngoai/" title="Tin Tức - Nước ngoài" type="application/rss+xml">
<link rel="alternate" href="https://nguoicodonvn2008.info/vi/news/rss/remix/" title="Tin Tức - Remix" type="application/rss+xml">
<link rel="alternate" href="https://nguoicodonvn2008.info/vi/news/rss/tam-su-tinh-yeu/" title="Tin Tức - Tâm sự tình yêu" type="application/rss+xml">
<link rel="alternate" href="https://nguoicodonvn2008.info/vi/news/rss/tho-suu-tam/" title="Tin Tức - Thơ sưu tầm" type="application/rss+xml">
<link rel="alternate" href="https://nguoicodonvn2008.info/vi/news/rss/cuoc-song/" title="Tin Tức - Cuộc sống" type="application/rss+xml">
<link rel="alternate" href="https://nguoicodonvn2008.info/vi/news/rss/phan-mem/" title="Tin Tức - Phần mềm" type="application/rss+xml">
<link rel="alternate" href="https://nguoicodonvn2008.info/vi/news/rss/kien-thuc-may-tinh/" title="Tin Tức - Kiến thức máy tính" type="application/rss+xml">
<link rel="alternate" href="https://nguoicodonvn2008.info/vi/news/rss/hoc-tap/" title="Tin Tức - Học tập" type="application/rss+xml">
<link rel="alternate" href="https://nguoicodonvn2008.info/vi/news/rss/tai-lieu/" title="Tin Tức - Tài liệu" type="application/rss+xml">
<link rel="alternate" href="https://nguoicodonvn2008.info/vi/news/rss/de-thi/" title="Tin Tức - Đề thi" type="application/rss+xml">
<link rel="preload" as="style" href="https://nguoicodonvn2008.info/assets/css/font-awesome.min.css" type="text/css">
<link rel="preload" as="style" href="https://nguoicodonvn2008.info/themes/default/css/bootstrap.non-responsive.css" type="text/css">
<link rel="preload" as="style" href="https://nguoicodonvn2008.info/themes/default/css/style.css" type="text/css">
<link rel="preload" as="style" href="https://nguoicodonvn2008.info/themes/default/css/style.non-responsive.css" type="text/css">
<link rel="preload" as="style" href="https://nguoicodonvn2008.info/themes/default/css/news.css" type="text/css">
<link rel="preload" as="style" href="https://nguoicodonvn2008.info/themes/default/css/custom.css" type="text/css">
<link rel="preload" as="script" href="https://nguoicodonvn2008.info/assets/js/jquery/jquery.min.js" type="text/javascript">
<link rel="preload" as="script" href="https://nguoicodonvn2008.info/assets/js/language/vi.js" type="text/javascript">
<link rel="preload" as="script" href="https://nguoicodonvn2008.info/assets/js/DOMPurify/purify3.js" type="text/javascript">
<link rel="preload" as="script" href="https://nguoicodonvn2008.info/assets/js/global.js" type="text/javascript">
<link rel="preload" as="script" href="https://nguoicodonvn2008.info/assets/js/site.js" type="text/javascript">
<link rel="preload" as="script" href="https://nguoicodonvn2008.info/themes/default/js/news.js" type="text/javascript">
<link rel="preload" as="script" href="https://nguoicodonvn2008.info/themes/default/js/main.js" type="text/javascript">
<link rel="preload" as="script" href="https://nguoicodonvn2008.info/themes/default/js/custom.js" type="text/javascript">
<link rel="preload" as="script" href="https://nguoicodonvn2008.info/themes/default/js/bootstrap.min.js" type="text/javascript">
<link rel="stylesheet" href="https://nguoicodonvn2008.info/assets/css/font-awesome.min.css">
<link rel="stylesheet" href="https://nguoicodonvn2008.info/themes/default/css/bootstrap.non-responsive.css">
<link rel="stylesheet" href="https://nguoicodonvn2008.info/themes/default/css/style.css">
<link rel="stylesheet" href="https://nguoicodonvn2008.info/themes/default/css/style.non-responsive.css">
<link rel="StyleSheet" href="https://nguoicodonvn2008.info/themes/default/css/news.css">
<link rel="stylesheet" href="https://nguoicodonvn2008.info/themes/default/css/custom.css">
<style type="text/css">
	body{background: #fff;}
</style>
    </head>
    <body>
<div id="print">
	<div id="hd_print">
		<h2 class="pull-left">.&#x3A; Nguoicodonvn2008.info - Cõi lòng người cô đơn &#x3A;.</h2>
		<p class="pull-right"><a title=".&#x3A; Nguoicodonvn2008.info - Cõi lòng người cô đơn &#x3A;." href="https://nguoicodonvn2008.info/">https://nguoicodonvn2008.info</a></p>
	</div>
	<div class="clear"></div>
	<hr />
	<div id="content">
		<h1>Cách nhập dữ liệu Excel vào tập lệnh Python bằng Pandas</h1>
		<ul class="list-inline">
			<li>Thứ tư - 09/10/2019 08:04</li>
			<li class="hidden-print txtrequired"><em class="fa fa-print">&nbsp;</em><a title="In ra" href="javascript:;" onclick="window.print()">In ra</a></li>
			<li class="hidden-print txtrequired"><em class="fa fa-power-off">&nbsp;</em><a title="Đóng cửa sổ này" href="javascript:;" onclick="window.close()">Đóng cửa sổ này</a></li>
		</ul>
		<div class="clear"></div>
		<div id="hometext">
		</div>
				<div class="imghome">
			<img alt="Cách nhập dữ liệu Excel vào tập lệnh Python bằng Pandas" src="https://st.quantrimang.com/photos/image/2019/10/09/nhap-du-lieu-excel-vao-python-bang-pandas-3.jpg" width="460" class="img-thumbnail" />
		</div>
		<div class="clear"></div>
		<div id="bodytext" class="clearfix">
			<p style="text-align: justify;">Microsoft Excel&nbsp;là phần mềm bảng tính được sử dụng rộng rãi nhất trên thế giới và có lý do chính đáng cho việc đó. Excel có giao diện thân thiện với người dùng và các công cụ tích hợp mạnh mẽ giúp đơn giản hơn khi làm việc với dữ liệu.</p>

<p style="text-align: justify;">Nhưng nếu muốn xử lý dữ liệu nâng cao hơn, bạn sẽ cần phải sử dụng những thứ vượt ra ngoài các khả năng của Excel và bắt đầu dùng một ngôn ngữ lập trình như&nbsp;Python. Thay vì sao chép thủ công dữ liệu vào database, sau đây là hướng dẫn nhanh về cách load dữ liệu Excel vào Python bằng Pandas.</p>

<p style="text-align: justify;"><strong>Lưu ý</strong>: Nếu chưa từng sử dụng Python trước đây, hướng dẫn này có thể khó khăn. Bạn nên bắt đầu với&nbsp;các trang web để tìm hiểu Python&nbsp;và&nbsp;những ví dụ Python cơ bản&nbsp;mà&nbsp;<strong>Quantrimang.com</strong>&nbsp;đã gợi ý.</p>

<h2 style="text-align: justify;">&nbsp;</h2>

<h2 id="mcetoc_1dmnb50mq0" style="text-align: justify;">Pandas là gì?</h2>

<p style="text-align: justify;">Python Data Analysis Library (Pandas)&nbsp;là một thư viện mã nguồn mở cho ngôn ngữ lập trình Python được sử dụng để phân tích và thao tác dữ liệu.</p>

<p style="text-align: justify;">Pandas load dữ liệu vào các đối tượng Python được gọi là Dataframe, lưu trữ dữ liệu theo hàng và cột giống như cơ sở dữ liệu truyền thống. Khi một Dataframe được tạo, nó có thể được thao tác bằng Python, mở ra vô số khả năng.</p>

<h2 id="mcetoc_1dmnb50mq1" style="text-align: justify;">Cài đặt Pandas</h2>

<p style="text-align: justify;"><strong>Lưu ý</strong>: Bạn phải có Python 2.7 trở lên để cài đặt Pandas.</p>

<p style="text-align: justify;">Để bắt đầu làm việc với Pandas trên máy tính, bạn sẽ cần nhập thư viện Pandas. Nếu tìm kiếm một giải pháp nâng cao, bạn có thể tải xuống&nbsp;<strong>Anaconda Python Distribution</strong>, có tích hợp Pandas. Nếu bạn không sử dụng Anaconda, Pandas rất đơn giản để cài đặt trong terminal.</p>

<p style="text-align: justify;">Pandas là gói PyPI, có nghĩa là bạn có thể cài đặt bằng PIP cho Python thông qua dòng lệnh. Các hệ thống Mac hiện đại đi kèm với PIP. Đối với các hệ thống Windows, Linux và nhiều hệ thống cũ khác, rất dễ dàng để học cách cài đặt PIP cho Python.</p>

<p style="text-align: justify;">Khi bạn đã mở terminal, phiên bản mới nhất của Pandas có thể được cài đặt bằng lệnh:</p>

<pre id="pre0">
<code>&gt;&gt; pip install pandas</code></pre>

<p style="text-align: justify;">Pandas cũng yêu cầu thư viện NumPy, hãy cài đặt thư viện này trên dòng lệnh:</p>

<pre id="pre1">
<code>&gt;&gt; pip install numpy</code></pre>

<p style="text-align: justify;">Bây giờ, bạn đã cài đặt Pandas và sẵn sàng tạo DataFrame đầu tiên!</p>

<h2 id="mcetoc_1dmnb50mq2" style="text-align: justify;">Chuẩn bị dữ liệu Excel</h2>

<p style="text-align: justify;">Trong ví dụ này, hãy sử dụng một tập dữ liệu mẫu: Một workbook Excel có tên&nbsp;<strong>Cars.xlsx.</strong></p>

<p style="text-align: justify;"><strong><img alt="Một workbook Excel có tên Cars.xlsx" data-i="0" data-src="https://st.quantrimang.com/photos/image/2019/10/09/nhap-du-lieu-excel-vao-python-bang-pandas-1.jpg" data-was-processed="true" height="500" src="https://st.quantrimang.com/photos/image/2019/10/09/nhap-du-lieu-excel-vao-python-bang-pandas-1.jpg" width="457" /></strong></p>

<p style="text-align: justify;">Tập dữ liệu này hiển thị thương hiệu, kiểu dáng, màu sắc và năm sản xuất của những chiếc ô tô được nhập vào bảng. Bảng được hiển thị dưới dạng phạm vi Excel. Pandas đủ thông minh để đọc dữ liệu một cách phù hợp.</p>

<p style="text-align: justify;">Workbook này được lưu vào thư mục&nbsp;<strong>Desktop,</strong>&nbsp;đây là đường dẫn file được sử dụng:</p>

<pre id="pre2">
<code>/Users/grant/Desktop/Cars.xlsx</code></pre>

<p style="text-align: justify;">Bạn sẽ cần biết đường dẫn file của workbook để sử dụng Pandas. Hãy bắt đầu bằng cách mở Visual Studio Code để viết script. Nếu bạn không có trình soạn thảo văn bản, bài viết khuyên dùng&nbsp;Visual Studio Code hoặc Atom Editor.</p>

<h2 id="mcetoc_1dmnb50mq3" style="text-align: justify;">Viết Python script</h2>

<p style="text-align: justify;">Bây giờ, bạn đã có trình soạn thảo văn bản mình cần. Tiếp theo, bài viết sẽ kết hợp Python và workbook Cars để tạo ra một DataFrame Pandas.</p>

<div style="text-align: justify;">&nbsp;</div>

<h3 id="mcetoc_1dmnb50mr4" style="text-align: justify;">Nhập thư viện Python</h3>

<p style="text-align: justify;">Mở trình soạn thảo văn bản và tạo một file Python mới. Hãy gọi cho nó là&nbsp;<strong>Script.py.</strong></p>

<p style="text-align: justify;">Để làm việc với Pandas trong script, bạn sẽ cần nhập nó vào code của mình. Điều này được thực hiện với một dòng code:</p>

<pre id="pre3">
<code>import pandas as pd</code></pre>

<p style="text-align: justify;">Ở đây, ví dụ đang load thư viện Pandas và đính kèm nó vào một biến&nbsp;<strong>“pd”.</strong>&nbsp;Bạn có thể sử dụng bất kỳ tên nào mình muốn, còn ví dụ hiện đang sử dụng&nbsp;<strong>“pd”,</strong>&nbsp;là viết tắt của&nbsp;<strong>Pandas.</strong></p>

<p style="text-align: justify;">Để làm việc với Excel bằng Pandas, bạn cần một đối tượng bổ sung có tên&nbsp;<strong>ExcelFile.</strong>ExcelFile được tích hợp vào hệ sinh thái Pandas, vì vậy bạn có thể nhập trực tiếp từ Pandas:</p>

<pre id="pre4">
<code>from pandas import ExcelFile</code></pre>

<h3 id="mcetoc_1dmnb50mr5" style="text-align: justify;">Làm việc với đường dẫn file</h3>

<p style="text-align: justify;">Để cấp cho Pandas quyền truy cập vào workbook, bạn cần hướng script của mình đến vị trí file. Cách dễ nhất để làm điều này là cung cấp cho script đường dẫn đầy đủ đến workbook.</p>

<p style="text-align: justify;">Nhớ lại đường dẫn trong ví dụ này:&nbsp;<strong>/Users/grant/Desktop/Cars.xlsx</strong></p>

<p style="text-align: justify;">Bạn sẽ cần đường dẫn file này được tham chiếu trong script để trích xuất dữ liệu. Thay vì tham chiếu đường dẫn bên trong hàm&nbsp;<strong>Read_Excel,</strong>&nbsp;hãy giữ “sạch” code bằng cách lưu trữ đường dẫn trong một biến:</p>

<pre id="pre5">
<code>Cars_Path = &#039;/Users/grant/Desktop/Cars.xlsx&#039;</code></pre>

<p style="text-align: justify;">Bây giờ, bạn đã sẵn sàng để trích xuất dữ liệu bằng hàm Pandas!</p>

<h3 id="mcetoc_1dmnb50mr6" style="text-align: justify;">Trích xuất dữ liệu Excel bằng Pandas.Read_Excel()</h3>

<p style="text-align: justify;">Với Pandas được nhập và bộ biến đường dẫn được đặt, giờ đây, bạn có thể sử dụng các hàm trong đối tượng Pandas để hoàn thành nhiệm vụ.</p>

<p style="text-align: justify;">Hàm bạn sẽ cần sử dụng có tên là&nbsp;<strong>Read_Excel.</strong>&nbsp;Hàm Read_Excel lấy đường dẫn file của workbook Excel và trả về một đối tượng DataFrame với nội dung của workbook. Pandas đặt chức năng này là:</p>

<pre id="pre6">
<code>pandas.read_excel(path)</code></pre>

<p style="text-align: justify;">Đối số&nbsp;<strong>“path”</strong>&nbsp;là đường dẫn đến workbook Cars.xlsx và bài viết đã đặt chuỗi đường dẫn thành biến&nbsp;<strong>Cars_Path.</strong></p>

<p style="text-align: justify;">Bạn đã sẵn sàng để tạo đối tượng DataFrame! Hãy kết hợp tất cả cùng nhau và đặt đối tượng DataFrame thành một biến có tên là&nbsp;<strong>DF:</strong></p>

<pre id="pre7">
<code>DF = pd.read_excel(Cars_Path)</code></pre>

<p style="text-align: justify;">Cuối cùng, bạn sẽ muốn xem DataFrame, vì vậy hãy in kết quả. Thêm một câu lệnh in vào cuối script, sử dụng biến DataFrame làm đối số:</p>

<pre id="pre8">
<code>print(DF)</code></pre>

<p style="text-align: justify;">
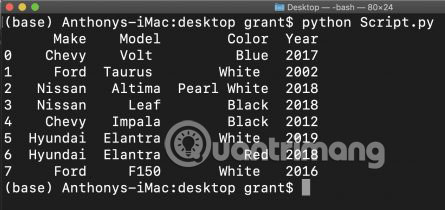
Đã đến lúc để chạy script trong terminal!</p>

<h3 id="mcetoc_1dmnb50mr7" style="text-align: justify;">Chạy script Python</h3>

<p style="text-align: justify;">Mở terminal hoặc dòng lệnh và điều hướng đến thư mục chứa script của bạn. Trong trường hợp này, ta có ngay&nbsp;<strong>“Script.py”</strong>&nbsp;trên desktop. Để thực thi script, sử dụng lệnh python theo sau là file script:</p>

<p style="text-align: justify;"><img alt="Chạy script Python" data-i="1" data-src="https://st.quantrimang.com/photos/image/2019/10/09/nhap-du-lieu-excel-vao-python-bang-pandas-2.jpg" data-was-processed="true" height="49" src="https://st.quantrimang.com/photos/image/2019/10/09/nhap-du-lieu-excel-vao-python-bang-pandas-2.jpg" width="650" /></p>

<p style="text-align: justify;">Python sẽ kéo dữ liệu từ “Cars.xlsx” vào DataFrame mới và in DataFrame ra terminal!</p>

<p style="text-align: justify;"><img alt="Python sẽ kéo dữ liệu từ “Cars.xlsx” vào DataFrame mới và in DataFrame ra terminal" data-i="2" data-src="https://st.quantrimang.com/photos/image/2019/10/09/nhap-du-lieu-excel-vao-python-bang-pandas-3.jpg" data-was-processed="true" height="210" src="https://st.quantrimang.com/photos/image/2019/10/09/nhap-du-lieu-excel-vao-python-bang-pandas-3.jpg" width="445" /></p>

<h3 id="mcetoc_1dmnb50mr8" style="text-align: justify;">Hãy xem xét kỹ hơn đối tượng DataFrame!</h3>

<p style="text-align: justify;">Thoạt nhìn, DataFrame trông rất giống với bảng Excel thông thường. Điều này khiến Pandas DataFrame rất dễ hiểu.</p>

<p style="text-align: justify;">Những header được gắn nhãn ở đầu tập dữ liệu và Python đã điền vào các hàng bằng tất cả thông tin đọc được từ workbook Cars.xlsx.</p>

<p style="text-align: justify;">Lưu ý cột ngoài cùng bên trái, một chỉ mục bắt đầu từ 0 và đánh số các cột. Theo mặc định, Pandas sẽ áp dụng chỉ mục này cho DataFrame, có thể hữu ích trong một số trường hợp. Nếu không muốn chỉ mục này được tạo, bạn có thể thêm một đối số bổ sung vào code:</p>

<pre id="pre9">
<code>DF = pd.read_excel(Cars_Path, index=False)</code></pre>

<p style="text-align: justify;">Đặt đối số&nbsp;<strong>“index”</strong>&nbsp;thành&nbsp;<strong>False</strong>&nbsp;sẽ loại bỏ cột chỉ mục, chỉ còn lại dữ liệu Excel.</p>

<p style="text-align: justify;">Bây giờ, bạn đã có khả năng đọc dữ liệu từ bảng tính Excel. Bạn có thể áp dụng lập trình Python theo bất kỳ cách nào mình chọn. Làm việc với Pandas là một cách đơn giản để các lập trình viên Python có kinh nghiệm làm việc với dữ liệu được lưu trữ trong workbook Excel.</p>

<p style="text-align: justify;">Sự dễ dàng khi sử dụng Python để phân tích và thao tác dữ liệu là một trong nhiều lý do tại sao&nbsp;Python là ngôn ngữ lập trình của tương lai.</p>

<p style="text-align: justify;">Chúc bạn thực hiện thành công!</p>
		</div>
				<div id="author">
						<p>
				<strong>Nguồn tin:</strong>
				Quantrimang.com
			</p>
		</div>
	</div>
	<div id="footer" class="clearfix">
		<div id="url">
			<strong>URL của bản tin này: </strong><a href="https://www.nguoicodonvn2008.info/vi/news/savefile/kien-thuc-may-tinh/cach-nhap-du-lieu-excel-vao-tap-lenh-python-bang-pandas-1137.html" title="Cách nhập dữ liệu Excel vào tập lệnh Python bằng Pandas">https://www.nguoicodonvn2008.info/vi/news/savefile/kien-thuc-may-tinh/cach-nhap-du-lieu-excel-vao-tap-lenh-python-bang-pandas-1137.html</a>

		</div>
		<div class="clear"></div>
		<div class="copyright">
			&copy; .&#x3A; Nguoicodonvn2008.info - Cõi lòng người cô đơn &#x3A;.
		</div>
		<div id="contact">
			<a href="mailto:admin@nguoicodonvn2008.info">admin@nguoicodonvn2008.info</a>
		</div>
	</div>
</div>
        <div id="timeoutsess" class="chromeframe">
            Bạn đã không sử dụng Site, <a onclick="timeoutsesscancel();" href="https://nguoicodonvn2008.info/#">Bấm vào đây để duy trì trạng thái đăng nhập</a>. Thời gian chờ: <span id="secField"> 60 </span> giây
        </div>
        <div id="openidResult" class="nv-alert" style="display:none"></div>
        <div id="openidBt" data-result="" data-redirect=""></div>
		</script>
		<div class="car-top">
  <span><img src="https://nguoicodonvn2008.info/themes/default/images/car.png" alt=""></span>
</div>
<script src="https://nguoicodonvn2008.info/assets/js/jquery/jquery.min.js"></script>
<script>var nv_base_siteurl="/",nv_lang_data="vi",nv_lang_interface="vi",nv_name_variable="nv",nv_fc_variable="op",nv_lang_variable="language",nv_module_name="news",nv_func_name="savefile",nv_is_user=0, nv_my_ofs=-4,nv_my_abbr="EDT",nv_cookie_prefix="nv4c_e856T",nv_check_pass_mstime=1738000,nv_area_admin=0,nv_safemode=0,theme_responsive=0,nv_recaptcha_ver=2,nv_recaptcha_sitekey="",nv_recaptcha_type="image",XSSsanitize=1;</script>
<script src="https://nguoicodonvn2008.info/assets/js/language/vi.js"></script>
<script src="https://nguoicodonvn2008.info/assets/js/DOMPurify/purify3.js"></script>
<script src="https://nguoicodonvn2008.info/assets/js/global.js"></script>
<script src="https://nguoicodonvn2008.info/assets/js/site.js"></script>
<script src="https://nguoicodonvn2008.info/themes/default/js/news.js"></script>
<script src="https://nguoicodonvn2008.info/themes/default/js/main.js"></script>
<script src="https://nguoicodonvn2008.info/themes/default/js/custom.js"></script>
<script type="application/ld+json">
        {
            "@context": "https://schema.org",
            "@type": "Organization",
            "url": "https://nguoicodonvn2008.info",
            "logo": "https://nguoicodonvn2008.info/uploads/angel.gif"
        }
        </script>
<script src="https://nguoicodonvn2008.info/themes/default/js/bootstrap.min.js"></script>
<script type="text/javascript">
var $scrolltop = $('.car-top');
$scrolltop.on('click', function () {
    $('html,body').animate({
        scrollTop: 0
    }, 800);
    $(this).addClass("car-run");
    setTimeout(function(){ $scrolltop.removeClass('car-run');}, 1000);
    return false;
});
$(window).on('scroll', function ()
{ 
    if($(window).scrollTop() >= 200)
    {
        $scrolltop.addClass("show");
        $scrolltop.addClass("car-down");
    }
    else
    {
       $scrolltop.removeClass("show");
       setTimeout(function(){ $scrolltop.removeClass('car-down');}, 300);
    }
});
</script>
</body>
</html>