Cách nâng cấp lên Windows 11 22H2 trên phần cứng không được hỗ trợ
- Thứ năm - 09/02/2023 23:09
- In ra
- Đóng cửa sổ này
Nếu bạn đã cài đặt Windows 11 trên phần cứng không được hỗ trợ, quá trình nâng cấp sẽ rất khó khăn. Khi bạn cố gắng tìm kiếm bản cập nhật, Windows 11 sẽ hiển thị mọi thứ là đã cập nhật và không có tùy chọn cài đặt phiên bản 22H2.
Mặc dù bạn có thể sử dụng phương pháp cài đặt sạch dựa trên ISO, quá trình nâng cấp cho phép bạn cài đặt phiên bản mới nhất mà không xóa các ứng dụng và dữ liệu khác của mình. Dưới đây là cách nâng cấp lên Windows 11 22H2 trên phần cứng không được hỗ trợ bằng file cài đặt Windows 11.
Windows 11 chạy kiểm tra khả năng tương thích phần cứng trong quá trình nâng cấp. Để thực hiện nâng cấp thành công, bạn sẽ cần thực hiện đánh giá khả năng tương thích phần cứng này. Để làm được điều này, chúng tôi sẽ thay thế file examinerress.dll trong Windows 11 ISO bằng file examinerress.dll từ Windows 10 ISO.
Nếu bạn có sẵn Windows 11 22H2 và Windows 10 ISO, hãy chuyển sang bước thứ ba bên dưới. Nếu chưa, hãy làm theo tất cả các bước để tải xuống những ISO cần thiết rồi thực hiện nâng cấp.
Mặc dù các bước này không gây ra bất kỳ sự cố nào, nhưng tốt hơn hết bạn nên tạo bản sao lưu mọi dữ liệu Windows 11 quan trọng trên ổ hệ thống của mình đề phòng trường hợp xảy ra sự cố và cần thực hiện cài đặt sạch.
1. Tải xuống Windows 11 22H2 ISO
Bạn có thể tải xuống Windows 11 ISO một cách hợp pháp trực tiếp từ máy chủ của Microsoft hoặc sử dụng Media Creation Tool. Hướng dẫn này sẽ sử dụng Media Creation Tool để tải xuống file image ISO.
1. Truy cập trang Microsoft Software Download.:
https://www.microsoft.com/software-download/windows11
2. Nhấp vào Download Now bên dưới Create Windows 11 Installation Media.
3. Chạy file mediacreationtool.exe và chấp nhận các điều khoản cấp phép.
4. Xem lại ngôn ngữ và ấn bản đã chọn. Để thay đổi ngôn ngữ, hãy bỏ chọn Use the recommended options for this PC và chọn ngôn ngữ ưa thích của bạn.
5. Bấm Next.
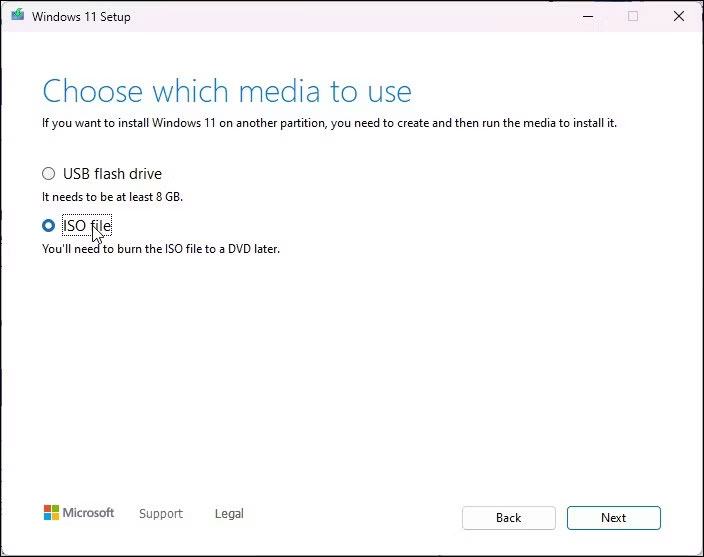
6. Chọn tùy chọn ISO file trong hộp thoại Choose which media to use.
7. Chọn vị trí tải xuống và nhấp vào Save. Đảm bảo phân vùng đã chọn có đủ dung lượng trống.
8. Media Creation Tool sẽ bắt đầu tải ISO xuống ổ cục bộ của bạn. Quá trình này có thể mất một chút thời gian, tùy thuộc vào kết nối Internet. Vì vậy, hãy đợi quá trình tải xuống hoàn tất.
9. Khi quá trình tải xuống hoàn tất, hãy nhấp vào Finish và làm theo bước tiếp theo để tải xuống Windows 10 ISO.
2. Tải xuống Windows 10 ISO
Bạn sẽ cần sửa đổi ISO của Windows 11 bằng cách thay thế file appraiserress.dll bằng một phiên bản có sẵn trong Windows 10 ISO. File DLL này chịu trách nhiệm thực hiện kiểm tra phần cứng trong quá trình nâng cấp.
Để tải xuống Windows 10 ISO:
1. Truy cập trang tải xuống Windows 10.: https://www.microsoft.com/en-us/software-download/windows10
2. Nhấp vào nút Download Now bên dưới Create Windows 10 installation media.
3. Chạy file mediacreationtool.exe để mở hộp thoại Windows 10 Setup.
4. Nhấp vào Accept.
5. Trong màn hình What do you want to do, chọn Create installation media và nhấp vào Next.
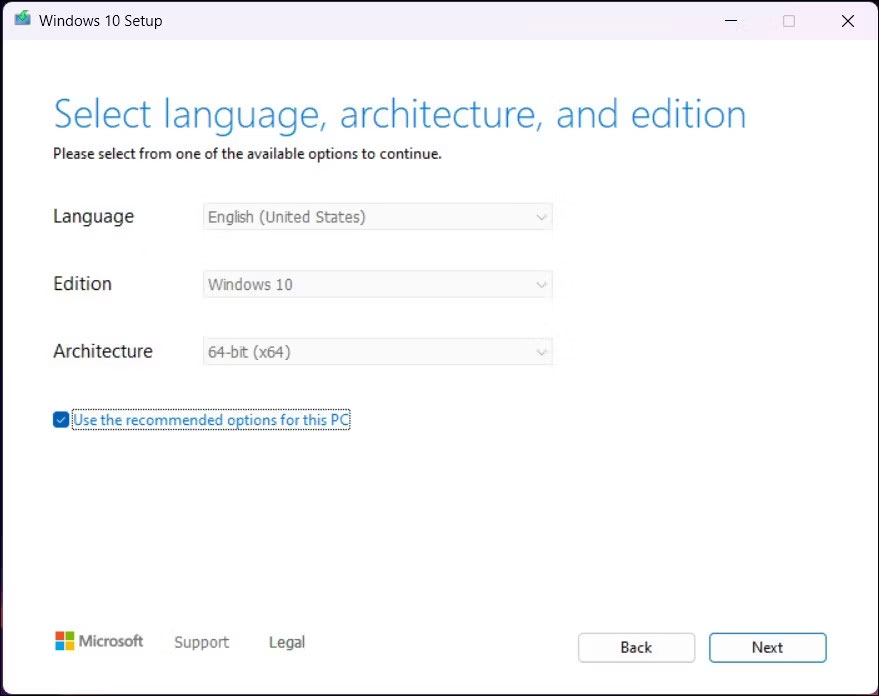
6. Kiểm tra xem các tùy chọn ngôn ngữ, ấn bản và kiến trúc có được đặt chính xác hay không. Nếu không, hãy nhấp vào Use the recommended options for this device và đặt tùy chọn của bạn.
7. Tiếp theo, chọn tùy chọn ISO file và nhấp vào Next.
8. Chọn vị trí tải xuống và nhấp vào Save.
9. Quá trình tải xuống có thể mất vài phút để hoàn tất. Vì vậy, hãy đợi quá trình hoàn tất và nhấp vào Finish sau khi hoàn tất.
Khi bạn đã lưu cả hai file ISO, hãy làm theo bước tiếp theo để giải nén và sửa đổi Windows 11 ISO.
3. Sửa đổi Windows 11 ISO để bỏ qua kiểm tra phần cứng trong quá trình nâng cấp
Các bước sau đây liên quan đến việc giải nén Windows 10 ISO và sao chép file examinerress.dll. Tiếp theo, di chuyển file DLL đã sao chép vào thư mục nguồn của Windows 11 ISO. Đây là cách để làm điều đó.
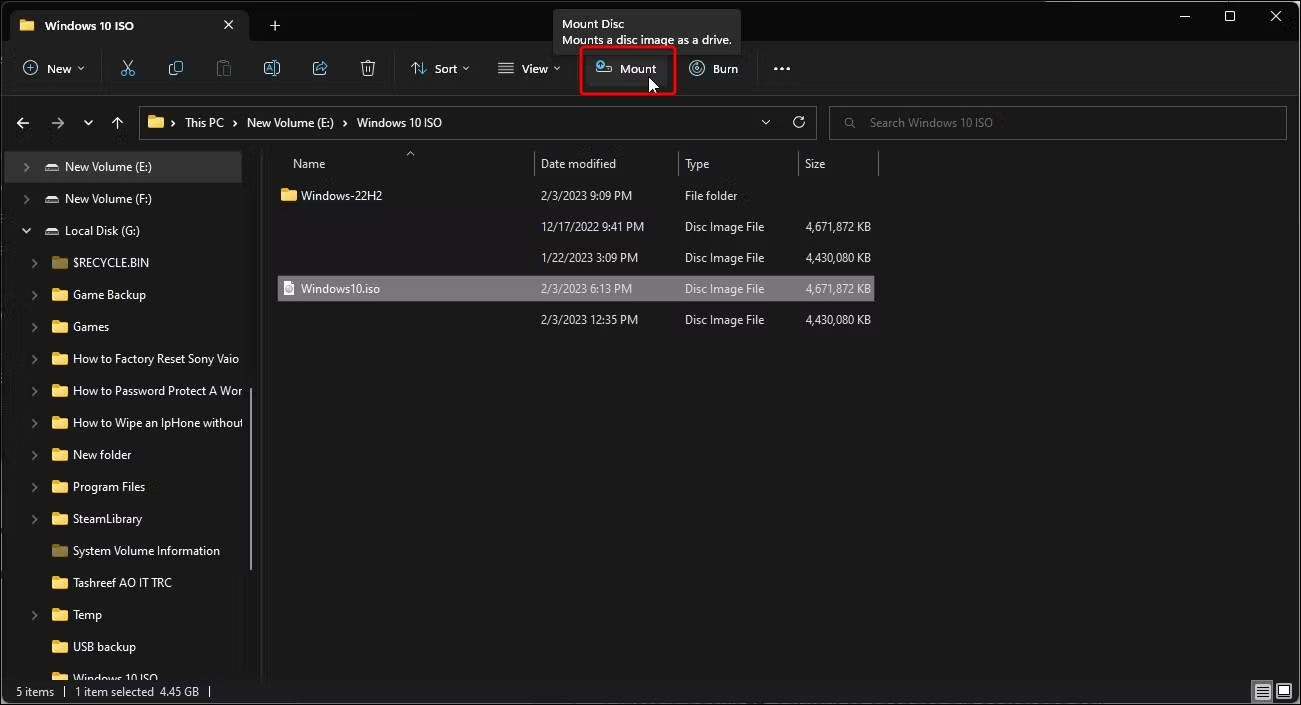
1. Nhấp chuột phải vào file ISO Windows 10 và chọn Mount. Thao tác này sẽ tạo một ổ đĩa DVD ảo mới và mở thư mục ISO.
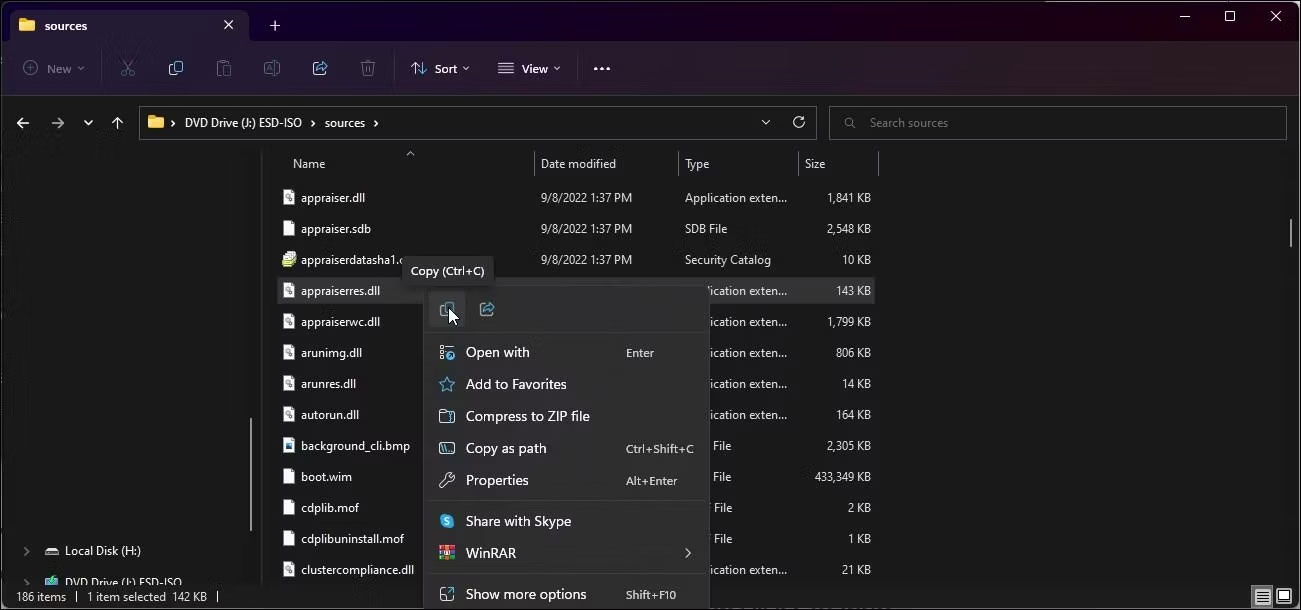
2. Mở thư mục Sources và xác định vị trí file appraiserres.dll. Sao chép file DLL và di chuyển nó sang một thư mục khác.
3. Tiếp theo, giải nén Windows 11 ISO sang một thư mục khác. Bạn có thể sử dụng WinRAR để giải nén file ISO của Windows 11.
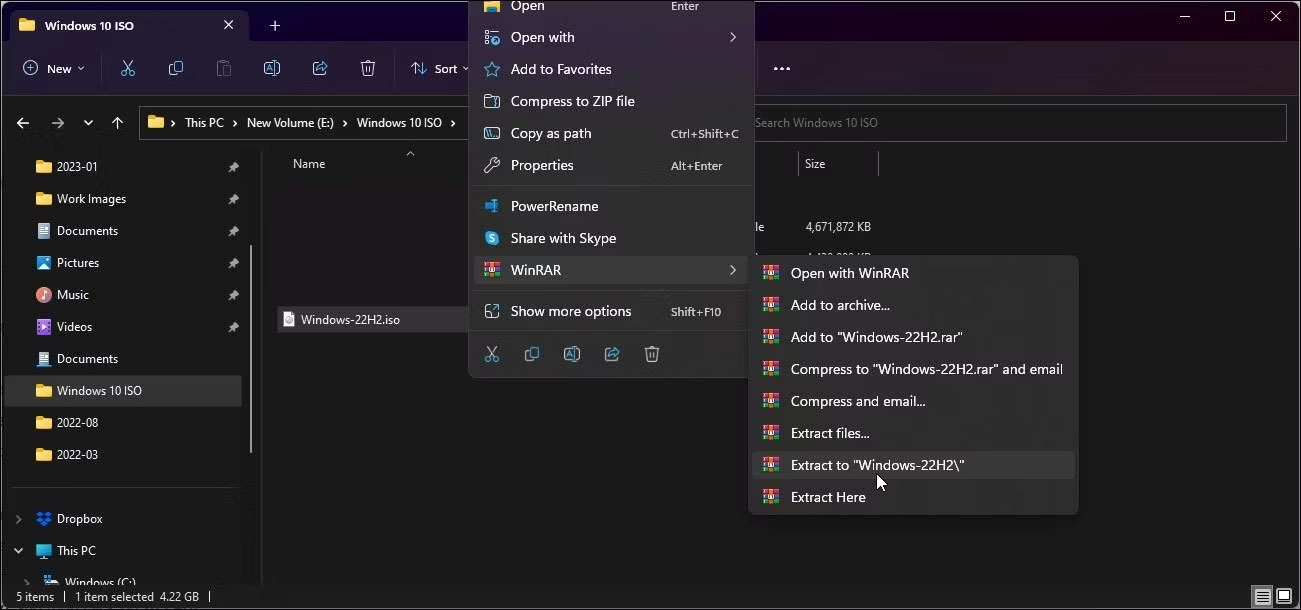
4. Mở thư mục giải nén của Windows 11 ISO và sau đó là thư mục Sources.
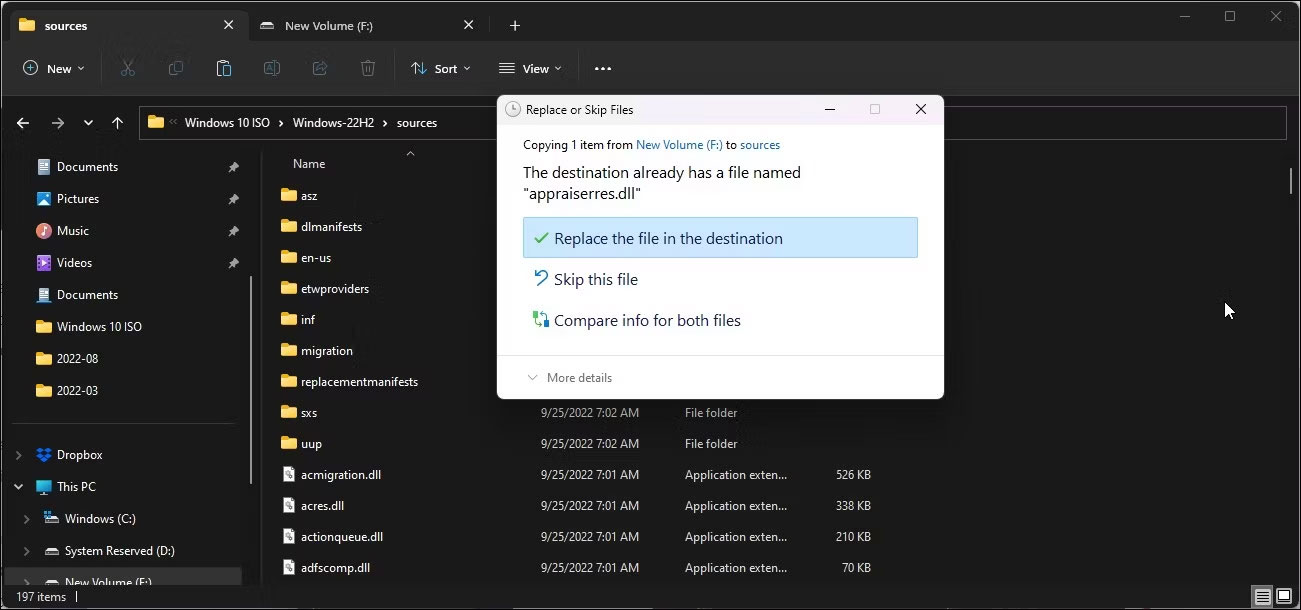
5. Tiếp theo, sao chép và dán file examinerres.dll được sao chép từ Windows 10 ISO vào thư mục Sources của Windows 11 ISO.
6. Chọn Replace the file in the destination để xác nhận hành động.
7. Tiếp theo, ngắt kết nối PC của bạn khỏi Internet. Điều này ngăn thiết lập tải xuống các file cập nhật trong khi cài đặt và ghi đè lên file dll đã sửa đổi.
8. Khi Internet bị tắt, hãy mở thư mục ISO Windows 11 đã giải nén và nhấp đúp vào Setup file. Nhấp vào Yes nếu được nhắc bởi UAC.
9. Trong hộp thoại Windows 11 Setup, nhấp vào Change how Setup downloads updates.
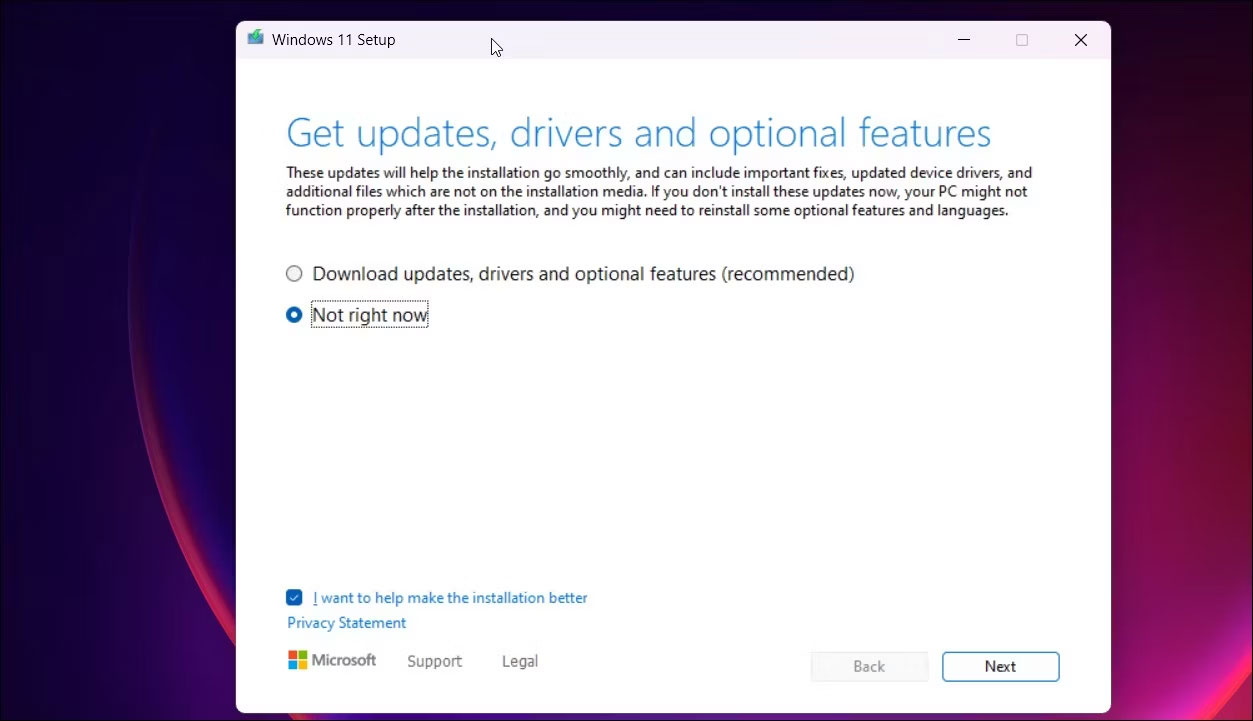
10. Tiếp theo, chọn Note right now. Điều này sẽ ngăn thiết lập Windows tìm và cài đặt các bản cập nhật mới hơn khiến quá trình nâng cấp không thành công trên phần cứng không được hỗ trợ.

11. Trong màn hình Choose what to keep, chọn Keep personal files and apps.
12. Nhấp vào Next và sau đó nhấp vào Accept.
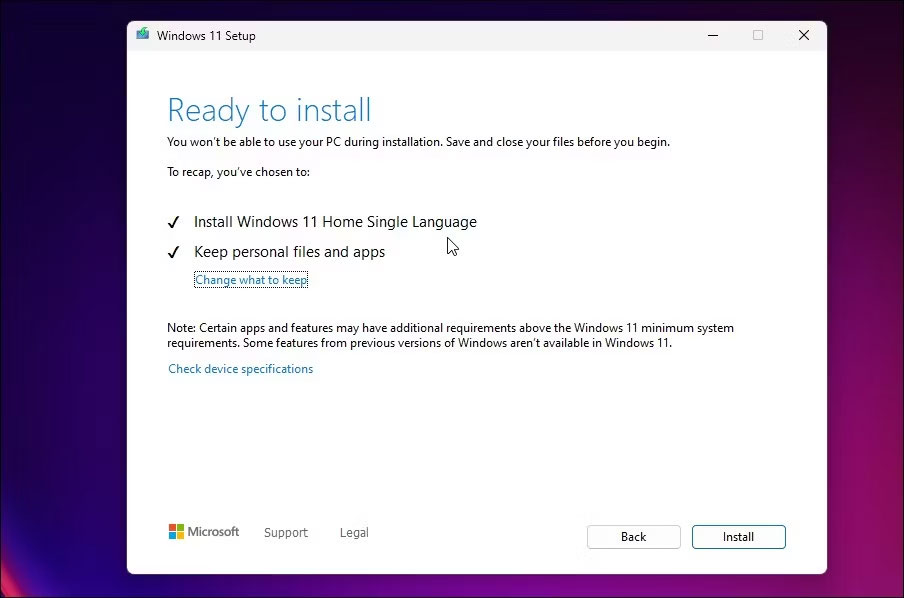
13. Tiếp theo, nhấp vào Install để cài đặt Windows 11 phiên bản 22H2 trong khi vẫn giữ các ứng dụng và file cá nhân của bạn.
14. Để máy tính của bạn ở chế độ chờ cho đến khi quá trình cài đặt hoàn tất. Sau khi khởi động lại, bạn sẽ có Windows 11 22H2 mới nhất chạy trên máy tính của mình.
Để kiểm tra thông số kỹ thuật Windows của bạn:

- Nhấn Win + I để mở Settings.
- Trong tab System, cuộn xuống và nhấp vào About.
- Trong thông số kỹ thuật của Windows, bạn sẽ thấy Version 22H2 nếu quá trình nâng cấp thành công.
4. Quay lại phiên bản trước
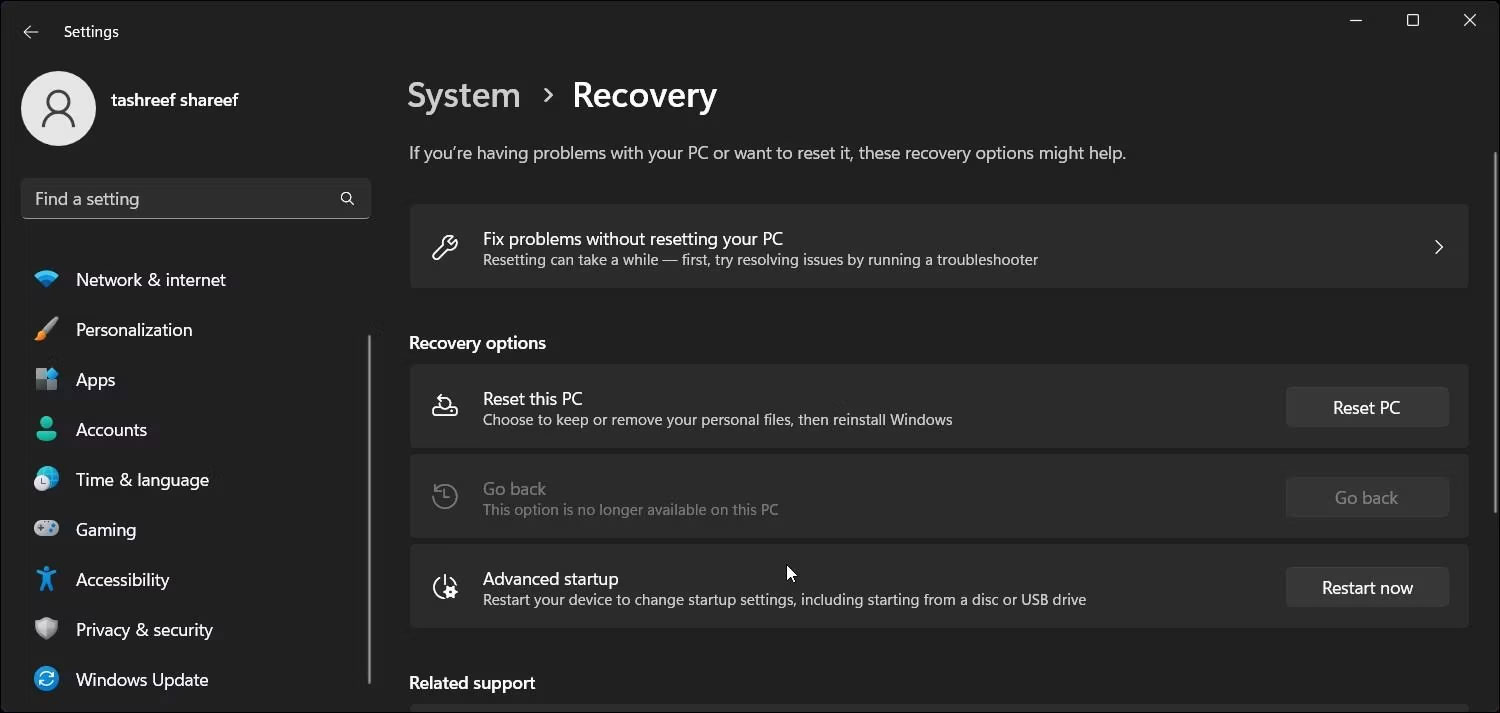
Nếu gặp sự cố sau khi nâng cấp, bạn có thể sử dụng tùy chọn Go back để hoàn tác cập nhật và khôi phục phiên bản cũ hơn của Windows 11. Tuy nhiên, tùy chọn Go back chỉ khả dụng trong 7 ngày kể từ khi nâng cấp. Sau đó, tùy chọn sẽ chuyển sang màu xám.
Để quay lại phiên bản trước:
1. Nhấn Win + I để mở Settings.
2. Trong tab System, cuộn xuống và nhấp vào Recovery.
3. Nhấp vào Go back bên dưới Recovery options. Sau đó, làm theo hướng dẫn trên màn hình để gỡ cài đặt bản cập nhật Windows 22H2.
