Cách mở Control Panel trên Windows 11
- Thứ ba - 17/10/2023 09:46
- In ra
- Đóng cửa sổ này
Khi muốn thay đổi các thiết lập cài đặt trong Windows 11, nơi mà đa số mọi người thường nghĩ tới đầu tiên là ứng dụng Settings. Tuy nhiên, Control Panel vẫn đóng một vai trò cực kỳ quan trọng trong nhiều tác vụ cấu hình mà bạn cần trên hệ điều hành mới.
Dưới đây là một số cách khác nhau để bạn truy cập Control Panel trên Windows 11.
Sử dụng thanh tìm kiếm menu Start
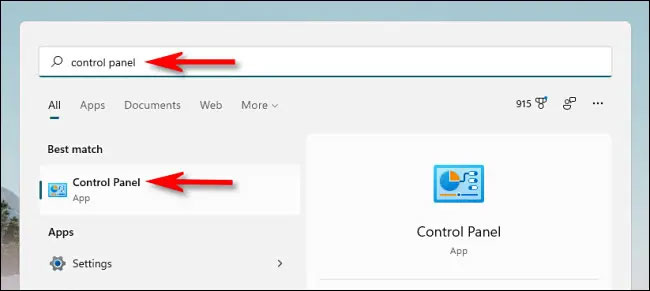
Một trong những cách đơn giản nhất để khởi chạy Control Panel là sử dụng menu Start.
Trước tiên, bạn nhấp vào nút Start trên thanh tác vụ. Menu Start sẽ lập tức mở ra. Tại đây, nhập từ khóa “control panel” trong thanh tìm kiếm.
Biểu tượng Control Panel sẽ xuất hiện trong kết quả tìm kiếm trả về. Bạn nhấp chuột vào biểu tượng này và giao diện Control Panel sẽ lập tức mở ra.
Sử dụng menu Run hoặc Command Prompt
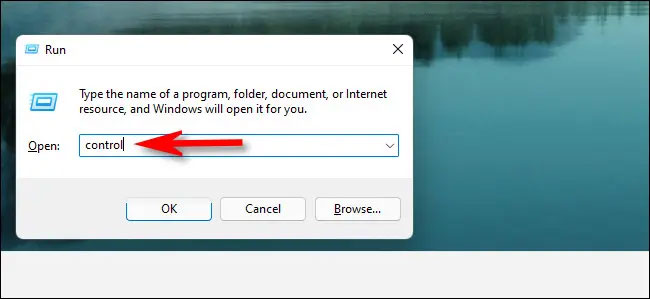
Bạn cũng có thể khởi chạy Control Panel từ menu Run. Thực hiện điều này bằng cách nhấn tổ hợp phím Windows + R để mở cửa sổ Run. Trong trường tìm kiếm, bạn nhập từ khóa “control”, sau đó nhấp vào “OK” hoặc nhấn Enter. Giao diện Control Panel sẽ ngay lập tức xuất hiện trên màn hình.
Tương tự, bạn có thể mở Control Panel từ Command Prompt hoặc Windows Terminal bằng cách truy cập các công cụ dòng lệnh này, sau đó gõ “control” và nhấn Enter.
Truy cập Control Panel thông qua menu Start của Windows
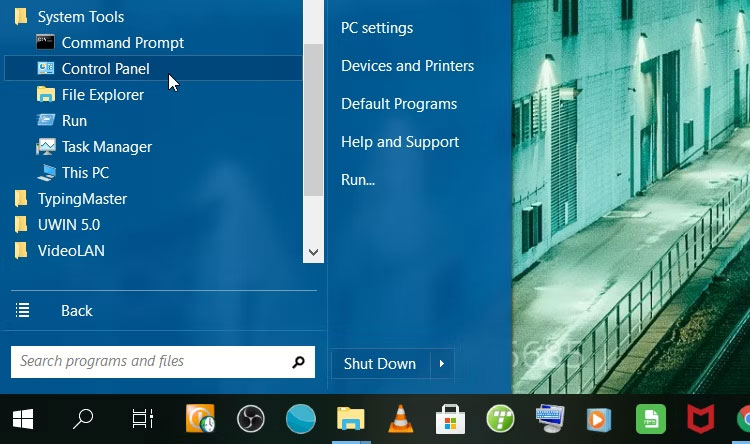
Menu Start của Windows cũng có thể giúp bạn dễ dàng truy cập Control Panel. Đây là cách thực hiện:
- Nhấp vào biểu tượng Windows trên thanh tác vụ hoặc nhấn phím Windows.
- Nhấp vào tùy chọn All Programs và chọn System Tools.
- Chọn Control Panel từ các mục menu.
Truy cập Control Panel thông qua menu Quick Access
Nếu bạn muốn dễ dàng truy cập một số công cụ hệ thống tích hợp sẵn của Windows, menu Quick Access có thể giúp ích. Bài viết sẽ chỉ cho bạn cách công cụ này có thể giúp bạn mở Control Panel. Dưới đây là các bước bạn cần phải làm theo:
- Nhấn Win + X để mở menu Quick Access.
- Cuộn xuống và chọn Search hoặc Run từ các tùy chọn.
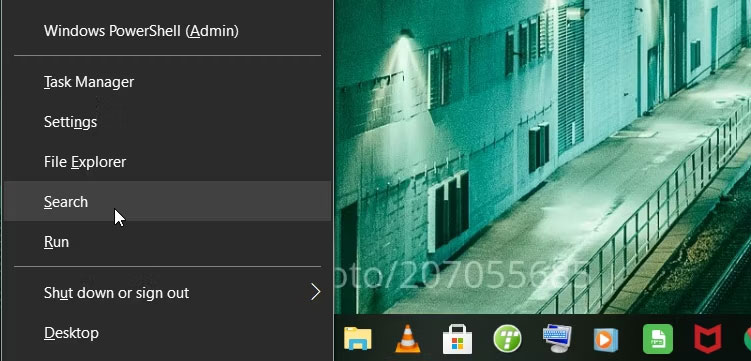
Cuối cùng, gõ Control Panel vào hộp tìm kiếm và nhấn Enter.
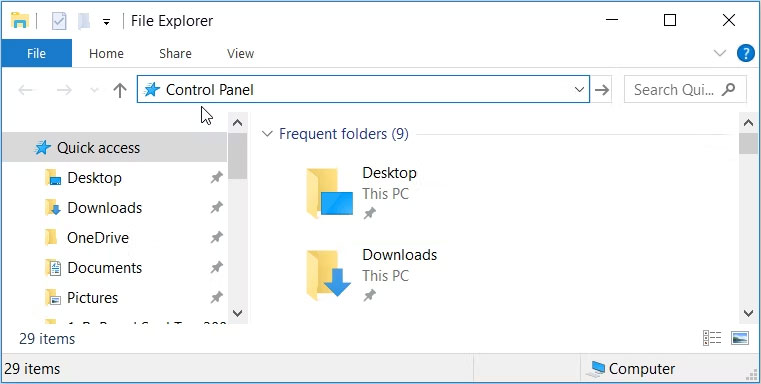
Truy cập Control Panel thông qua thanh địa chỉ File Explorer
Thanh địa chỉ của File Explorer giúp bạn dễ dàng truy cập các chương trình phần mềm trên thiết bị của mình. Đây là quá trình sử dụng công cụ này để truy cập Control Panel:
- Nhấn Win + E để mở File Explorer.
- Điều hướng đến thanh địa chỉ của File Explorer, nhập Control Panel, rồi nhấn Enter.
Ngoài ra, hãy nhập C:\Windows\System32 vào thanh địa chỉ File Explorer và nhấp vào control.exe hoặc control trong cửa sổ tiếp theo.
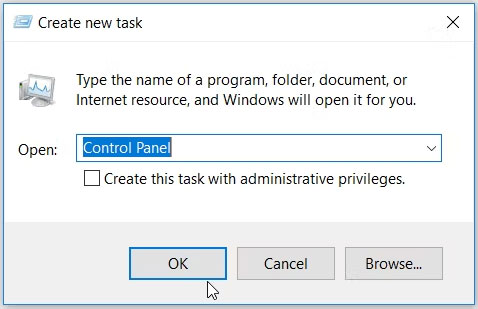
Truy cập Control Panel thông qua Task Manager
Task Manager cũng cung cấp một cách dễ dàng để truy cập Control Panel. Đây là cách bạn có thể sử dụng nó:
- Nhấn Ctrl + Shift + Esc để mở Task Manager.
- Điều hướng đến File > Run new task.
- Nhập Control Panel vào hộp tìm kiếm và nhấn Enter.
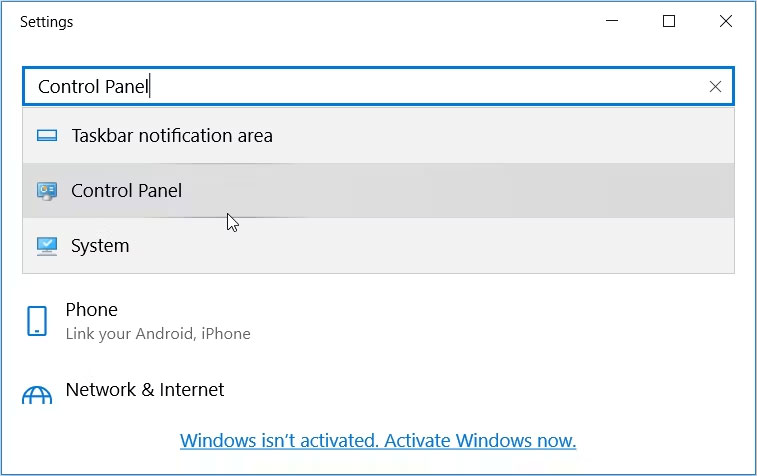
Truy cập Control Panel thông qua Windows Setting
Bạn có biết rằng bạn cũng có thể truy cập Control Panel thông qua Windows Settings không? Đây là cách thực hiện:
- Nhấn Win + I để mở cửa sổ Settings.
- Nhập Control Panel vào trường tìm kiếm và nhấp vào tùy chọn liên quan từ kết quả tìm kiếm.
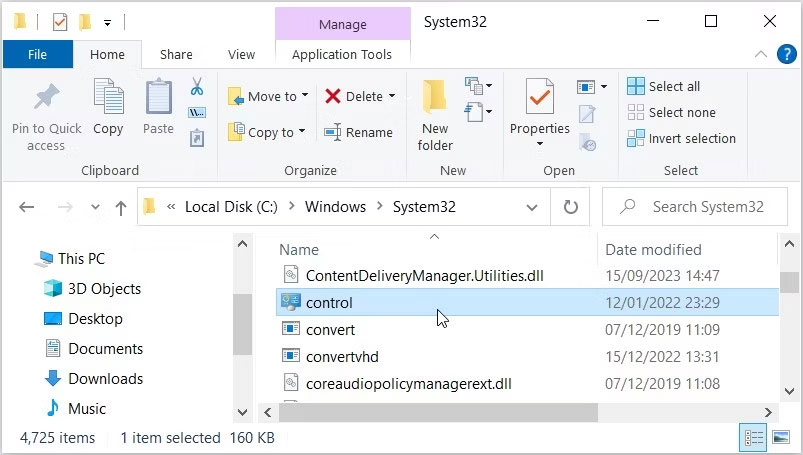
Truy cập Control Panel thông qua thư mục System32
Bạn có biết rằng bạn có thể truy cập hầu hết các ứng dụng Windows của mình bằng các file thực thi (.exe) trong thư mục System32 không?
Đây là cách mở Control Panel thông qua thư mục System32:
- Nhấp vào biểu tượng File Explorer trên thanh tác vụ hoặc nhấn Win + E để mở File Explorer.
- Chọn This PC ở phía bên trái và sau đó nhấp vào Local Disk (C:) ở phía bên phải.
- Điều hướng đến Windows > System32.
- Cuộn xuống và chọn control để mở Control Panel.
Ghim Control Panel trên taskbar

Khi đã mở được Control Panel bằng bất kỳ phương pháp nào được mô tả ở trên, bạn cũng sẽ thấy biểu tượng của nó xuất hiện trên thanh tác vụ dưới đáy màn hình. Nếu thường xuyên phải sử dụng Control Panel, bạn có thể ghim logo trực tiếp trên thanh tác vụ để Quick Access chỉ bằng một cú nhấp chuột khi cần.
Thực hiện việc này bằng cách nhấp chuột phải vào biểu tượng Control Panel khi nó đang được mở, sau đó chọn tùy chọn “Pin to Taskbar”. Lần tới khi bạn muốn khởi chạy Control Panel, chỉ cần nhấp chuột trái một lần vào biểu tượng tương ứng trên thanh tác vụ.
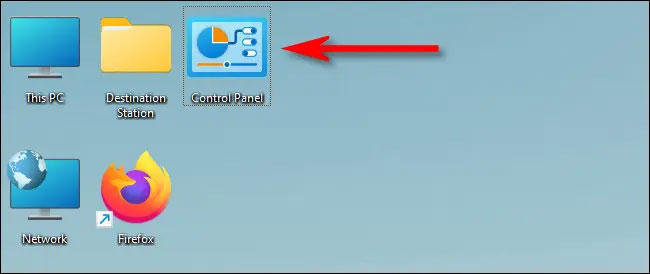
Thêm biểu tượng Control Panel trên màn hình desktop
Tương tự, bạn cũng có thể thêm biểu tượng Control Panel trên màn hình desktop để Quick Access bằng cách nhấp đúp chuột khi cần.
Trước tiên, hãy nhấn Windows + i để mở ứng dụng Settings, sau đó điều hướng đến mục Personalization > Themes, và nhấp vào “Desktop Icon Settings”. Trong cửa sổ cài đặt biểu tượng trên màn hình mở ra, hãy tích vào ô vuông bên cạnh “Control Panel”, sau đó nhấp vào “OK”. Biểu tượng Control Panel sẽ lập tức xuất hiện trên màn hình desktop. Để khởi chạy, bạn chỉ cần nhấp đúp vào biểu tượng này bất kỳ lúc nào.
