Cách mở Control Panel trên Windows 11
- Thứ tư - 29/10/2025 23:04
- In ra
- Đóng cửa sổ này
Control Panel thường được sử dụng trong nhiều phiên bản Windows, bao gồm cả Windows 11. Đơn giản nhất là khi gỡ ứng dụng trên máy tính, bạn sẽ cần đến Control Panel. Chúng tôi sẽ hướng dẫn các bạn một vài cách mở Control Panel trên Windows 11.
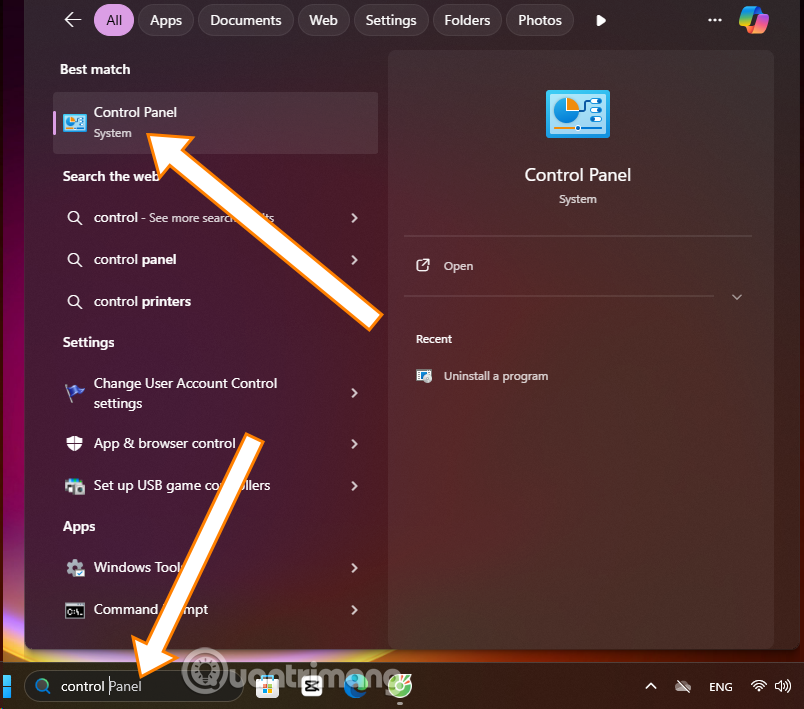
Mở Control Panel trong thanh tìm kiếm
Đơn giản nhất là bạn chỉ cần mở Menu Start trên Windows 11 lên và chọn thanh tìm kiếm nội dung trong Windows. Gõ từ khóa Control Panel và chọn biểu tượng Control Panel hiển thị trong danh sách.
Sử dụng Run
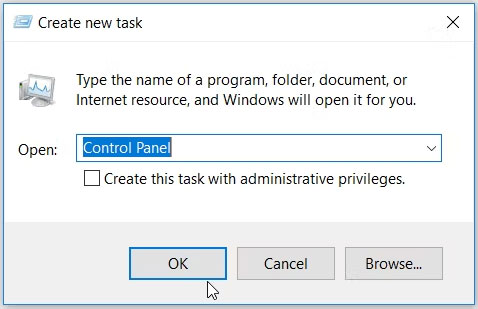
Một cách khác nhanh và đơn giản, bạn hãy sử dụng phím tắt Windows + R và cửa sổ Run sẽ hiển thị như ở dưới. Sau đó nhập control/control panel và chọn OK.

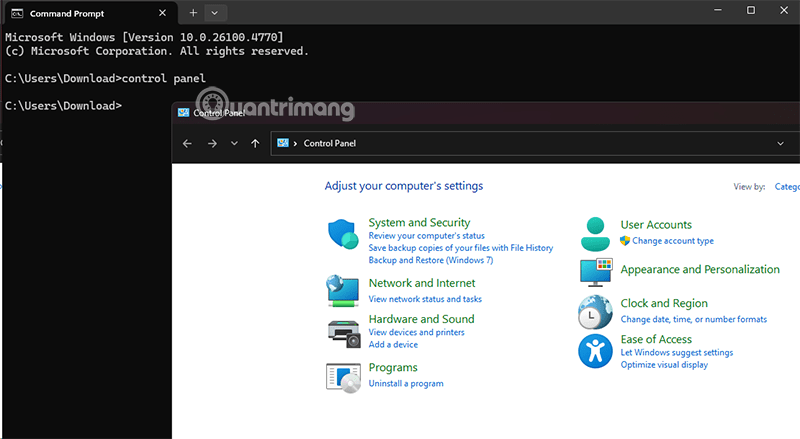
Sử dụng CMD (Command Prompt)
Để mở Control Panel bằng CMD (Command Prompt), bạn có thể sử dụng một trong các lệnh sau, tùy thuộc vào phiên bản Windows của bạn và cách bạn muốn Control Panel hiển thị:
Bạn có thể đơn giản gõ lệnh control vào CMD. Đây là cách phổ biến và hoạt động trên hầu hết các phiên bản Windows, bằng cách:
- Nhấn tổ hợp phím Windows + R để mở hộp thoại Run.
- Gõ cmd và nhấn Enter để mở Command Prompt.
- Tại cửa sổ CMD, gõ lệnh Control Panel rồi nhấn Enter, cửa sổ Control Panel sẽ hiển thị ở dưới.
Mở nhanh Control Panel bằng Shortcut
Bước 1: Ở ngoài màn hình Desktop, bạn hãy nhấp chuột phải trên màn hình chính và chọn New > Shortcut.
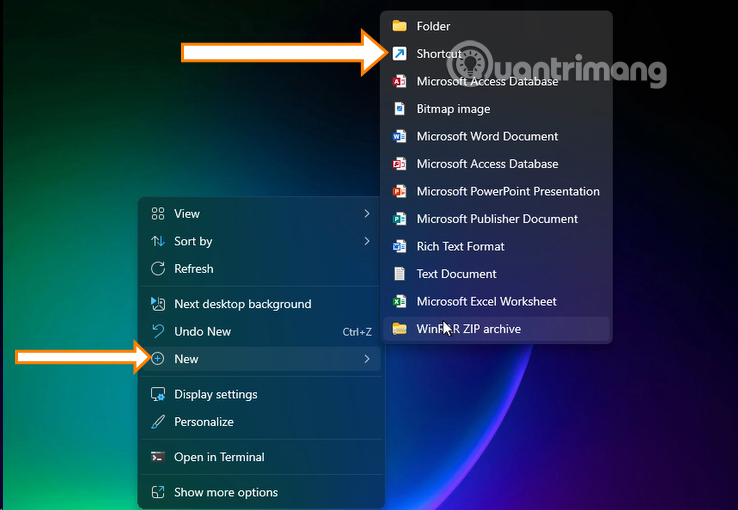
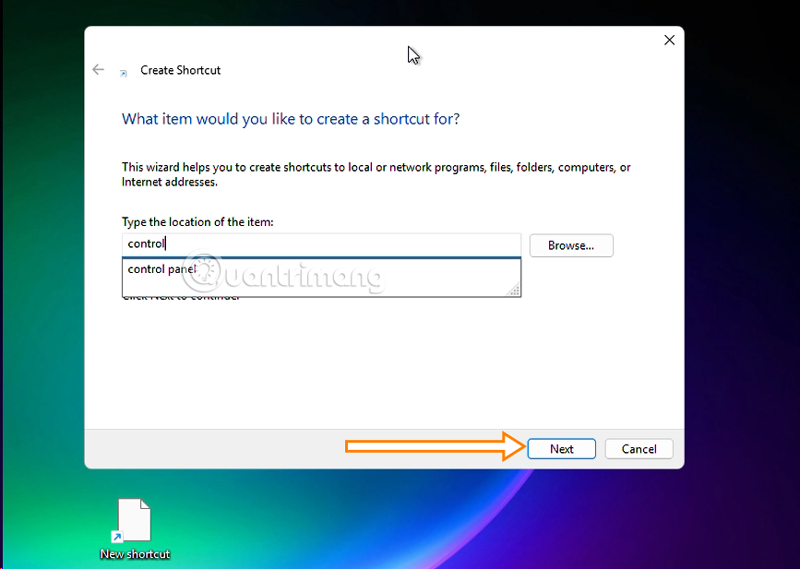
Bước 2: Trên phần Type the location of the item, hãy điền Control Panel vào và chọn Next.
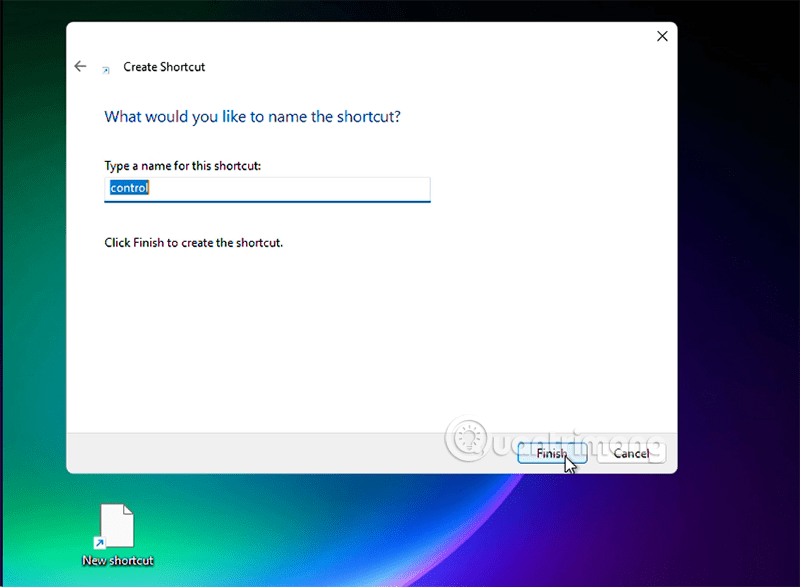
Bước 3: Điền tên của Shortcut vào trường thông tin bên trên vào và chọn Finish để hoàn tất.
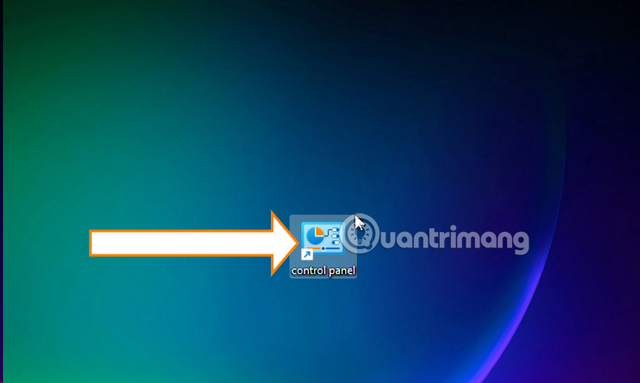
Bước 4: Và đây, phím tắt của bạn khi hoàn thành sẽ hiển thị như ở dưới đây, giờ bạn chỉ cần chọn phím tắt này là mở được Control Panel.
Truy cập Control Panel thông qua thanh địa chỉ File Explorer
Thanh địa chỉ của File Explorer giúp bạn dễ dàng truy cập các chương trình phần mềm trên thiết bị của mình. Đây là quá trình sử dụng công cụ này để truy cập Control Panel:
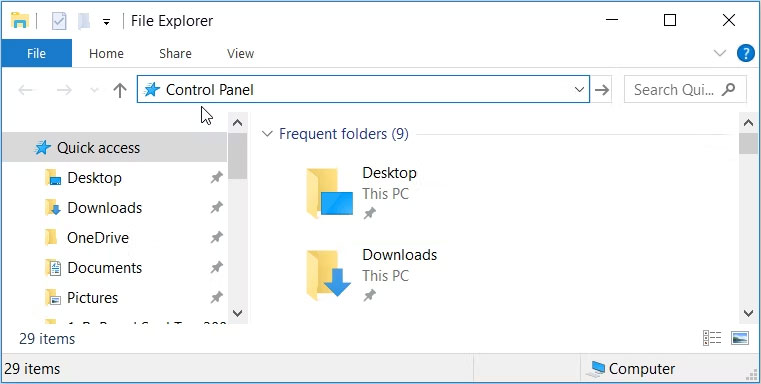
- Nhấn Win + E để mở File Explorer.
- Điều hướng đến thanh địa chỉ của File Explorer, nhập Control Panel, rồi nhấn Enter.
Ngoài ra, hãy nhập C:\Windows\System32 vào thanh địa chỉ File Explorer và nhấp vào control.exe hoặc control trong cửa sổ tiếp theo.
Truy cập Control Panel thông qua Task Manager
Task Manager cũng cung cấp một cách dễ dàng để truy cập Control Panel. Đây là cách bạn có thể sử dụng nó:
- Nhấn Ctrl + Shift + Esc để mở Task Manager.
- Điều hướng đến File > Run new task.
- Nhập Control Panel vào hộp tìm kiếm và nhấn Enter.
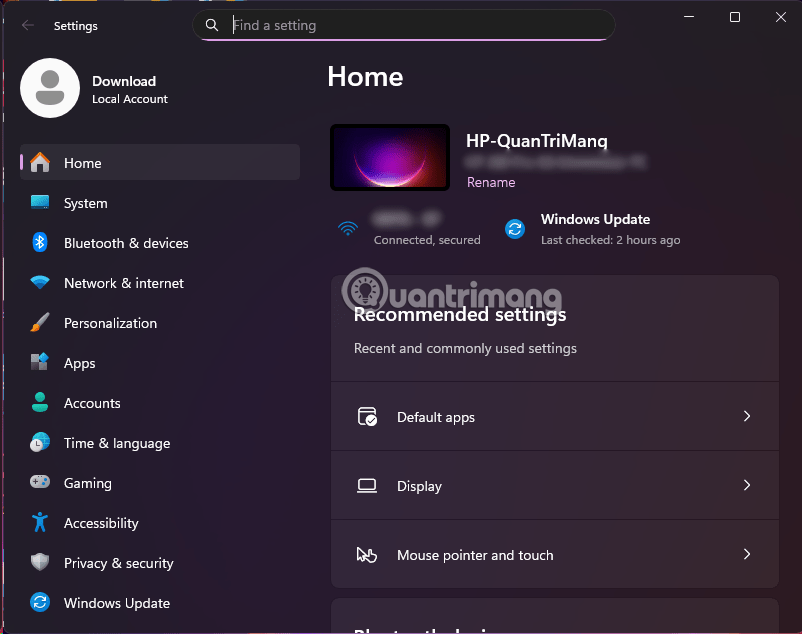
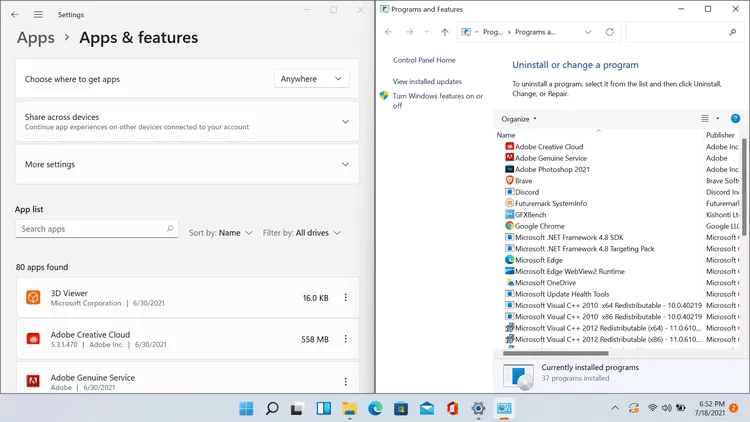
Truy cập Control Panel thông qua Windows Setting
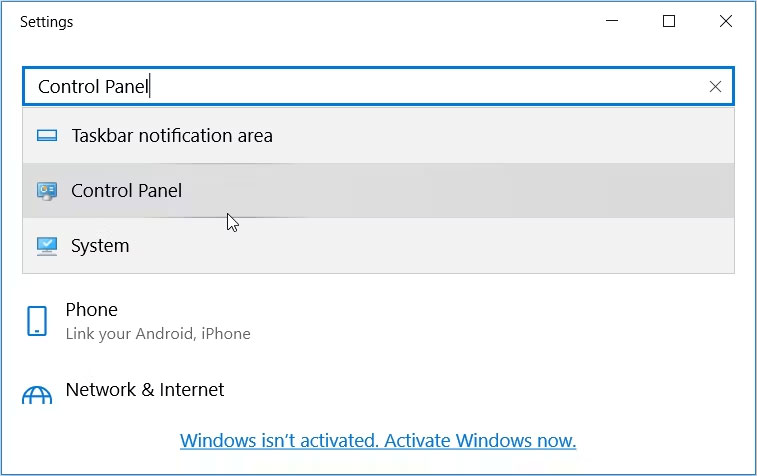
Bạn có biết rằng bạn cũng có thể truy cập Control Panel thông qua Windows Settings không? Đây là cách thực hiện:
- Nhấn Win + I để mở cửa sổ Settings.
- Nhập Control Panel vào trường tìm kiếm và nhấp vào tùy chọn liên quan từ kết quả tìm kiếm.
Truy cập Control Panel thông qua thư mục System32
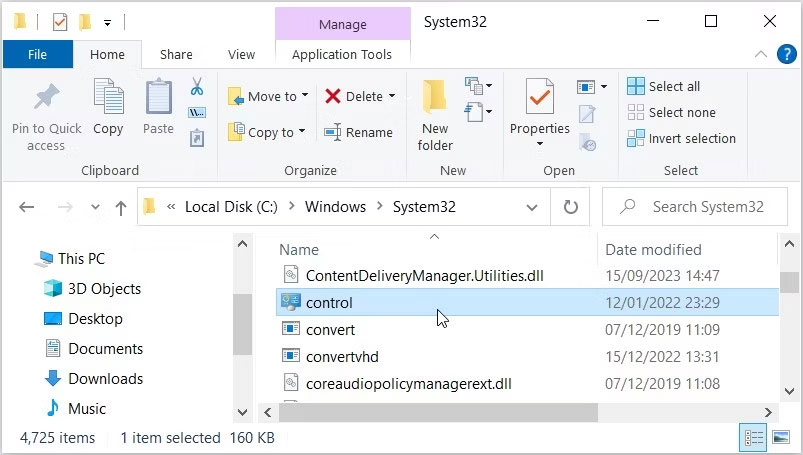
Bạn có biết rằng bạn có thể truy cập hầu hết các ứng dụng Windows của mình bằng các file thực thi (.exe) trong thư mục System32 không?
Đây là cách mở Control Panel thông qua thư mục System32:
- Nhấp vào biểu tượng File Explorer trên thanh tác vụ hoặc nhấn Win + E để mở File Explorer.
- Chọn This PC ở phía bên trái và sau đó nhấp vào Local Disk (C:) ở phía bên phải.
- Điều hướng đến Windows > System32.
- Cuộn xuống và chọn control để mở Control Panel.
Ghim Control Panel trên taskbar

Khi đã mở được Control Panel bằng bất kỳ phương pháp nào được mô tả ở trên, bạn cũng sẽ thấy biểu tượng của nó xuất hiện trên thanh tác vụ dưới đáy màn hình. Nếu thường xuyên phải sử dụng Control Panel, bạn có thể ghim logo trực tiếp trên thanh tác vụ để Quick Access chỉ bằng một cú nhấp chuột khi cần.
Thực hiện việc này bằng cách nhấp chuột phải vào biểu tượng Control Panel khi nó đang được mở, sau đó chọn tùy chọn “Pin to Taskbar”. Lần tới khi bạn muốn khởi chạy Control Panel, chỉ cần nhấp chuột trái một lần vào biểu tượng tương ứng trên thanh tác vụ.
Thêm biểu tượng Control Panel trên màn hình desktop
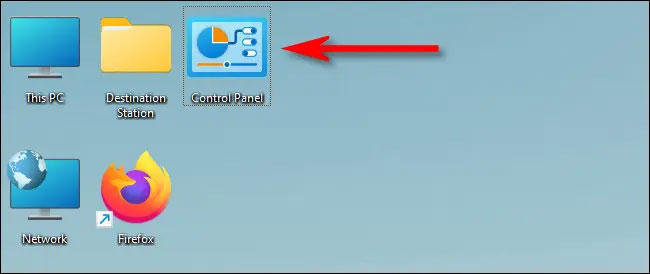
Tương tự, bạn cũng có thể thêm biểu tượng Control Panel trên màn hình desktop để Quick Access bằng cách nhấp đúp chuột khi cần.
Trước tiên, hãy nhấn Windows + i để mở ứng dụng Settings, sau đó điều hướng đến mục Personalization > Themes, và nhấp vào “Desktop Icon Settings”. Trong cửa sổ cài đặt biểu tượng trên màn hình mở ra, hãy tích vào ô vuông bên cạnh “Control Panel”, sau đó nhấp vào “OK”. Biểu tượng Control Panel sẽ lập tức xuất hiện trên màn hình desktop. Để khởi chạy, bạn chỉ cần nhấp đúp vào biểu tượng này bất kỳ lúc nào.
Một số câu hỏi thường gặp về Control Panel
Control Panel làm được những gì?
Control Panel tổng hợp nhiều công cụ hoặc "applet" nhỏ để quản lý các khía cạnh khác nhau của hệ thống:
Quản lý Phần cứng và Âm thanh:
- Thêm hoặc gỡ bỏ thiết bị: Bạn có thể cài đặt máy in, máy quét, webcam, chuột, bàn phím, v.v.
- Điều chỉnh âm thanh: Tùy chỉnh âm lượng, chọn thiết bị phát/ghi âm và cài đặt âm thanh hệ thống.
- Tùy chọn nguồn điện: Cài đặt chế độ tiết kiệm pin, thời gian tắt màn hình và chế độ ngủ của máy.
- Quản lý thiết bị: Xem danh sách các thiết bị đang kết nối và cập nhật driver (trình điều khiển) của chúng.
Quản lý Chương trình:
- Gỡ cài đặt chương trình: Loại bỏ các phần mềm không cần thiết khỏi máy tính.
- Thay đổi hoặc sửa chữa chương trình: Điều chỉnh cài đặt hoặc khắc phục lỗi các ứng dụng đã cài đặt.
- Tính năng Windows: Bật hoặc tắt các chức năng tích hợp sẵn của Windows (ví dụ: Internet Information Services, Hyper-V).
Quản lý Tài khoản người dùng:
- Tạo/xóa tài khoản: Thêm hoặc xóa các tài khoản người dùng trên máy tính.
- Thay đổi loại tài khoản: Cấp quyền quản trị viên (Administrator) hoặc đặt làm người dùng tiêu chuẩn.
- Thay đổi mật khẩu: Đặt lại hoặc cập nhật mật khẩu cho các tài khoản.
- Kiểm soát Tài khoản người dùng (UAC): Điều chỉnh mức độ cảnh báo khi các chương trình cố gắng thực hiện thay đổi hệ thống.
Mạng và Internet:
- Kiểm tra trạng thái mạng: Xem kết nối mạng hiện tại của bạn (Wi-Fi, Ethernet).
- Thiết lập kết nối mới: Cấu hình mạng Wi-Fi, mạng dây hoặc VPN.
- Chia sẻ tài nguyên: Thiết lập chia sẻ tệp, thư mục hoặc máy in qua mạng.
- Khắc phục sự cố mạng: Sử dụng các công cụ để chẩn đoán và sửa lỗi kết nối.
Giao diện và Cá nhân hóa:
- Thay đổi hình nền, chủ đề: Tùy chỉnh giao diện màn hình nền theo ý muốn.
- Điều chỉnh độ phân giải màn hình: Thay đổi kích thước hiển thị của màn hình.
- Tùy chỉnh Taskbar và Start Menu: Sắp xếp các biểu tượng và thay đổi hành vi của thanh tác vụ.
- Phông chữ: Cài đặt hoặc quản lý các phông chữ có trên hệ thống.
Hệ thống và Bảo mật:
- Trung tâm Bảo mật và Bảo trì: Kiểm tra tình trạng bảo mật tổng thể của máy tính (tường lửa, phần mềm chống virus).
- Windows Update: Quản lý và kiểm tra các bản cập nhật hệ thống.
- Tường lửa Windows Defender: Cấu hình các quy tắc tường lửa để bảo vệ máy tính của bạn.
- Thông tin hệ thống: Xem chi tiết về CPU, RAM, phiên bản Windows, v.v.
- Sao lưu và Khôi phục: Tạo bản sao lưu dữ liệu và khôi phục lại hệ thống khi cần.
Đồng hồ, Ngôn ngữ và Vùng:
- Đặt ngày giờ: Điều chỉnh ngày, giờ và múi giờ.
- Cài đặt ngôn ngữ: Thêm hoặc thay đổi ngôn ngữ hiển thị và bàn phím.
- Định dạng khu vực: Tùy chỉnh định dạng số, tiền tệ, ngày tháng theo vùng địa lý.
Trợ năng (Ease of Access):
- Cung cấp các tùy chọn hỗ trợ đặc biệt cho người dùng có nhu cầu riêng (ví dụ: phóng to màn hình, bàn phím ảo, đọc văn bản).
Control Panel khác gì so với Settings trong Windows 10/11?
- Control Panel là công cụ truyền thống đã có từ rất lâu trong Windows, cung cấp quyền truy cập sâu hơn vào các cài đặt hệ thống và quản lý phần cứng/phần mềm chi tiết. Giao diện của nó có thể hơi cũ kỹ và ít trực quan hơn.
- Settings (Cài đặt) là ứng dụng hiện đại hơn, được giới thiệu từ Windows 8 và phát triển mạnh mẽ trên Windows 10/11. Nó có giao diện thân thiện, dễ sử dụng hơn, tập trung vào các cài đặt phổ biến và cá nhân hóa. Mặc dù nhiều chức năng đã được chuyển sang Settings, Control Panel vẫn chứa một số tùy chọn nâng cao mà bạn không tìm thấy ở Settings.
