Cách làm Windows 11 trông giống Ubuntu
- Thứ ba - 27/09/2022 00:54
- In ra
- Đóng cửa sổ này
Windows 11 chứa rất nhiều tùy chọn tùy chỉnh được tích hợp sẵn. Bạn có thể dễ dàng thay đổi hình nền, màu nhấn, phông chữ và thậm chí cả phong cách của các biểu tượng. Nhưng ngay cả sau khi thực hiện những thay đổi đó, Windows vẫn cứ là Windows. Điều gì sẽ xảy ra nếu bạn muốn làm cho Windows trông giống như Linux?
Có rất nhiều bản phân phối Linux, mỗi distro có một phong cách thiết kế và giao diện người dùng riêng biệt. Ubuntu được coi là một trong những phiên bản hấp dẫn và có thể sử dụng được. Và chỉ với một chút thao tác và vài phần mềm của bên thứ ba, bạn có thể làm cho Windows 11 trông giống như Ubuntu.
Trước tiên, hãy tạo một điểm khôi phục hệ thống!
Bạn nên tạo một điểm khôi phục hệ thống mới trước một dự án như thế này. Mặc dù việc tùy chỉnh giao diện người dùng và thêm theme là tương đối an toàn, nhưng vẫn có khả năng xảy ra sự cố.
Một vài phút thực hiện việc tạo điểm khôi phục ngay bây giờ có thể giúp bạn tiết kiệm hàng giờ đồng hồ về sau nếu sự cố xảy ra.
Làm cho Windows 11 trông giống như Ubuntu (phương pháp nhanh)
Có rất nhiều theme tốt có sẵn cho Windows 11 sẽ làm cho nó trông giống như Ubuntu chỉ với một vài cú nhấp chuột. Nhưng bạn sẽ phải trả tiền cho sự tiện lợi này.
Bạn có thể tìm thấy một số gói giao diện Ubuntu tuyệt vời trên DeviantArt và Skinpacks.com. Phương pháp cài đặt chính xác sẽ khác nhau, nhưng chúng thường có hướng dẫn rõ ràng. Giá trung bình là từ $4,99 đến $9,99, không phải là một số tiền lớn.
Làm cho Windows 11 trông giống như Ubuntu (phương pháp DIY)
Bạn có thể làm cho Windows 11 giống Ubuntu hơn mà không tốn bất cứ thứ gì ngoài thời gian. Phương pháp này nhằm mục đích làm cho Windows 11 trông giống như một bản cài đặt mặc định của Ubuntu, không phải là một trong các biến thể Ubuntu như Budgie.
1. Thay đổi màu nhấn
Hãy bắt đầu với sự thay đổi dễ dàng nhất: Màu nhấn. Ubuntu sử dụng một bộ màu cốt lõi, như được hiển thị trên trang web chính thức của Ubuntu.
- Mở Settings > Personalization > Colors và cuộn xuống phần Accent Color.
- Đặt Accent Color thành Manual và nhấp vào View Colors.
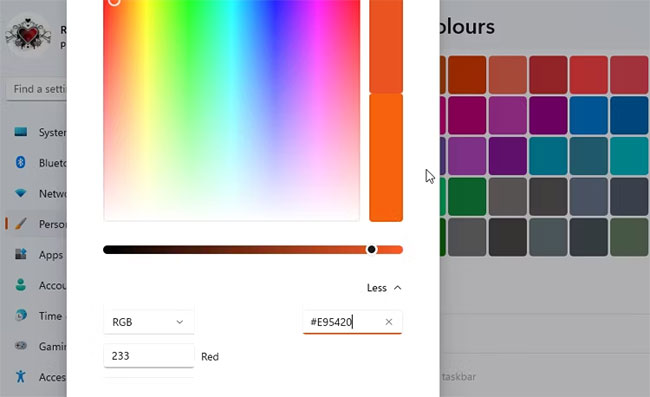
- Trong bộ chọn màu nhấn, hãy nhấp vào More rồi nhập #E95420 vào trường thập lục phân. Nhấp vào Done.
- Quay lại cài đặt Colors, đảm bảo rằng Transparency Effects ở trạng thái On.
Bạn cũng có thể thay đổi sang Dark Mode, vì nó trông gần với giao diện của phiên bản Ubuntu hiện tại hơn.
2. Ẩn các biểu tượng trên desktop
Desktop Ubuntu nhìn chung gọn gàng hơn nhiều so với desktop Windows bình thường. Nó không có các biểu tượng ứng dụng và file.
Nhấp chuột phải vào bất kỳ đâu trên màn hình và chọn View > Show desktop icons. Khi tùy chọn này được bỏ chọn, các biểu tượng của bạn sẽ biến mất. Bạn có thể lấy lại chúng bằng cách lặp lại quy trình nếu cần.
3. Thay đổi con trỏ chuột
Kiểu con trỏ chuột có vẻ là một thay đổi nhỏ, nhưng nó giúp mang lại cho Windows 11 giao diện của Ubuntu. Tải xuống gói Ubuntu Cursors: http://www.rw-designer.com/cursor-set/ubuntu và giải nén các file từ thư mục nén.
- Mở Settings > Bluetooth & device > Mouse > Additional mouse settings.
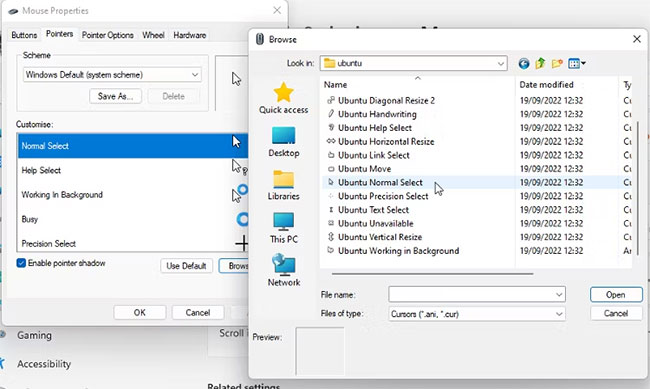
- Chọn tab Pointers và với Normal Select được highlight, hãy nhấp vào Browse.
- Điều hướng đến thư mục Ubuntu Cursors đã giải nén, chọn con trỏ Ubuntu Normal Select và nhấp vào Open.
- Lặp lại điều này cho tất cả các con trỏ chuột khác, sau đó nhấp vào Apply.
4. Tùy chỉnh phông chữ và màu PowerShell
Terminal tiêu chuẩn trong Ubuntu sử dụng một phông chữ và bảng màu cụ thể. Bạn có thể thay đổi kiểu PowerShell để trông giống như Ubuntu terminal. Bạn có thể lấy phông chữ chính thức từ trang web Ubuntu. Tải xuống file và giải nén nội dung vào một thư mục.
- Mở Settings > Personalization > Fonts.
- Chọn tất cả các file phông chữ trong thư mục đã giải nén và kéo chúng vào cửa sổ phông chữ.
- Bây giờ hãy mở PowerShell. Bạn chỉ có thể tìm kiếm nó trong Windows Search.
- Nhấp chuột phải vào thanh trên cùng và chọn Properties từ menu.
- Trong tab Font, chọn Ubuntu Mono.
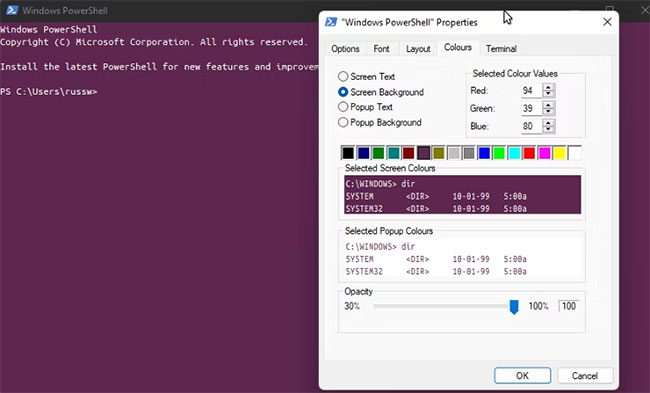
- Trong tab Colors, chọn Screen Text và thay đổi màu thành màu trắng. Chọn Screen Background và thay đổi các giá trị RBG thành 94, 39 và 80.
- Nhấp vào Ok và đóng PowerShell.
7. Ẩn Taskbar
Bây giờ để đối phó với Windows Taskbar. Bạn có thể làm điều này theo cách nhanh chóng và dễ dàng hoặc chọn cách đầy đủ hơn.
Cách dễ dàng là mở Settings > Personalization > Taskbar. Sau đó chọn Automatically hide the taskbar. Nó sẽ vẫn có sẵn nếu bạn cần, nhưng không hiển thị trên màn hình và làm hỏng giao diện Ubuntu.
Cách hoàn chỉnh hơn yêu cầu sử dụng thêm một phần mềm: Taskbar Hider.
- Tải xuống phiên bản chương trình phù hợp với bạn (32-bit hoặc 64-bit) và giải nén file.
- Nhấp đúp vào file chương trình để chạy nó và chọn hotkey bạn muốn sử dụng.
- Bạn cũng có thể đặt nó để tự động ẩn Taskbar khi Windows khởi động.
- Bấm Ok, sau đó bấm hotkey bạn đã chọn để ẩn Taskbar.
Nếu muốn, bạn có thể di chuyển thanh tác vụ lên đầu màn hình để mô phỏng thanh trên cùng của Ubuntu. Bạn sẽ cần sử dụng một công cụ như Taskbar11, cho phép bạn thay đổi vị trí và kích thước của taskbar. Nó cũng cho phép bạn loại bỏ hầu hết các biểu tượng trên thanh tác vụ. Trông sẽ không giống hoàn toàn, nhưng có thể khá gần với phong cách Ubuntu.
8. Thêm Linkbar
Một trong những tính năng chính của Ubuntu là Linkbar. May mắn thay, bạn có thể tải xuống một công cụ Linkbar tương tự cho Windows.
- Tải xuống file Linkbar: https://sourceforge.net/projects/linkbar/ và sau đó nhấp chuột phải vào nó, rồi chọn Extract all.
- Nhấp đúp vào file Linkbar64 và chọn người có thể sử dụng file đó: Mọi người hoặc chỉ bạn.
- Bạn phải chọn một thư mục. Đây là nơi các mục bạn thêm vào link bar sẽ được lưu trữ. Sau đó nhấp vào Apply.
- Nhấp chuột phải vào Linkbar và chọn Settings. Thay đổi màu thành đen.
- Đặt tùy chọn Position on screen thành Left và Order of shortcuts thành Up to down.
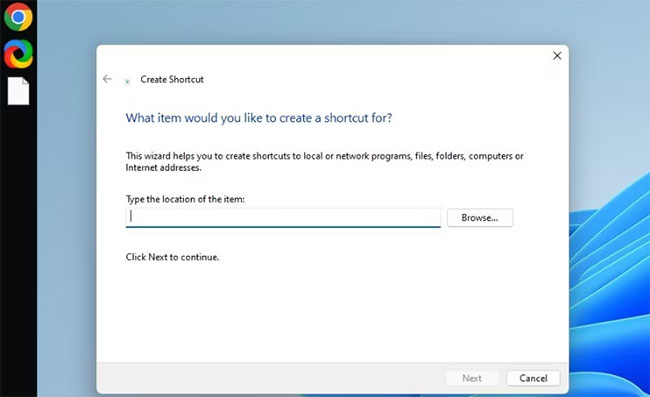
- Để thêm các mục vào Linkbar, hãy nhấp chuột phải vào nó và chọn New > Shortcut.
- Nhấp vào Browse và tìm ứng dụng bạn muốn thêm. Bạn có thể chọn shortcut đến ứng dụng hoặc file .exe của ứng dụng. Lặp lại điều này cho tất cả các ứng dụng bạn muốn thêm.
9. Thay đổi hình nền desktop
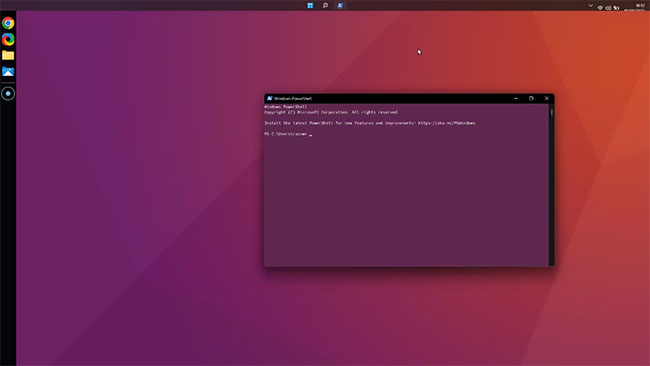
Thay đổi hình nền desktop trên Windows 11 là một trong những cách nhanh nhất để làm cho nó giống Ubuntu. Có rất nhiều hình nền phù hợp có sẵn trực tuyến sử dụng bảng màu Ubuntu tím và cam dễ nhận biết. Bộ sưu tập yêu thích có thể được tìm thấy tại Wallpaper Access.
10. Cài đặt WSL và Ubuntu
Bước cuối cùng này là hoàn toàn không bắt buộc. Nếu bạn hài lòng với những gì đã thực hiện, bạn không cần phải làm gì thêm. Nhưng để có trải nghiệm Ubuntu đầy đủ, bạn sẽ cần WSL.
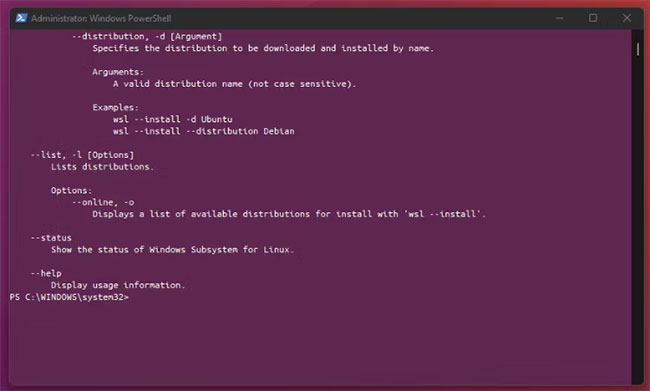
- Mở PowerShell với quyền admin và nhập: wsl - install.
- Tải xuống và cài đặt Ubuntu từ Microsoft Store. Quá trình này có thể mất một chút thời gian vì nó có dung lượng khoảng 600MB.
- Sau khi cài đặt xong, bạn có thể mở Ubuntu từ menu Start. Bạn cũng có thể đặt một shortcut đến nó trong Linkbar.
- Một cửa sổ terminal sẽ mở ra, cho phép bạn nhập các lệnh Linux như thể máy tính Windows của bạn là máy tính Ubuntu.
Nếu muốn mang một số phong cách Ubuntu lên Windows 11, bạn có thể làm như vậy khá dễ dàng. Mua gói skin được tùy chỉnh sẵn là phương pháp nhanh chóng và đầy đủ nhất. Nhưng với một vài phần mềm miễn phí và một số thay đổi kiểu dáng dễ dàng, bất kỳ ai cũng có thể làm cho Windows 11 trông giống Ubuntu hơn mà không tốn một xu.
