Cách khởi động kép Windows 11 và Windows 10
- Thứ hai - 28/03/2022 01:40
- In ra
- Đóng cửa sổ này
Với hệ thống khởi động kép, bạn có thể cài đặt Windows 11 trên PC chạy Windows 10. Điều này cho phép bạn thử nghiệm hệ điều hành mới từ Microsoft mà không cần phải gỡ cài đặt hệ điều hành hiện có.
Thiết lập hệ thống khởi động kép Windows khá dễ dàng. Tất cả những gì bạn cần là hệ thống tương thích với Windows 11, image ISO, đủ dung lượng lưu trữ và vài phút đồng hồ. Hãy xem xét hai cách để khởi động kép Windows 11 với Windows 10 trong bài viết dưới đây.
Điều kiện tiên quyết để khởi động kép Windows 11 với Windows 10
Bạn cần chuẩn bị một chút trước khi có thể khởi động kép Windows 11. Trước hết, bạn phải có một máy tính có thể chạy Windows 11. Điều này nói thì dễ hơn làm, bởi vì hệ thống yêu cầu để chạy Windows 11 cao hơn một chút so với những gì mọi người mong đợi.
Nếu PC của bạn có thể chạy Windows 11, hãy tải xuống image ISO của Windows 11 và tạo USB boot. Nếu không có USB, bạn có thể mount các file image ISO.
Có thể cài đặt Windows 11 trên PC chạy Windows 10 ở đâu?
Bạn có thể thu nhỏ volume hiện có và tạo một phân vùng mới trên ổ đĩa để cài đặt Windows 11. Bài viết sẽ hướng dẫn bạn các bước cần thiết để thu nhỏ, định dạng và tạo một phân vùng mới.
Phương pháp 1: Khởi động kép Windows 10 và Windows 11 từ bên trong
Bạn có thể cài đặt Windows 11 bằng cách chạy file setup.exe trực tiếp từ thư mục Windows Source. Điều này rất hữu ích nếu bạn không có USB boot. Phương pháp này bao gồm nhiều bước, vì vậy hãy làm theo những gì cần thiết trong trường hợp của bạn.
Bước 1: Thu nhỏ volume hoặc phân vùng
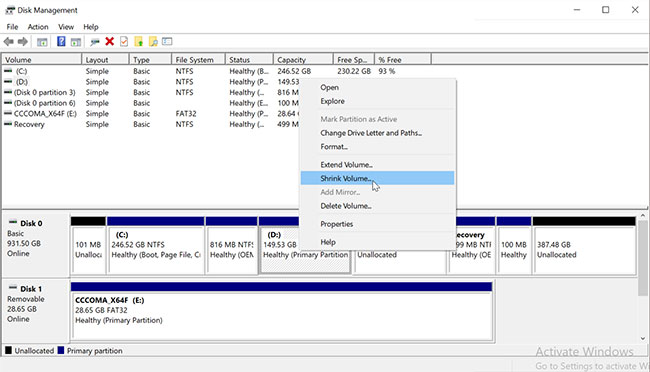
Đầu tiên, hãy thu nhỏ phân vùng hiện tại để tạo một phân vùng khác đủ lớn cho việc cài đặt Windows 11. Để thực hiện việc này, hãy nhấn Win + R để mở Run. Tiếp theo, gõ diskmgmt.msc và nhấn OK để mở công cụ Disk Management.
Trong phần Disk, nhấp chuột phải vào bất kỳ ổ nào có đủ dung lượng trống và chọn Shrink Volume.
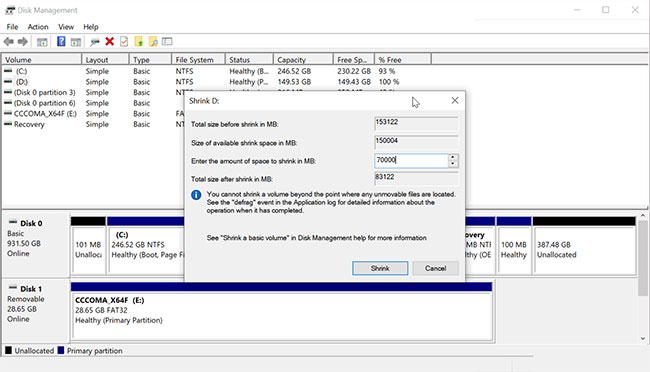
Trong hộp thoại xuất hiện, nhập dung lượng cần thu nhỏ tính bằng MB và nhấp vào Shrink. Ví dụ, nếu volume hiện tại của bạn còn trống 153122MB (150GB), hãy nhập 70000 vào trường Shrink. Nó sẽ thu nhỏ volume hiện tại của bạn xuống còn 80GB và 70GB còn lại sẽ hiển thị dưới dạng dung lượng chưa được cấp phát.
Bước 2: Tạo một volume mới
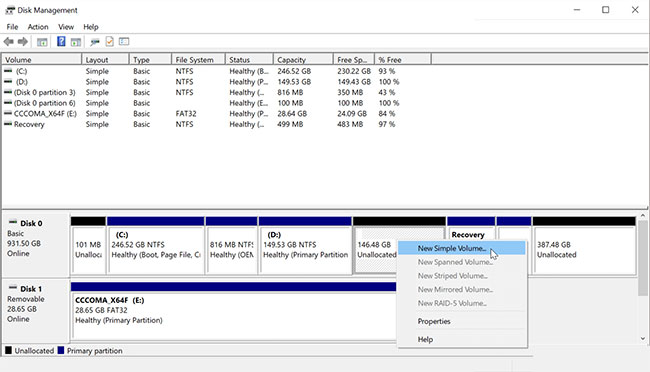
Để tạo một volume mới, hãy nhấp chuột phải vào không gian chưa được cấp phát và chọn New Simple Volume.

Trong cửa sổ New Simple Volume Wizard, bấm Next. Sau đó, nhập kích thước cho volume mới và nhấp vào Next. Đảm bảo bạn cấp phát đủ dung lượng để cài đặt Windows 11.
Chọn tùy chọn Assign the following drive letter và nhấp vào Next.
Tiếp theo, tích vào Format this volume with the following settings và chọn như sau:
- File System - NTFS
- Allocation unit size - Default
- Volume Label - Windows 11
Gắn nhãn volume sẽ giúp bạn dễ dàng nhận ra ổ trong khi cài đặt. Ngoài ra, hãy chọn tùy chọn Perform a quick format. Cuối cùng, nhấp vào Finish để tạo một phân vùng mới.
Bước 3: Cài đặt Windows 11 với Windows 10
Kết nối USB boot Window 11 với PC. Nếu bạn không có USB boot, hãy mount image ISO của Windows 11.
Để thực hiện việc này, hãy nhấp chuột phải vào image ISO và chọn Mount. Sau khi bạn đã mount image, nó sẽ xuất hiện dưới dạng ổ mới trong This PC.
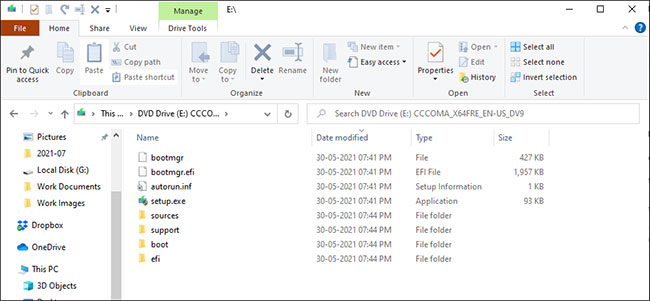
Tiếp theo, mở USB boot hoặc ISO được mount trong File Explorer. Sau đó, mở thư mục Sources và chạy file setup.exe. Nhấp vào Yes khi được UAC (User Account Control) nhắc.
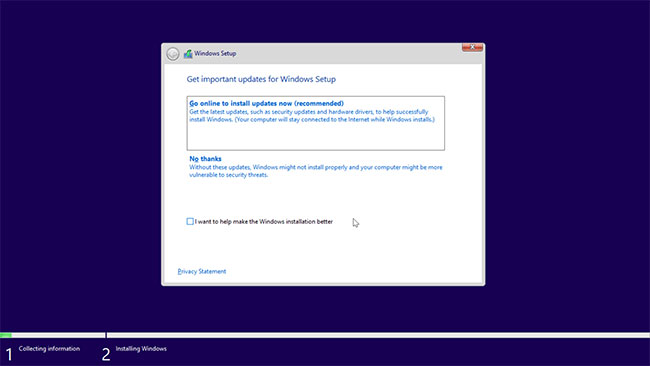
Trong màn hình Windows Setup, chọn No thanks để tiếp tục. Tiếp theo, chấp nhận các thông báo và điều khoản cấp phép hiện hành, rồi nhấn vào Next.
Chọn tùy chọn Custom: Install Windows only (advanced). Trong màn hình Where do you want to install Windows, chọn volume Windows 11 và nhấp vào Next.
Windows 11 bây giờ sẽ bắt đầu cài đặt. Quá trình này có thể mất một chút thời gian và lâu hơn trên ổ cứng truyền thống.
Trong khi cài đặt, PC của bạn sẽ khởi động lại và hiển thị Windows Boot Manager. Tại đây, chọn tùy chọn Windows 10/11 Setup đầu tiên để tiếp tục thiết lập.
Sau khi thiết lập xong, hãy khởi động lại PC và bạn sẽ thấy tùy chọn khởi động kép trong Boot Manager.
Phương pháp 2: Khởi động kép Windows 11 với Windows 10 bằng ổ boot khi khởi động
Nếu muốn, bạn cũng có thể cài đặt Windows 11 khi khởi động bằng ổ boot. Đây là cách thực hiện.
Trước tiên, hãy làm theo bước 1 trong phương pháp 1 để thu nhỏ một volume trên ổ đĩa, tạo không gian chưa được cấp phát. Khi bạn có không gian chưa được cấp phát đủ lớn để cài đặt Windows 11, hãy tiến hành cài đặt.
1. Tắt PC và kết nối USB boot.
2. Trong khi khởi động lại PC, hãy bắt đầu nhấn F12 để truy cập menu Boot.
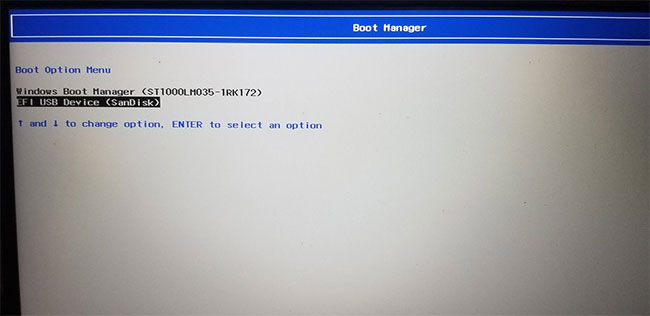
3. Chọn ổ boot Windows 11 làm thiết bị khởi động trong Boot Manager.
4. Trong cửa sổ Setup, chọn ngôn ngữ và các tùy chọn khác, rồi nhấp vào OK.
5. Tiếp theo, nhấp vào Install Now và chấp nhận các điều khoản của giấy phép.
6. Chọn tùy chọn Custom: Install Windows only.
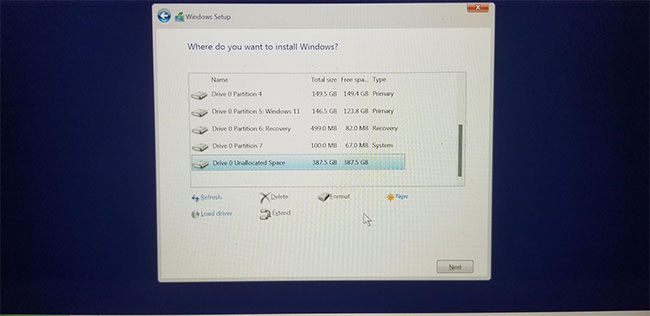
7. Trong màn hình Where do you want to install Windows, chọn Unallocated space partition và nhấp vào Next.
Windows 11 sẽ bắt đầu cài đặt trên phân vùng đã chọn của bạn. Thực hiện theo các bước thiết lập để hoàn tất cài đặt. Sau khi cài đặt, thiết bị của bạn sẽ tự động đặt Windows 11 làm hệ điều hành mặc định.
Cách chọn hệ điều hành mặc định để khởi động giữa Windows 10 và 11
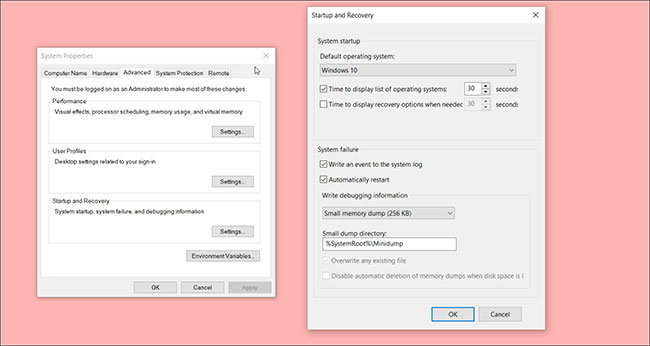
Bạn có thể thay đổi hệ điều hành mặc định để khởi động trên hệ thống khởi động kép từ Startup and Recovery. Đây là cách thực hiện.
1. Nhấn Win + I để mở Settings.
2. Đi tới System và sau đó mở tab About từ ngăn bên trái.
3. Trong ngăn bên phải, nhấp vào Advanced System Settings trong phần Related Settings.
4. Trong phần Startup and Recovery, nhấp vào Settings.
5. Nhấp vào menu drop-down Default operating system và chọn hệ điều hành ưa thích.
6. Đặt các tùy chọn Time to display list of operating systems và Time to display recovery options when needed thành 30 giây mỗi tùy chọn.
7. Nhấp vào OK để lưu các thay đổi và khởi động lại PC.
Trong khi khởi động lại, hệ thống sẽ nhắc bạn chọn hệ điều hành ưa thích để khởi động. Nếu bạn không chọn bất kỳ cái nào, nó sẽ tự động khởi động hệ điều hành mặc định. Nếu bạn vẫn không thấy các tùy chọn khởi động kép trong khi khởi động lại, hãy thử tắt Fast Startup.
Tính năng khởi động kép rất hữu ích nếu bạn muốn dùng thử Windows 11 mà không cần lo lắng về các vấn đề hiệu suất và độ ổn định của nó. Tuy nhiên, khởi động kép không phải là không có những khiếm khuyết. Có những rủi ro và vấn đề có thể ảnh hưởng đến hiệu suất hệ thống. Biết các sự cố khởi động kép tiềm ẩn có thể xảy ra sẽ giúp bạn giảm thiểu tác động của chúng.
