<!DOCTYPE html>
    <html lang="vi" xmlns="http://www.w3.org/1999/xhtml" prefix="og: http://ogp.me/ns#">
    <head>
<title>Cách khắc phục PUBG&#x3A; Battlegrounds không lưu cài đặt trên Windows 11&#x002F;10</title>
<meta name="description" content="Cách khắc phục PUBG&#x3A; Battlegrounds không lưu cài đặt trên Windows 11&#x002F;10 - Savefile - Tin Tức -...">
<meta name="author" content=".: Nguoicodonvn2008.info - Cõi lòng người cô đơn :.">
<meta name="copyright" content=".: Nguoicodonvn2008.info - Cõi lòng người cô đơn :. [admin@nguoicodonvn2008.info]">
<meta name="robots" content="index, archive, follow, noodp">
<meta name="googlebot" content="index,archive,follow,noodp">
<meta name="msnbot" content="all,index,follow">
<meta name="generator" content="NukeViet v4.5">
<meta http-equiv="Content-Type" content="text/html; charset=utf-8">
<meta property="og:title" content="Cách khắc phục PUBG&#x3A; Battlegrounds không lưu cài đặt trên Windows 11&#x002F;10">
<meta property="og:type" content="website">
<meta property="og:description" content="Savefile - Tin Tức -...">
<meta property="og:site_name" content=".&#x3A; Nguoicodonvn2008.info - Cõi lòng người cô đơn &#x3A;.">
<meta property="og:url" content="https://www.nguoicodonvn2008.info/vi/news/savefile/kien-thuc-may-tinh/cach-khac-phuc-pubg-battlegrounds-khong-luu-cai-dat-tren-windows-11-10-6766.html">
<link rel="shortcut icon" href="https://nguoicodonvn2008.info/favicon.ico">
<link rel="canonical" href="https://www.nguoicodonvn2008.info/vi/news/savefile/kien-thuc-may-tinh/cach-khac-phuc-pubg-battlegrounds-khong-luu-cai-dat-tren-windows-11-10-6766.html">
<link rel="alternate" href="https://nguoicodonvn2008.info/vi/news/rss/" title="Tin Tức" type="application/rss+xml">
<link rel="alternate" href="https://nguoicodonvn2008.info/vi/news/rss/karaoke-dual/" title="Tin Tức - Karaoke Dual" type="application/rss+xml">
<link rel="alternate" href="https://nguoicodonvn2008.info/vi/news/rss/nhac-tre/" title="Tin Tức - Nhạc trẻ" type="application/rss+xml">
<link rel="alternate" href="https://nguoicodonvn2008.info/vi/news/rss/tru-tinh/" title="Tin Tức - Trữ tình" type="application/rss+xml">
<link rel="alternate" href="https://nguoicodonvn2008.info/vi/news/rss/nuoc-ngoai/" title="Tin Tức - Nước ngoài" type="application/rss+xml">
<link rel="alternate" href="https://nguoicodonvn2008.info/vi/news/rss/remix/" title="Tin Tức - Remix" type="application/rss+xml">
<link rel="alternate" href="https://nguoicodonvn2008.info/vi/news/rss/tam-su-tinh-yeu/" title="Tin Tức - Tâm sự tình yêu" type="application/rss+xml">
<link rel="alternate" href="https://nguoicodonvn2008.info/vi/news/rss/tho-suu-tam/" title="Tin Tức - Thơ sưu tầm" type="application/rss+xml">
<link rel="alternate" href="https://nguoicodonvn2008.info/vi/news/rss/cuoc-song/" title="Tin Tức - Cuộc sống" type="application/rss+xml">
<link rel="alternate" href="https://nguoicodonvn2008.info/vi/news/rss/phan-mem/" title="Tin Tức - Phần mềm" type="application/rss+xml">
<link rel="alternate" href="https://nguoicodonvn2008.info/vi/news/rss/kien-thuc-may-tinh/" title="Tin Tức - Kiến thức máy tính" type="application/rss+xml">
<link rel="alternate" href="https://nguoicodonvn2008.info/vi/news/rss/hoc-tap/" title="Tin Tức - Học tập" type="application/rss+xml">
<link rel="alternate" href="https://nguoicodonvn2008.info/vi/news/rss/tai-lieu/" title="Tin Tức - Tài liệu" type="application/rss+xml">
<link rel="alternate" href="https://nguoicodonvn2008.info/vi/news/rss/de-thi/" title="Tin Tức - Đề thi" type="application/rss+xml">
<link rel="preload" as="style" href="https://nguoicodonvn2008.info/assets/css/font-awesome.min.css" type="text/css">
<link rel="preload" as="style" href="https://nguoicodonvn2008.info/themes/default/css/bootstrap.non-responsive.css" type="text/css">
<link rel="preload" as="style" href="https://nguoicodonvn2008.info/themes/default/css/style.css" type="text/css">
<link rel="preload" as="style" href="https://nguoicodonvn2008.info/themes/default/css/style.non-responsive.css" type="text/css">
<link rel="preload" as="style" href="https://nguoicodonvn2008.info/themes/default/css/news.css" type="text/css">
<link rel="preload" as="style" href="https://nguoicodonvn2008.info/themes/default/css/custom.css" type="text/css">
<link rel="preload" as="script" href="https://nguoicodonvn2008.info/assets/js/jquery/jquery.min.js" type="text/javascript">
<link rel="preload" as="script" href="https://nguoicodonvn2008.info/assets/js/language/vi.js" type="text/javascript">
<link rel="preload" as="script" href="https://nguoicodonvn2008.info/assets/js/DOMPurify/purify3.js" type="text/javascript">
<link rel="preload" as="script" href="https://nguoicodonvn2008.info/assets/js/global.js" type="text/javascript">
<link rel="preload" as="script" href="https://nguoicodonvn2008.info/assets/js/site.js" type="text/javascript">
<link rel="preload" as="script" href="https://nguoicodonvn2008.info/themes/default/js/news.js" type="text/javascript">
<link rel="preload" as="script" href="https://nguoicodonvn2008.info/themes/default/js/main.js" type="text/javascript">
<link rel="preload" as="script" href="https://nguoicodonvn2008.info/themes/default/js/custom.js" type="text/javascript">
<link rel="preload" as="script" href="https://nguoicodonvn2008.info/themes/default/js/bootstrap.min.js" type="text/javascript">
<link rel="stylesheet" href="https://nguoicodonvn2008.info/assets/css/font-awesome.min.css">
<link rel="stylesheet" href="https://nguoicodonvn2008.info/themes/default/css/bootstrap.non-responsive.css">
<link rel="stylesheet" href="https://nguoicodonvn2008.info/themes/default/css/style.css">
<link rel="stylesheet" href="https://nguoicodonvn2008.info/themes/default/css/style.non-responsive.css">
<link rel="StyleSheet" href="https://nguoicodonvn2008.info/themes/default/css/news.css">
<link rel="stylesheet" href="https://nguoicodonvn2008.info/themes/default/css/custom.css">
<style type="text/css">
	body{background: #fff;}
</style>
    </head>
    <body>
<div id="print">
	<div id="hd_print">
		<h2 class="pull-left">.&#x3A; Nguoicodonvn2008.info - Cõi lòng người cô đơn &#x3A;.</h2>
		<p class="pull-right"><a title=".&#x3A; Nguoicodonvn2008.info - Cõi lòng người cô đơn &#x3A;." href="https://nguoicodonvn2008.info/">https://nguoicodonvn2008.info</a></p>
	</div>
	<div class="clear"></div>
	<hr />
	<div id="content">
		<h1>Cách khắc phục PUBG&#x3A; Battlegrounds không lưu cài đặt trên Windows 11&#x002F;10</h1>
		<ul class="list-inline">
			<li>Thứ hai - 20/02/2023 23:58</li>
			<li class="hidden-print txtrequired"><em class="fa fa-print">&nbsp;</em><a title="In ra" href="javascript:;" onclick="window.print()">In ra</a></li>
			<li class="hidden-print txtrequired"><em class="fa fa-power-off">&nbsp;</em><a title="Đóng cửa sổ này" href="javascript:;" onclick="window.close()">Đóng cửa sổ này</a></li>
		</ul>
		<div class="clear"></div>
		<div id="hometext">
		</div>
				<div class="imghome">
			<img alt="Cách khắc phục PUBG&#x3A; Battlegrounds không lưu cài đặt trên Windows 11&#x002F;10" src="https://st.quantrimang.com/photos/image/2023/02/20/pubg-battlegrounds-khong-luu-cai-dat-6.jpg" width="460" class="img-thumbnail" />
		</div>
		<div class="clear"></div>
		<div id="bodytext" class="clearfix">
			<p style="text-align: justify;">Nhiều người chơi điều chỉnh cài đặt đồ họa, âm thanh và điều khiển trong PUBG: Battlegrounds để phù hợp với sở thích của mình. Tuy nhiên, một số người chơi đã báo cáo rằng họ không thể thay đổi cài đặt trong PUBG: Battlegrounds vì game không lưu chúng. Cài đặt của PUBG bị reset mỗi khi họ khởi động lại game.</p>

<p style="text-align: justify;">Đây là một vấn đề khó chịu. Người chơi vẫn có thể chơi PUBG nhưng không thể thay đổi cài đặt trong game. Nếu PUBG: Battlegrounds không lưu cài đặt cho bạn, đây là 5 bản sửa lỗi bạn có thể thử.</p>

<h2 style="text-align: justify;">1. Xóa file GameUserSettings</h2>

<p style="text-align: justify;">Một trong những giải pháp được xác nhận rộng rãi nhất cho việc PUBG không lưu cài đặt game là xóa file GameUserSettings.ini của nó. Xóa file cấu hình đó thường sửa được lỗi PUBG không lưu cài đặt. Việc áp dụng giải pháp tiềm năng này đã hiệu quả với rất nhiều người chơi. Đây là cách bạn có thể xóa file GameUserSettings.ini đó:
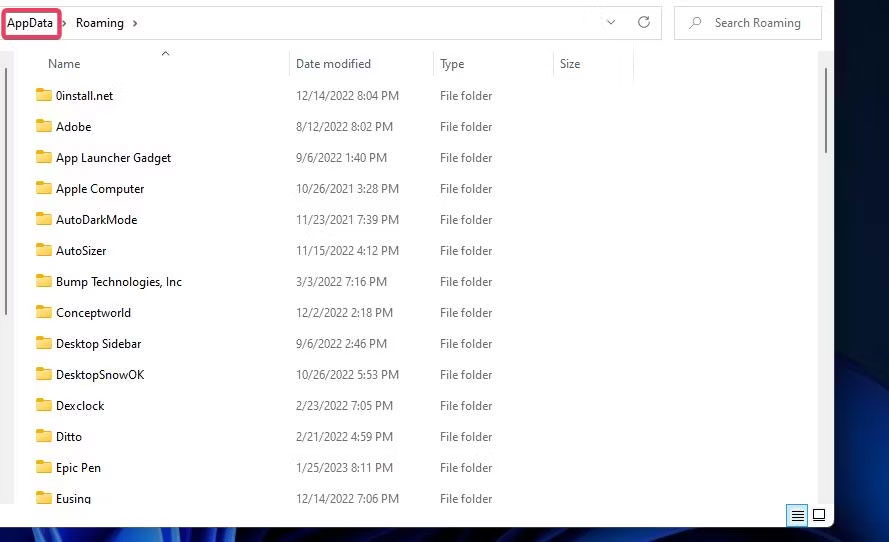
</p>

<p style="text-align: justify;">1.&nbsp;Mở ứng dụng Run&nbsp;mà bạn có thể truy cập nhanh bằng phím tắt&nbsp;<strong>Windows + R</strong>.</p>

<p style="text-align: justify;">2. Nhập&nbsp;<strong>%appdata%</strong>&nbsp;bên trong&nbsp;<strong>Run</strong>&nbsp;và nhấn&nbsp;<strong>Enter</strong>&nbsp;để&nbsp;mở Windows File Explorer&nbsp;trong thư mục&nbsp;<strong>AppData.</strong></p>

<p style="text-align: justify;">3. Nhấp vào&nbsp;<strong>AppData</strong>&nbsp;trong thanh địa chỉ của Explorer để xem thư mục đó.</p>

<figure>
<div style="text-align: justify;"><img alt="Thư mục AppData" data-i="0" data-src="https://st.quantrimang.com/photos/image/2023/02/20/pubg-battlegrounds-khong-luu-cai-dat-1.jpg" data-was-processed="true" height="542" src="https://st.quantrimang.com/photos/image/2023/02/20/pubg-battlegrounds-khong-luu-cai-dat-1.jpg" width="889" /></div>

<figcaption>
<div style="text-align: justify;">Thư mục AppData</div>
</figcaption>
</figure>

<p style="text-align: justify;">4. Mở thư mục con&nbsp;<strong>Local</strong>&nbsp;trong thư mục&nbsp;<strong>AppData.</strong></p>

<p style="text-align: justify;">5. Nhấp vào thư mục&nbsp;<strong>TslGame</strong>&nbsp;để xem và mở nó.</p>

<p style="text-align: justify;">6. Sau đó mở các thư mục&nbsp;<strong>Saved &gt; Config &gt; WindowsNoEditor</strong>&nbsp;từ đó.</p>

<figure>
<div style="text-align: justify;"><img alt="File ini GameUserSettings" data-i="1" data-src="https://st.quantrimang.com/photos/image/2023/02/20/pubg-battlegrounds-khong-luu-cai-dat-2.jpg" data-was-processed="true" height="554" src="https://st.quantrimang.com/photos/image/2023/02/20/pubg-battlegrounds-khong-luu-cai-dat-2.jpg" width="815" /></div>

<figcaption>
<div style="text-align: justify;">File ini GameUserSettings</div>
</figcaption>
</figure>

<p style="text-align: justify;">
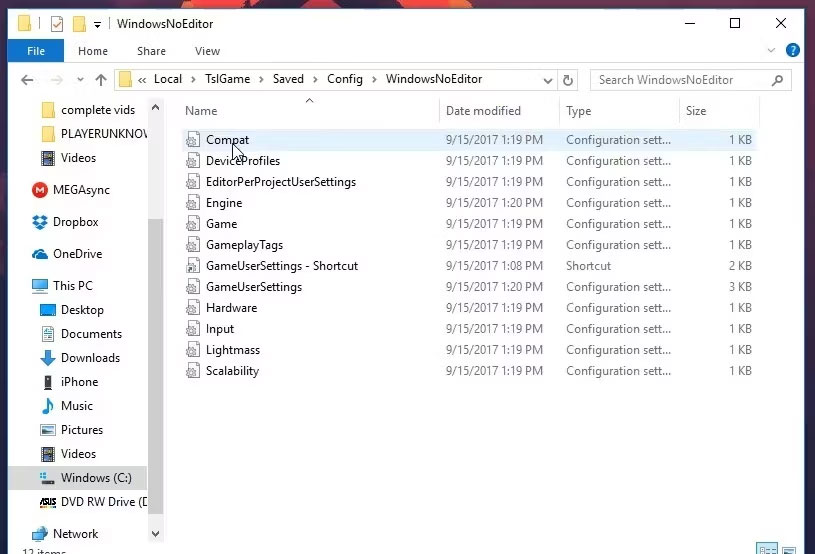
7. Nhấp chuột phải vào file GameUserSettings.ini và chọn&nbsp;<strong>Delete.</strong></p>

<p style="text-align: justify;">8. Khởi chạy PUBG và thử thay đổi lại cài đặt game.</p>

<p style="text-align: justify;">Một số người chơi PlayerUnknown’s Battleground cũng đã nói rằng việc bỏ chọn tùy chọn Read-only cho file GameUserSettings.ini có thể khắc phục lỗi PUBG không lưu. Bạn có thể làm điều đó bằng cách nhấp chuột phải vào file GameUserSettings và chọn&nbsp;<strong>Properties.</strong>&nbsp;Bỏ chọn hộp kiểm&nbsp;<strong>Read-only</strong>&nbsp;nếu nó được chọn. Nhấp vào&nbsp;<strong>Apply &gt; OK</strong>&nbsp;để lưu tùy chọn thuộc tính của file.</p>

<h2 style="text-align: justify;">2. Xác minh tính toàn vẹn của các file PUBG</h2>

<p style="text-align: justify;">Việc xác minh các file game có thể giải quyết nhiều sự cố khi chơi game. Trong trường hợp này, PUBG có thể chơi được nhưng không hoạt động bình thường vì nó không lưu cài đặt. Do đó, đây có thể là một lỗi mà việc xác minh các file PUBG có thể giải quyết.</p>

<figure>
<div style="text-align: justify;"><img alt="Tùy chọn xác minh file trong Epic Games" data-i="2" data-src="https://st.quantrimang.com/photos/image/2023/02/20/pubg-battlegrounds-khong-luu-cai-dat-3.jpg" data-was-processed="true" height="554" src="https://st.quantrimang.com/photos/image/2023/02/20/pubg-battlegrounds-khong-luu-cai-dat-3.jpg" width="895" /></div>

<figcaption>
<div style="text-align: justify;">Tùy chọn xác minh file trong Epic Games</div>
</figcaption>
</figure>

<p style="text-align: justify;">
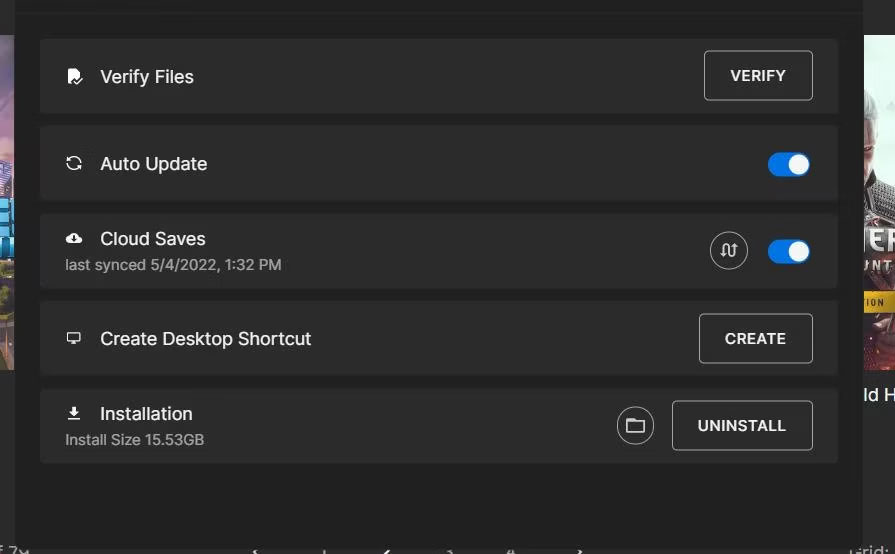
Cả phần mềm client Steam và Epic Games Launcher mà người chơi cài đặt PUBG đều bao gồm các tùy chọn để xác minh game. Các tùy chọn khắc phục sự cố đó quét và sửa chữa các file game.</p>

<h2 style="text-align: justify;">3. Vô hiệu hóa Controlled Folder Access</h2>

<p style="text-align: justify;">Controlled Folder Access chặn&nbsp;ransomware&nbsp;và phần mềm độc hại khác khỏi việc sửa đổi các file trong thư mục. Tuy nhiên, tính năng đó cũng có thể ngăn game lưu tiến trình và cài đặt khi nó hạn chế quyền truy cập thư mục của chúng. Đảm bảo tính năng đó không gây ra sự cố cho cài đặt lưu PUBG trên PC bằng cách kiểm tra và tắt cài đặt của nó như sau:</p>

<p style="text-align: justify;">1. Nhấp đúp vào Windows Security bên trong khay hệ thống.</p>

<p style="text-align: justify;">2. Nhấp vào tùy chọn điều hướng&nbsp;<strong>Virus &amp; threat protection</strong>&nbsp;trong tab&nbsp;<strong>Home.</strong></p>

<p style="text-align: justify;">3. Cuộn xuống và nhấp vào tùy chọn điều hướng&nbsp;<strong>Manage ransomware protection</strong>.</p>

<figure>
<div style="text-align: justify;"><img alt="Tùy chọn Manage ransomware protection" data-i="3" data-src="https://st.quantrimang.com/photos/image/2023/02/20/pubg-battlegrounds-khong-luu-cai-dat-4.jpg" data-was-processed="true" height="552" src="https://st.quantrimang.com/photos/image/2023/02/20/pubg-battlegrounds-khong-luu-cai-dat-4.jpg" width="972" /></div>

<figcaption>
<div style="text-align: justify;">Tùy chọn Manage ransomware protection</div>
</figcaption>
</figure>

<p style="text-align: justify;">
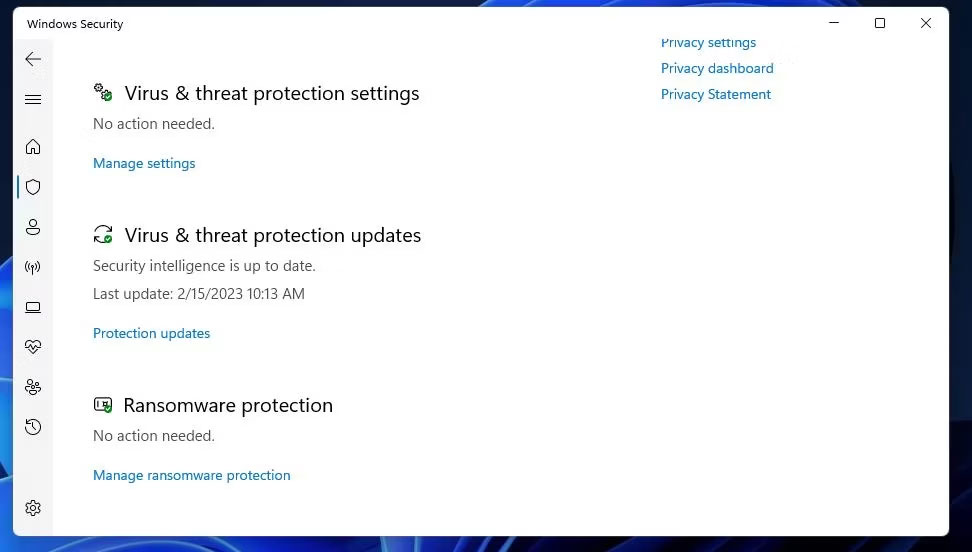
4. Nếu Controlled Folder Access được bật, hãy nhấp vào cài đặt đó để tắt.</p>

<figure>
<div style="text-align: justify;"><img alt="Cài đặt Controlled Folder Access" data-i="4" data-src="https://st.quantrimang.com/photos/image/2023/02/20/pubg-battlegrounds-khong-luu-cai-dat-5.jpg" data-was-processed="true" height="553" src="https://st.quantrimang.com/photos/image/2023/02/20/pubg-battlegrounds-khong-luu-cai-dat-5.jpg" width="965" /></div>

<figcaption>
<div style="text-align: justify;">Cài đặt Controlled Folder Access</div>
</figcaption>
</figure>

<p style="text-align: justify;">
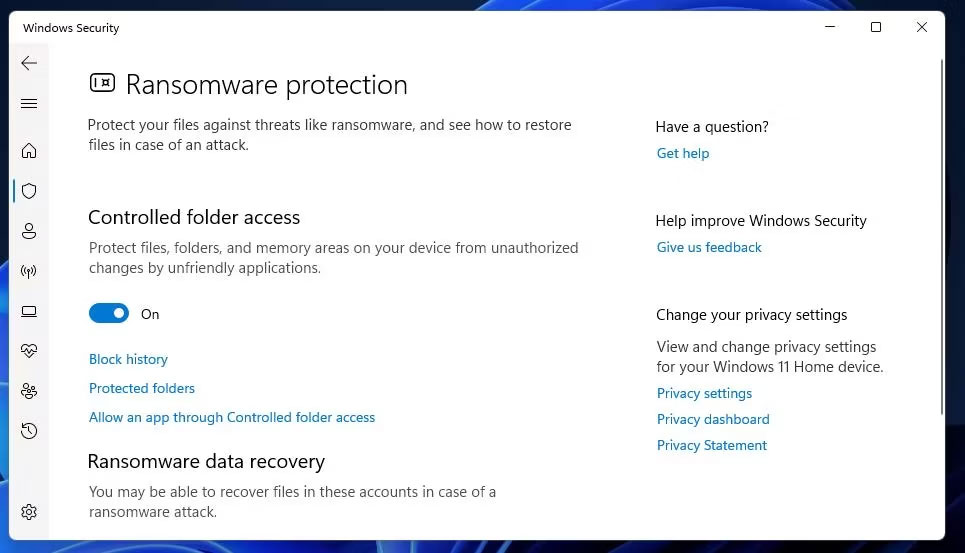
Bây giờ, hãy thử thay đổi lại cài đặt game trong PUBG với Controlled Folder Access bị tắt. Nếu cách khắc phục đó hiệu quả nhưng bạn vẫn muốn tiếp tục sử dụng Controlled Folder Access, hãy thử thêm PUBG vào danh sách loại trừ.</p>

<p style="text-align: justify;">Bạn có thể làm điều đó bằng cách nhấp vào tùy chọn&nbsp;<strong>Allowed an app through Controlled folder access</strong>&nbsp;bên dưới cài đặt&nbsp;<strong>Controlled folder access</strong>&nbsp;đã bật. Nhấp vào&nbsp;<strong>Add an allowed app</strong>&nbsp;để chọn file PUBG EXE để loại trừ.</p>

<h2 style="text-align: justify;">4. Vô hiệu hóa phần mềm diệt virus của bên thứ ba</h2>

<p style="text-align: justify;">Một số ứng dụng diệt virus của bên thứ ba cũng có thể bao gồm tính năng Controlled folder access tương tự như tính năng trong Windows Security. Vì vậy, người dùng có các tiện ích diệt virus của bên thứ ba nên chọn tắt chúng thông qua menu ngữ cảnh khay hệ thống.</p>

<p style="text-align: justify;">Hoặc xem qua các tab cài đặt của phần mềm diệt virus để xem liệu một tab có bao gồm cài đặt tương đương để hạn chế quyền truy cập của ứng dụng vào các thư mục và file hay không và tắt nó nếu có.</p>

<h2 style="text-align: justify;">5. Cài đặt lại PUBG</h2>

<p style="text-align: justify;">Cài đặt lại PUBG là giải pháp cuối cùng có thể khắc phục lỗi các cài đặt không lưu nếu không có phương án nào khác hoạt động. Vì PUBG là game có dung lượng 30-40 gigabyte nên không lý tưởng để tải xuống và cài đặt lại. Tuy nhiên, giải pháp tiềm năng này có thể khắc phục cài đặt PUBG không lưu nếu nguyên nhân là do các file game bị hỏng hoặc bị thiếu. Nếu là người dùng Epic Games, bạn sẽ cần cài đặt lại PUBG như sau:
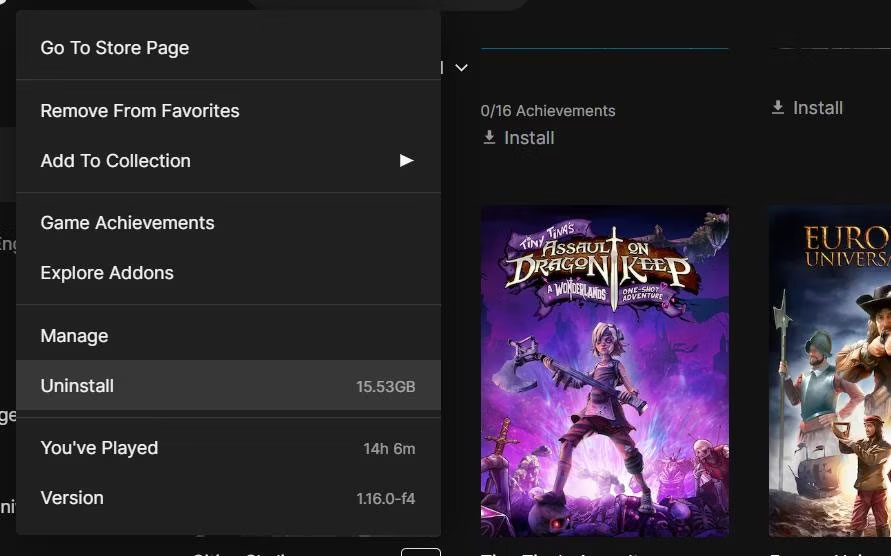
</p>

<p style="text-align: justify;">1. Mở&nbsp;<strong>Epic Games Launcher</strong>&nbsp;và nhấp vào tab&nbsp;<strong>Library</strong>&nbsp;của nó.</p>

<p style="text-align: justify;">2. Nhấp vào nút menu … bên dưới PUBG trong thư viện.</p>

<p style="text-align: justify;">3. Chọn tùy chọn menu&nbsp;<strong>Uninstall.</strong></p>

<figure>
<div style="text-align: justify;"><img alt="Tùy chọn Uninstall" data-i="5" data-src="https://st.quantrimang.com/photos/image/2023/02/20/pubg-battlegrounds-khong-luu-cai-dat-6.jpg" data-was-processed="true" height="556" src="https://st.quantrimang.com/photos/image/2023/02/20/pubg-battlegrounds-khong-luu-cai-dat-6.jpg" width="891" /></div>

<figcaption>
<div style="text-align: justify;">Tùy chọn Uninstall</div>
</figcaption>
</figure>

<p style="text-align: justify;">4. Nhấp vào&nbsp;<strong>Uninstall</strong>&nbsp;khi được yêu cầu xác nhận.</p>

<p style="text-align: justify;">5. Sau khi gỡ cài đặt, hãy nhấp vào PUBG trong tab&nbsp;<strong>Library</strong>&nbsp;và chọn&nbsp;<strong>Install</strong>&nbsp;để cài đặt lại.</p>

<figure>
<div style="text-align: justify;"><img alt="Tùy chọn Install trong Epic Games" data-i="6" data-src="https://st.quantrimang.com/photos/image/2023/02/20/pubg-battlegrounds-khong-luu-cai-dat-7.jpg" data-was-processed="true" height="590" src="https://st.quantrimang.com/photos/image/2023/02/20/pubg-battlegrounds-khong-luu-cai-dat-7.jpg" width="836" /></div>

<figcaption>
<div style="text-align: justify;">Tùy chọn Install trong Epic Games</div>
</figcaption>
</figure>

<p style="text-align: justify;">Người dùng Steam có thể chọn gỡ cài đặt PUBG qua Control Panel, như được đề cập trong&nbsp;hướng dẫn gỡ cài đặt phần mềm trong Windows 11. Sau khi xóa PUBG, hãy chọn game đó trong tab&nbsp;<strong>Library</strong>&nbsp;của Steam và nhấp vào&nbsp;<strong>Install.</strong></p>
		</div>
				<div id="author">
						<p>
				<strong>Nguồn tin:</strong>
				Quantrimang.com
			</p>
		</div>
	</div>
	<div id="footer" class="clearfix">
		<div id="url">
			<strong>URL của bản tin này: </strong><a href="https://www.nguoicodonvn2008.info/vi/news/savefile/kien-thuc-may-tinh/cach-khac-phuc-pubg-battlegrounds-khong-luu-cai-dat-tren-windows-11-10-6766.html" title="Cách khắc phục PUBG&#x3A; Battlegrounds không lưu cài đặt trên Windows 11&#x002F;10">https://www.nguoicodonvn2008.info/vi/news/savefile/kien-thuc-may-tinh/cach-khac-phuc-pubg-battlegrounds-khong-luu-cai-dat-tren-windows-11-10-6766.html</a>

		</div>
		<div class="clear"></div>
		<div class="copyright">
			&copy; .&#x3A; Nguoicodonvn2008.info - Cõi lòng người cô đơn &#x3A;.
		</div>
		<div id="contact">
			<a href="mailto:admin@nguoicodonvn2008.info">admin@nguoicodonvn2008.info</a>
		</div>
	</div>
</div>
        <div id="timeoutsess" class="chromeframe">
            Bạn đã không sử dụng Site, <a onclick="timeoutsesscancel();" href="https://nguoicodonvn2008.info/#">Bấm vào đây để duy trì trạng thái đăng nhập</a>. Thời gian chờ: <span id="secField"> 60 </span> giây
        </div>
        <div id="openidResult" class="nv-alert" style="display:none"></div>
        <div id="openidBt" data-result="" data-redirect=""></div>
		</script>
		<div class="car-top">
  <span><img src="https://nguoicodonvn2008.info/themes/default/images/car.png" alt=""></span>
</div>
<script src="https://nguoicodonvn2008.info/assets/js/jquery/jquery.min.js"></script>
<script>var nv_base_siteurl="/",nv_lang_data="vi",nv_lang_interface="vi",nv_name_variable="nv",nv_fc_variable="op",nv_lang_variable="language",nv_module_name="news",nv_func_name="savefile",nv_is_user=0, nv_my_ofs=-4,nv_my_abbr="EDT",nv_cookie_prefix="nv4c_e856T",nv_check_pass_mstime=1738000,nv_area_admin=0,nv_safemode=0,theme_responsive=0,nv_recaptcha_ver=2,nv_recaptcha_sitekey="",nv_recaptcha_type="image",XSSsanitize=1;</script>
<script src="https://nguoicodonvn2008.info/assets/js/language/vi.js"></script>
<script src="https://nguoicodonvn2008.info/assets/js/DOMPurify/purify3.js"></script>
<script src="https://nguoicodonvn2008.info/assets/js/global.js"></script>
<script src="https://nguoicodonvn2008.info/assets/js/site.js"></script>
<script src="https://nguoicodonvn2008.info/themes/default/js/news.js"></script>
<script src="https://nguoicodonvn2008.info/themes/default/js/main.js"></script>
<script src="https://nguoicodonvn2008.info/themes/default/js/custom.js"></script>
<script type="application/ld+json">
        {
            "@context": "https://schema.org",
            "@type": "Organization",
            "url": "https://nguoicodonvn2008.info",
            "logo": "https://nguoicodonvn2008.info/uploads/angel.gif"
        }
        </script>
<script src="https://nguoicodonvn2008.info/themes/default/js/bootstrap.min.js"></script>
<script type="text/javascript">
var $scrolltop = $('.car-top');
$scrolltop.on('click', function () {
    $('html,body').animate({
        scrollTop: 0
    }, 800);
    $(this).addClass("car-run");
    setTimeout(function(){ $scrolltop.removeClass('car-run');}, 1000);
    return false;
});
$(window).on('scroll', function ()
{ 
    if($(window).scrollTop() >= 200)
    {
        $scrolltop.addClass("show");
        $scrolltop.addClass("car-down");
    }
    else
    {
       $scrolltop.removeClass("show");
       setTimeout(function(){ $scrolltop.removeClass('car-down');}, 300);
    }
});
</script>
</body>
</html>