<!DOCTYPE html>
    <html lang="vi" xmlns="http://www.w3.org/1999/xhtml" prefix="og: http://ogp.me/ns#">
    <head>
<title>Cách khắc phục lỗi DXGI_ERROR_DEVICE_REMOVED trong Windows 10&#x002F;11</title>
<meta name="description" content="Cách khắc phục lỗi DXGI_ERROR_DEVICE_REMOVED trong Windows 10&#x002F;11 - Savefile - Tin Tức -...">
<meta name="author" content=".: Nguoicodonvn2008.info - Cõi lòng người cô đơn :.">
<meta name="copyright" content=".: Nguoicodonvn2008.info - Cõi lòng người cô đơn :. [admin@nguoicodonvn2008.info]">
<meta name="robots" content="index, archive, follow, noodp">
<meta name="googlebot" content="index,archive,follow,noodp">
<meta name="msnbot" content="all,index,follow">
<meta name="generator" content="NukeViet v4.5">
<meta http-equiv="Content-Type" content="text/html; charset=utf-8">
<meta property="og:title" content="Cách khắc phục lỗi DXGI_ERROR_DEVICE_REMOVED trong Windows 10&#x002F;11">
<meta property="og:type" content="website">
<meta property="og:description" content="Savefile - Tin Tức - https&#x3A;&#x002F;&#x002F;www.nguoicodonvn2008.info&#x002F;vi&#x002F;news&#x002F;savefile&#x002F;kien-thuc-may-tinh&#x002F;cach-khac-phuc-loi-dxgi-error-device-removed-trong-windows-10-11-7198.html">
<meta property="og:site_name" content=".&#x3A; Nguoicodonvn2008.info - Cõi lòng người cô đơn &#x3A;.">
<meta property="og:url" content="https://www.nguoicodonvn2008.info/vi/news/savefile/kien-thuc-may-tinh/cach-khac-phuc-loi-dxgi-error-device-removed-trong-windows-10-11-7198.html">
<link rel="shortcut icon" href="https://nguoicodonvn2008.info/favicon.ico">
<link rel="canonical" href="https://www.nguoicodonvn2008.info/vi/news/savefile/kien-thuc-may-tinh/cach-khac-phuc-loi-dxgi-error-device-removed-trong-windows-10-11-7198.html">
<link rel="alternate" href="https://nguoicodonvn2008.info/vi/news/rss/" title="Tin Tức" type="application/rss+xml">
<link rel="alternate" href="https://nguoicodonvn2008.info/vi/news/rss/karaoke-dual/" title="Tin Tức - Karaoke Dual" type="application/rss+xml">
<link rel="alternate" href="https://nguoicodonvn2008.info/vi/news/rss/nhac-tre/" title="Tin Tức - Nhạc trẻ" type="application/rss+xml">
<link rel="alternate" href="https://nguoicodonvn2008.info/vi/news/rss/tru-tinh/" title="Tin Tức - Trữ tình" type="application/rss+xml">
<link rel="alternate" href="https://nguoicodonvn2008.info/vi/news/rss/nuoc-ngoai/" title="Tin Tức - Nước ngoài" type="application/rss+xml">
<link rel="alternate" href="https://nguoicodonvn2008.info/vi/news/rss/remix/" title="Tin Tức - Remix" type="application/rss+xml">
<link rel="alternate" href="https://nguoicodonvn2008.info/vi/news/rss/tam-su-tinh-yeu/" title="Tin Tức - Tâm sự tình yêu" type="application/rss+xml">
<link rel="alternate" href="https://nguoicodonvn2008.info/vi/news/rss/tho-suu-tam/" title="Tin Tức - Thơ sưu tầm" type="application/rss+xml">
<link rel="alternate" href="https://nguoicodonvn2008.info/vi/news/rss/cuoc-song/" title="Tin Tức - Cuộc sống" type="application/rss+xml">
<link rel="alternate" href="https://nguoicodonvn2008.info/vi/news/rss/phan-mem/" title="Tin Tức - Phần mềm" type="application/rss+xml">
<link rel="alternate" href="https://nguoicodonvn2008.info/vi/news/rss/kien-thuc-may-tinh/" title="Tin Tức - Kiến thức máy tính" type="application/rss+xml">
<link rel="alternate" href="https://nguoicodonvn2008.info/vi/news/rss/hoc-tap/" title="Tin Tức - Học tập" type="application/rss+xml">
<link rel="alternate" href="https://nguoicodonvn2008.info/vi/news/rss/tai-lieu/" title="Tin Tức - Tài liệu" type="application/rss+xml">
<link rel="alternate" href="https://nguoicodonvn2008.info/vi/news/rss/de-thi/" title="Tin Tức - Đề thi" type="application/rss+xml">
<link rel="preload" as="style" href="https://nguoicodonvn2008.info/assets/css/font-awesome.min.css" type="text/css">
<link rel="preload" as="style" href="https://nguoicodonvn2008.info/themes/default/css/bootstrap.non-responsive.css" type="text/css">
<link rel="preload" as="style" href="https://nguoicodonvn2008.info/themes/default/css/style.css" type="text/css">
<link rel="preload" as="style" href="https://nguoicodonvn2008.info/themes/default/css/style.non-responsive.css" type="text/css">
<link rel="preload" as="style" href="https://nguoicodonvn2008.info/themes/default/css/news.css" type="text/css">
<link rel="preload" as="style" href="https://nguoicodonvn2008.info/themes/default/css/custom.css" type="text/css">
<link rel="preload" as="script" href="https://nguoicodonvn2008.info/assets/js/jquery/jquery.min.js" type="text/javascript">
<link rel="preload" as="script" href="https://nguoicodonvn2008.info/assets/js/language/vi.js" type="text/javascript">
<link rel="preload" as="script" href="https://nguoicodonvn2008.info/assets/js/DOMPurify/purify3.js" type="text/javascript">
<link rel="preload" as="script" href="https://nguoicodonvn2008.info/assets/js/global.js" type="text/javascript">
<link rel="preload" as="script" href="https://nguoicodonvn2008.info/assets/js/site.js" type="text/javascript">
<link rel="preload" as="script" href="https://nguoicodonvn2008.info/themes/default/js/news.js" type="text/javascript">
<link rel="preload" as="script" href="https://nguoicodonvn2008.info/themes/default/js/main.js" type="text/javascript">
<link rel="preload" as="script" href="https://nguoicodonvn2008.info/themes/default/js/custom.js" type="text/javascript">
<link rel="preload" as="script" href="https://nguoicodonvn2008.info/themes/default/js/bootstrap.min.js" type="text/javascript">
<link rel="stylesheet" href="https://nguoicodonvn2008.info/assets/css/font-awesome.min.css">
<link rel="stylesheet" href="https://nguoicodonvn2008.info/themes/default/css/bootstrap.non-responsive.css">
<link rel="stylesheet" href="https://nguoicodonvn2008.info/themes/default/css/style.css">
<link rel="stylesheet" href="https://nguoicodonvn2008.info/themes/default/css/style.non-responsive.css">
<link rel="StyleSheet" href="https://nguoicodonvn2008.info/themes/default/css/news.css">
<link rel="stylesheet" href="https://nguoicodonvn2008.info/themes/default/css/custom.css">
<style type="text/css">
	body{background: #fff;}
</style>
    </head>
    <body>
<div id="print">
	<div id="hd_print">
		<h2 class="pull-left">.&#x3A; Nguoicodonvn2008.info - Cõi lòng người cô đơn &#x3A;.</h2>
		<p class="pull-right"><a title=".&#x3A; Nguoicodonvn2008.info - Cõi lòng người cô đơn &#x3A;." href="https://nguoicodonvn2008.info/">https://nguoicodonvn2008.info</a></p>
	</div>
	<div class="clear"></div>
	<hr />
	<div id="content">
		<h1>Cách khắc phục lỗi DXGI_ERROR_DEVICE_REMOVED trong Windows 10&#x002F;11</h1>
		<ul class="list-inline">
			<li>Thứ năm - 22/06/2023 04:15</li>
			<li class="hidden-print txtrequired"><em class="fa fa-print">&nbsp;</em><a title="In ra" href="javascript:;" onclick="window.print()">In ra</a></li>
			<li class="hidden-print txtrequired"><em class="fa fa-power-off">&nbsp;</em><a title="Đóng cửa sổ này" href="javascript:;" onclick="window.close()">Đóng cửa sổ này</a></li>
		</ul>
		<div class="clear"></div>
		<div id="hometext">
		</div>
				<div class="imghome">
			<img alt="Cách khắc phục lỗi DXGI_ERROR_DEVICE_REMOVED trong Windows 10&#x002F;11" src="https://st.quantrimang.com/photos/image/2023/06/22/loi-dxgi-error-device-removed-10.jpg" width="460" class="img-thumbnail" />
		</div>
		<div class="clear"></div>
		<div id="bodytext" class="clearfix">
			<p style="text-align: justify;">Lỗi DXGI_ERROR_DEVICE_REMOVED đôi khi xảy ra khi người dùng cố gắng khởi động một số game Windows nhất định hoặc khi chơi chúng. Người chơi đã báo cáo lỗi này xảy ra đối với các game như FIFA 2022, Prepar3D, Need for Speed Rivals, Apex và Crysis 3, cùng những game khác. Thông báo lỗi DirectX này cho biết: &quot;DirectX function ‘GetDeviceRemovedReason’ failed with DXGI_ERROR_DEVICE_REMOVED&quot;.</p>

<p style="text-align: justify;">Do đó, các game Windows hoàn toàn không khởi chạy hoặc thường xuyên gặp sự cố do lỗi DXGI_ERROR_DEVICE_REMOVED. Thông báo lỗi nêu rõ rằng đã xảy ra sự cố liên quan đến card đồ họa của bạn. Do đó, các giải pháp tiềm năng này có thể khắc phục lỗi DXGI_ERROR_DEVICE_REMOVED trong Windows 10/11.</p>

<h2 style="text-align: justify;">1. Sửa đổi registry key GraphicsDriver</h2>

<p style="text-align: justify;">Sửa đổi registry key GraphicsDriver là cách khắc phục tiềm năng được xác nhận rộng rãi nhất cho lỗi DXGI_ERROR_DEVICE_REMOVED. Giải pháp này liên quan đến việc thêm DWORD TDR (Timeout Detection and Recovery) vào key GraphicsDrivers. Đặt DWORD đó thành 0 sẽ tắt tính năng phát hiện TDR. Bạn có thể áp dụng chỉnh sửa registry này như sau:</p>

<p style="text-align: justify;">1. Nhấn&nbsp;<strong>Win + S</strong>, nhập&nbsp;<strong>regedit</strong>&nbsp;bên trong công cụ tìm kiếm và nhấp vào Registry Editor.</p>

<p style="text-align: justify;">2. Tiếp theo, điều hướng đến key GraphicsDrivers tại vị trí registry này:</p>

<pre id="pre0">
<code>HKEY_LOCAL_MACHINE\SYSTEM\CurrentControlSet\Control\GraphicsDrivers</code></pre>

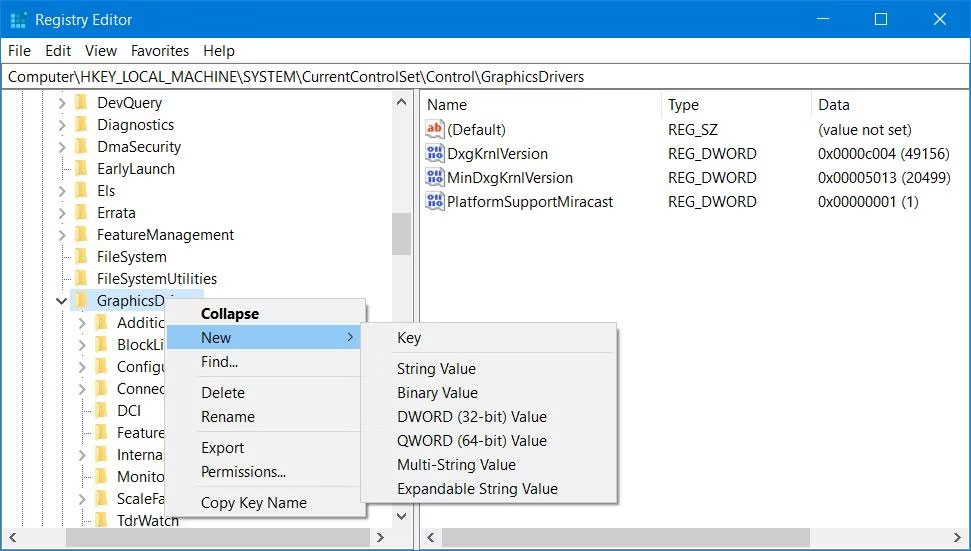
<p style="text-align: justify;">3. Nhấp chuột phải vào&nbsp;<strong>GraphicsDrivers</strong>&nbsp;và chọn các tùy chọn&nbsp;<strong>New &gt; DWORD</strong>&nbsp;trong menu ngữ cảnh.</p>

<figure>
<div style="text-align: justify;"><img alt="Tùy chọn New &gt; DWORD" data-i="0" data-src="https://st.quantrimang.com/photos/image/2023/06/22/loi-dxgi-error-device-removed-1.jpg" data-was-processed="true" height="551" src="https://st.quantrimang.com/photos/image/2023/06/22/loi-dxgi-error-device-removed-1.jpg" width="971" /></div>

<figcaption>
<div style="text-align: justify;">Tùy chọn New &gt; DWORD</div>
</figcaption>
</figure>

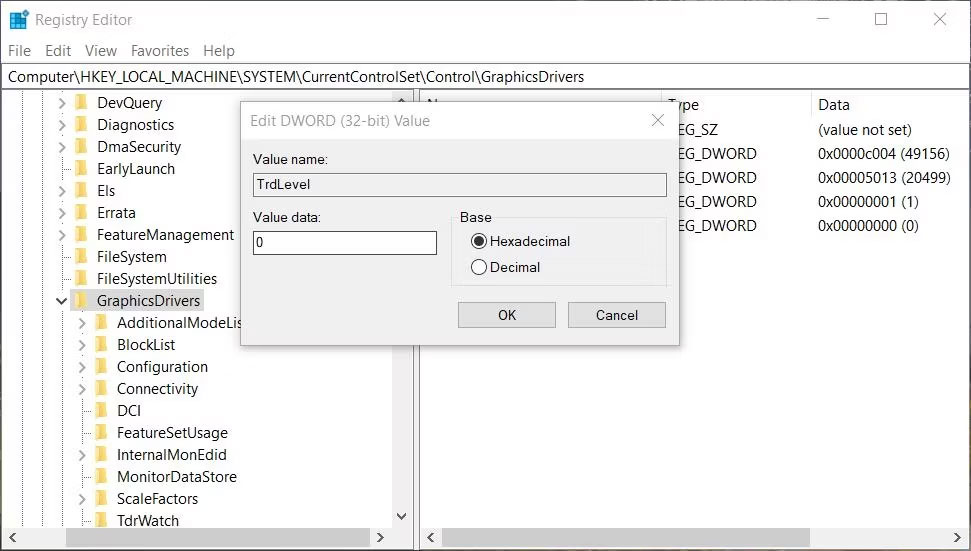
<p style="text-align: justify;">4. Nhập tiêu đề&nbsp;<strong>TdrLevel</strong>&nbsp;cho DWORD.</p>

<p style="text-align: justify;">5. Nhấp đúp vào&nbsp;<strong>TdrLevel</strong>&nbsp;để kích hoạt hộp&nbsp;<strong>Value.</strong></p>

<p style="text-align: justify;">6. Giá trị DWORD đã được đặt thành&nbsp;<strong>0</strong>&nbsp;theo mặc định. Tuy nhiên, hãy thay đổi giá trị đó thành 0 và nhấp vào&nbsp;<strong>OK.</strong></p>

<figure>
<div style="text-align: justify;"><img alt="TrdLevel DWORD" data-i="1" data-src="https://st.quantrimang.com/photos/image/2023/06/22/loi-dxgi-error-device-removed-2.jpg" data-was-processed="true" height="551" src="https://st.quantrimang.com/photos/image/2023/06/22/loi-dxgi-error-device-removed-2.jpg" width="971" /></div>

<figcaption>
<div style="text-align: justify;">TrdLevel DWORD</div>
</figcaption>
</figure>

<p style="text-align: justify;">7. Bây giờ, hãy đóng Registry Editor, nhấp vào&nbsp;<strong>Start</strong>&nbsp;và chọn<strong>&nbsp;Power &gt; Restart</strong>.</p>

<p style="text-align: justify;">Một số người dùng cũng xác nhận việc xóa TdrDelay QWORD trong cùng một key cũng có thể khắc phục được lỗi DXGI_ERROR_DEVICE_REMOVED. Nếu bạn có thể thấy TdrDelay QWORD trong key GraphicsDrivers, hãy thử xóa nó đi. Để làm như vậy, nhấp chuột phải vào TdrDelay QWORD và chọn&nbsp;<strong>Delete.</strong>&nbsp;Chọn&nbsp;<strong>Yes</strong>&nbsp;để xác nhận việc xóa.</p>

<h2 style="text-align: justify;">2. Tắt cài đặt Antialiasing</h2>

<p style="text-align: justify;">Antialiasing là một cài đặt đồ họa giúp làm mịn các đường răng cưa khi được bật. Tuy nhiên, hiệu ứng đồ họa này đôi khi có thể gây ra sự cố treo như lỗi DXGI_ERROR_DEVICE_REMOVED. Đây là cách bạn có thể tắt Antialiasing trong NVIDIA Control Panel:</p>

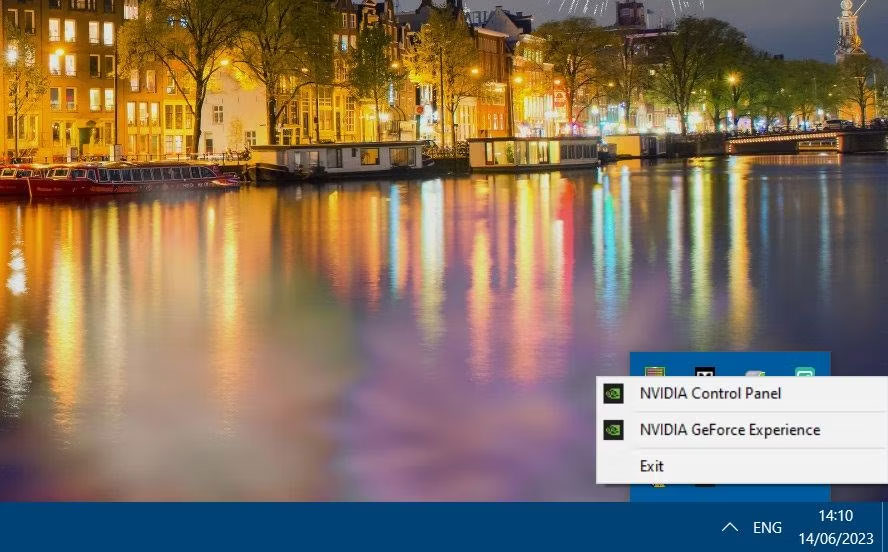
<p style="text-align: justify;">1. Nhấp chuột phải vào logo NVIDIA trong khu vực khay hệ thống và chọn NVIDIA Control Panel.</p>

<figure>
<div style="text-align: justify;"><img alt="Tùy chọn NVIDIA Control Panel" data-i="2" data-src="https://st.quantrimang.com/photos/image/2023/06/22/loi-dxgi-error-device-removed-3.jpg" data-was-processed="true" height="552" src="https://st.quantrimang.com/photos/image/2023/06/22/loi-dxgi-error-device-removed-3.jpg" width="888" /></div>

<figcaption>
<div style="text-align: justify;">Tùy chọn NVIDIA Control Panel</div>
</figcaption>
</figure>

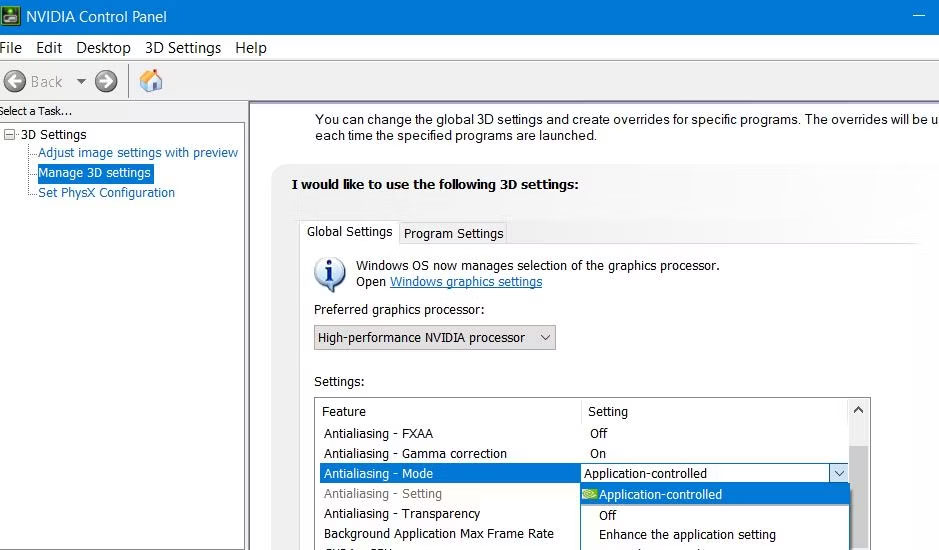
<p style="text-align: justify;">2. Nhấp vào tùy chọn điều hướng&nbsp;<strong>Manage 3D</strong>&nbsp;trong thanh bên.</p>

<p style="text-align: justify;">3. Chọn tab Global Settings của NVIDIA Control Panel.</p>

<p style="text-align: justify;">4. Tiếp theo, nhấp vào tùy chọn<strong>&nbsp;Antialiasing – Mode</strong>&nbsp;và chọn&nbsp;<strong>Off.</strong></p>

<figure>
<div style="text-align: justify;"><img alt="Cài đặt Antialising - Mode" data-i="3" data-src="https://st.quantrimang.com/photos/image/2023/06/22/loi-dxgi-error-device-removed-4.jpg" data-was-processed="true" height="550" src="https://st.quantrimang.com/photos/image/2023/06/22/loi-dxgi-error-device-removed-4.jpg" width="939" /></div>

<figcaption>
<div style="text-align: justify;">Cài đặt Antialising - Mode</div>
</figcaption>
</figure>

<p style="text-align: justify;">5. Lặp lại bước trước đó cho các tùy chọn&nbsp;<strong>Antialiasing – Transparency, FXAA</strong>&nbsp;và&nbsp;<strong>Gamma</strong>.</p>

<p style="text-align: justify;">6. Sau đó chọn Apply để đặt các tùy chọn đồ họa mới.</p>

<p style="text-align: justify;">Bạn cũng có thể tắt Antialiasing cho GPU AMD trong phần mềm Radeon. Hãy xem hướng dẫn về&nbsp;cách điều chỉnh cài đặt AMD Radeon&nbsp;để biết thêm chi tiết về cách tắt Antialiasing ở đó.</p>

<h2 style="text-align: justify;">3. Tắt tính năng NVIDIA ShadowPlay (Overlay)</h2>

<p style="text-align: justify;">Tính năng ShadowPlay của GeForce Experience để ghi lại game có thể gây gánh nặng đáng kể cho&nbsp;<a data-type="internal" href="https://quantrimang.com/cong-nghe/gpu-la-gi-176254" title="GPU là gì?">GPU</a>. Vì vậy, bài viết khuyên bạn nên tắt tính năng đó để khắc phục lỗi DXGI_ERROR_DEVICE_REMOVED. Bạn có thể tắt NVIDIA ShadowPlay trong GeForce Experience như sau:</p>

<p style="text-align: justify;">1. Để mở GeForce Experience, nhấp chuột phải vào biểu tượng khay hệ thống NVIDIA và chọn phần mềm đó trên menu ngữ cảnh.</p>

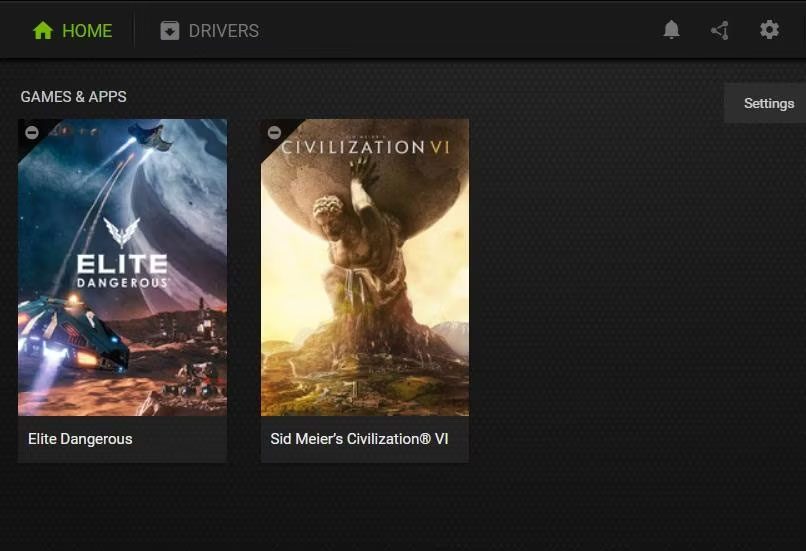
<p style="text-align: justify;">2. Sau đó nhấp vào nút răng cưa (Settings) để truy cập các tùy chọn khác.</p>

<figure>
<div style="text-align: justify;"><img alt="Nút Settings trong GeForce Experience." data-i="4" data-src="https://st.quantrimang.com/photos/image/2023/06/22/loi-dxgi-error-device-removed-5.jpg" data-was-processed="true" height="551" src="https://st.quantrimang.com/photos/image/2023/06/22/loi-dxgi-error-device-removed-5.jpg" width="806" /></div>

<figcaption>
<div style="text-align: justify;">Nút Settings trong GeForce Experience.</div>
</figcaption>
</figure>

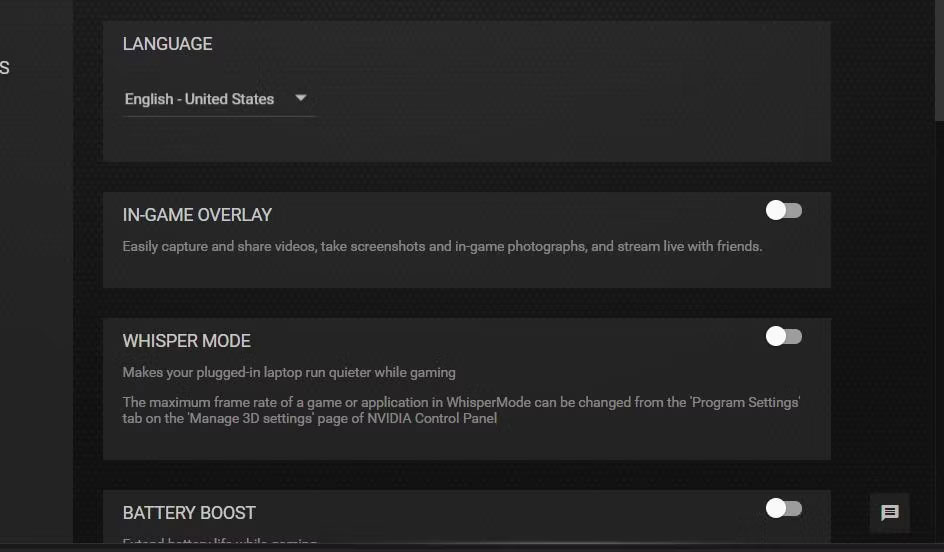
<p style="text-align: justify;">3. Tắt tùy chọn&nbsp;<strong>In-Game Overlay</strong>.</p>

<figure>
<div style="text-align: justify;"><img alt="Tùy chọn In-Game Overlay" data-i="5" data-src="https://st.quantrimang.com/photos/image/2023/06/22/loi-dxgi-error-device-removed-6.jpg" data-was-processed="true" height="552" src="https://st.quantrimang.com/photos/image/2023/06/22/loi-dxgi-error-device-removed-6.jpg" width="944" /></div>

<figcaption>
<div style="text-align: justify;">Tùy chọn In-Game Overlay</div>
</figcaption>
</figure>

<p style="text-align: justify;">4. Thoát khỏi phần mềm GeForce Experience và thử chơi game của bạn với ShadowPlay bị tắt.</p>

<h2 style="text-align: justify;">4. Tắt cài đặt đồ họa DLSS</h2>

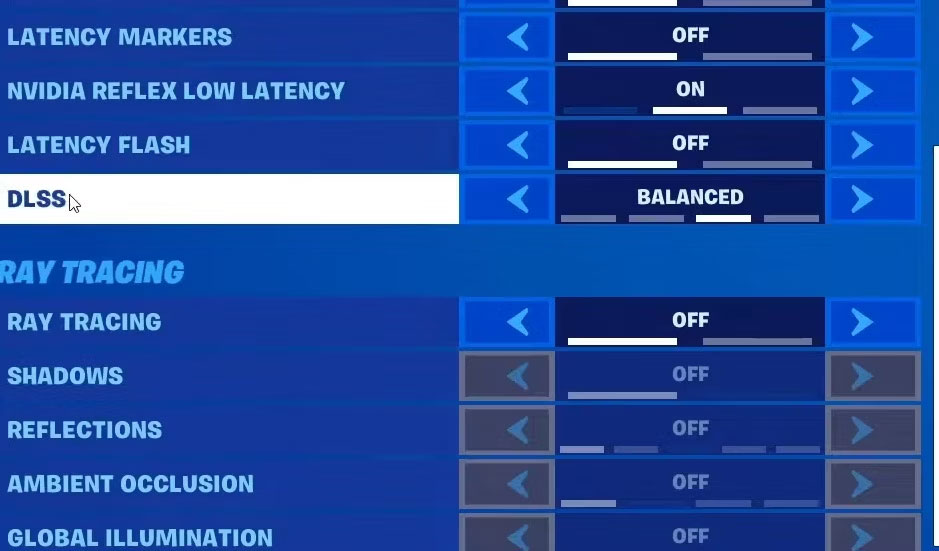
<p style="text-align: justify;">Một số người chơi xác nhận việc tắt cài đặt đồ họa&nbsp;DLSS&nbsp;trong game sẽ khắc phục lỗi DXGI_ERROR_DEVICE_REMOVED. Nếu game bị ảnh hưởng không phải lúc nào cũng gặp sự cố khi bạn khởi động, hãy thử tắt tùy chọn DLSS của game đó. Bạn thường có thể tìm thấy cài đặt đó trong các tùy chọn tab đồ họa hoặc video của game.</p>

<figure>
<div style="text-align: justify;"><img alt="Tùy chọn DLSS" data-i="6" data-src="https://st.quantrimang.com/photos/image/2023/06/22/loi-dxgi-error-device-removed-7.jpg" data-was-processed="true" height="551" src="https://st.quantrimang.com/photos/image/2023/06/22/loi-dxgi-error-device-removed-7.jpg" width="939" /></div>

<figcaption>
<div style="text-align: justify;">Tùy chọn DLSS</div>
</figcaption>
</figure>

<h2 style="text-align: justify;">5. Hoàn tác ép xung</h2>

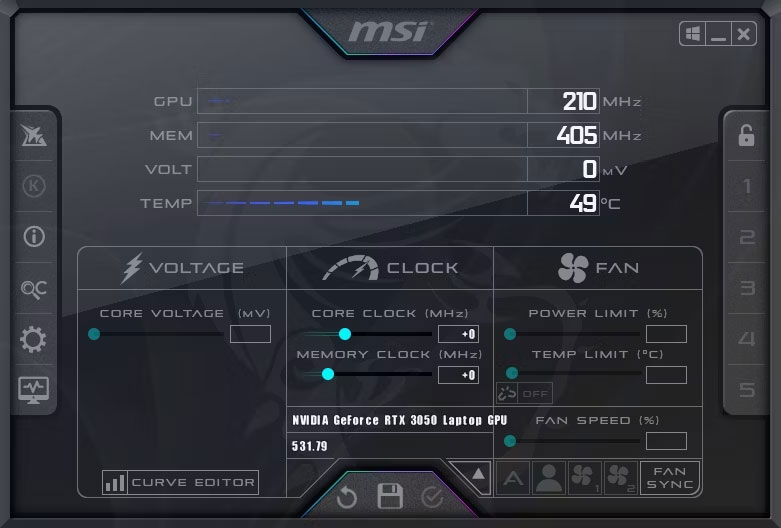
<p style="text-align: justify;">Bạn đã thực hiện bất kỳ ép xung GPU hoặc bộ xử lý nào trên PC của mình chưa? Nếu có, việc ép xung này có thể đã gây ra lỗi DXGI_ERROR_DEVICE_REMOVED. Hoàn tác việc ép xung bằng phần mềm mà bạn đã áp dụng. Hoặc bạn có thể hoàn tác ép xung bằng&nbsp;<a data-type="internal" href="https://quantrimang.com/cong-nghe/3-cach-don-gian-reset-thiet-lap-bios-121281" title="3 cách đơn giản để reset thiết lập BIOS">cách reset BIOS</a>&nbsp;(Basic Input Output System).</p>

<figure>
<div style="text-align: justify;"><img alt="Trang chủ MSI Afterburner" data-i="7" data-src="https://st.quantrimang.com/photos/image/2023/06/22/loi-dxgi-error-device-removed-8.jpg" data-was-processed="true" height="528" src="https://st.quantrimang.com/photos/image/2023/06/22/loi-dxgi-error-device-removed-8.jpg" width="781" /></div>

<figcaption>
<div style="text-align: justify;">Trang chủ MSI Afterburner</div>
</figcaption>
</figure>

<h2 style="text-align: justify;">6. Chạy DirectX Web Installer</h2>

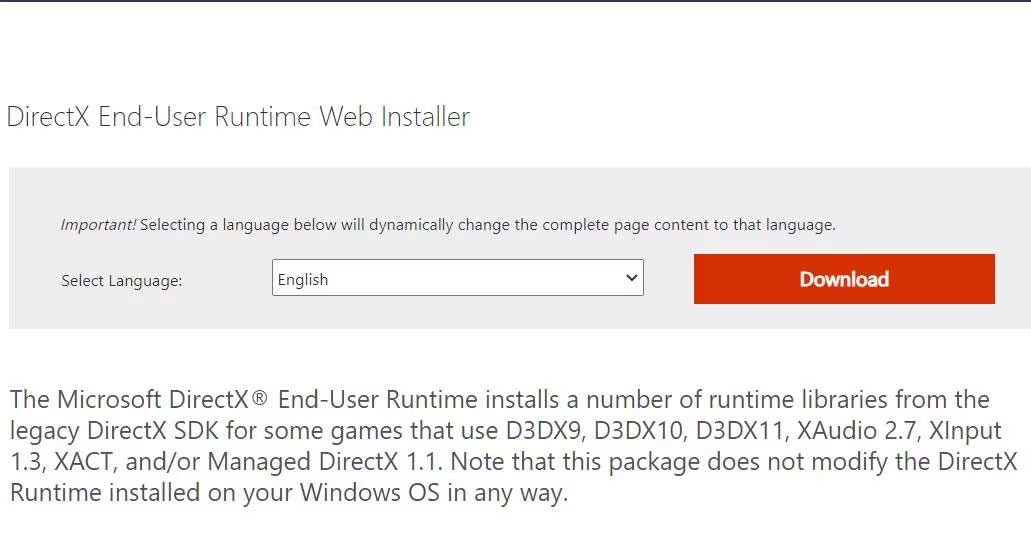
<p style="text-align: justify;">DXGI_ERROR_DEVICE_REMOVED có thể xảy ra do sự cố DirectX. Ví dụ, một số thành phần DirectX bắt buộc có thể bị thiếu trên PC của bạn. Bạn có thể giải quyết vấn đề đó bằng cách tải xuống và chạy DirectX Web Installer như sau:</p>

<p style="text-align: justify;">1.&nbsp;<a href="https://quantrimang.com/url?q=aHR0cHM6Ly93d3cubWljcm9zb2Z0LmNvbS9lbi11cy9kb3dubG9hZC9kZXRhaWxzLmFzcHg%2FaWQ9MzU%3D" rel="nofollow noopener" target="_blank" title="Mở trang tải xuống DirectX">Mở trang tải xuống DirectX này</a>.</p>

<p style="text-align: justify;">2. Nhấp vào nút&nbsp;<strong>Download</strong>&nbsp;màu cam để lấy file cài đặt DirectX.</p>

<figure>
<div style="text-align: justify;"><img alt="Nút Download" data-i="8" data-src="https://st.quantrimang.com/photos/image/2023/06/22/loi-dxgi-error-device-removed-9.jpg" data-was-processed="true" height="551" src="https://st.quantrimang.com/photos/image/2023/06/22/loi-dxgi-error-device-removed-9.jpg" width="1031" /></div>

<figcaption>
<div style="text-align: justify;">Nút Download</div>
</figcaption>
</figure>

<p style="text-align: justify;">3. Để xem File Explorer, giữ nút logo&nbsp;<strong>Windows</strong>&nbsp;và nhấn<strong>&nbsp;E</strong>. Sau đó, mở thư mục chứa gói Microsoft DirectX End-User Runtime.</p>

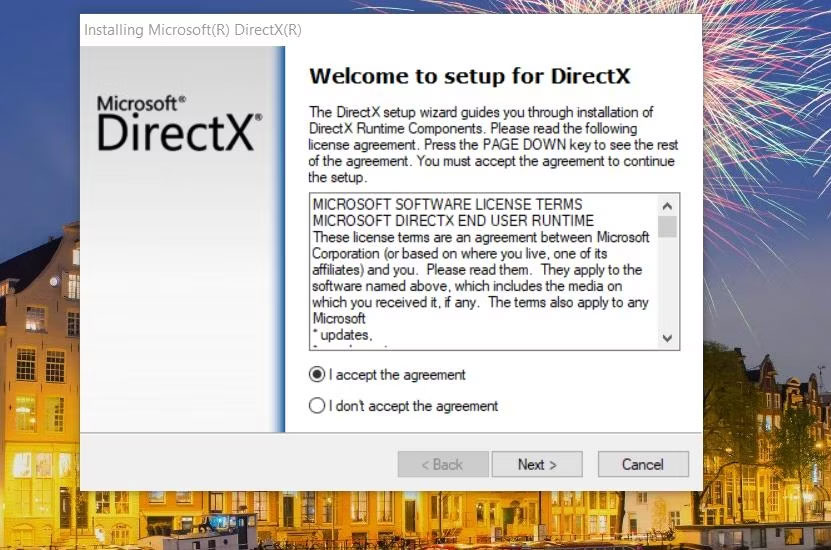
<p style="text-align: justify;">4. Nhấp đúp vào&nbsp;<strong>dxwebsetup.exe</strong>&nbsp;để hiển thị cửa sổ Installing Microsoft (R) DirectX (R).</p>

<p style="text-align: justify;">5. Nhấp vào&nbsp;<strong>I accept the agreement &gt; Next</strong>.</p>

<figure>
<div style="text-align: justify;"><img alt="Nhấp vào I accept the agreement" data-i="9" data-src="https://st.quantrimang.com/photos/image/2023/06/22/loi-dxgi-error-device-removed-10.jpg" data-was-processed="true" height="550" src="https://st.quantrimang.com/photos/image/2023/06/22/loi-dxgi-error-device-removed-10.jpg" width="831" /></div>

<figcaption>
<div style="text-align: justify;">Nhấp vào I accept the agreement</div>
</figcaption>
</figure>

<p style="text-align: justify;">6. Nếu bạn không muốn Bing Bar, hãy bỏ chọn tùy chọn&nbsp;<strong>Install the Bing Bar</strong>.</p>

<p style="text-align: justify;">7. Chọn&nbsp;<strong>Next</strong>&nbsp;để cài đặt các thành phần DirectX.</p>
		</div>
				<div id="author">
						<p>
				<strong>Nguồn tin:</strong>
				Quantrimang.com
			</p>
		</div>
	</div>
	<div id="footer" class="clearfix">
		<div id="url">
			<strong>URL của bản tin này: </strong><a href="https://www.nguoicodonvn2008.info/vi/news/savefile/kien-thuc-may-tinh/cach-khac-phuc-loi-dxgi-error-device-removed-trong-windows-10-11-7198.html" title="Cách khắc phục lỗi DXGI_ERROR_DEVICE_REMOVED trong Windows 10&#x002F;11">https://www.nguoicodonvn2008.info/vi/news/savefile/kien-thuc-may-tinh/cach-khac-phuc-loi-dxgi-error-device-removed-trong-windows-10-11-7198.html</a>

		</div>
		<div class="clear"></div>
		<div class="copyright">
			&copy; .&#x3A; Nguoicodonvn2008.info - Cõi lòng người cô đơn &#x3A;.
		</div>
		<div id="contact">
			<a href="mailto:admin@nguoicodonvn2008.info">admin@nguoicodonvn2008.info</a>
		</div>
	</div>
</div>
        <div id="timeoutsess" class="chromeframe">
            Bạn đã không sử dụng Site, <a onclick="timeoutsesscancel();" href="https://nguoicodonvn2008.info/#">Bấm vào đây để duy trì trạng thái đăng nhập</a>. Thời gian chờ: <span id="secField"> 60 </span> giây
        </div>
        <div id="openidResult" class="nv-alert" style="display:none"></div>
        <div id="openidBt" data-result="" data-redirect=""></div>
		</script>
		<div class="car-top">
  <span><img src="https://nguoicodonvn2008.info/themes/default/images/car.png" alt=""></span>
</div>
<div id="run_cronjobs" style="visibility:hidden;display:none;"><img alt="cron" src="/index.php?second=cronjobs&amp;p=t8nfKL1r" width="1" height="1" /></div>
<script src="https://nguoicodonvn2008.info/assets/js/jquery/jquery.min.js"></script>
<script>var nv_base_siteurl="/",nv_lang_data="vi",nv_lang_interface="vi",nv_name_variable="nv",nv_fc_variable="op",nv_lang_variable="language",nv_module_name="news",nv_func_name="savefile",nv_is_user=0, nv_my_ofs=-4,nv_my_abbr="EDT",nv_cookie_prefix="nv4c_e856T",nv_check_pass_mstime=1738000,nv_area_admin=0,nv_safemode=0,theme_responsive=0,nv_recaptcha_ver=2,nv_recaptcha_sitekey="",nv_recaptcha_type="image",XSSsanitize=1;</script>
<script src="https://nguoicodonvn2008.info/assets/js/language/vi.js"></script>
<script src="https://nguoicodonvn2008.info/assets/js/DOMPurify/purify3.js"></script>
<script src="https://nguoicodonvn2008.info/assets/js/global.js"></script>
<script src="https://nguoicodonvn2008.info/assets/js/site.js"></script>
<script src="https://nguoicodonvn2008.info/themes/default/js/news.js"></script>
<script src="https://nguoicodonvn2008.info/themes/default/js/main.js"></script>
<script src="https://nguoicodonvn2008.info/themes/default/js/custom.js"></script>
<script type="application/ld+json">
        {
            "@context": "https://schema.org",
            "@type": "Organization",
            "url": "https://nguoicodonvn2008.info",
            "logo": "https://nguoicodonvn2008.info/uploads/angel.gif"
        }
        </script>
<script src="https://nguoicodonvn2008.info/themes/default/js/bootstrap.min.js"></script>
<script type="text/javascript">
var $scrolltop = $('.car-top');
$scrolltop.on('click', function () {
    $('html,body').animate({
        scrollTop: 0
    }, 800);
    $(this).addClass("car-run");
    setTimeout(function(){ $scrolltop.removeClass('car-run');}, 1000);
    return false;
});
$(window).on('scroll', function ()
{ 
    if($(window).scrollTop() >= 200)
    {
        $scrolltop.addClass("show");
        $scrolltop.addClass("car-down");
    }
    else
    {
       $scrolltop.removeClass("show");
       setTimeout(function(){ $scrolltop.removeClass('car-down');}, 300);
    }
});
</script>
</body>
</html>