Cách gỡ cài đặt ứng dụng trên Windows 11
- Thứ tư - 30/03/2022 01:55
- In ra
- Đóng cửa sổ này
Bên cạnh việc cài đặt, thì gỡ cài đặt ứng dụng cũng là một trong những tác vụ quan trọng trên bất cứ hệ thống máy tính nào. Đối với một ứng dụng đã không còn cần thiết, hoặc gây lỗi phần mềm, xung đột hệ thống, thì việc gỡ cài đặt nó là điều cần thiết. Bài viết này sẽ hướng dẫn bạn cách gỡ cài đặt một ứng dụng trên Windows 11 cực kỳ nhanh chóng và đơn giản.
Gỡ cài đặt ứng dụng bằng Start Menu
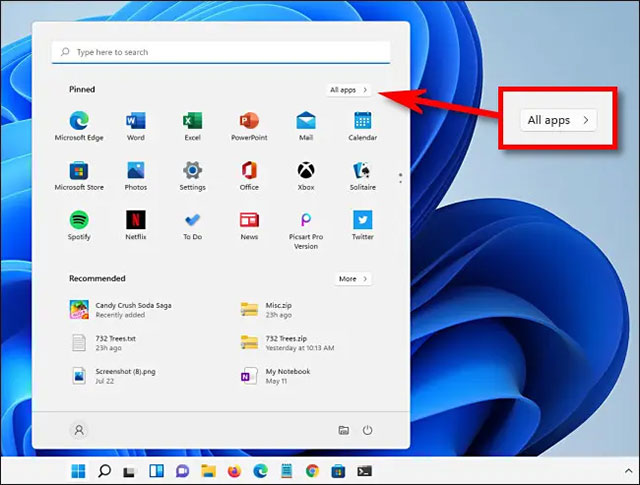
Trước tiên, hãy nhấp vào nút Start trên thanh taskbar dưới đáy màn hình. Trong giao diện menu Start hiện ra, bấm chọn mục “All Apps” ở góc trên bên phải.
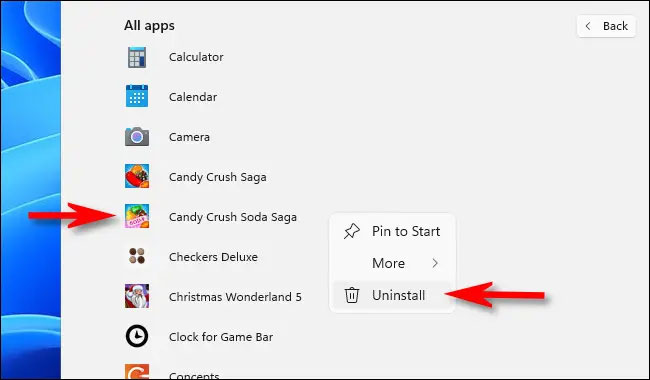
Trên màn hình “All Apps”, bạn tìm ứng dụng mà mình muốn gỡ cài đặt trong danh sách ứng dụng hiện có trên hệ thống. Nhấp chuột phải vào biểu tượng của ứng dụng và chọn “Uninstall” từ menu nhỏ xuất hiện.
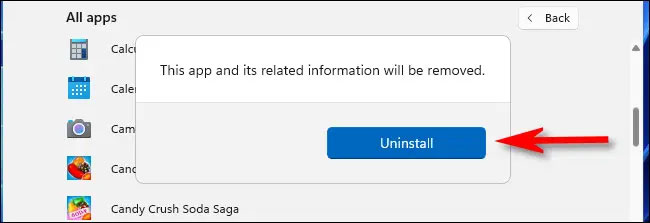
Nếu đây là một ứng dụng Windows Store, bạn sẽ thấy một cửa sổ bật lên xác nhận. Nhấp vào “Uninstall” và ứng dụng sẽ lập tức được gỡ cài đặt hoàn toàn.
Trong trường hợp đây là một ứng dụng Win32 cổ điển, Control Panel sẽ mở đến trang “Programs and Features”. Trên màn hình này, tìm ứng dụng bạn muốn gỡ cài đặt, chọn nó, sau đó nhấp vào nút “Uninstall” trên thanh công cụ ngay phía trên danh sách ứng dụng.

Nhấp vào “Yes” trong cửa sổ xác nhận xuất hiện và Windows sẽ gỡ cài đặt chương trình này hoàn toàn.
Gỡ cài đặt ứng dụng bằng Settings
Bạn cũng có thể gỡ cài đặt một ứng dụng dễ dàng bằng cách sử dụng menu Settings Windows.
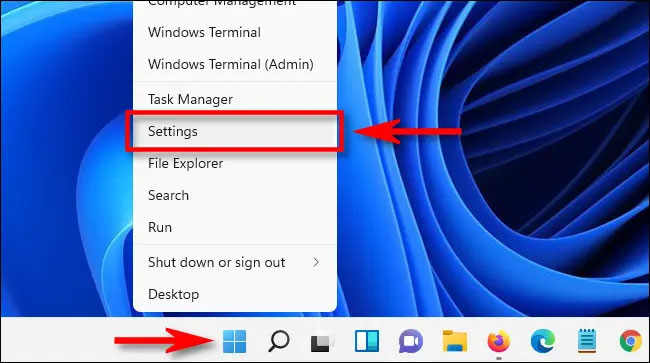
Trước tiên, mở ứng dụng Settings Windows bằng cách nhấn tổ hợp phím Windows + i. Hoặc bạn cũng có thể nhấp chuột phải vào nút Start trên thanh tác vụ taskbar và chọn “Settings” từ menu bật lên.
Khi cửa sổ Settings mở ra, hãy nhấp vào mục “Apps” trong danh sách bên phải, sau đó chọn “Apps & Features”.
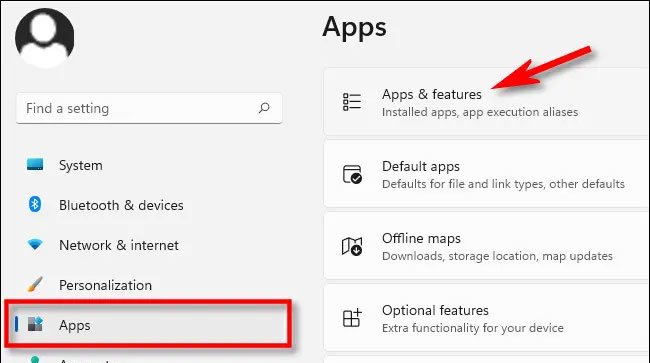
Trên màn hình cài đặt Apps & Features, cuộn xuống danh sách ứng dụng và tìm ứng dụng bạn muốn gỡ cài đặt. Nhấp vào nút ba chấm bên cạnh ứng dụng đó và chọn “Uninstall” trong menu xuất hiện.
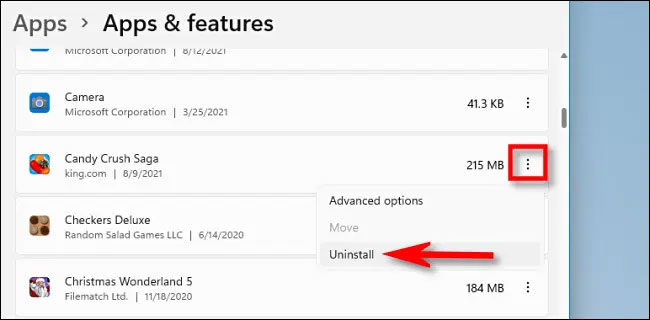
Khi hệ thống yêu cầu xác nhận, hãy nhấp vào “Uninstall” và ứng dụng sẽ được gỡ cài đặt lập tức nếu đây là một ứng dụng Windows Store. Trong trường hợp đó là ứng dụng Win32, bạn sẽ cần nhấp vào “Yes” trên một cửa sổ xác nhận nữa, và quá trình gỡ cài đặt sẽ diễn ra.
Gỡ cài đặt ứng dụng bằng Control Panel
Hiện tại, Windows 11 vẫn bao gồm giao diện Control Panel kế thừa, mặc dù Microsoft đang dần chuyển nhiều chức năng của nó sang ứng dụng Cài đặt. Nếu bạn muốn gỡ cài đặt một ứng dụng thông qua Control Panel, trước tiên hãy mở Control Panel, sau đó nhấp vào “Uninstall a Program”.

Trên trang “Programs and Features”, bạn cuộn qua danh sách và tìm ứng dụng mà mình muốn gỡ cài đặt. Khi tìm thấy, hãy bấm chọn ứng dụng đó và nhấp vào nút “Uninstall” trên thanh công cụ nằm ngay phía trên danh sách.
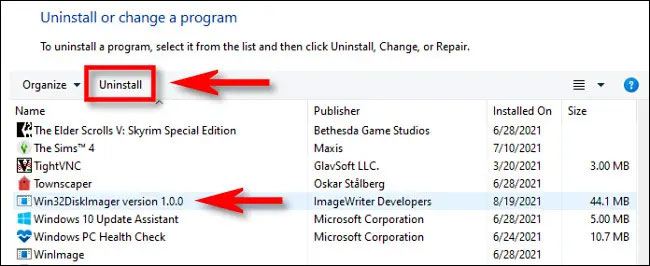
Nhấp vào “Yes” khi cửa sổ xác nhận bật lên và chương trình sẽ được gỡ cài đặt.
Cách gỡ ứng dụng không thể gỡ trên Windows 11
Trên Windows 11, có một vài ứng dụng bạn muốn gỡ thuộc danh sách không thể gỡ được theo những cách thông thường. Ví dụ, Microsoft không muốn bạn gỡ các ứng dụng như Windows Maps, Cortana, Alarms, Windows Camera, Your Phone... Tuy nhiên, bạn vẫn có cách gỡ chúng mà không làm ảnh hưởng tới hệ điều hành và sau đó có thể cài lại bằng Microsoft Store bất cứ khi nào bạn cần.
Lưu ý: Nếu bạn cài đặt Windows 11 từ đầu bạn sẽ cần phải cập nhật Windows Package Manager (App Installer) trước khi tiến hành gỡ ứng dụng không thể gỡ bằng Windows PowerShell.
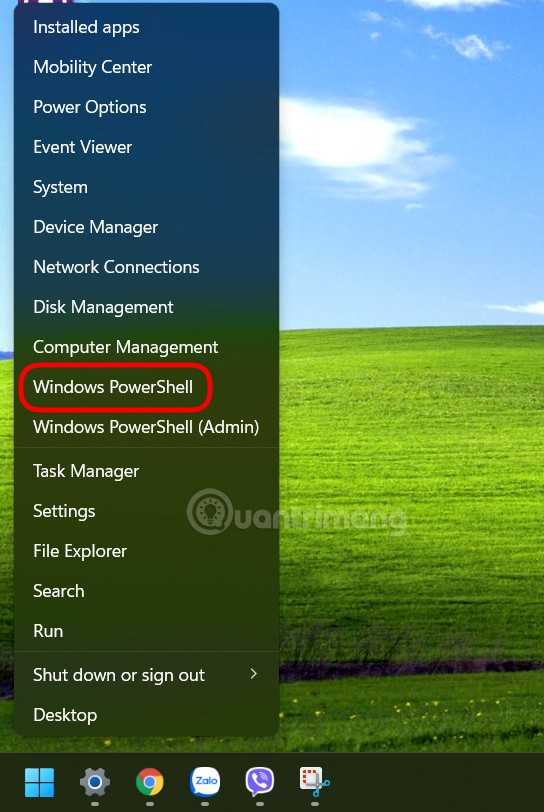
Bước 1: Nhấp chuột phải vào nút Start sau đó chọn Windows PowerShell. Bạn không cần quyền admin.
Bước 2: Nhập winget list và nhấn Enter. Nếu bạn sử dụng winget lần đầu, bạn cần đồng ý các điều khoản của Microsoft. Nhấn Y rồi nhấn Enter. Sau đó, Windows PowerShell sẽ hiển thị cho bạn danh sách các ứng dụng đang cài đặt trên máy của bạn.
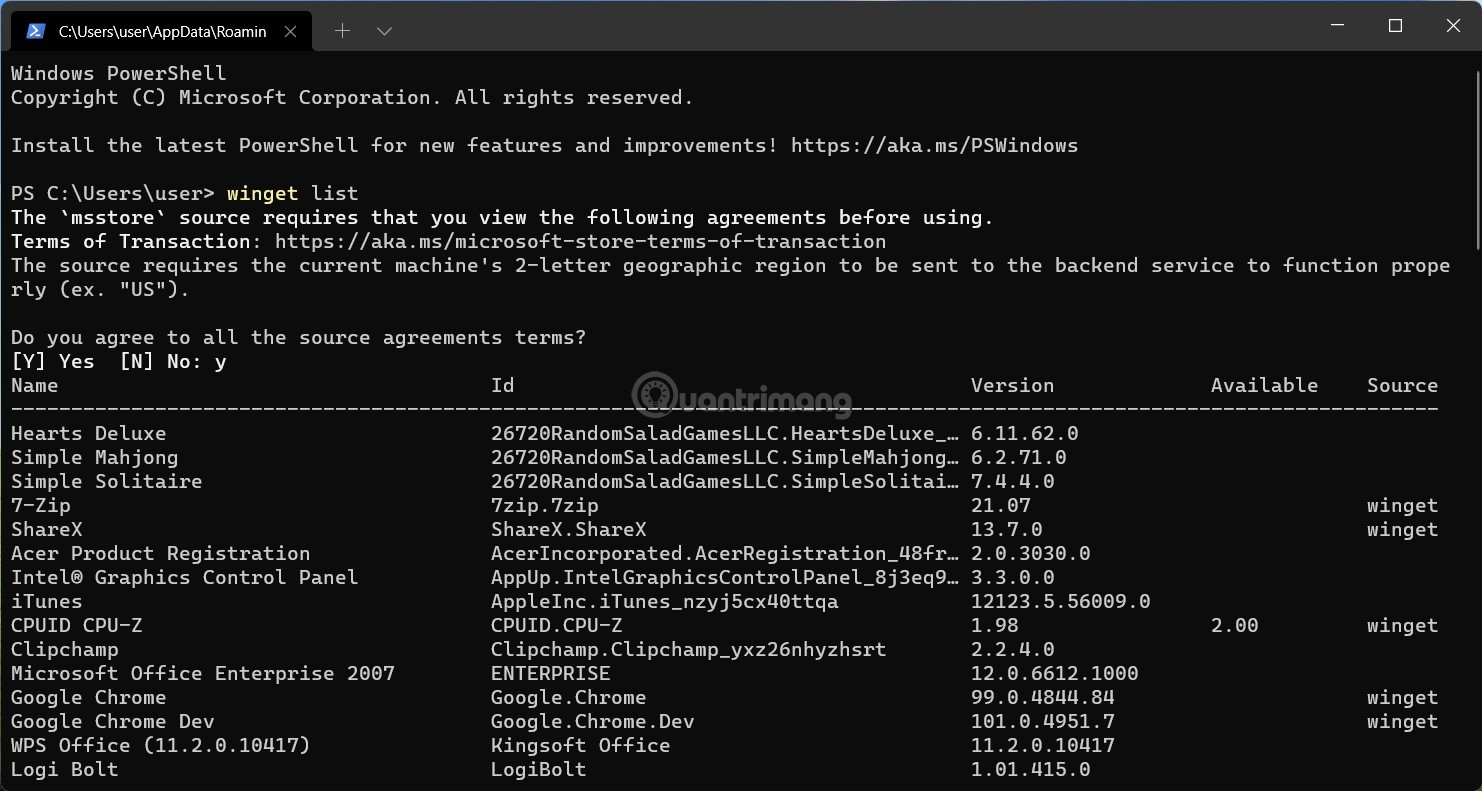
Bước 3: Tất cả những gì bạn cần đó là cột đầu tiên với tên gọi "Name". Một số ứng dụng trong Start Menu với trong Windows PowerShell được đặt tên khác nhau, ví dụ Camera và Microsoft Camera hoặc Weather và MSN Weather. Bạn cần viết ra hoặc ghi nhớ tên ứng dụng hiển thị trong Windows PowerShell.
Bước 4: Để gỡ cài đặt ứng dụng không thể gỡ khỏi Windows 11 nhập câu lệnh sau: winget uninstall app_name rồi nhấn Enter. Thay thế "app_name" bằng tên ứng dụng tương ứng. Ví dụ: winget uninstall Cortana. Lặp lại lệnh winget uninstall cho tất cả các ứng dụng mà bạn muốn gỡ khỏi máy tính.
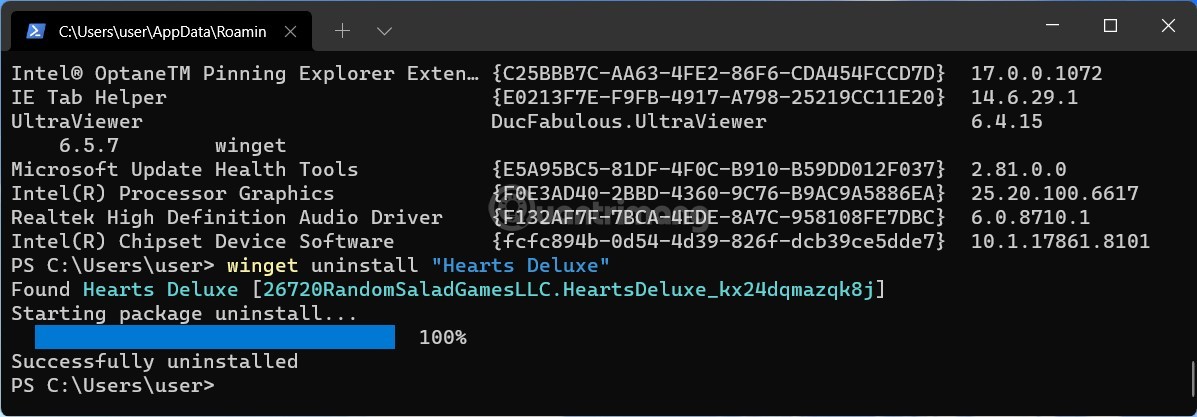
Lưu ý: Nếu ứng dụng bạn muốn gỡ có hai từ trong tên, bạn cần đặt tên của ứng dụng vào ngoặc kép. Ví dụ: winget uninstall "Your Phone".
Chúc bạn thực hiện thành công!
