Cách điều khiển và truy cập máy tính bằng điện thoại với Microsoft Remote Desktop
- Thứ ba - 17/09/2019 01:46
- In ra
- Đóng cửa sổ này

Việc điều khiển máy tính qua smartphone tưởng chừng không có ích mấy nhưng bạn cứ thử tưởng tượng đang nằm trên giường mà có thể truy cập và chỉnh sửa một file văn bản trên máy tính mà trước đó quên không chỉnh sửa lại, hoặc sử dụng các tác vụ khác trên máy tính.
Bạn chỉ cần chuẩn bị một chiếc Smartphone có cấu hình tầm trung trở lên thì bạn đã có thể nắm trọn trong tay hệ thống máy tính của mình rồi, từ những việc sử dụng phần mềm máy tính, hỗ trợ bạn bè và chuyển file trên máy tính cho bạn bè của mình... Cách điều khiển máy tính và truy cập máy tính bằng điện thoại qua phần mềm Microsoft Remote Desktop.
1. Bật tính năng cho phép điều khiển máy tính
- Tải Microsoft Remote Desktop cho iOS:
- Tải Microsoft Remote Desktop cho Android:
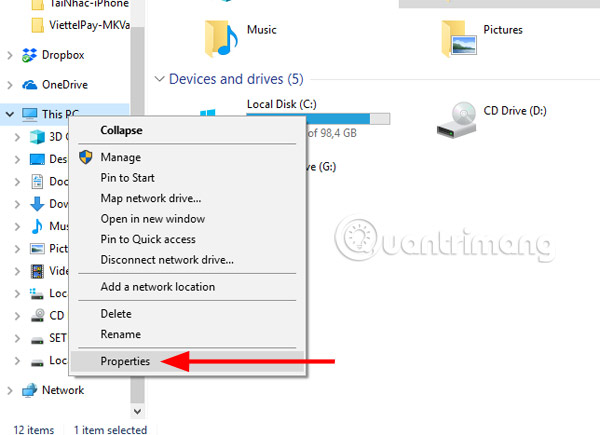
Bước 1: Tải về ứng dụng Remote Desktop cho iOS ở trên, sau đó thì bấm vào biểu tượng My Computer/This PC và chọn Properties.
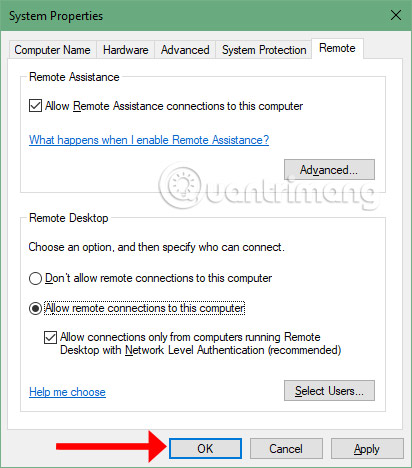
Bước 2: Trong menu System, bạn hãy chọn Remote Settings.
Trong bảng System Properties, bạn hãy tích chọn Allow remote connections to this computer, và sẽ có một bảng thông báo rằng là:
"Máy tính này của bạn được thiết lập để tự động chuyển chế độ sleep khi không sử dụng. Trong khi máy tính ở chế độ Sleep, mọi người không thể kết nối với nó từ xa. Để thay đổi cài đặt này bạn hãy vào Control Panel > Power Options để điều chỉnh lại chế độ này".
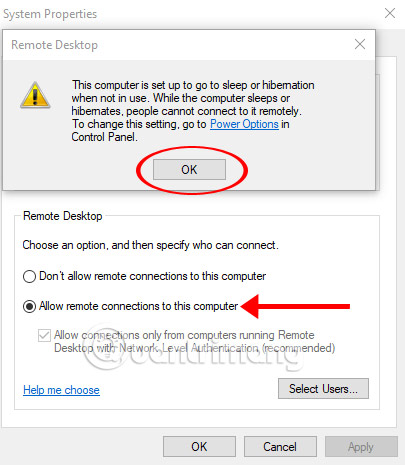
Tiếp theo bấm OK để hoàn tất.
2. Điều khiển máy tính trong mạng LAN bằng Microsoft Remote Desktop
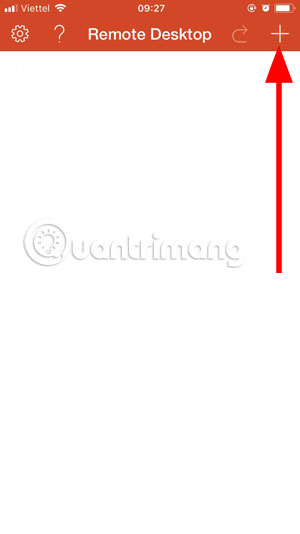
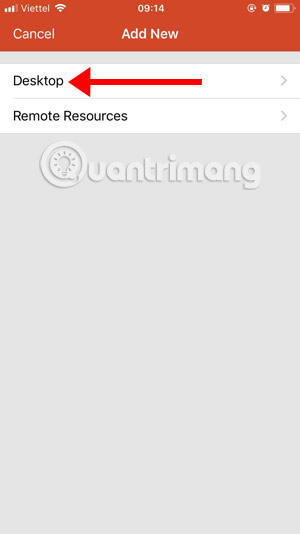
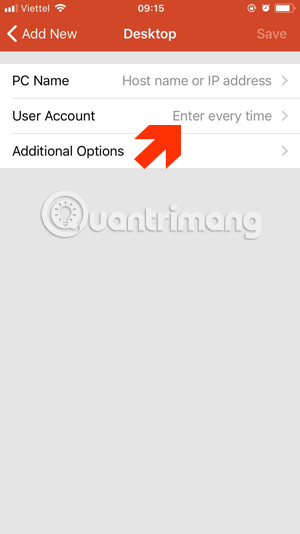
Bước 3: Giờ hãy chuyển sang điện thoại của bạn, khởi động ứng dụng Microsoft Remote Desktop lên, bấm vào dấu cộng ở góc trên bên phải và bấm Desktop để thêm máy tính muốn điều khiển.
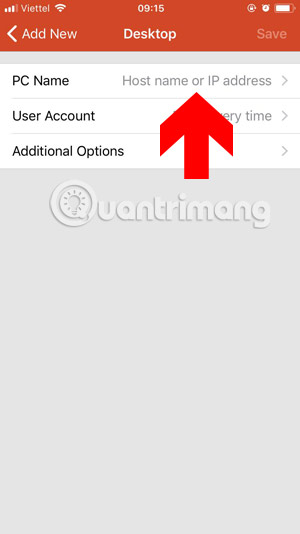
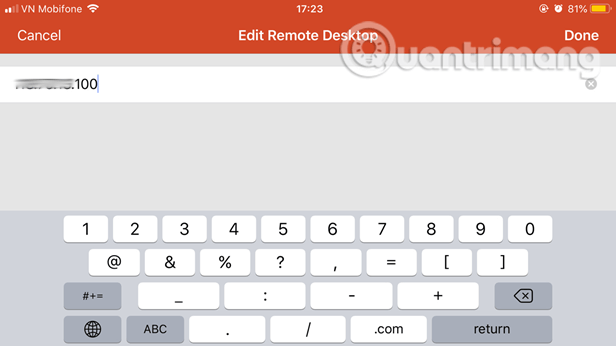
Có hai điều mà bạn cần phải chú ý để kết nối điện thoại với máy tính, đó là PC Name và User Account. Ở phần PC Name thì bạn cần cung cấp cho mục này địa chỉ IP máy tính của bạn. Nếu chưa biết cách xem địa chỉ IP máy tính bạn có thể xem hướng dẫn ở dưới đây.
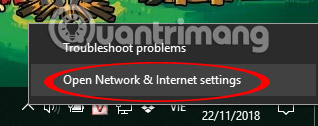
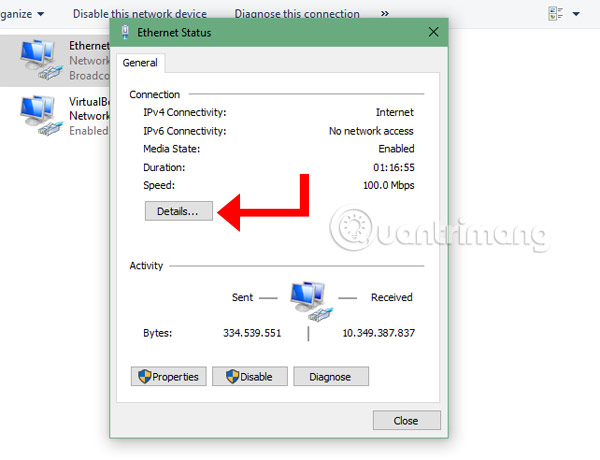
Bấm vào biểu tượng mạng của bạn, chọn Open Network & Internet Settings.
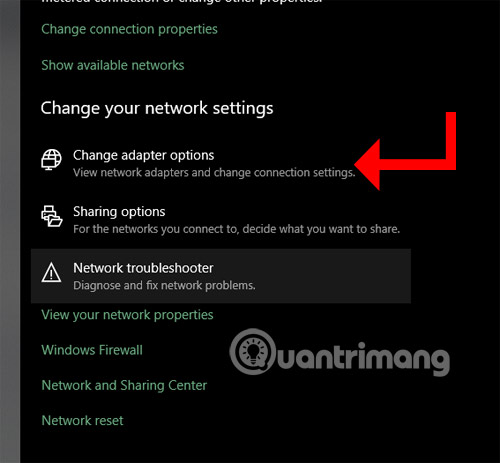
Trong menu Network & Internet Settings hãy chọn Change Adapter options trong mục Change your network settings.
Bấm Details để lấy thông tin địa chỉ IP của máy tính.
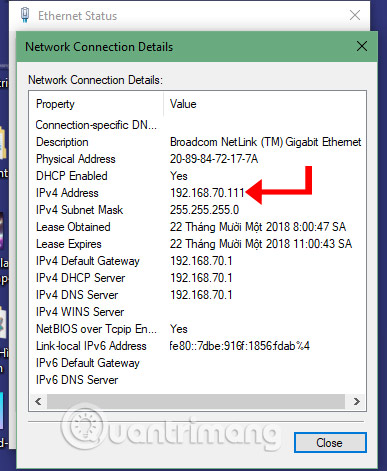
Tiếp đó là bảng Network Connection Details sẽ hiện ra, trong cửa sổ này bạn hãy xem địa chỉ IP của mình ở mục IPv4 Address. Lấy địa chỉ đó và ghi vào mục PC Name ở trên ứng dụng Microsoft Remote Desktop.
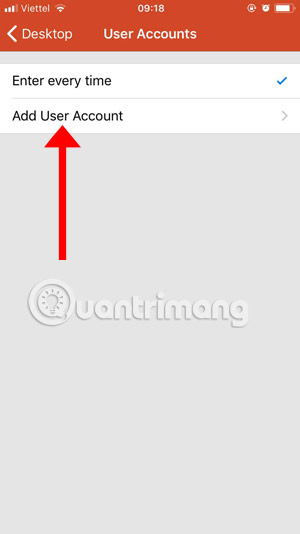
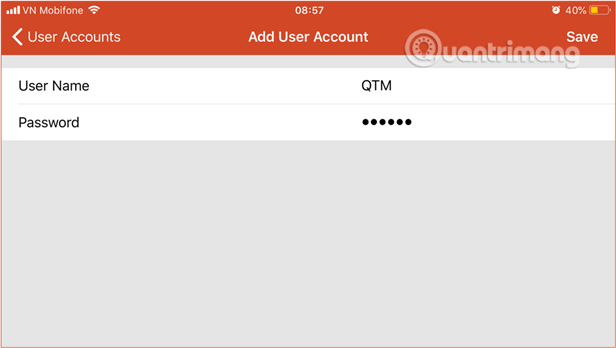
Bước 4: Sau mục PC Name sẽ đến mục User Account, User Account ở đây là tên người dùng trên máy tính, nếu bạn có sử dụng Account của Microsoft như hotmail hayoutlook thì bạn phải ghi tên tài khoản của bạn vào mục User Account này. Bấm vào User Account trong mục Desktop, trong này bạn sẽ có hai lựa chọn là Enter Every Time và Add User Account.
Nếu chọn Enter Every time thì mỗi lần kết nối điện thoại với máy tính, bạn sẽ phải nhập tên người dùng và mật khẩu đang sử dụng trên máy tính vào, còn chọn Add User Account thì bạn sẽ thêm tài khoản vào luôn và không cần phải nhập tài khoản mỗi lần truy cập vào máy tính để điều khiển nữa.
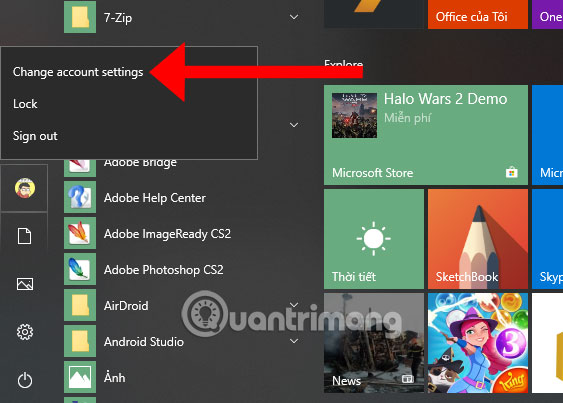
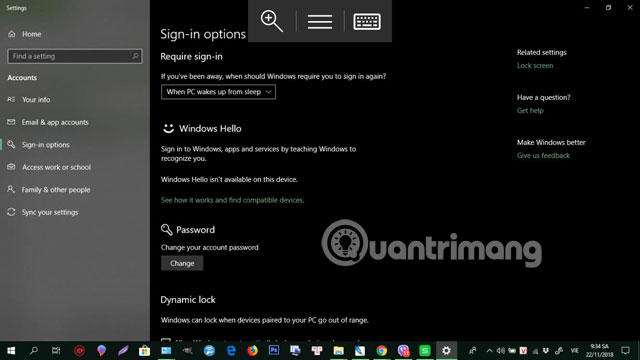
Nếu bạn không biết cách lấy thông tin tài khoản User trên máy tính của bạn, hãy bấm vào biểu tượng Start > chọn biểu tượng ảnh đại diện > chọn Change account Settings.
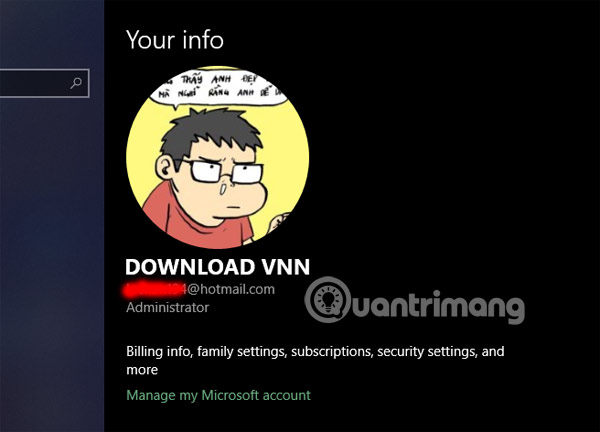
Trong bảng Your Info, bạn sẽ thấy thông tin tài khoản User, nếu có tài khoản hotmail hoặc outlook thì hãy ghi nó vào mục Add User Account kèm theo mật khẩu đặt trên máy. Còn không đặt mật khẩu hay thêm tài khoản thì bạn chỉ cần thêm tên User vào thôi.
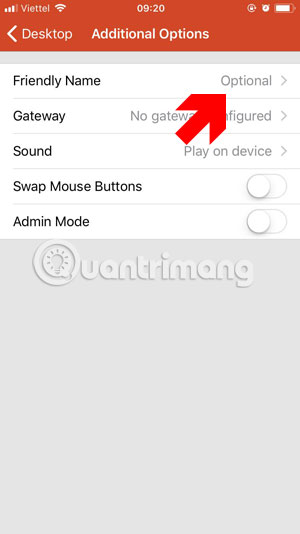
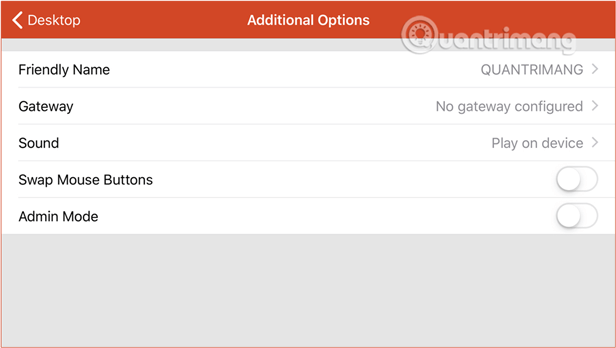
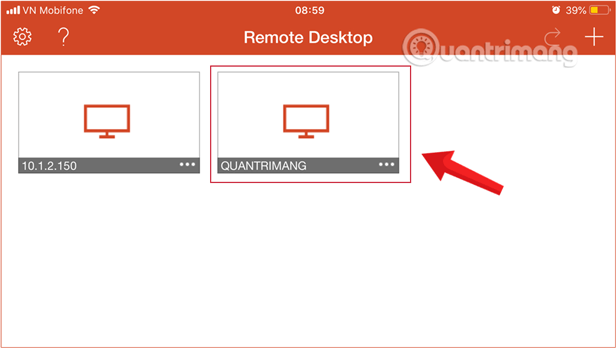
Tiếp theo là phần Friendly Name, đây là tên bạn đặt cho mỗi PC được kết nối, nếu mục này bạn để trống thì nó sẽ được thay thế bằng địa chỉ IP của máy đó. Sau khi nhập thông tin bạn sẽ thấy mục Remote Desktop sẽ hiện ra PC vừa được thêm vào.
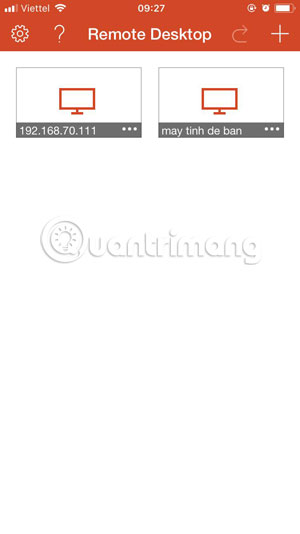
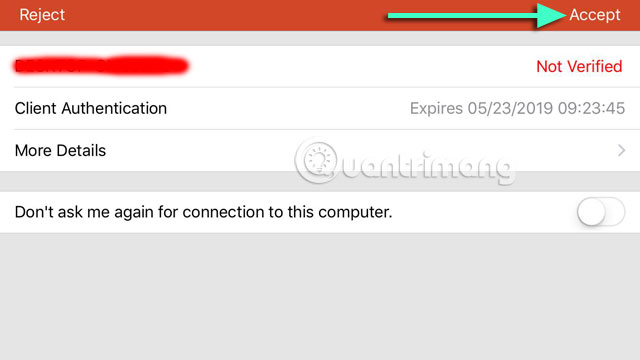
Bấm vào PC muốn kết nối và điểu khiển, tiếp theo sẽ là tên máy tính của bạn hiện ra và thông tin ở dưới, chọn Accepts để đồng ý kết nối.
Tiếp theo, giao diện máy tính của bạn sẽ được hiển thị trên điện thoại, cùng lúc này màn hình máy tính của bạn sẽ chuyển sang chế độ Sleep.
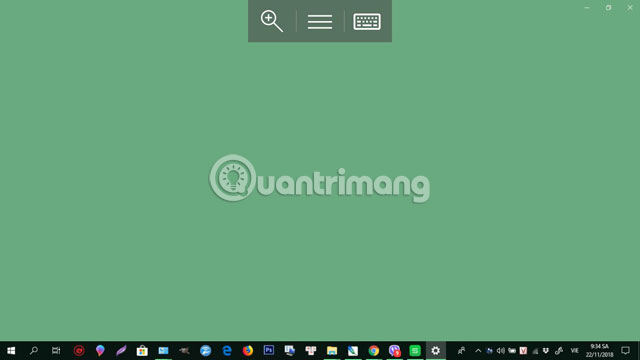
Ở cạnh trên màn hình, bạn sẽ thấy ba phím chức năng dùng để sử dụng cho việc điều khiển máy tính trên điện thoại.
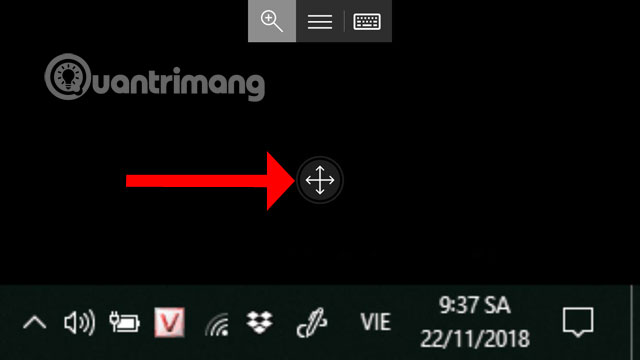
Đầu tiên là chức năng phóng to màn hình, bấm vào biểu tượng ngoài cùng bên trái. Sau đó bấm vào biểu tượng mũi tên ở giữa màn hình và di chuyển chúng đến nơi bạn cần nhìn rõ hơn.
Biểu tượng ở giữa là danh sách chức năng tùy chỉnh con trỏ chuột (Mouse Pointer), tắt điều khiển máy tính (End Session), chuyển về màn hình chính (Home).
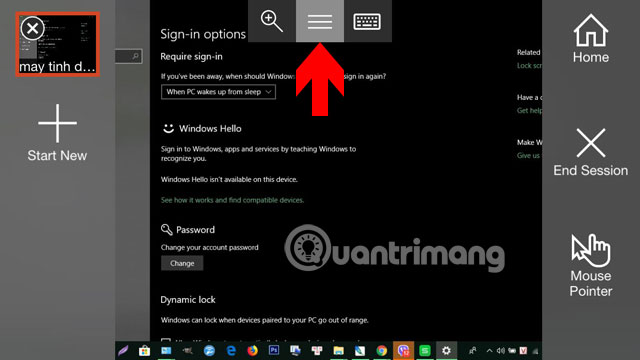
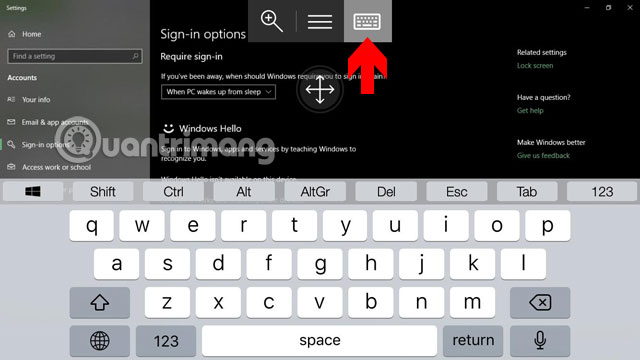
Và biểu tượng cuối cùng bên phải là bàn phím ảo để nhập thông tin.
Bạn có thể vào trực tiếp My Computer, xóa hoặc phục hồi những file đã xóa trên máy tính bằng Remote Desktop.

Hay chỉnh sửa những file văn bản, file thông tin có trong máy tính của mình.
3. Cách điều khiển máy tính từ xa qua Internet bằng Microsoft Remote Desktop
Nếu bạn muốn điều khiển máy tính của mình từ xa thông qua Internet, thì ngoài việc cấu hình các thuộc tính hệ thống, bạn sẽ cần thiết lập cả bộ router cục bộ để cho phép các kết nối từ xa đi qua. Nghiễm nhiên là bạn sẽ cần biết cả địa chỉ IP public của mình để kết nối với thiết bị qua internet nữa nhé. Sẽ rắc rối hơn điều khiển máy tính trong mạng LAN một chút.
3.1. Thiết lập địa chỉ IP tĩnh cho PC
Hầu hết các máy tính trong private network đều được gán địa chỉ IP động, có thể thay đổi bất cứ lúc nào. Nếu bạn thường xuyên sử dụng điều khiển máy tính từ xa thông qua internet chứ không phải trong cùng mạng LAN, bạn nên thiết lập cấu hình máy tính của mình bằng địa chỉ IP tĩnh để không phải cấu hình lại cài đặt chuyển tiếp cổng (Port Forwarding), phục vụ cho sử dụng ứng dụng Remote Desktop.
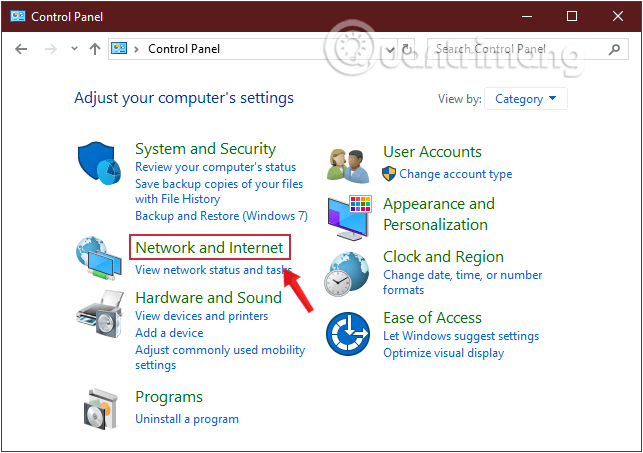
Bước 1: Mở Control Panel.
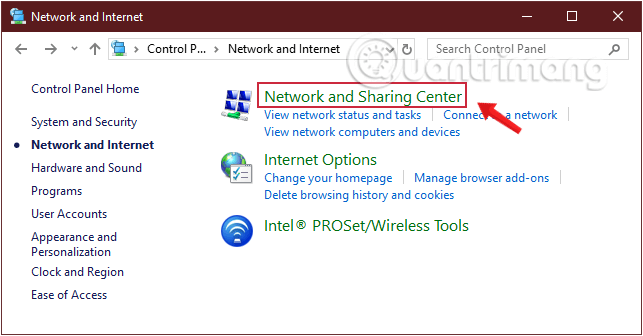
Bước 2: Tìm và nhấp chọn Network and Internet.
Bước 3: Tìm và nhấp chọn Network and Sharing Center.
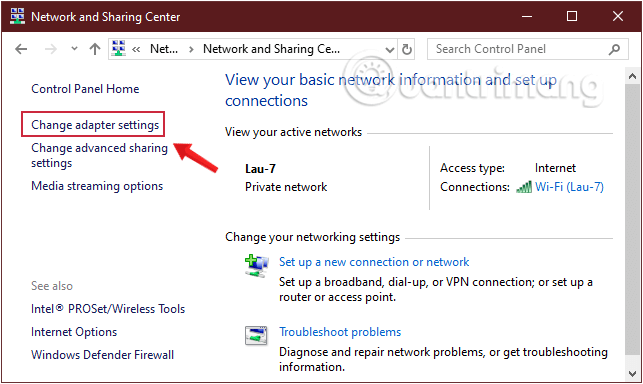
Bước 4: Lúc này trên màn hình xuất hiện một cửa sổ mới, tại cửa sổ này nhìn sang khung bên trái click chọn Change adapter settings.
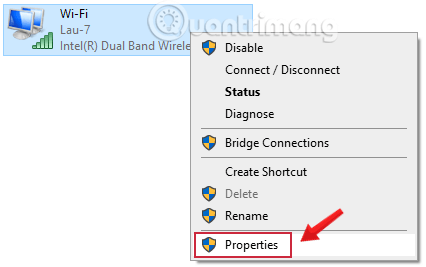
Bước 5: Kích chuột phải vào mạng bạn đang kết nối, click chọn Properties.
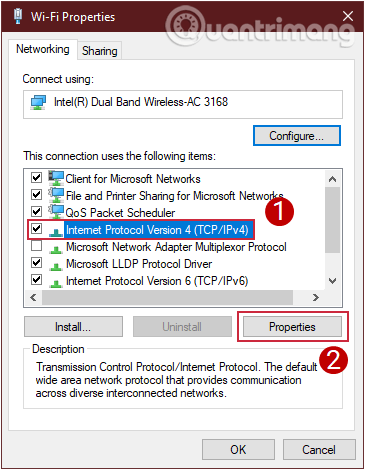
Bước 6: Lúc này trên màn hình xuất hiện một cửa sổ popup mới, tại đây bạn click chọn Internet Protocol Version 4 (TCP/IPv4), sau đó chọn Properties.
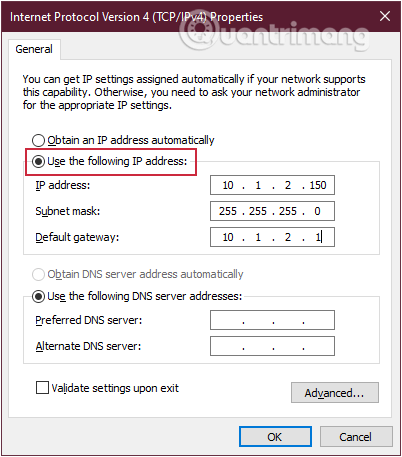
Bước 7: Tiếp theo, ở tab General, bạn bỏ tích mục Obtain an IP address automatically, đánh tích chọn mục Use the following IP address và thiết lập các mục sau:
- IP address: địa chỉ IP cục bộ hợp lệ nằm ngoài phạm vi DHCP để ngăn xung đột địa chỉ IP trong mạng.
- Ví dụ: 10.1.2.150. (Bạn có thể tìm thấy thông tin này trong phần cài đặt DHCP trên bộ router của mình).
- Subnet mask: điền subnet mask cho mạng.
- Đối với home network, subnet mask thường là 255.255.255.0.
- Default gateway: điền thông tin cổng mặc định, là địa chỉ IP bộ router của bạn.
- Ví dụ: 10.1.2.1.
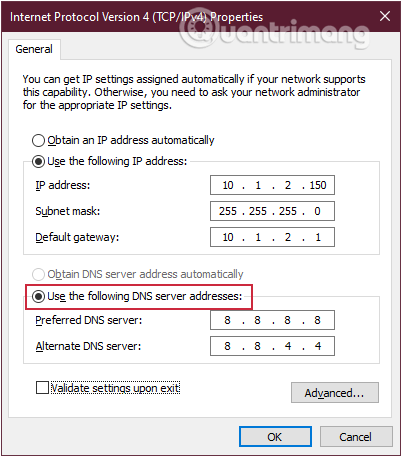
Bước 8: Phía dưới Use the following DNS server addresses, nhớ nhập địa chỉ IP máy chủ DNS của bạn, thường chính là địa chỉ IP bộ router.
Nếu không thể kết nối với internet, hãy sử dụng các địa chỉ DNS public của Google:
Preferred DNS Server: 8.8.8.8
 Alternate DNS Server: 8.8.4.4
Bước 9: Cuối cùng click chọn OK rồi Close các cửa sổ lại.
3.2. Cách tìm địa chỉ IP public của bạn
Cách dễ dàng nhất để tìm địa chỉ IP công cộng là “hỏi” một website, do website đó nhìn máy tính dưới địa chỉ IP công cộng và có thể nói cho người dùng.
Hãy lưu ý rằng, các địa chỉ IP public không cố định. Nhà cung cấp dịch vụ Internet có thể định kỳ gán cho bạn một địa chỉ IP.
3.3. Cấu hình router để chuyển tiếp cổng máy tính từ xa
Để có thể điều khiển máy tính từ xa thông qua internet đến một máy tính cụ thể trong một private network, bạn sẽ cần chuyển tiếp cổng TCP 3389 trên bộ định tuyến (router) của mình.
Cách làm như sau:
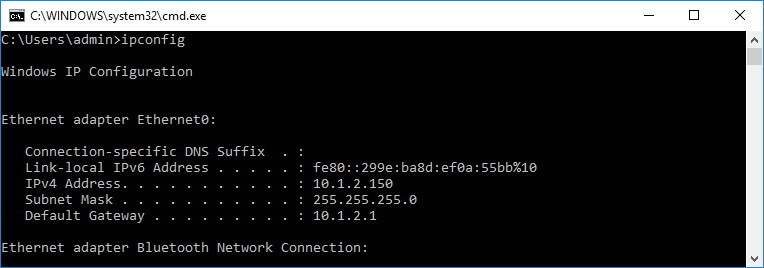
Bước 1: Mở Command Prompt.
Bước 2: Nhập lệnh sau và nhấn Enter:
ipconfig
Lưu ý:
- IPv4 Address là địa chỉ nhận dạng máy tính của bạn trên mạng cục bộ.
- Default Gateway là địa chỉ IPv4 của bộ định tuyến của bạn.
Bước 3: Mở trình duyệt web của bạn.
Bước 4: Nhập địa chỉ IPv4 của router và nhấn Enter.
Bước 5: Đăng nhập vào router của bạn với tên người dùng và mật khẩu.
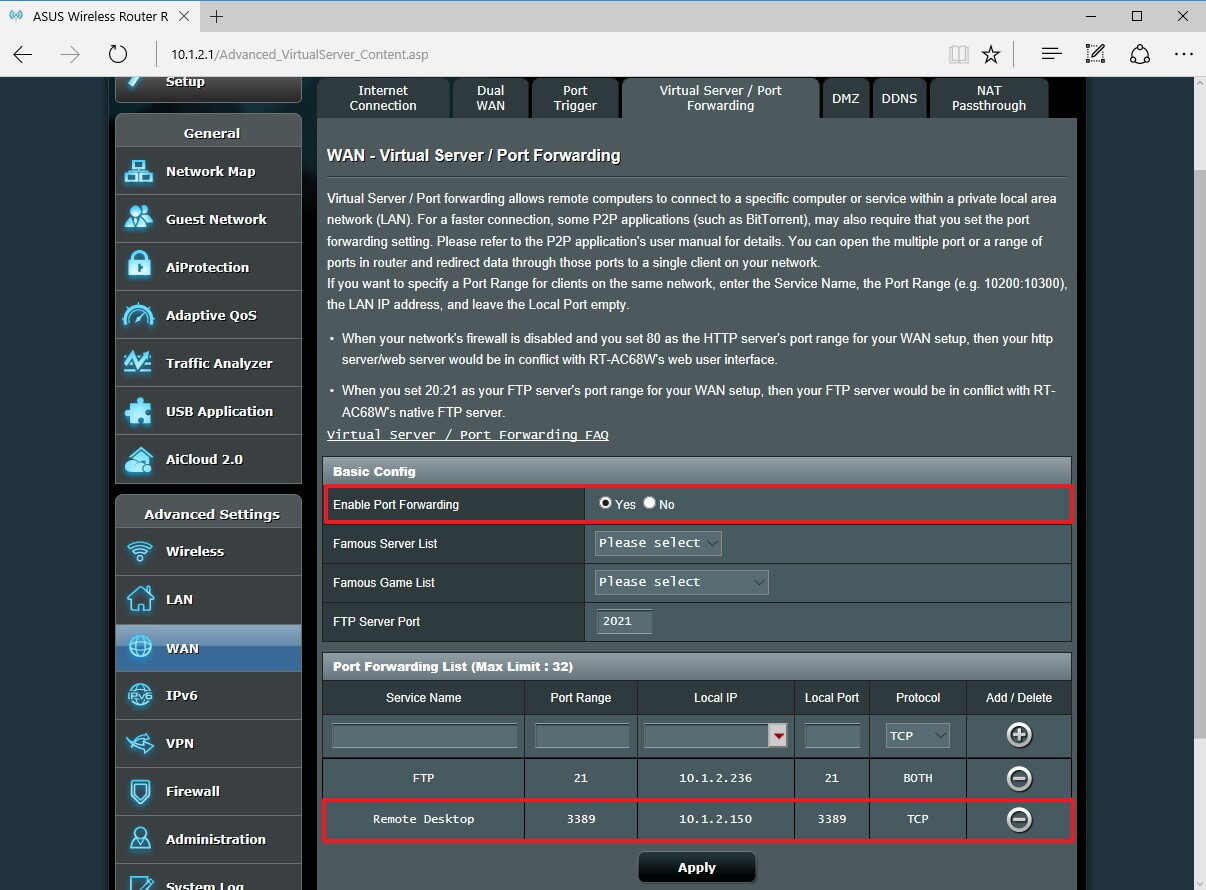
Bước 6: Ở giao diện hiển thị, tìm phần Port Forwarding và đảm bảo nó đang được bật.
Bước 7: Trong nội dung phần port forwarding, thêm thông tin cần thiết, bao gồm:
- Service name: Tên này chỉ mang tính tham khảo, bạn có thể sử dụng bất kỳ tên nào bạn muốn.
- Port Range: Nhập số cổng TCP 3389.
- Local IP: Nhập địa chỉ IPv4 máy tính của bạn (IP tĩnh bạn đã thiết lập ở trên).
Ví dụ: 10.1.2.150. - Local Port: Nhập số cổng TCP 3389.
- Protocol: Chọn TCP.
Bước 8: Lưu cấu hình để áp dụng các cài đặt mới vừa thiết lập.
Điều quan trọng cần lưu ý là hầu hết mỗi router có giao diện riêng không giống nhau, hãy tìm hiểu hướng dẫn sử dụng bộ định tuyến của bạn để tìm nơi thay đổi cài đặt Port Forwarding.
Điều khiển máy tính từ xa qua internet bằng Microsoft Remote Desktop
Khi máy tính và mạng của bạn được cấu hình đúng cách để cho phép điều khiển từ xa thì việc còn lại vô cùng dễ dàng.
Bước 1: Khởi động ứng dụng Microsoft Remote Desktop trên điện thoại của bạn lên, bấm vào dấu cộng ở góc trên bên phải và bấm Desktop để thêm máy tính muốn điều khiển.
Bước 2: Bước này bạn làm tương tự như cách kết nối trong mạng LAN ở phía trên. Điểm khác biệt là ở PC Name thì bạn cần cung cấp cho mục này địa chỉ IP public.
Bước 3: Tiếp đó điền User Account, User Account ở đây là tên người dùng và mật khẩu trên máy tính, đặt Friendly Name cho dễ nhớ, cách làm tương tự như hướng dẫn ở mục 2.
Bước 4: Từ màn hình chính Remote Desktop, bạn kích vào thiết bị muốn kết nối và điểu khiển.
Bây giờ bạn đã hoàn toàn có thể điều khiển máy tính của mình từ xa qua Internet rồi.
Như vậy, với hướng dẫn truy cập và điều khiển máy tính bằng điện thoại trên đây bạn sẽ được điều khiển máy tính bằng chiếc Smartphone của mình. Sau khi truy cập và điều khiển được Desktop trên điện thoại, bạn có thể tùy chỉnh, thay đổi những dữ liệu và cài đặt trên máy tính.
