Cách đặt mật khẩu cho máy tính Windows 10, cách đổi mật khẩu Win 10
- Thứ ba - 10/06/2025 02:57
- In ra
- Đóng cửa sổ này
Cài mật khẩu máy tính sẽ giúp bảo mật máy tính tốt hơn. Ngoài việc đặt mật khẩu mới cho máy tính, Quantrimang.com cũng sẽ hướng dẫn bạn cách đổi mật khẩu máy tính Windows 10. Hãy theo dõi nhé.
Từ Windows XP đến Windows 10, người dùng luôn thiết lập mật khẩu để bảo vệ cho máy tính cá nhân của mình. Đây là biện pháp đơn giản và mang lại hiệu quả bảo mật cho người sử dụng máy tính. Trên máy tính Windows 10, giao diện hệ thống đã thay đổi vì thế chúng ta sẽ có thể gặp khó khăn trong việc cài đặt mật khẩu cho máy tính. Nếu bạn mới làm quen với giao diện Windows 10, hoặc chưa biết cách đặt mật khẩu cho máy tính Windows 10, hãy theo dõi bài viết dưới đây của Quản trị mạng.
Cách đặt mật khẩu Windows 10
Nên sử dụng mã PIN hay mật khẩu?
Cả mã PIN và mật khẩu đều có ưu và nhược điểm khi nói đến khả năng bảo vệ tài khoản. Mặc dù mật khẩu có thể bảo mật hơn, vì bao gồm cả các ký tự, ký hiệu và số, nhưng việc nhập mật khẩu cũng có thể gây nhàm chán trong quá trình khởi động, đặc biệt nếu mật khẩu quá phức tạp. Ngược lại, mã PIN có thể dễ nhập hơn, nhưng một mã PIN đơn giản có thể không cung cấp mức độ bảo mật như bạn mong muốn.
Mặc dù bạn có thể thiết lập một mật khẩu phức tạp bao gồm cả số, chữ cái và ký hiệu, nhưng việc không bảo mật được mật khẩu có nghĩa là ai đó có được thông tin đăng nhập của bạn sẽ có toàn quyền truy cập vào tài khoản Microsoft của bạn.
Cách cài mật khẩu cho máy tính thông qua Control Panel
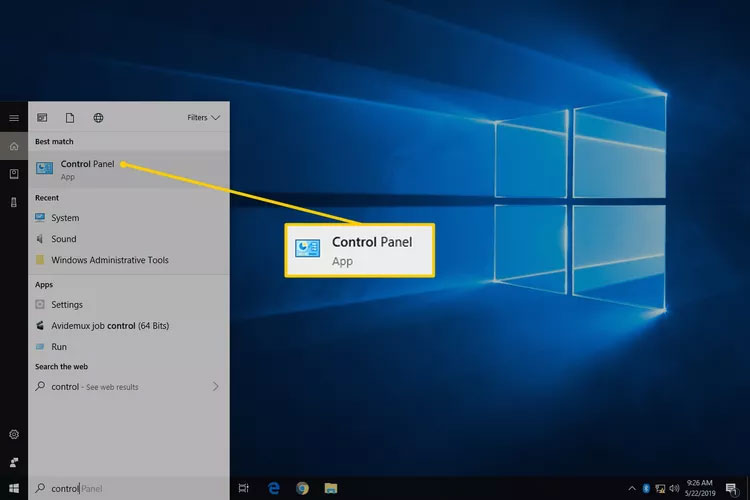
1. Mở Control Panel. Cách dễ nhất để làm điều đó là gõ control từ menu Start hoặc hộp thoại Run.
2. Chọn User Accounts.
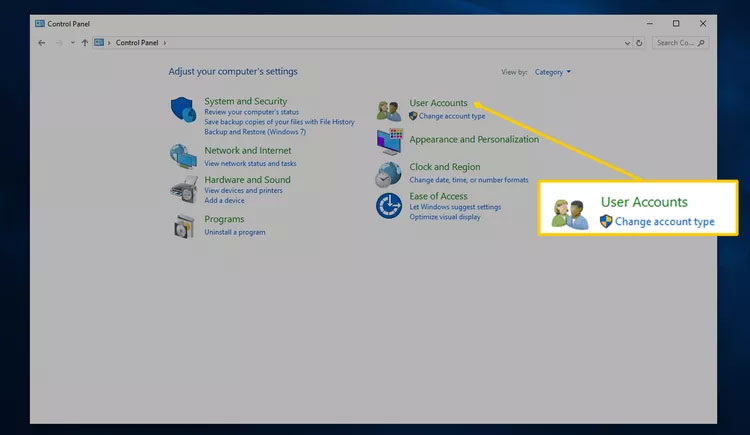
Lưu ý: Nếu bạn đang xem các applet bằng biểu tượng của chúng thay vì ở chế độ xem danh mục trên Windows 10, hãy chuyển sang bước 4 sau khi chọn User Accounts.
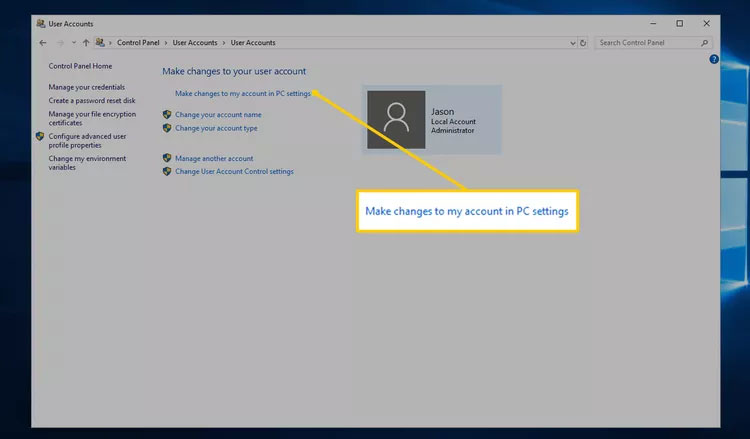
3. Mở User Accounts.
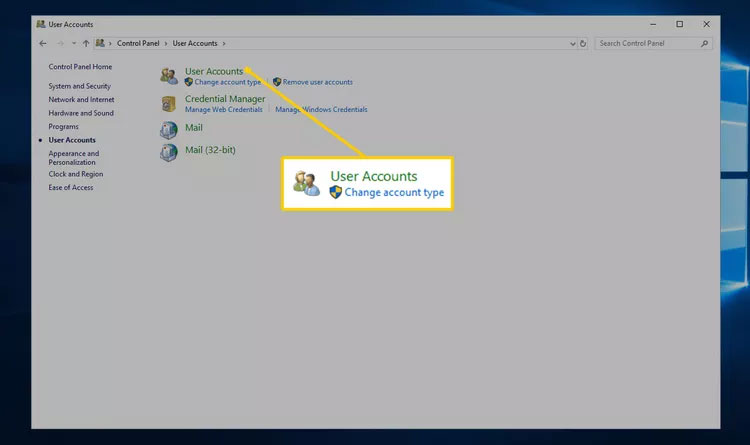
4. Chọn Make changes to my account in PC settings.
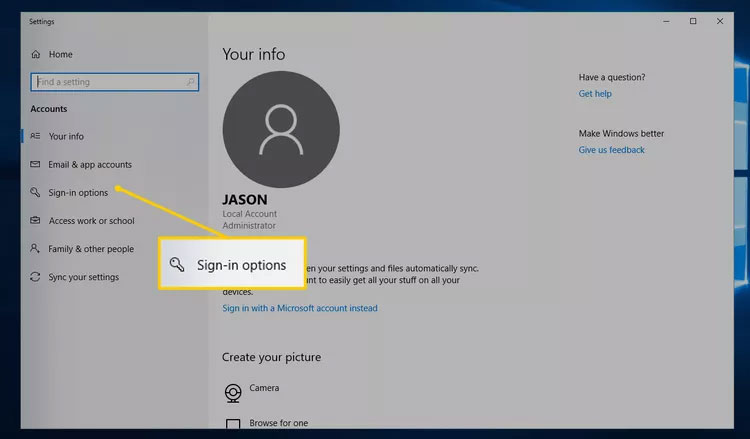
5. Chọn Sign-in options.
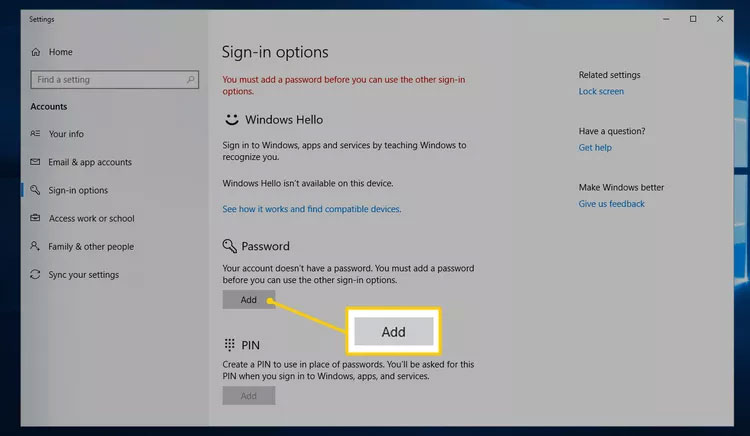
6. Trong khu vực Password, chọn Add.
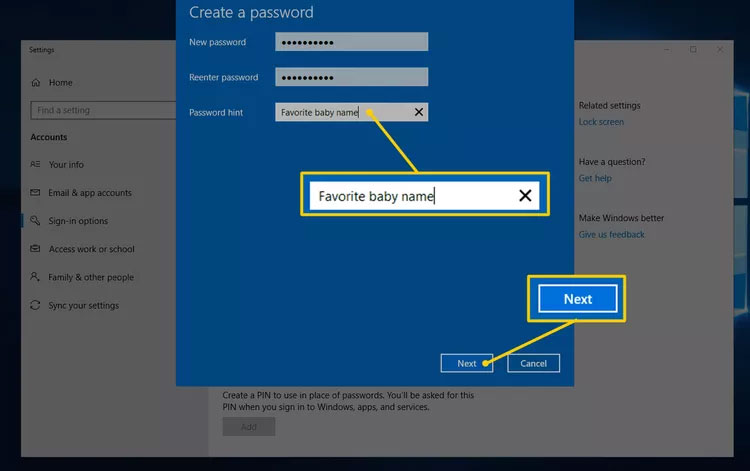
7. Nhập mật khẩu mới vào hai trường văn bản đầu tiên. Bạn phải làm điều đó hai lần để đảm bảo bạn gõ mật khẩu chính xác.
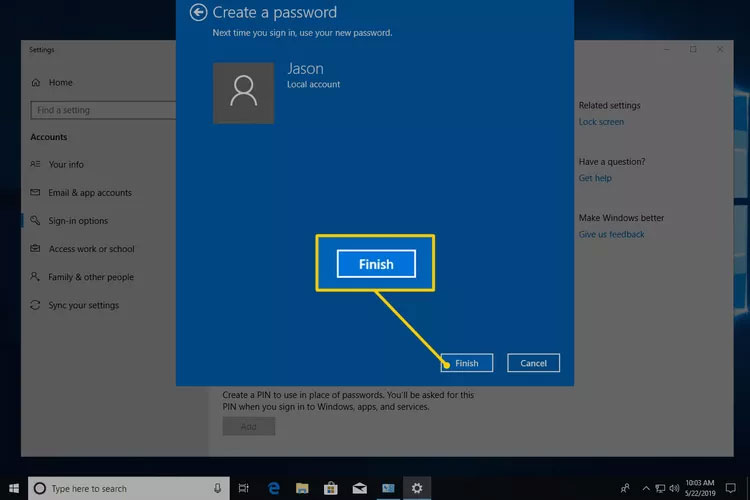
8. Trong trường Password hint, hãy nhập nội dung nào đó sẽ giúp bạn nhớ mật khẩu nếu bạn quên, sau đó chọn Next.
9. Nhấn Finish để hoàn tất việc thiết lập mật khẩu mới.
10. Bây giờ, bạn có thể thoát khỏi bất kỳ cửa sổ nào bạn đã mở để tạo mật khẩu, như Settings hoặc PC settings.
Lưu ý: Bạn nên tạo ổ đĩa reset mật khẩu sau khi tạo mật khẩu mới. Nếu mật khẩu của bạn thực sự phức tạp và bạn không muốn tạo ổ đĩa reset, hãy cân nhắc việc lưu trữ mật khẩu đó trong trình quản lý mật khẩu.
Cách cài mật khẩu cho máy tính thông qua Ctrl + Alt + Delete
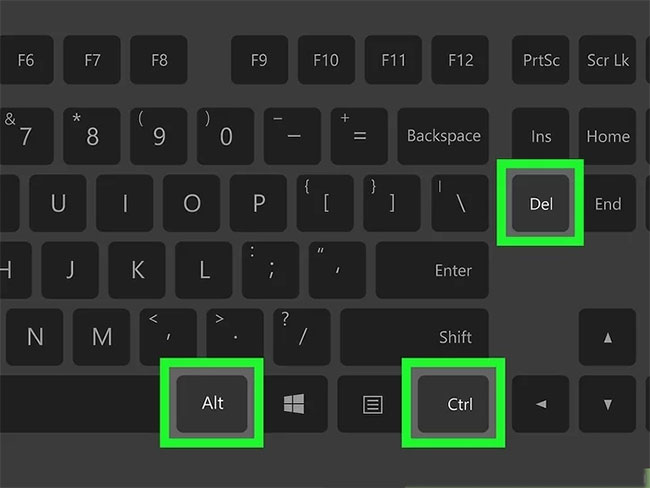
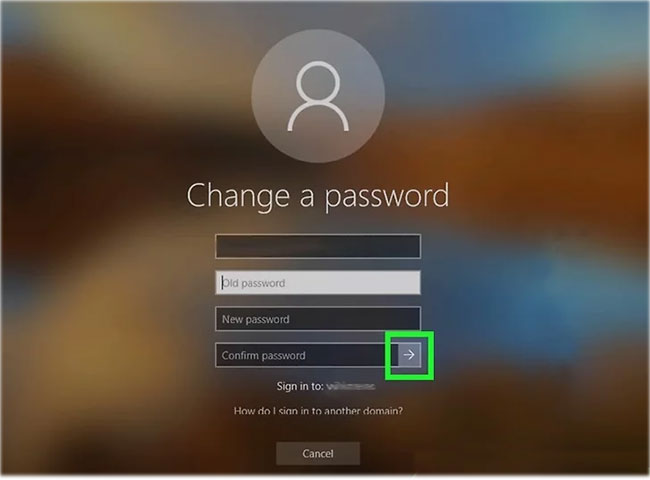
1. Nhấn Ctrl + Alt + Del.
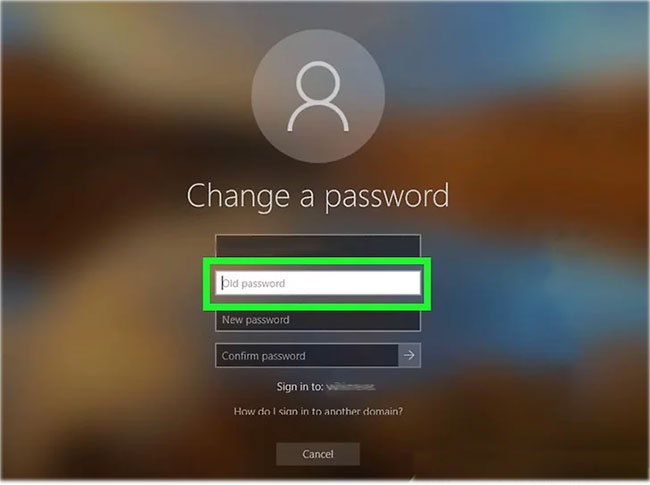
2. Nhấp vào Change a password.

3. Nhập mật khẩu cũ của bạn. Nếu bạn chưa từng đặt mật khẩu, hãy để trống ô này.
4. Nhập mật khẩu mới của bạn. Bạn sẽ phải nhập nó hai lần để đảm bảo rằng mình không gõ sai.
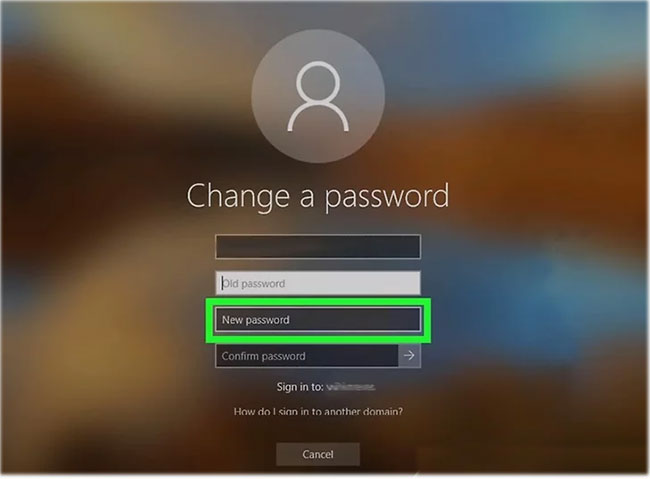
5. Nhấp vào Submit. Nó là mũi tên ở cuối hộp Confirm password.
6. Bấm OK.
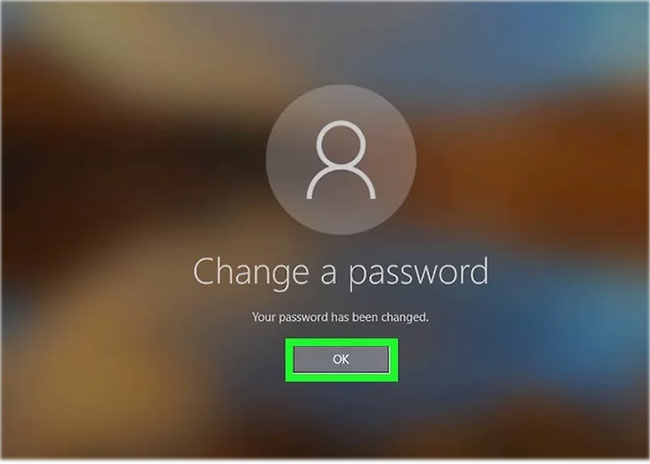
Bây giờ. bạn đã đặt thành công mật khẩu trên máy tính của mình. Bất cứ khi nào đăng nhập, bạn sẽ phải nhập mật khẩu này.
Cách cài mật khẩu cho máy tính thông qua Settings
Bước 1:
Chúng ta click chuột vào biểu tượng Start ở góc trái dưới cùng máy tính, chọn tiếp biểu tượng hình người và nhấn chọn vào Change account settings.

Bước 2:
Trong giao diện Accounts nhấp chọn vào mục Sign-in options. Sau đó bạn nhìn sang nội dung bên phải sẽ thấy có 3 tùy chọn tạo mật khẩu cho Windows 10, gồm tạo mật khẩu thông thường (Password) tạo mật khẩu với mã pin chỉ dùng số (PIN) và tạo mật khẩu đăng nhập bằng hình ảnh (Picture password).
Nếu muốn tạo mật khẩu bảo mật Windows 10 thông thường, click chuột vào Change tại Password.
Bước 3:
Chúng ta sẽ nhập mật khẩu vào ô New password, nhắc lại mật khẩu vào Reenter password, gõ gợi ý mật khẩu tại Password hint nếu bạn quên mật khẩu đăng nhập máy tính. Sau đó nhấn Next bên dưới. Cuối cùng nhấn Finish để hoàn thành việc đặt mật khẩu.
Bước 4:
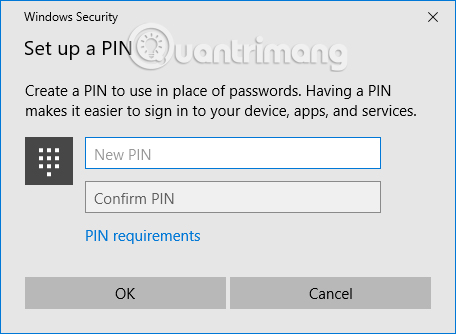
Nếu muốn sử dụng mã PIN cài mật khẩu đăng nhập Windows 10 nhấn chọn Add tại mục PIN.
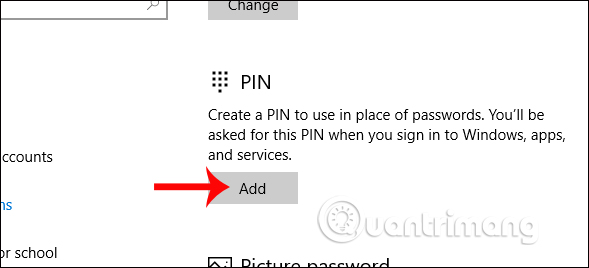
Sau đó chúng ta nhập mã PIN là các số vào trong giao diện này.
Bên cạnh đó, chúng ta có thể tùy chỉnh độ dài, ngắn cho mã PIN hoặc thời gian sử dụng cho mã PIN trên Windows 10 theo bài viết dưới đây.
Bước 5:
Nếu muốn thiết lập mật khẩu Windows 10 bằng hình ảnh, nhấn chọn Add tại mục Picture Password.

Sau đó nhấn vào Choose picture để lựa chọn hình ảnh để làm mật khẩu đăng nhập máy tính Windows 10. Tuy nhiên, cách làm này khá phức tạp vì bạn sẽ cần xác định 3 điểm ảnh và vẽ mô hình để mở khóa máy tính.
Vì thế bạn nên chọn cách tạo mật khẩu thông thường hoặc sử dụng mã PIN để tạo pass đăng nhập trên Windows 10.

Như vậy khi đăng nhập máy tính bạn sẽ cần nhập đúng mật khẩu mình đã tạo trước đó.
Cách đổi mật khẩu Windows 10
Một số lưu ý về việc thay đổi mật khẩu trên Windows 10
Trong Windows 10, có thể chọn giữa hai loại tài khoản khác nhau: Tài khoản Microsoft và tài khoản cục bộ.
Tài khoản Microsoft yêu cầu quyền truy cập Internet, cho phép bạn đăng nhập vào nhiều máy tính có cùng thông tin xác thực và cho phép truy cập vào Microsoft Store. Ngược lại, tài khoản cục bộ chỉ dành riêng cho máy tính cá nhân.
Việc thay đổi mật khẩu tài khoản cục bộ không ảnh hưởng đến bất kỳ dịch vụ nào khác. Tuy nhiên, việc thay đổi mật khẩu tài khoản Microsoft có nghĩa là mật khẩu mới phải được sử dụng ở mọi nơi có tài khoản đó.
Mẹo nhanh: Nếu bạn chưa có tài khoản Microsoft và muốn tạo một tài khoản, hãy đọc bài viết của Quantrimang.com về cách tạo tài khoản Microsoft.
Thay đổi mật khẩu Windows 10 từ Control Panel
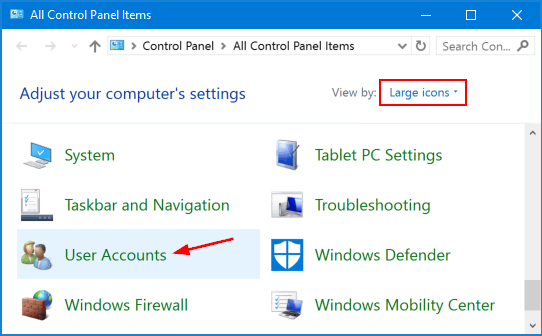
1. Mở Control Panel. Đặt tùy chọn View by thành Large icons. Nhấp vào User Accounts.
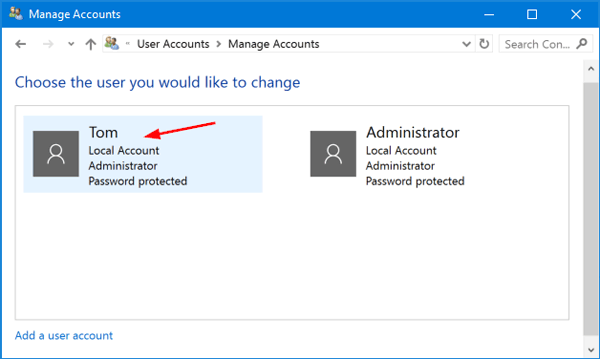
2. Nhấp vào liên kết Manage another account.
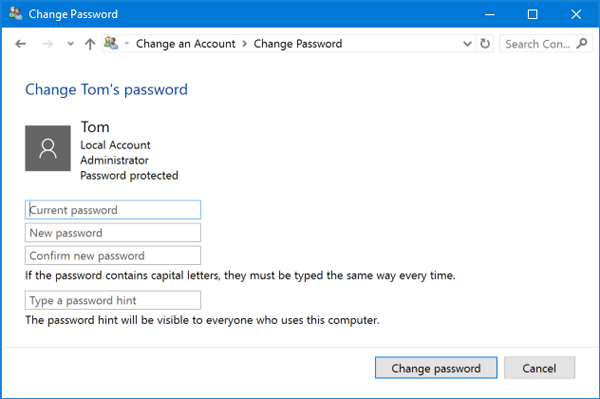
3. Nhấp vào tài khoản người dùng mà bạn muốn thay đổi mật khẩu.
4. Trên màn hình tiếp theo, nhấp vào tùy chọn Change the password.
5. Nhập mật khẩu hiện tại và sau đó nhập mật khẩu mới bạn muốn sử dụng. Nhấp vào Change password.
Thay đổi mật khẩu Windows 10 từ PC Settings
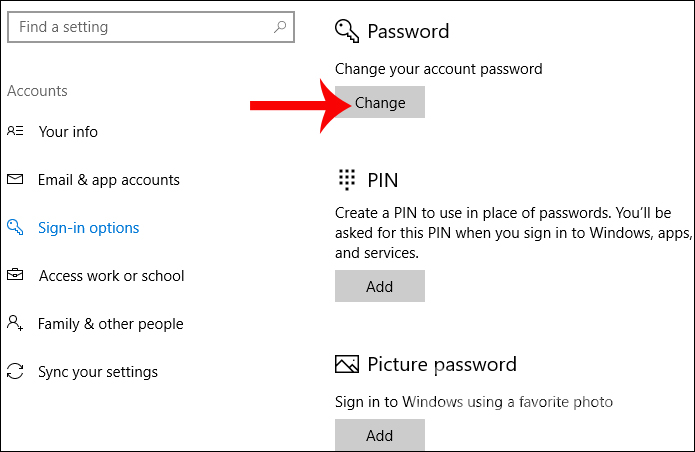
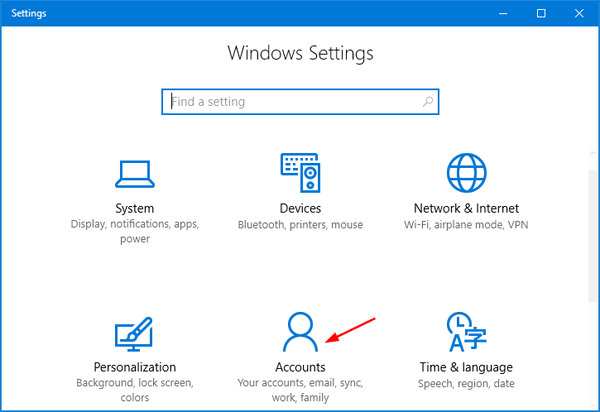
1. Nhấn các phím Win+I để mở ứng dụng Settings. Nhấp vào Accounts.
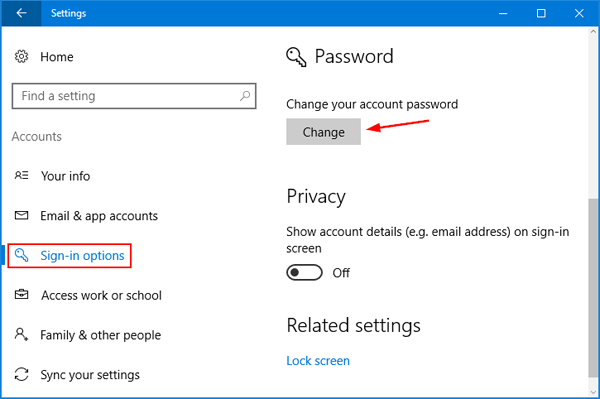
2. Nhấp vào tùy chọn Sign-in ở bên trái và nhấp vào nút Change trong phần Password ở bên phải.
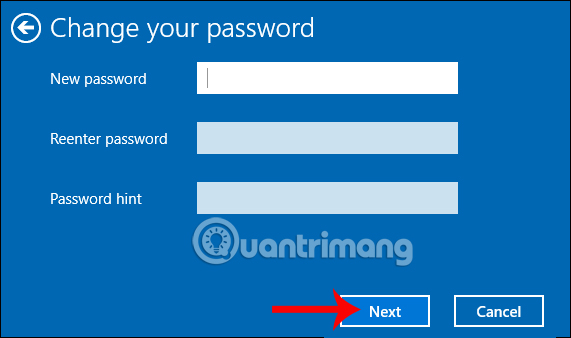
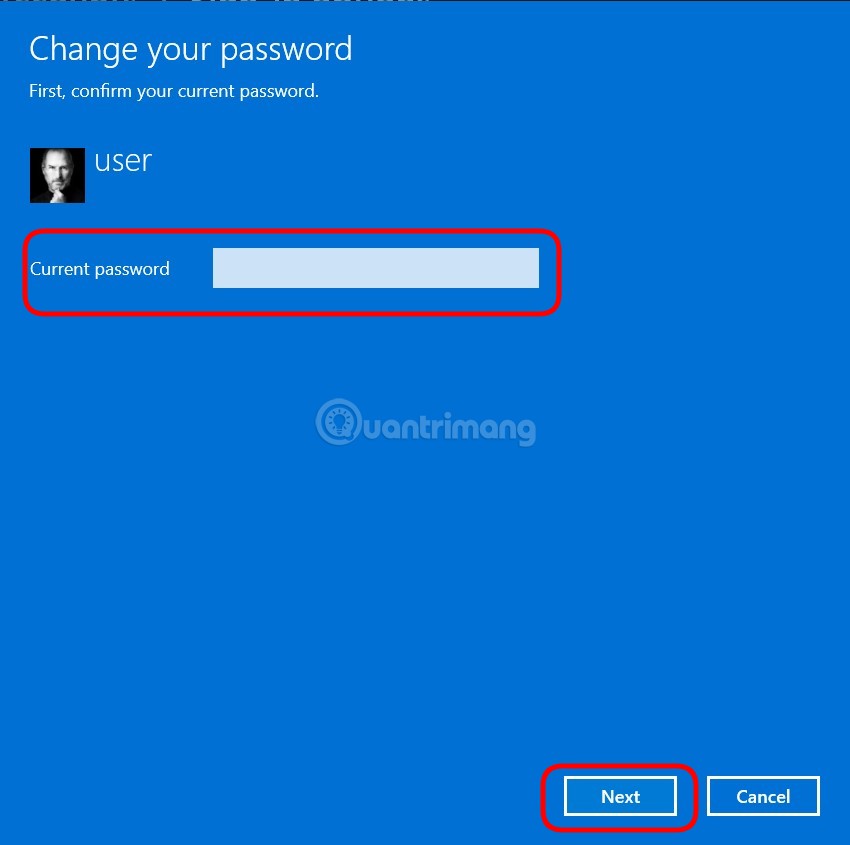
3. Nhập mật khẩu hiện tại và nhấp vào Next.
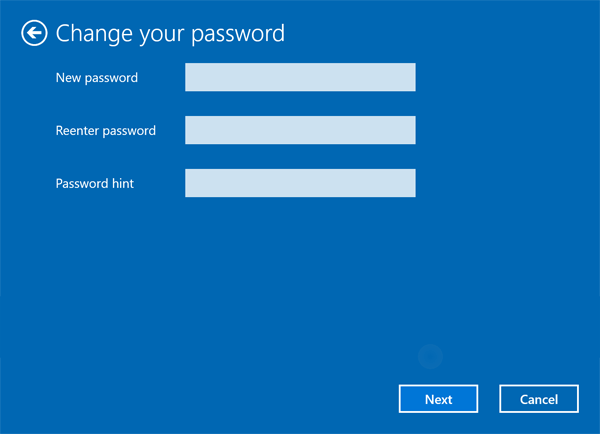
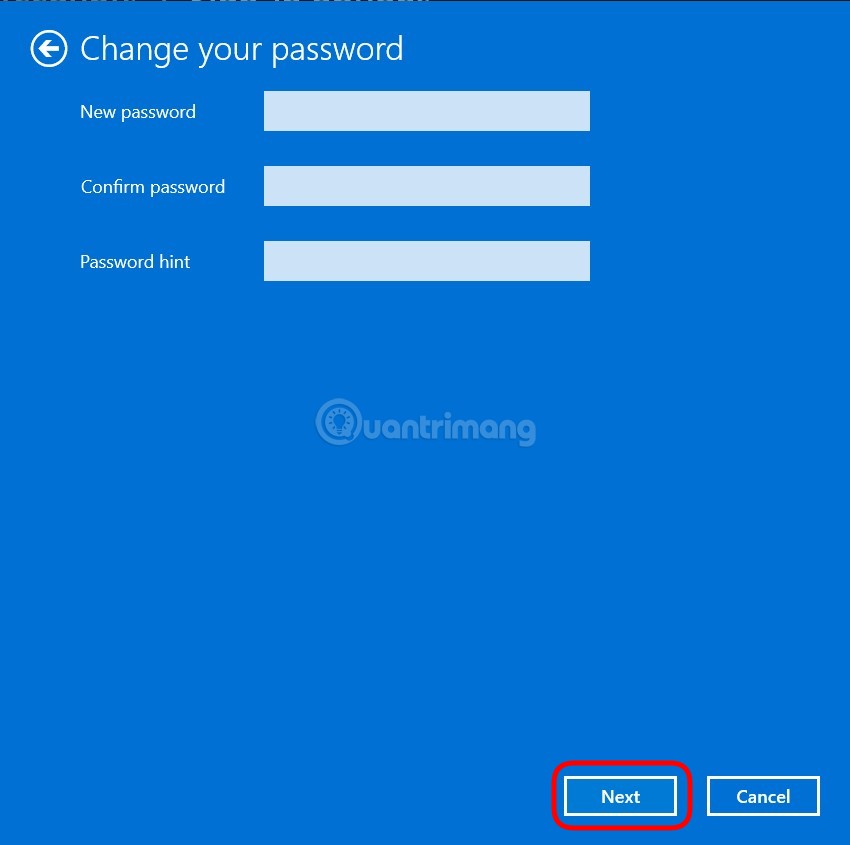
4. Nhập mật khẩu mới 2 lần và đặt gợi ý mật khẩu. Nhấn Next.
Thay đổi mật khẩu Windows 10 từ Computer Management
1. Nhấp chuột phải vào biểu tượng This PC trên desktop và sau đó chọn Manage.
2. Trong Computer Management, mở rộng Local Users and Groups > Users ở bên trái. Bấm chuột phải vào người dùng mong muốn ở giữa, rồi chọn Set Password.
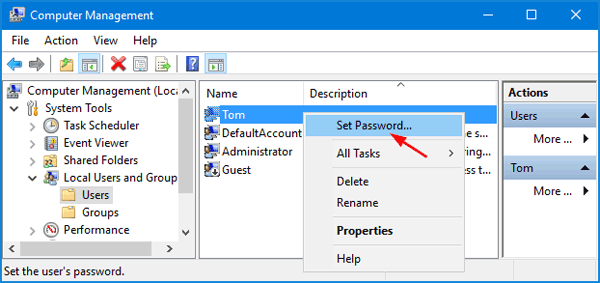
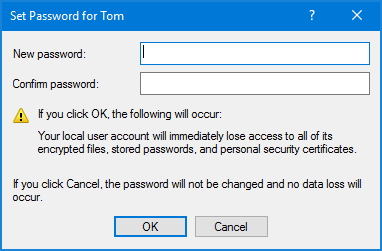
3. Nhấp vào nút Proceed để xác nhận.
4. Nhập mật khẩu mới hai lần và nhấp vào OK.
Thay đổi mật khẩu Windows 10 bằng Netplwiz
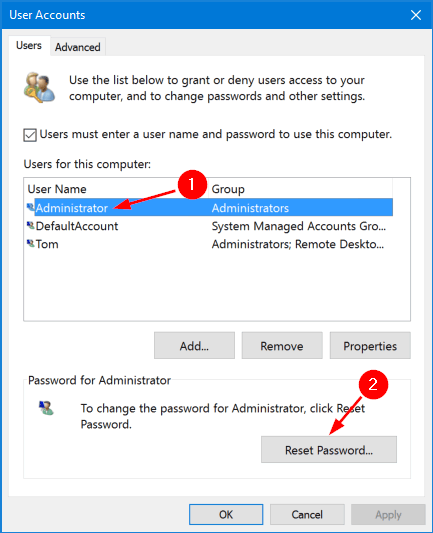
1. Nhấn các phím Win+R với nhau để mở hộp Run. Nhập netplwiz và nhấn Enter.
2. Trong cửa sổ User Accounts, hãy chọn một tài khoản người dùng bạn muốn thay đổi mật khẩu và sau đó nhấp vào nút Reset Password.
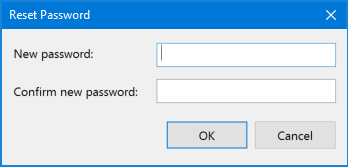
3. Nhập mật khẩu mới cho tài khoản người dùng, rồi bấm OK.
Cách đổi mật khẩu Windows 10 bằng lệnh cmd
Ngoài cách sử dụng cài đặt để đặt và đổi mật khẩu, bạn có thể sử dụng lệnh cmd để làm việc này trên tất cả các phiên bản Windows. Thực hiện theo các bước sau:
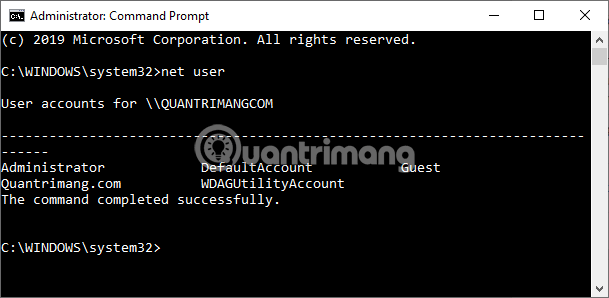
- Mở cmd bằng quyền Admin, nhập lệnh sau để liệt kê tất cả các tài khoản hiện có trên máy và nhấn
Enter:
net user
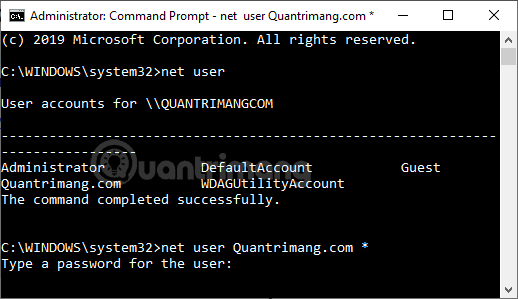
- Nhập lệnh sau để thay đổi mật khẩu cho tài khoản và nhấn
Enter:
net user USERNAME *
- Trong lệnh này, bạn thay USERNAME thành tên tài khoản cần đổi mật khẩu. Ví dụ ở đây mình muốn đổi mật khẩu cho tài khoản Quantrimang.com, lệnh sẽ thành: net user Quantrimang.com * như dưới đây:
- Nhập mật khẩu mới cho user và nhấn
Enter. - Nhập lại mật khẩu mới lần nữa để xác nhận và nhấn
Enter.
Khi hoàn tất các bước trên, hãy đăng xuất khỏi tài khoản Windows 10 và đăng nhập lại để sử dụng mật khẩu mới. Nếu tài khoản trên máy tính Windows 10 của bạn liên kết với tài khoản Microsoft thì các bước đổi mật khẩu trên sẽ không thể áp dụng được. Bạn cần phải đổi mật khẩu tài khoản Microsoft thì mới được.
Cách đổi mật khẩu tài khoản Microsoft
Khi bạn liên kết máy tính với tài khoản Microsoft thì chính mật khẩu của tài khoản Microsoft sẽ được dùng để làm mật khẩu đăng nhập máy tính của bạn. Khi đó, nếu muốn đổi mật khẩu đăng nhập máy tính, bạn cần phải đổi mật khẩu tài khoản Microsoft. Các bước thực hiện như sau:
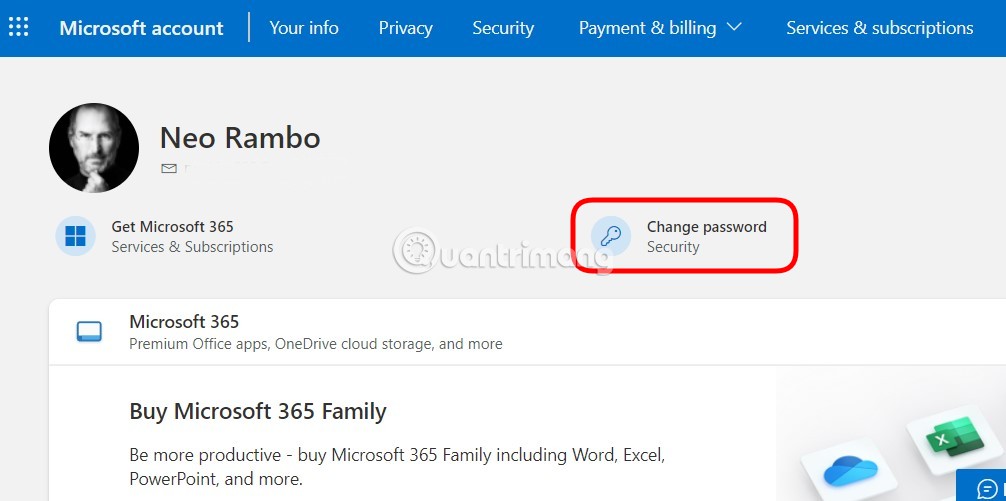
Bước 1: Mở bất cứ trình duyệt nào bạn thích rồi truy cập Trang quản lý tài khoản của Microsoft.
https://account.microsoft.com/
Bước 2: Nhấn vào Change password.
Bước 3: Tại đây, bạn nhập mật khẩu hiện tại vào ô Current password, nhấn mật khẩu mới vào ô New password và nhập lại mật khẩu mới vào ô Reented password.
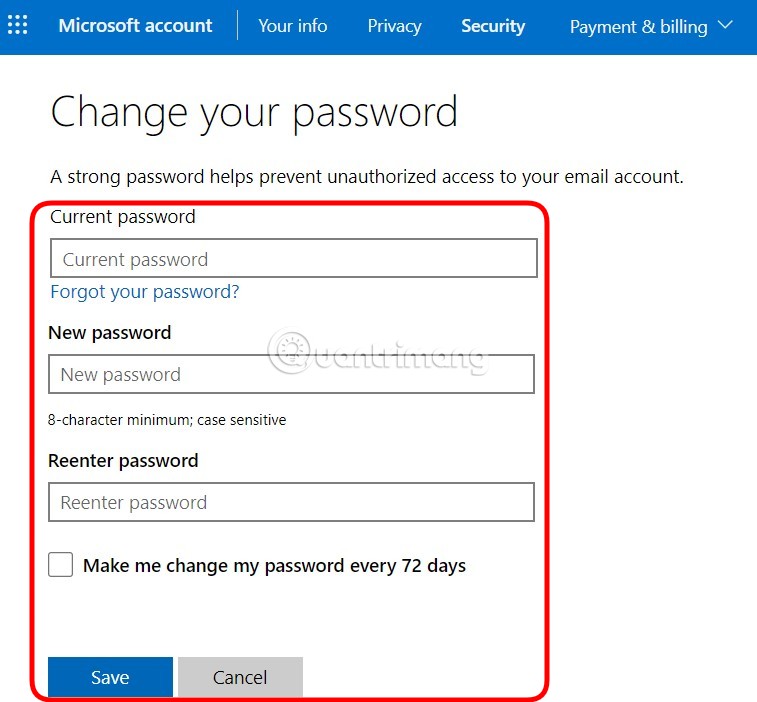
Bước 4: Sau khi nhập xong mật khẩu, bạn nhấn Save để hoàn thành. Nếu muốn Microsoft nhắc bạn đổi mật khẩu theo chu kỳ 72 ngày để đảm bảo an toàn, bạn có thể tích vào ô bên cạnh dòng chữ "Make my change my password every 72 days".
Xóa mật khẩu máy tính Windows 10
Ngoài việc đổi mật khẩu thành mật khẩu khác thì cũng không ít bạn có nhu cầu xóa mật khẩu đi để đăng nhập cho nhanh. Việc xóa mật khẩu sẽ giúp bạn truy cập máy tính nhanh hơn nhưng lại không đảm bảo tính an toàn nếu bạn có cất "tài liệu mật" trong máy. Vì thế, bạn hãy cân nhắc trước khi thực hiện.
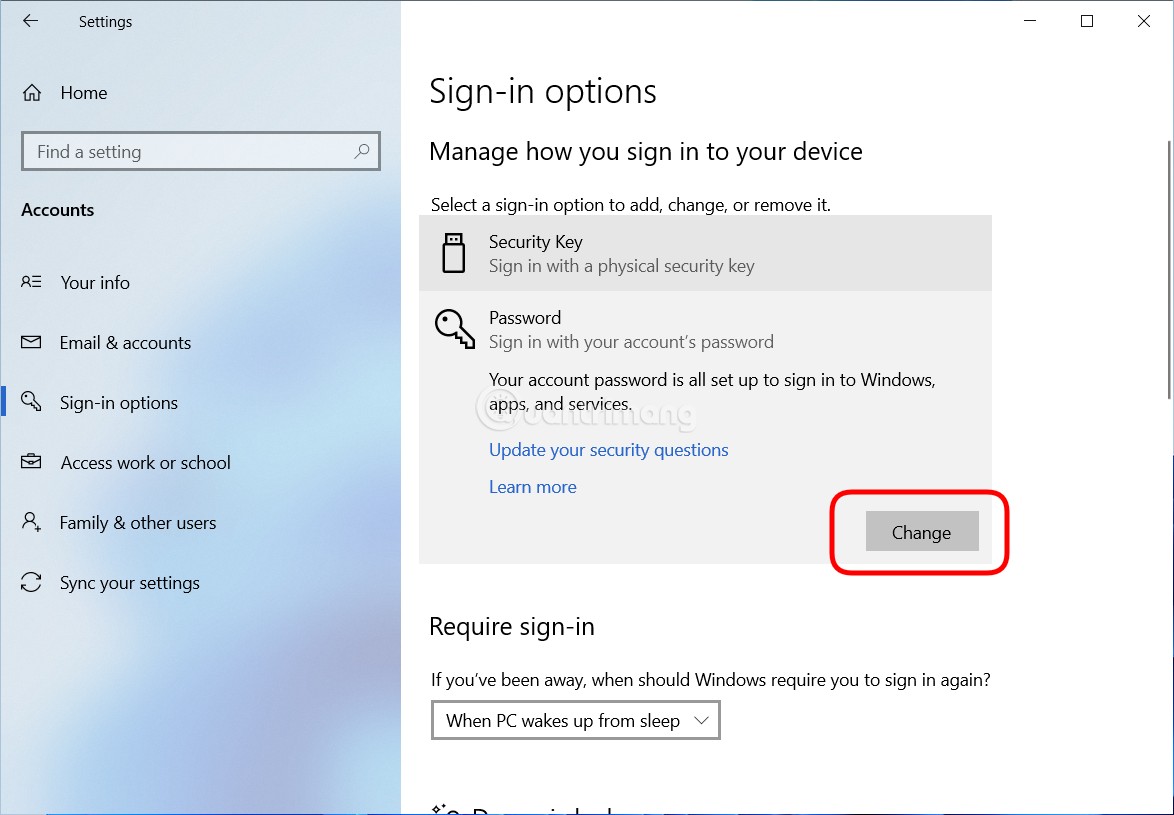
Bước 1: Nhấn Win + I để mở Settings.
Bước 2: Nhấn vào Accounts.
Bước 3: Nhấn vào Sign-in options.
Bước 4: Trong phần Password bạn hãy nhấn vào nút Change.
Bước 5: Nhập mật khẩu hiện tại rồi nhấn Next.
Bước 6: Không nhập gì cả nhấn Next luôn sau đó nhấn Finish để hoàn thành việc xóa tài khoản.
Mật khẩu mạnh nhất trên máy tính là gì?
Thật kỳ lạ, hầu hết các mật khẩu có thể được tìm thấy khá dễ dàng và nhanh chóng bởi những người tò mò. Bên cạnh đó, bí mật của bất kỳ mật khẩu tốt nào không chỉ là độ tin cậy mà còn nằm ở tính dễ ghi nhớ của nó.
Bất kể, nếu bạn muốn bảo vệ hệ thống bằng mật khẩu một cách hiệu quả, bạn nên làm theo các mẹo và quy tắc hiệu quả sau:
- Sử dụng cả chữ hoa và chữ thường,
- Thêm số bổ sung, ký hiệu đặc biệt và dấu hiệu,
- Không sử dụng thông tin mà tất cả mọi người đều biết, chẳng hạn như tên, ngày sinh và địa danh của bạn,
- Tạo mật khẩu có ít nhất 5 đến 6 ký tự,
- Cố gắng nhớ tất cả mật khẩu của bạn, thay vì viết chúng ra giấy.
- Chỉ một mật khẩu phức tạp mới có thể là một rào cản tốt trong việc bảo mật dữ liệu của bạn. Trong mọi trường hợp, mật khẩu dài bất hợp lý (nhiều hơn 8-10 ký tự) có thể trở thành vấn đề đối với người dùng, vì chúng có thể dễ quên và khó nhớ lại.
Tại sao việc đặt mật khẩu trên PC của bạn lại quan trọng đến vậy?
Không nghi ngờ gì nữa, việc bảo vệ máy tính để bàn hoặc máy tính xách tay của bạn bằng mật khẩu cũng quan trọng như dữ liệu bạn cần bảo mật. Hãy nhớ rằng nó sẽ hạn chế những cá nhân có thể tiếp cận máy tính của bạn. Bằng cách này, dữ liệu của bạn sẽ được bảo vệ và bạn sẽ không gặp rủi ro bị người khác lấy bất kỳ thông tin cá nhân nào mà không có sự đồng ý của bạn.
Sau đó, một lần nữa, điều quan trọng là phải làm nổi bật ý nghĩa của một mật khẩu phù hợp, nghĩa là áp dụng một mật khẩu mà chỉ bạn biết và dễ nhớ đối với bạn, còn những người dùng khác thì không.
Hơn nữa, bài viết khuyên bạn nên tính đến các mẹo bảo mật được đưa ra ở trên khi đăng nhập vào Windows 10, để tránh bị đánh cắp.
Trên đây là cách cài mật khẩu cho máy tính Windows 10, theo 3 cách khác nhau đặt theo mật khẩu thông thường, theo mã PIN và theo hình ảnh. Tuy nhiên, cách đơn giản và hiệu quả được nhiều người lựa chọn đó là đặt mật khẩu thông thường và sử dụng mã PIN.
Chúc các bạn thực hiện thành công!
