Cách chuyển Windows sang ổ khác bằng Macrium Reflect
- Chủ nhật - 07/07/2024 23:51
- In ra
- Đóng cửa sổ này
Cho dù bạn đang nâng cấp từ HDD lên SSD hay cài đặt ổ đĩa có dung lượng lớn hơn, đây là cách dễ nhất để di chuyển cài đặt hệ điều hành Windows hiện tại và tất cả dữ liệu sang ổ khác.
Cách di chuyển Windows sang ổ khác bằng Macrium Reflect
Macrium Reflect là công cụ sao lưu và clone cao cấp dành cho Windows. Hãy truy cập trang web Macrium Reflect: https://www.macrium.com/products/home và tải xuống phiên bản Home của công cụ. Bạn có thể mua giấy phép hoặc chọn dùng thử miễn phí. Sau khi nhập thông tin chi tiết, bạn sẽ nhận được liên kết tải xuống trong email. Sử dụng liên kết này để tải xuống trình cài đặt và chạy nó trên máy tính. Làm theo hướng dẫn trên màn hình để cài đặt ứng dụng.
Để ngăn chặn bất kỳ sự cố nào, hãy đảm bảo ổ mới có dung lượng bằng hoặc nhiều hơn ổ hiện tại. Tất cả dữ liệu trên ổ đích sẽ bị xóa, vì vậy đừng quên sao lưu mọi thứ quan trọng.
Sau khi hoàn tất, hãy làm theo các bước sau để di chuyển Windows sang ổ khác:
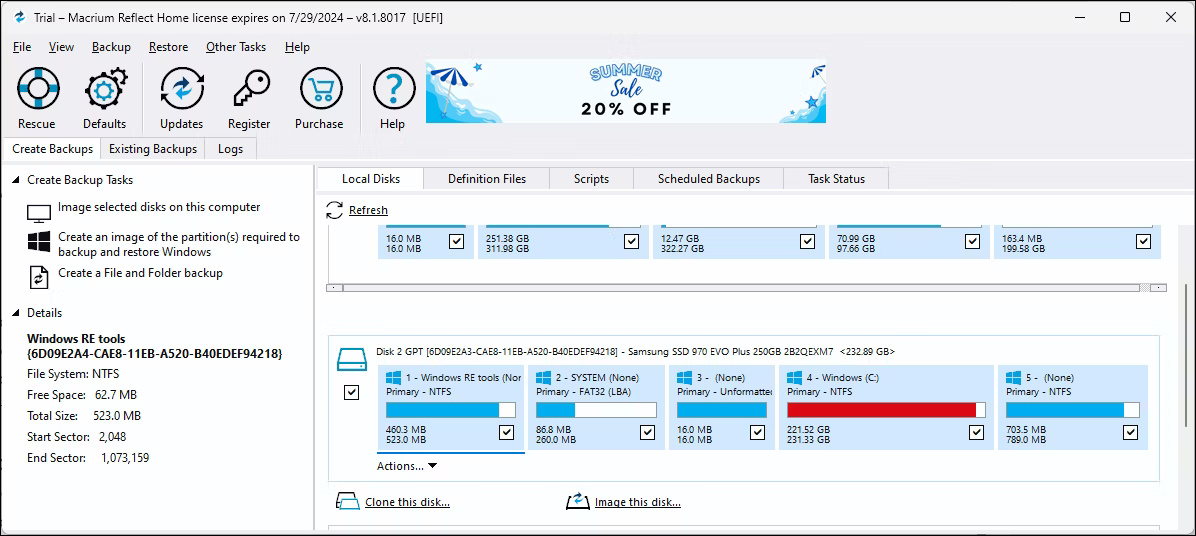
1. Khởi chạy Macrium Reflect để bắt đầu quá trình clone. Trong tab Local Disks, định vị và chọn ổ cài đặt Windows. Sau đó bấm vào tùy chọn Clone this disk.
2. Hộp thoại Clone mới sẽ mở ra, hiển thị ổ cài đặt Windows được chọn làm nguồn. Đảm bảo tất cả các phân vùng của ổ nguồn đều được chọn.
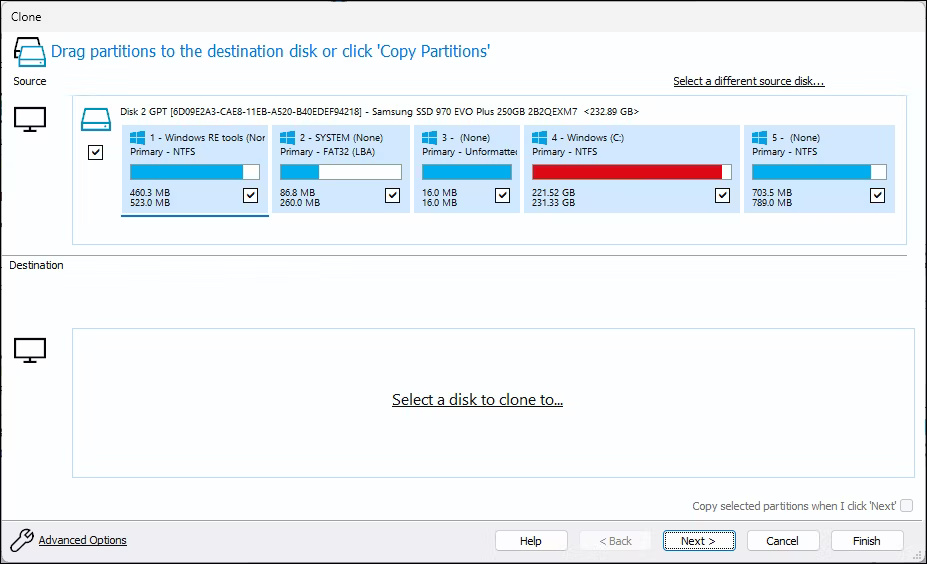
3. Bây giờ, cần chọn ổ đích (mới) mà các file Windows sẽ được di chuyển đến. Nhấp vào Select a disk to clone to và chọn ổ đích từ danh sách.
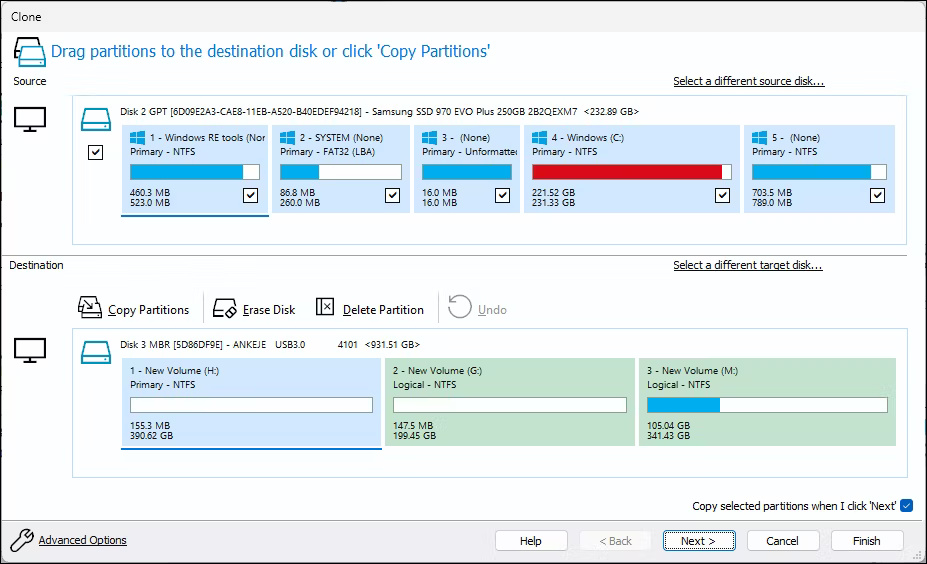
4. Sau đó nhấp vào tùy chọn Erase Disk để xóa tất cả dữ liệu khỏi ổ đích.
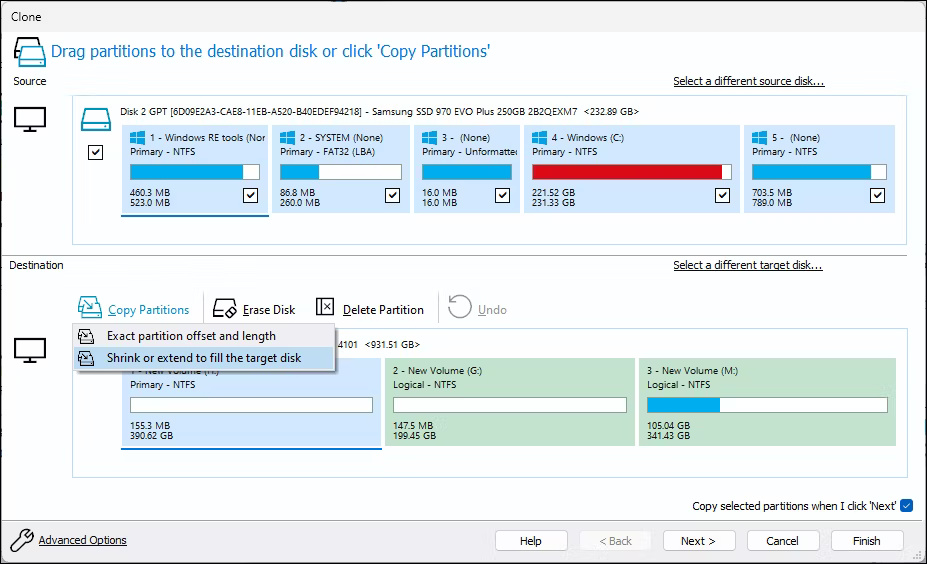
5. Để di chuyển cài đặt, hãy chọn tùy chọn Copy selected partitions when I click ‘Next’ ở góc dưới bên phải. Sau đó nhấn Next để tiếp tục.
6. Nếu gặp lỗi “too many primary partitions, nothing copied” , hãy nhấp vào tùy chọn Copy Partitions và chọn tùy chọn Shrink or extend to fill the target disk. Nhấn Next để tiếp tục.
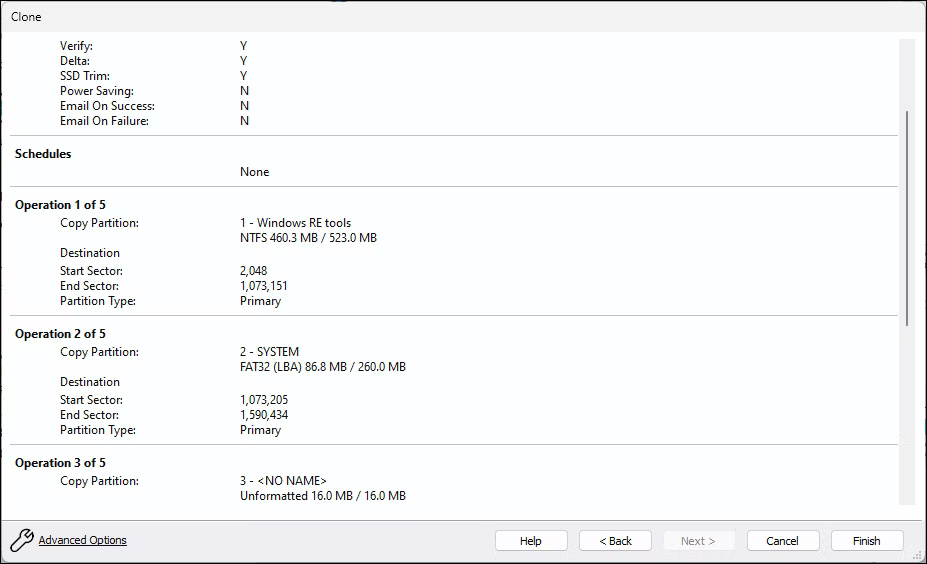
7. Trên màn hình tiếp theo, bạn có thể lên lịch clone. Để clone ngay lập tức, nhấp vào Next. Đọc tóm tắt về quá trình clone ổ và nhấp vào Finish.
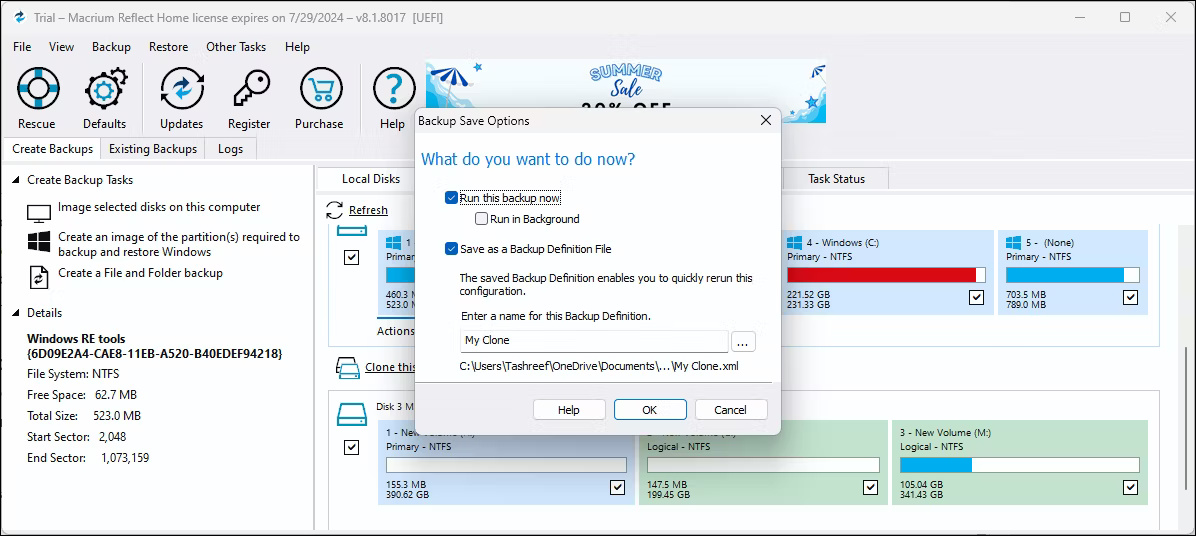
8. Trong menu pop-up, chọn hộp Run this backup now và Save as a backup definitionfile. Đồng ý với bất kỳ cảnh báo nào và nhấp vào OK.
9. Tùy thuộc vào kích thước ổ đĩa, quá trình này có thể mất một chút thời gian để hoàn thành. Sau khi clone hoàn tất, cả hai ổ sẽ trông giống nhau trong Macrium Reflect.
Đặt ổ mới làm ổ boot
Để khởi động từ ổ mới được clone, bạn có thể cần phải thay thế ổ SATA hiện có bằng ổ đó, ngoại trừ khi chuyển Windows từ SSD SATA sang M.2. Bất chấp điều đó, bạn sẽ cần đặt ổ đĩa mới của mình làm ổ boot chính trong cài đặt BIOS hoặc UEFI.
Bạn có thể vào BIOS trên Windows 10 và 11 bằng cách nhấn phím F10 trong khi khởi động lại. Tuy nhiên, phím nóng có thể khác nhau tùy theo nhà sản xuất. Thay vào đó, chúng ta sẽ sử dụng phím Esc để truy cập menu Start và tiếp tục từ đó.
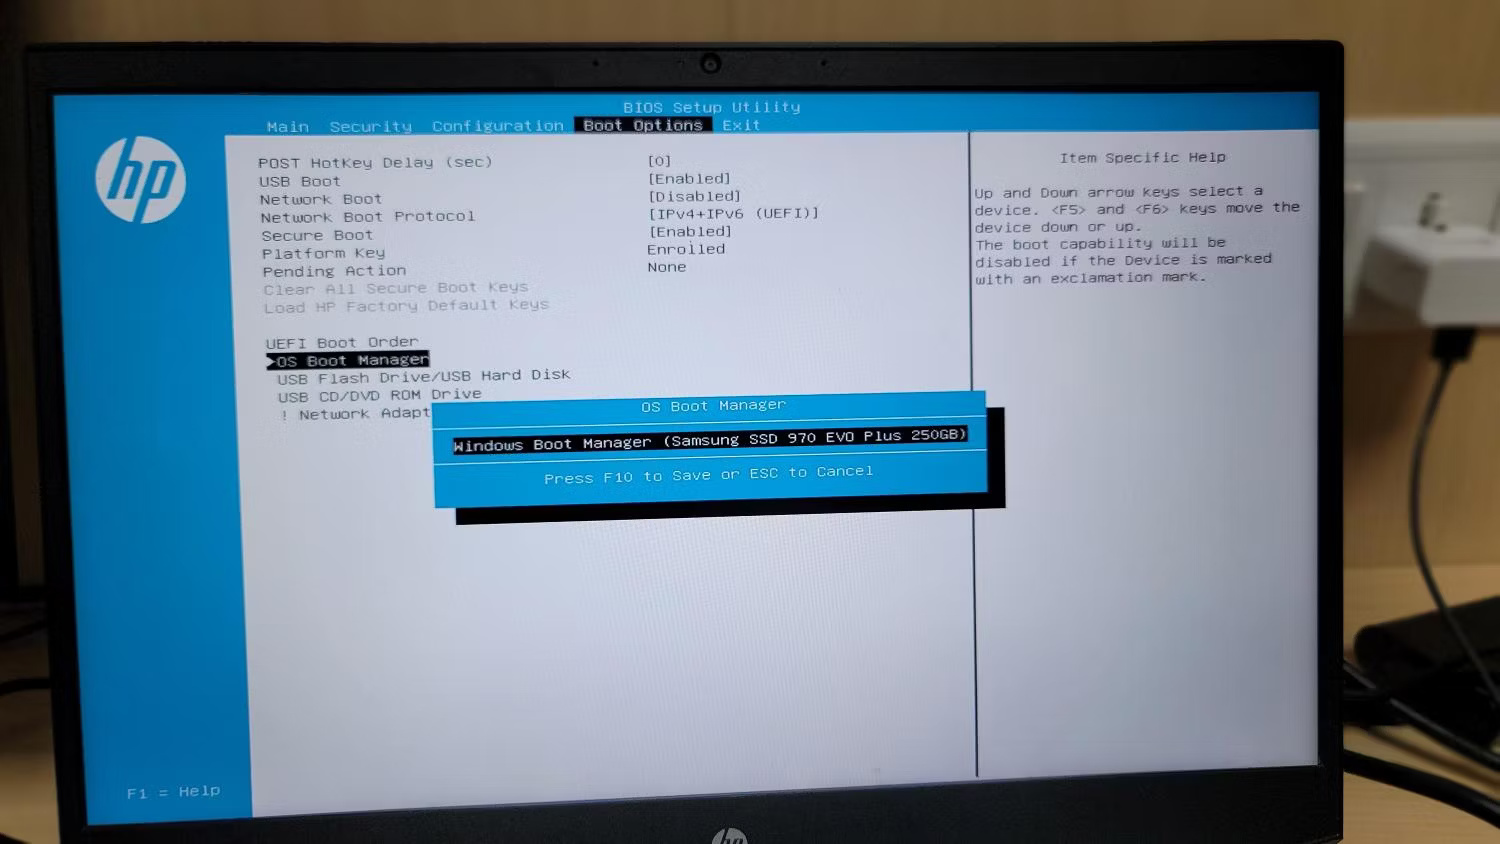
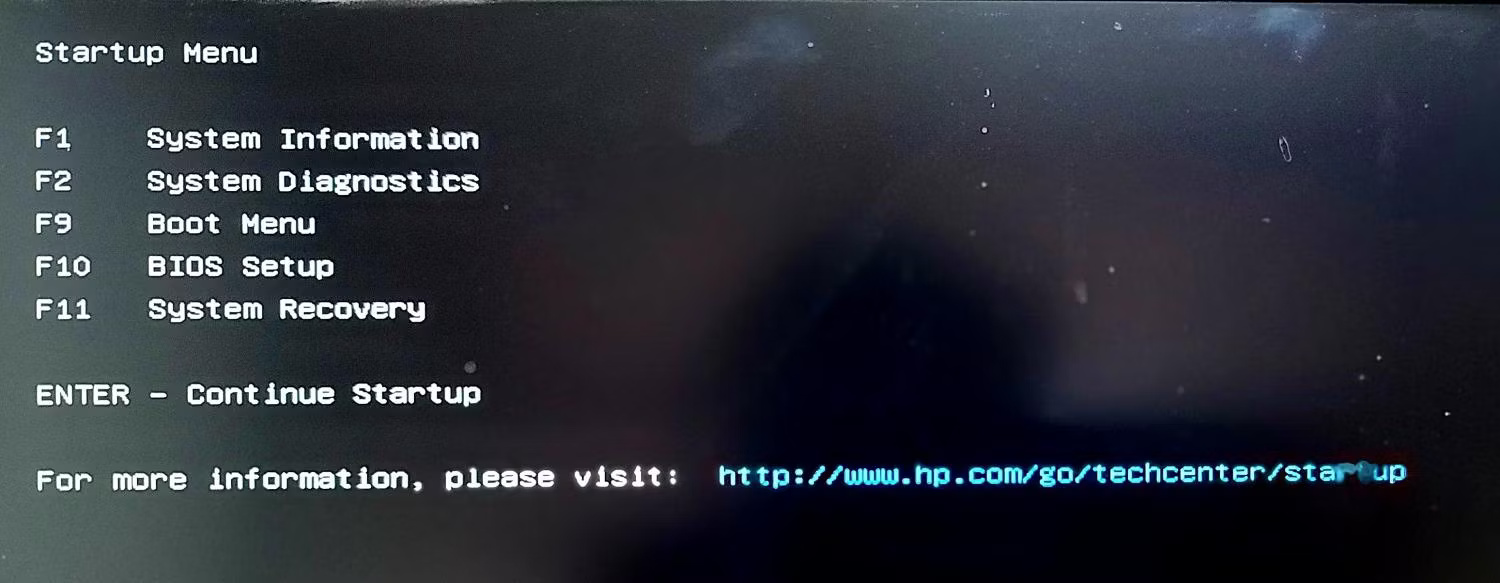
1. Tắt máy tính. Sau đó nhấn nút nguồn để bật và nhấn phím Esc liên tục để xem Startup menu. Trong menu khởi động, nhấn phím tương ứng để vào tiện ích BIOS hoặc UEFI. Trong trường hợp này, đó là F10 cho máy tính xách tay HP.
2. Khi ở trong tiện ích BIOS, hãy đi tới Boot Options. Một lần nữa, có thể có một số khác biệt tùy thuộc vào nhà sản xuất (bất kỳ điều gì liên quan đến 'Boot').
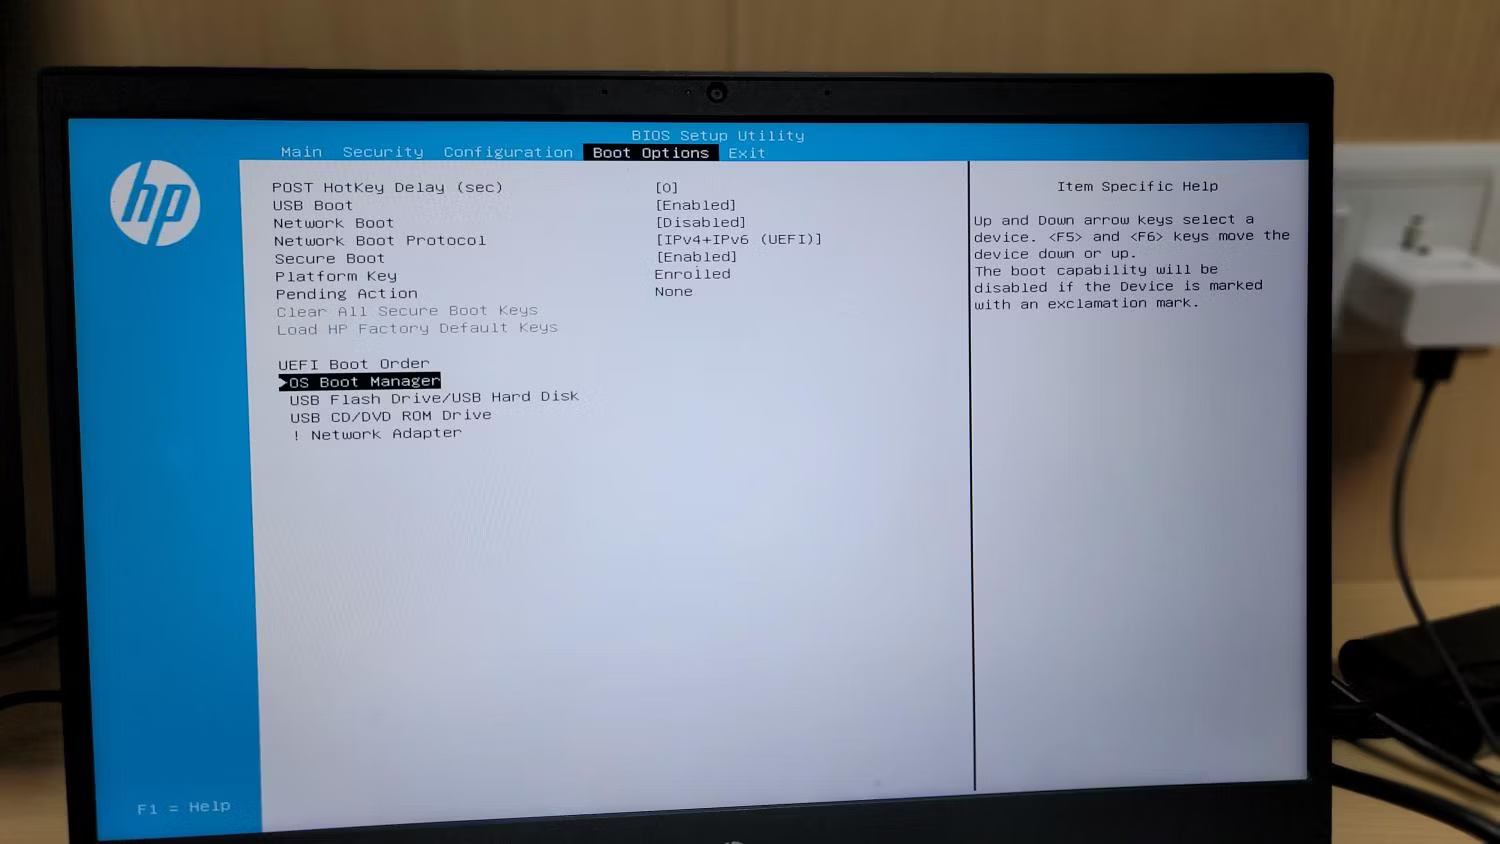
3. Sử dụng các phím mũi tên để highlight OS Boot Manager, sau đó nhấn Enter để chọn nó. Trong hộp thoại OS Boot Manager, chọn ổ mới được clone và nhấn F10 để lưu nó làm ổ boot.
4. Cuối cùng, điều hướng đến tab Exit và chọn Save Changes and Exit. Nếu thành công, máy tính sẽ khởi động lại và khởi động từ ổ mới.
Clone ổ là cách dễ nhất để di chuyển Windows 10 hoặc 11 sang ổ khác. Trong một số ít trường hợp, bạn có thể gặp phải sự cố kích hoạt Windows nhưng sự cố này sẽ tự giải quyết trong vòng 24 giờ. Tuy nhiên, hãy nhớ rằng việc cài đặt ổ được clone trên một máy tính khác và khởi động từ nó sẽ không kích hoạt Windows vì giấy phép kỹ thuật số được gắn với bo mạch chủ hệ thống.
Nếu định cài đặt ổ được clone trên một máy tính khác hoặc phần cứng mới, trước tiên hãy đảm bảo liên kết product key Windows với tài khoản Microsoft của bạn. Sau đó, bạn có thể đăng nhập vào Windows bằng tài khoản Microsoft của mình và nó sẽ tự động kích hoạt giấy phép.
