<!DOCTYPE html>
    <html lang="vi" xmlns="http://www.w3.org/1999/xhtml" prefix="og: http://ogp.me/ns#">
    <head>
<title>Cách chuyển đổi hình ảnh CR2 sang JPG trên Windows</title>
<meta name="description" content="Cách chuyển đổi hình ảnh CR2 sang JPG trên Windows - Savefile - Tin Tức -...">
<meta name="author" content=".: Nguoicodonvn2008.info - Cõi lòng người cô đơn :.">
<meta name="copyright" content=".: Nguoicodonvn2008.info - Cõi lòng người cô đơn :. [admin@nguoicodonvn2008.info]">
<meta name="robots" content="index, archive, follow, noodp">
<meta name="googlebot" content="index,archive,follow,noodp">
<meta name="msnbot" content="all,index,follow">
<meta name="generator" content="NukeViet v4.5">
<meta http-equiv="Content-Type" content="text/html; charset=utf-8">
<meta property="og:title" content="Cách chuyển đổi hình ảnh CR2 sang JPG trên Windows">
<meta property="og:type" content="website">
<meta property="og:description" content="Savefile - Tin Tức - https&#x3A;&#x002F;&#x002F;www.nguoicodonvn2008.info&#x002F;vi&#x002F;news&#x002F;savefile&#x002F;kien-thuc-may-tinh&#x002F;cach-chuyen-doi-hinh-anh-cr2-sang-jpg-tren-windows-7207.html">
<meta property="og:site_name" content=".&#x3A; Nguoicodonvn2008.info - Cõi lòng người cô đơn &#x3A;.">
<meta property="og:url" content="https://www.nguoicodonvn2008.info/vi/news/savefile/kien-thuc-may-tinh/cach-chuyen-doi-hinh-anh-cr2-sang-jpg-tren-windows-7207.html">
<link rel="shortcut icon" href="https://nguoicodonvn2008.info/favicon.ico">
<link rel="canonical" href="https://www.nguoicodonvn2008.info/vi/news/savefile/kien-thuc-may-tinh/cach-chuyen-doi-hinh-anh-cr2-sang-jpg-tren-windows-7207.html">
<link rel="alternate" href="https://nguoicodonvn2008.info/vi/news/rss/" title="Tin Tức" type="application/rss+xml">
<link rel="alternate" href="https://nguoicodonvn2008.info/vi/news/rss/karaoke-dual/" title="Tin Tức - Karaoke Dual" type="application/rss+xml">
<link rel="alternate" href="https://nguoicodonvn2008.info/vi/news/rss/nhac-tre/" title="Tin Tức - Nhạc trẻ" type="application/rss+xml">
<link rel="alternate" href="https://nguoicodonvn2008.info/vi/news/rss/tru-tinh/" title="Tin Tức - Trữ tình" type="application/rss+xml">
<link rel="alternate" href="https://nguoicodonvn2008.info/vi/news/rss/nuoc-ngoai/" title="Tin Tức - Nước ngoài" type="application/rss+xml">
<link rel="alternate" href="https://nguoicodonvn2008.info/vi/news/rss/remix/" title="Tin Tức - Remix" type="application/rss+xml">
<link rel="alternate" href="https://nguoicodonvn2008.info/vi/news/rss/tam-su-tinh-yeu/" title="Tin Tức - Tâm sự tình yêu" type="application/rss+xml">
<link rel="alternate" href="https://nguoicodonvn2008.info/vi/news/rss/tho-suu-tam/" title="Tin Tức - Thơ sưu tầm" type="application/rss+xml">
<link rel="alternate" href="https://nguoicodonvn2008.info/vi/news/rss/cuoc-song/" title="Tin Tức - Cuộc sống" type="application/rss+xml">
<link rel="alternate" href="https://nguoicodonvn2008.info/vi/news/rss/phan-mem/" title="Tin Tức - Phần mềm" type="application/rss+xml">
<link rel="alternate" href="https://nguoicodonvn2008.info/vi/news/rss/kien-thuc-may-tinh/" title="Tin Tức - Kiến thức máy tính" type="application/rss+xml">
<link rel="alternate" href="https://nguoicodonvn2008.info/vi/news/rss/hoc-tap/" title="Tin Tức - Học tập" type="application/rss+xml">
<link rel="alternate" href="https://nguoicodonvn2008.info/vi/news/rss/tai-lieu/" title="Tin Tức - Tài liệu" type="application/rss+xml">
<link rel="alternate" href="https://nguoicodonvn2008.info/vi/news/rss/de-thi/" title="Tin Tức - Đề thi" type="application/rss+xml">
<link rel="preload" as="style" href="https://nguoicodonvn2008.info/assets/css/font-awesome.min.css" type="text/css">
<link rel="preload" as="style" href="https://nguoicodonvn2008.info/themes/default/css/bootstrap.non-responsive.css" type="text/css">
<link rel="preload" as="style" href="https://nguoicodonvn2008.info/themes/default/css/style.css" type="text/css">
<link rel="preload" as="style" href="https://nguoicodonvn2008.info/themes/default/css/style.non-responsive.css" type="text/css">
<link rel="preload" as="style" href="https://nguoicodonvn2008.info/themes/default/css/news.css" type="text/css">
<link rel="preload" as="style" href="https://nguoicodonvn2008.info/themes/default/css/custom.css" type="text/css">
<link rel="preload" as="script" href="https://nguoicodonvn2008.info/assets/js/jquery/jquery.min.js" type="text/javascript">
<link rel="preload" as="script" href="https://nguoicodonvn2008.info/assets/js/language/vi.js" type="text/javascript">
<link rel="preload" as="script" href="https://nguoicodonvn2008.info/assets/js/DOMPurify/purify3.js" type="text/javascript">
<link rel="preload" as="script" href="https://nguoicodonvn2008.info/assets/js/global.js" type="text/javascript">
<link rel="preload" as="script" href="https://nguoicodonvn2008.info/assets/js/site.js" type="text/javascript">
<link rel="preload" as="script" href="https://nguoicodonvn2008.info/themes/default/js/news.js" type="text/javascript">
<link rel="preload" as="script" href="https://nguoicodonvn2008.info/themes/default/js/main.js" type="text/javascript">
<link rel="preload" as="script" href="https://nguoicodonvn2008.info/themes/default/js/custom.js" type="text/javascript">
<link rel="preload" as="script" href="https://nguoicodonvn2008.info/themes/default/js/bootstrap.min.js" type="text/javascript">
<link rel="stylesheet" href="https://nguoicodonvn2008.info/assets/css/font-awesome.min.css">
<link rel="stylesheet" href="https://nguoicodonvn2008.info/themes/default/css/bootstrap.non-responsive.css">
<link rel="stylesheet" href="https://nguoicodonvn2008.info/themes/default/css/style.css">
<link rel="stylesheet" href="https://nguoicodonvn2008.info/themes/default/css/style.non-responsive.css">
<link rel="StyleSheet" href="https://nguoicodonvn2008.info/themes/default/css/news.css">
<link rel="stylesheet" href="https://nguoicodonvn2008.info/themes/default/css/custom.css">
<style type="text/css">
	body{background: #fff;}
</style>
    </head>
    <body>
<div id="print">
	<div id="hd_print">
		<h2 class="pull-left">.&#x3A; Nguoicodonvn2008.info - Cõi lòng người cô đơn &#x3A;.</h2>
		<p class="pull-right"><a title=".&#x3A; Nguoicodonvn2008.info - Cõi lòng người cô đơn &#x3A;." href="https://nguoicodonvn2008.info/">https://nguoicodonvn2008.info</a></p>
	</div>
	<div class="clear"></div>
	<hr />
	<div id="content">
		<h1>Cách chuyển đổi hình ảnh CR2 sang JPG trên Windows</h1>
		<ul class="list-inline">
			<li>Thứ hai - 26/06/2023 09:38</li>
			<li class="hidden-print txtrequired"><em class="fa fa-print">&nbsp;</em><a title="In ra" href="javascript:;" onclick="window.print()">In ra</a></li>
			<li class="hidden-print txtrequired"><em class="fa fa-power-off">&nbsp;</em><a title="Đóng cửa sổ này" href="javascript:;" onclick="window.close()">Đóng cửa sổ này</a></li>
		</ul>
		<div class="clear"></div>
		<div id="hometext">
		</div>
				<div class="imghome">
			<img alt="Cách chuyển đổi hình ảnh CR2 sang JPG trên Windows" src="https://st.quantrimang.com/photos/image/2023/06/26/chuyen-doi-cr2-sang-jpg-15.jpg" width="460" class="img-thumbnail" />
		</div>
		<div class="clear"></div>
		<div id="bodytext" class="clearfix">
			<p style="text-align: justify;"><a data-type="internal" href="https://quantrimang.com/cong-nghe/file-cr2-la-gi-176744" title="File CR2 là gì?">CR2</a>&nbsp;là định dạng ảnh RAW (chưa xử lý) dành cho máy ảnh Canon. Đây là định dạng RAW không được phần mềm Windows hỗ trợ rộng rãi. Do đó, người dùng không thể mở và xem ảnh Canon CR2 bằng nhiều gói phần mềm Windows.</p>

<p style="text-align: justify;">Thay vì cố gắng tìm phần mềm để mở hình ảnh CR2, bạn có thể chuyển đổi chúng sang&nbsp;định dạng file JPG. JPG là định dạng file phổ biến mà bạn có thể mở bằng nhiều trình xem và chỉnh sửa hình ảnh. Đây là cách bạn có thể chuyển đổi hình ảnh CR2 sang định dạng JPG trên Windows 11/10.</p>

<h2 style="text-align: justify;">Cách chuyển đổi hình ảnh CR2 sang JPG bằng Free CR2 Converter</h2>

<p style="text-align: justify;">Free CR2 Converter là phần mềm miễn phí dành cho Windows 11, 10, 8 và 7 mà bạn có thể chuyển đổi hàng loạt file CR2 sang JPG. Phần mềm đó cũng cho phép bạn chuyển đổi các file CR2 sang&nbsp;định dạng PNG&nbsp;và&nbsp;BMP. Bạn có thể chuyển đổi hình ảnh CR2 sang file JPG bằng Free CR2 Converter như sau:</p>

<p style="text-align: justify;">1. Mở trang tải xuống&nbsp;Free CR2 Converter&nbsp;trên Softpedia:&nbsp;<br />
<span style="color:rgb(192, 57, 43);"><strong>https://www.softpedia.com/get/Multimedia/Graphic/Image-Convertors/Free-CR2-Converter.shtml</strong></span></p>

<p style="text-align: justify;">2. Nhấp vào&nbsp;<strong>Download</strong>&nbsp;&gt;&nbsp;<strong>Softpedia Secure Download (US)</strong>&nbsp;để lấy file thiết lập Free CR2 Converter.</p>

<p style="text-align: justify;">3. Nhấn các phím logo&nbsp;<strong>Windows + X</strong>&nbsp;để chọn&nbsp;<strong>File Explorer</strong>&nbsp;và điều hướng đến thư mục chứa trình hướng dẫn thiết lập Free CR2 Converter.</p>

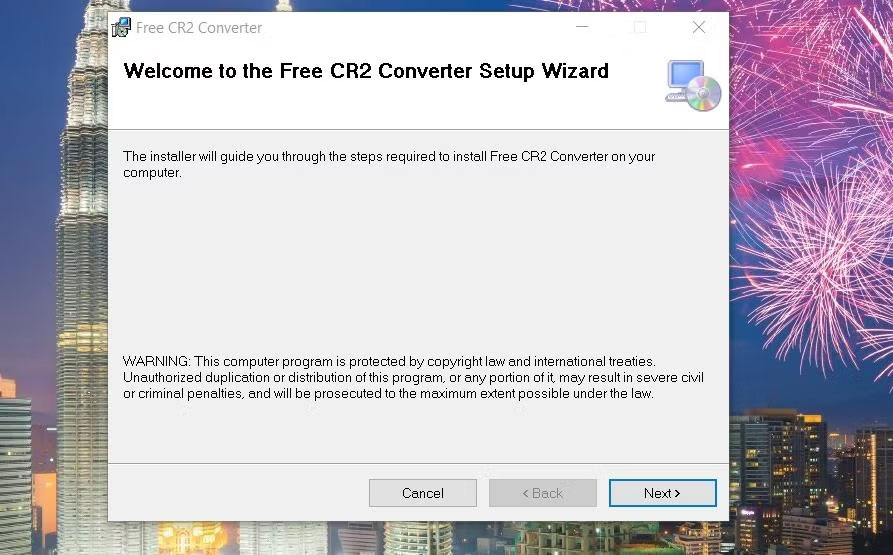
<p style="text-align: justify;">4. Nhấp đúp vào&nbsp;<strong>cr2converter_setup.exe</strong>&nbsp;để hiển thị cửa sổ thiết lập Free CR2 Converter.</p>

<figure>
<div style="text-align: justify;"><img alt="Cửa sổ Free CR2 Converter" data-i="0" data-src="https://st.quantrimang.com/photos/image/2023/06/26/chuyen-doi-cr2-sang-jpg-1.jpg" data-was-processed="true" height="555" src="https://st.quantrimang.com/photos/image/2023/06/26/chuyen-doi-cr2-sang-jpg-1.jpg" width="893" /></div>

<figcaption>
<div style="text-align: justify;">Cửa sổ Free CR2 Converter</div>
</figcaption>
</figure>

<p style="text-align: justify;">5. Nhấn&nbsp;<strong>Next</strong>&nbsp;3 lần để cài đặt phần mềm với đường dẫn Program Files mặc định của nó.</p>

<p style="text-align: justify;">6. Chọn&nbsp;<strong>Close</strong>&nbsp;để thoát khỏi trình hướng dẫn thiết lập.</p>

<p style="text-align: justify;">7. Nhấp đúp vào desktop shortcut của Free CR2 Converter.</p>

<p style="text-align: justify;">8. Nhấn nút&nbsp;<strong>Add</strong>&nbsp;trong Free CR2 Converter.</p>

<p style="text-align: justify;">9. Chọn file CR2 bạn muốn chuyển đổi và nhấp vào&nbsp;<strong>Open</strong>.</p>

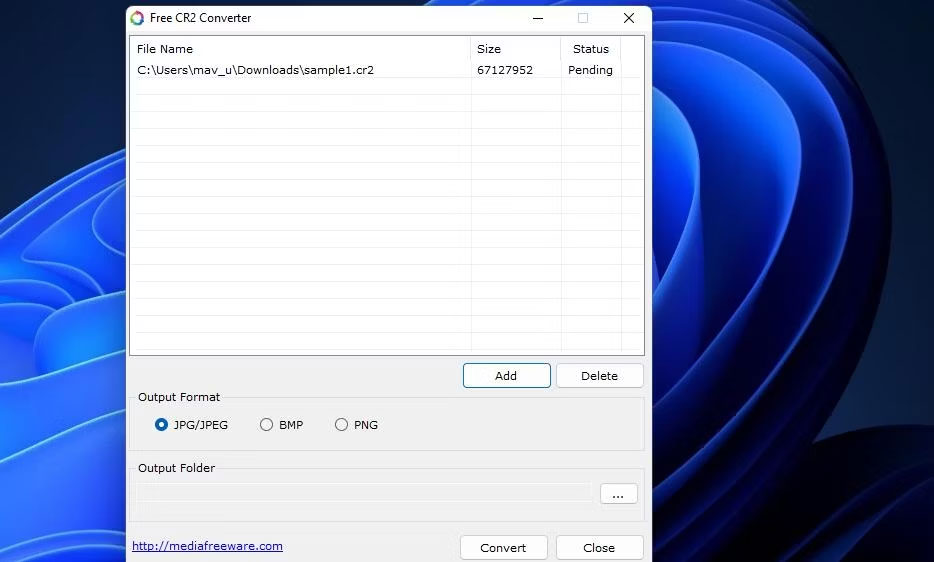
<p style="text-align: justify;">10. Tiếp theo, nhấp vào nút&nbsp;<strong>JPG</strong>&nbsp;nếu nó chưa được chọn.</p>

<figure>
<div style="text-align: justify;"><img alt="Nhấp vào nút JPG" data-i="1" data-src="https://st.quantrimang.com/photos/image/2023/06/26/chuyen-doi-cr2-sang-jpg-2.jpg" data-was-processed="true" height="562" src="https://st.quantrimang.com/photos/image/2023/06/26/chuyen-doi-cr2-sang-jpg-2.jpg" width="934" /></div>

<figcaption>
<div style="text-align: justify;">Nhấp vào nút JPG</div>
</figcaption>
</figure>

<p style="text-align: justify;">11. Nhấp vào nút&nbsp;<strong>…</strong>&nbsp;để chọn thư mục đầu ra.</p>

<p style="text-align: justify;">12. Nhấn nút&nbsp;<strong>Convert</strong>.</p>

<p style="text-align: justify;">13. Chọn&nbsp;<strong>OK</strong>&nbsp;trên hộp thoại chuyển đổi xuất hiện.</p>

<p style="text-align: justify;">Bây giờ, hãy mở thư mục đầu ra mà bạn đã chọn. Ở đó, bạn sẽ tìm thấy file JPG đã chuyển đổi cho ảnh RAW mà bạn đã chọn. Nhấp đúp vào file JPG đó để mở file trong trình xem ảnh mặc định của bạn.</p>

<h2 style="text-align: justify;">Cách chuyển đổi file CR2 sang JPG bằng ứng dụng Image Converter</h2>

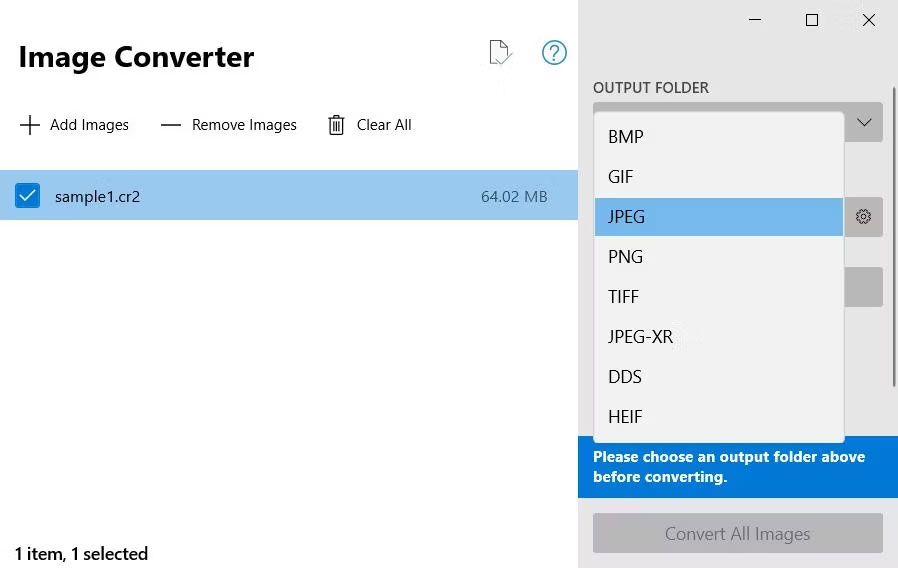
<p style="text-align: justify;">Image Converter là một ứng dụng Microsoft Store hỗ trợ nhiều định dạng RAW, chẳng hạn như CR2, ARW, RAF và RW2. Vì vậy, bạn có thể chuyển đổi các định dạng RAW khác nhau sang file JPEG (JPG), TIFF, BMP, GIF và PNG bằng Image Converter. Đây là cách bạn có thể chuyển đổi ảnh CR2 của mình sang JPG bằng Image Converter:</p>

<p style="text-align: justify;">1. Mở trang Microsoft Store của&nbsp;Image Converter<br />
<span style="color:rgb(192, 57, 43);"><strong>https://apps.microsoft.com/store/detail/image-converter/9PGN31QTZQ26?hl=en-us&amp;gl=us</strong></span></p>

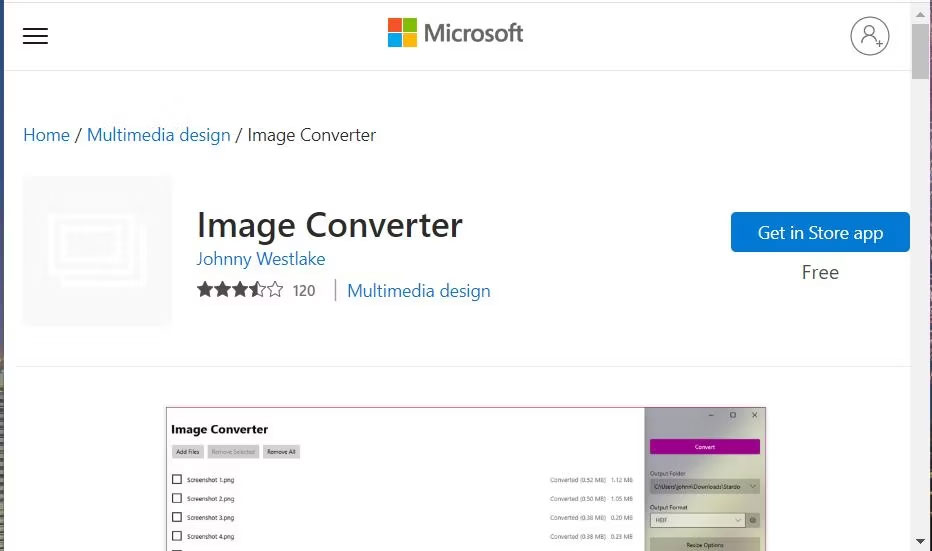
<p style="text-align: justify;">2. Nhấp vào&nbsp;<strong>Get in Store</strong>&nbsp;để hiển thị lời nhắc mở ứng dụng Microsoft Store.</p>

<figure>
<div style="text-align: justify;"><img alt="Nút ứng dụng Get in Store" data-i="2" data-src="https://st.quantrimang.com/photos/image/2023/06/26/chuyen-doi-cr2-sang-jpg-3.jpg" data-was-processed="true" height="551" src="https://st.quantrimang.com/photos/image/2023/06/26/chuyen-doi-cr2-sang-jpg-3.jpg" width="932" /></div>

<figcaption>
<div style="text-align: justify;">Nút ứng dụng Get in Store</div>
</figcaption>
</figure>

<p style="text-align: justify;">3. Chọn&nbsp;<strong>Open Microsoft Store</strong>&nbsp;để truy cập tùy chọn&nbsp;<strong>Download</strong>&nbsp;cho Image Converter.</p>

<p style="text-align: justify;">4. Nhấp vào tùy chọn&nbsp;<strong>Install</strong>&nbsp;của Image Converter.</p>

<p style="text-align: justify;">5. Chọn&nbsp;<strong>Open</strong>&nbsp;để hiển thị Image Converter</p>

<p style="text-align: justify;">6. Nhấn nút&nbsp;<strong>Add</strong>&nbsp;<strong>Images</strong>.</p>

<p style="text-align: justify;">7. Chọn một hình ảnh CR2 để chuyển đổi và nhấp vào&nbsp;<strong>Select</strong>.</p>

<p style="text-align: justify;">8. Chọn&nbsp;<strong>JPEG</strong>&nbsp;trên menu drop-down&nbsp;<strong>Output format</strong>.</p>

<figure>
<div style="text-align: justify;"><img alt="Các tùy chọn chuyển đổi định dạng file trong Image Converter" data-i="3" data-src="https://st.quantrimang.com/photos/image/2023/06/26/chuyen-doi-cr2-sang-jpg-4.jpg" data-was-processed="true" height="568" src="https://st.quantrimang.com/photos/image/2023/06/26/chuyen-doi-cr2-sang-jpg-4.jpg" width="898" /></div>

<figcaption>
<div style="text-align: justify;">Các tùy chọn chuyển đổi định dạng file trong Image Converter</div>
</figcaption>
</figure>

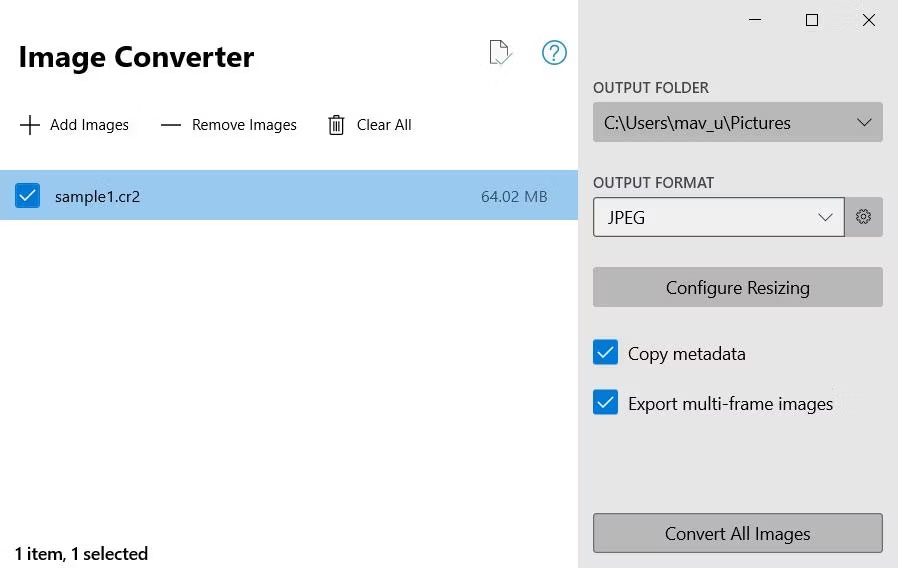
<p style="text-align: justify;">9. Nhấn nút&nbsp;<strong>Click to Choose</strong>&nbsp;và chọn thư mục để lưu file JPG. Sau đó nhấp vào tùy chọn&nbsp;<strong>Select Folder</strong>.</p>

<p style="text-align: justify;">10. Nhấp vào hộp kiểm cho file bạn đã chọn để chuyển đổi.</p>

<p style="text-align: justify;">11. Nhấn nút&nbsp;<strong>Convert All</strong>&nbsp;<strong>Images</strong>.</p>

<figure>
<div style="text-align: justify;"><img alt="Ứng dụng chuyển đổi hình ảnh" data-i="4" data-src="https://st.quantrimang.com/photos/image/2023/06/26/chuyen-doi-cr2-sang-jpg-5.jpg" data-was-processed="true" height="568" src="https://st.quantrimang.com/photos/image/2023/06/26/chuyen-doi-cr2-sang-jpg-5.jpg" width="898" /></div>

<figcaption>
<div style="text-align: justify;">Ứng dụng chuyển đổi hình ảnh</div>
</figcaption>
</figure>

<p style="text-align: justify;">12. Đợi công cụ chuyển đổi kết thúc.</p>

<p style="text-align: justify;">13. Sau đó mở hình ảnh JPG đã chuyển đổi từ thư mục bạn đã chọn để lưu nó vào.</p>

<h2 style="text-align: justify;">Cách chuyển đổi hình ảnh CR2 sang JPG bằng ứng dụng web FreeConvert</h2>

<p style="text-align: justify;">Nếu không muốn cài đặt phần mềm, bạn luôn có thể sử dụng một trong nhiều ứng dụng web chuyển đổi hình ảnh CR2 sang JPG. FreeConvert là một trong những ứng dụng web mà bạn có thể chuyển đổi các file CR2 sang JPG và 8 định dạng khác. Ứng dụng đó cũng bao gồm cài đặt nén cho các file đã chuyển đổi. Đây là các bước để chuyển đổi hình ảnh CR2 sang JPG bằng FreeConvert:</p>

<p style="text-align: justify;">1. Mở ứng dụng web&nbsp;FreeConvert CR2 to JPG&quot;<br />
<strong><span style="color:rgb(192, 57, 43);">https://www.freeconvert.com/cr2-to-jpg</span></strong></p>

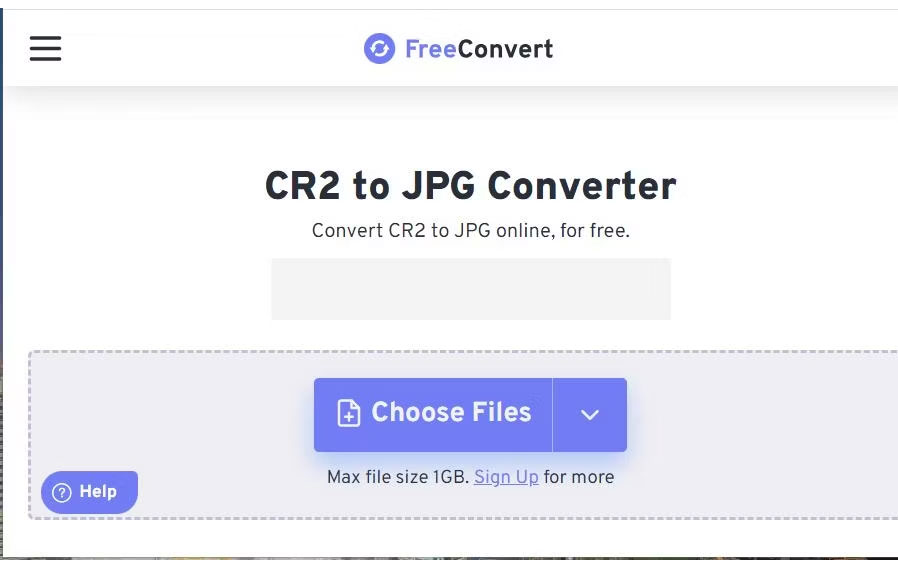
<p style="text-align: justify;">2. Nhấp vào nút&nbsp;<strong>Choose Files</strong>.</p>

<figure>
<div style="text-align: justify;"><img alt="Nút Choose Files" data-i="5" data-src="https://st.quantrimang.com/photos/image/2023/06/26/chuyen-doi-cr2-sang-jpg-6.jpg" data-was-processed="true" height="568" src="https://st.quantrimang.com/photos/image/2023/06/26/chuyen-doi-cr2-sang-jpg-6.jpg" width="898" /></div>

<figcaption>
<div style="text-align: justify;">Nút Choose Files</div>
</figcaption>
</figure>

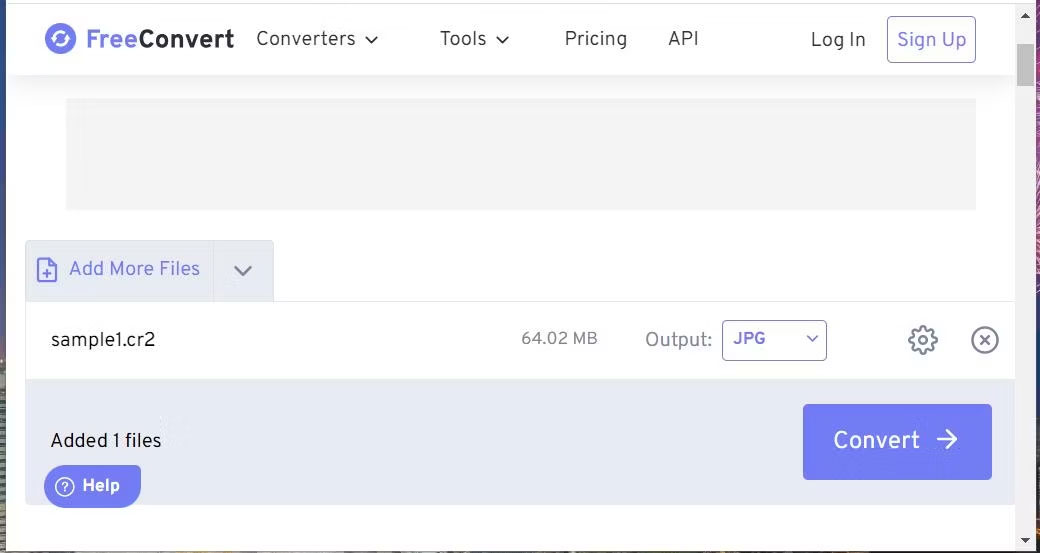
<p style="text-align: justify;">3. Chọn file CR2 và nhấp vào&nbsp;<strong>Open</strong>.</p>

<p style="text-align: justify;">4. Sau đó chọn tùy chọn JPG trên menu drop-down&nbsp;<strong>Output</strong>.</p>

<p style="text-align: justify;">5. Nhấp vào nút&nbsp;<strong>Convert</strong>.</p>

<figure>
<div style="text-align: justify;"><img alt="Tùy chọn Convert trong FreeConvert" data-i="6" data-src="https://st.quantrimang.com/photos/image/2023/06/26/chuyen-doi-cr2-sang-jpg-7.jpg" data-was-processed="true" height="553" src="https://st.quantrimang.com/photos/image/2023/06/26/chuyen-doi-cr2-sang-jpg-7.jpg" width="1040" /></div>

<figcaption>
<div style="text-align: justify;">Tùy chọn Convert trong FreeConvert</div>
</figcaption>
</figure>

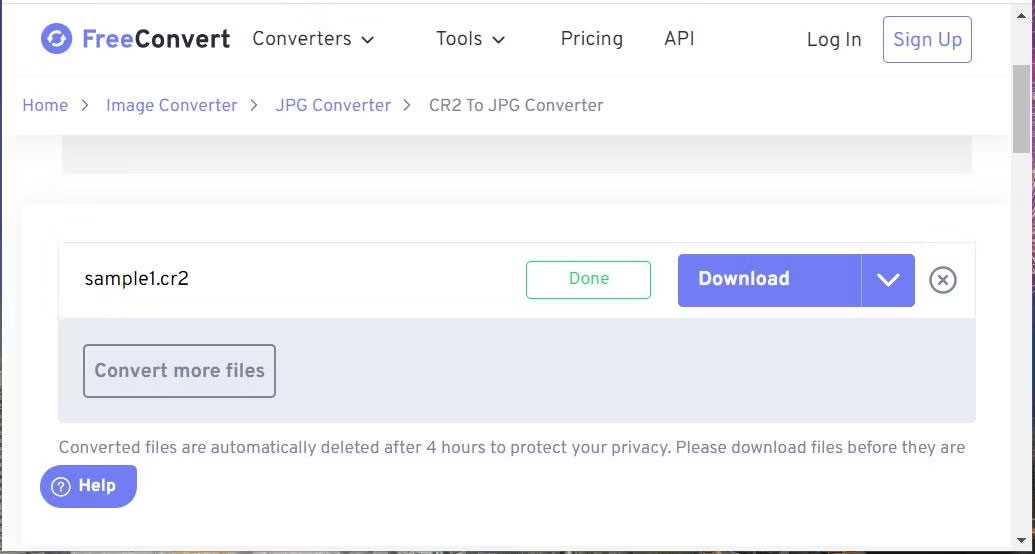
<p style="text-align: justify;">6. Nhấn tùy chọn&nbsp;<strong>Download</strong>&nbsp;của ứng dụng web.</p>

<figure>
<div style="text-align: justify;"><img alt="Tùy chọn Download" data-i="7" data-src="https://st.quantrimang.com/photos/image/2023/06/26/chuyen-doi-cr2-sang-jpg-8.jpg" data-was-processed="true" height="554" src="https://st.quantrimang.com/photos/image/2023/06/26/chuyen-doi-cr2-sang-jpg-8.jpg" width="1035" /></div>

<figcaption>
<div style="text-align: justify;">Tùy chọn Download</div>
</figcaption>
</figure>

<p style="text-align: justify;">7. Sau đó, mở thư mục mà trình duyệt của bạn thường tải file xuống để tìm hình ảnh JPG đã chuyển đổi đó.</p>

<h2 style="text-align: justify;">Cách chuyển đổi hình ảnh CR2 sang JPG bằng IrfanView</h2>

<p style="text-align: justify;">IrfanView là một trong&nbsp;những trình xem ảnh tốt nhất dành cho Windows&nbsp;bao gồm công cụ chuyển đổi file mà bạn có thể chuyển đổi định dạng hình ảnh. Phần mềm đó không hỗ trợ định dạng CR2 theo mặc định. Tuy nhiên, việc cài đặt plugin bổ sung có thể mở rộng hỗ trợ file của IrfanView để bao gồm CR2. Đây là cách bạn có thể tải xuống và cài đặt IrfanView và plugin cần thiết của nó để hỗ trợ CR2:</p>

<p style="text-align: justify;">1. Mở trang tải xuống&nbsp;IrfanView&nbsp;trên Fosshub:<br />
<span style="color:rgb(192, 57, 43);"><strong>https://www.fosshub.com/IrfanView.html</strong></span></p>

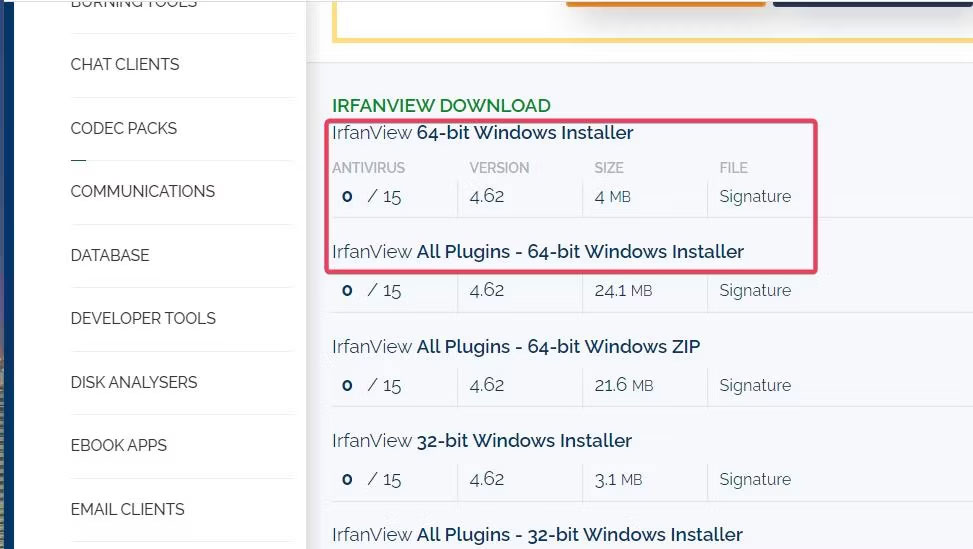
<p style="text-align: justify;">2. Nhấp vào liên kết tải xuống&nbsp;<strong>IrfanView 64-bit Windows Installer</strong>.</p>

<p style="text-align: justify;">3. Sau đó nhấp vào liên kết tải xuống&nbsp;<strong>IrfanView All Plugins – 64-bit Windows Installer</strong>.</p>

<figure>
<div style="text-align: justify;"><img alt="Các tùy chọn tải xuống IrfanView" data-i="8" data-src="https://st.quantrimang.com/photos/image/2023/06/26/chuyen-doi-cr2-sang-jpg-9.jpg" data-was-processed="true" height="549" src="https://st.quantrimang.com/photos/image/2023/06/26/chuyen-doi-cr2-sang-jpg-9.jpg" width="973" /></div>

<figcaption>
<div style="text-align: justify;">Các tùy chọn tải xuống IrfanView</div>
</figcaption>
</figure>

<p style="text-align: justify;">4. Tiếp theo, nhấp vào biểu tượng thư mục thư viện trên thanh tác vụ để hiển thị trình quản lý file Windows Explorer.</p>

<p style="text-align: justify;">5. Chuyển đến thư mục mà các file IrfanView đã được tải xuống.</p>

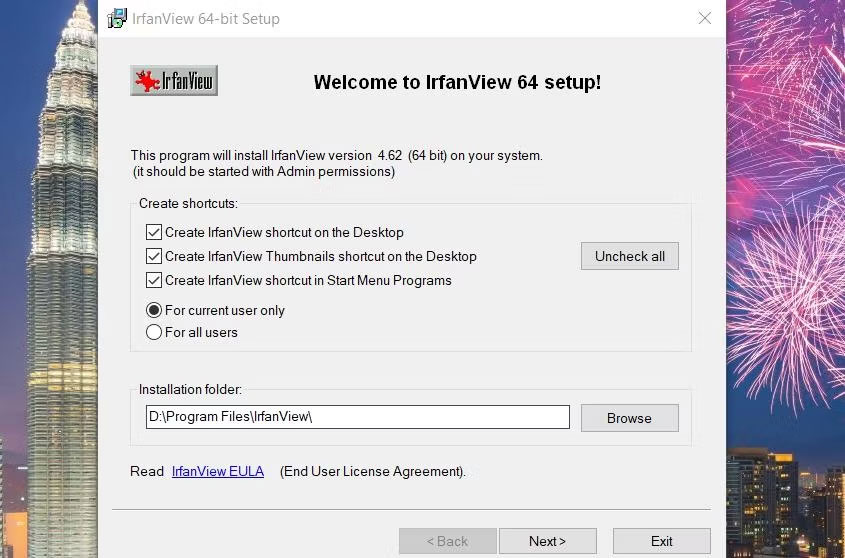
<p style="text-align: justify;">6. Nhấp đúp vào file&nbsp;<strong>iview462_x64_setup.exe</strong>&nbsp;để mở cửa sổ thiết lập IrfanView.</p>

<figure>
<div style="text-align: justify;"><img alt="Cửa sổ thiết lập IrfanView 64-bit" data-i="9" data-src="https://st.quantrimang.com/photos/image/2023/06/26/chuyen-doi-cr2-sang-jpg-10.jpg" data-was-processed="true" height="558" src="https://st.quantrimang.com/photos/image/2023/06/26/chuyen-doi-cr2-sang-jpg-10.jpg" width="845" /></div>

<figcaption>
<div style="text-align: justify;">Cửa sổ thiết lập IrfanView 64-bit</div>
</figcaption>
</figure>

<p style="text-align: justify;">7. Tiếp tục nhấp vào&nbsp;<strong>Next</strong>&nbsp;để cài đặt IrfanView với cài đặt mặc định.</p>

<p style="text-align: justify;">8. Chọn&nbsp;<strong>Done</strong>&nbsp;để thoát khỏi IrfanView.</p>

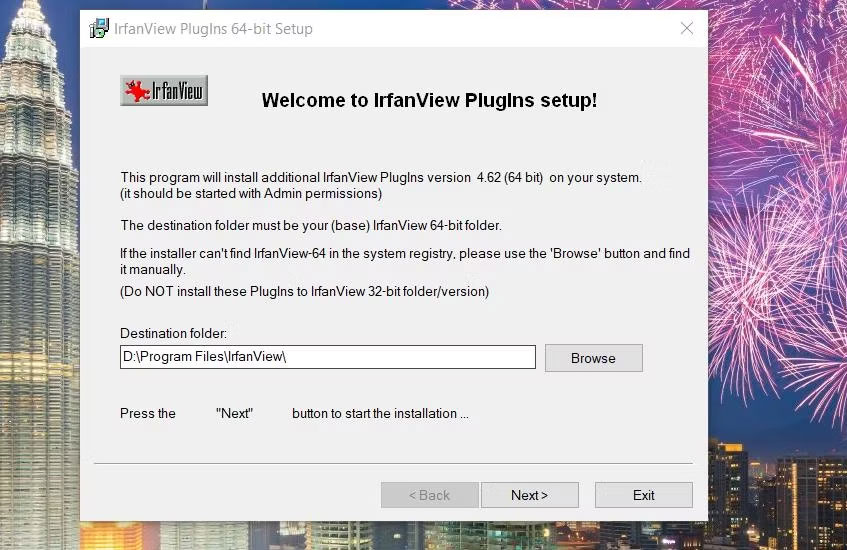
<p style="text-align: justify;">9. Để cài đặt plugin, nhấp đúp vào file&nbsp;<strong>iview462_plugins_x64_setup.exe.</strong></p>

<p style="text-align: justify;">10. Sau đó nhấn&nbsp;<strong>Next</strong>&nbsp;để cài đặt plugin.</p>

<figure>
<div style="text-align: justify;"><img alt="Cửa sổ thiết lập Plugin" data-i="10" data-src="https://st.quantrimang.com/photos/image/2023/06/26/chuyen-doi-cr2-sang-jpg-11.jpg" data-was-processed="true" height="550" src="https://st.quantrimang.com/photos/image/2023/06/26/chuyen-doi-cr2-sang-jpg-11.jpg" width="847" /></div>

<figcaption>
<div style="text-align: justify;">Cửa sổ thiết lập Plugin</div>
</figcaption>
</figure>

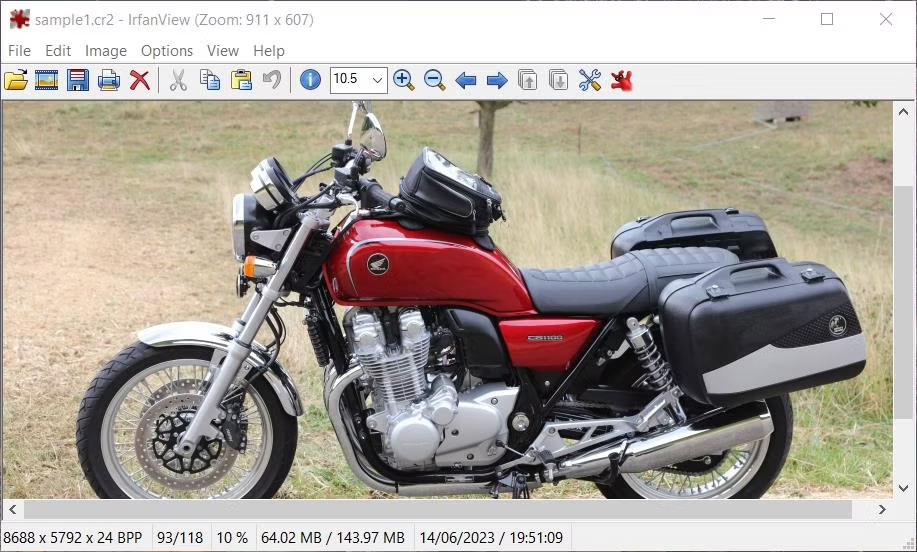
<p style="text-align: justify;">Bây giờ, hãy tiếp tục và mở phần mềm IrfanView. Sau khi cài đặt plugin của nó, giờ đây bạn có thể mở hình ảnh CR2 trong phần mềm mà không cần chuyển đổi chúng. Nhấp vào&nbsp;<strong>File</strong>&nbsp;&gt;&nbsp;<strong>Open</strong>&nbsp;để chọn file CR2. Sau đó nhấp vào&nbsp;<strong>Open</strong>&nbsp;một lần nữa để xem nó trong trình xem ảnh.</p>

<figure>
<div style="text-align: justify;"><img alt="Hình ảnh CR2 mở trong IrfanView" data-i="11" data-src="https://st.quantrimang.com/photos/image/2023/06/26/chuyen-doi-cr2-sang-jpg-12.jpg" data-was-processed="true" height="552" src="https://st.quantrimang.com/photos/image/2023/06/26/chuyen-doi-cr2-sang-jpg-12.jpg" width="917" /></div>

<figcaption>
<div style="text-align: justify;">Hình ảnh CR2 mở trong IrfanView</div>
</figcaption>
</figure>

<p style="text-align: justify;">Vì bạn có thể mở hình ảnh CR2 trong IrfanView nên bạn không cần chuyển đổi chúng sang JPG. Tuy nhiên, làm như vậy vẫn tốt hơn vì ảnh JPG có kích thước file nhỏ hơn ảnh CR2. Vì vậy, bạn có thể tiết kiệm một số dung lượng ổ bằng cách chuyển đổi hình ảnh CR2 sang JPG và sau đó xóa file gốc. Đây là cách bạn có thể chuyển đổi ảnh CR2 sang JPG trong IrfanView:</p>

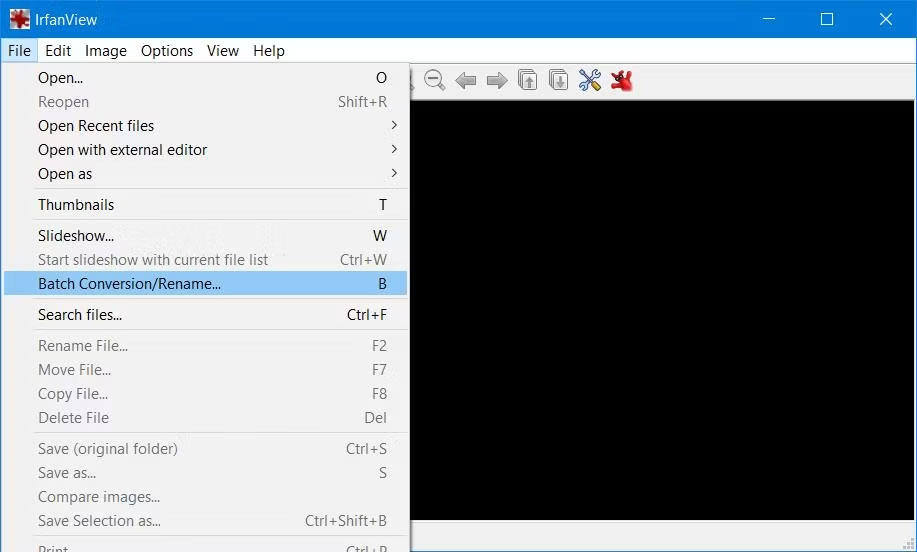
<p style="text-align: justify;">1. Nhấp vào menu&nbsp;<strong>File</strong>&nbsp;mới ở góc trên cùng bên trái hoặc IrfanView.</p>

<p style="text-align: justify;">2. Chọn tùy chọn&nbsp;<strong>Batch Conversion</strong>.</p>

<figure>
<div style="text-align: justify;"><img alt="Tùy chọn Batch Conversion" data-i="12" data-src="https://st.quantrimang.com/photos/image/2023/06/26/chuyen-doi-cr2-sang-jpg-13.jpg" data-was-processed="true" height="552" src="https://st.quantrimang.com/photos/image/2023/06/26/chuyen-doi-cr2-sang-jpg-13.jpg" width="917" /></div>

<figcaption>
<div style="text-align: justify;">Tùy chọn Batch Conversion</div>
</figcaption>
</figure>

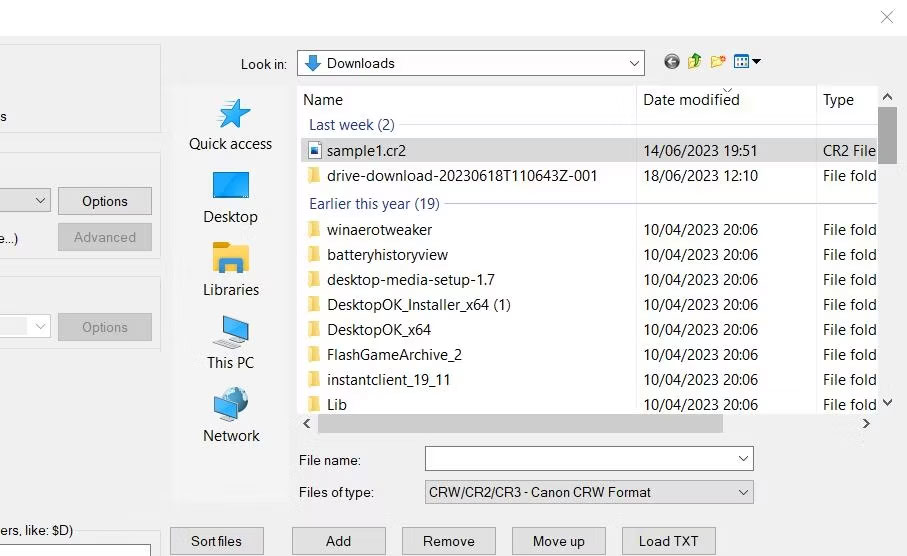
<p style="text-align: justify;">3. Nhấp vào menu drop-down&nbsp;<strong>Look in</strong>&nbsp;để chọn thư mục chứa hình ảnh CR2 của bạn.</p>

<figure>
<div style="text-align: justify;"><img alt="Tùy chọn Look in" data-i="13" data-src="https://st.quantrimang.com/photos/image/2023/06/26/chuyen-doi-cr2-sang-jpg-14.jpg" data-was-processed="true" height="556" src="https://st.quantrimang.com/photos/image/2023/06/26/chuyen-doi-cr2-sang-jpg-14.jpg" width="907" /></div>

<figcaption>
<div style="text-align: justify;">Tùy chọn Look in</div>
</figcaption>
</figure>

<p style="text-align: justify;">4. Tiếp theo, nhấp vào menu drop-down&nbsp;<strong>Files of type</strong>&nbsp;và chọn tùy chọn&nbsp;<strong>CRW/CR2/CR3.</strong></p>

<p style="text-align: justify;">5. Chọn file CR2 của bạn và nhấp vào&nbsp;<strong>Add</strong>.</p>

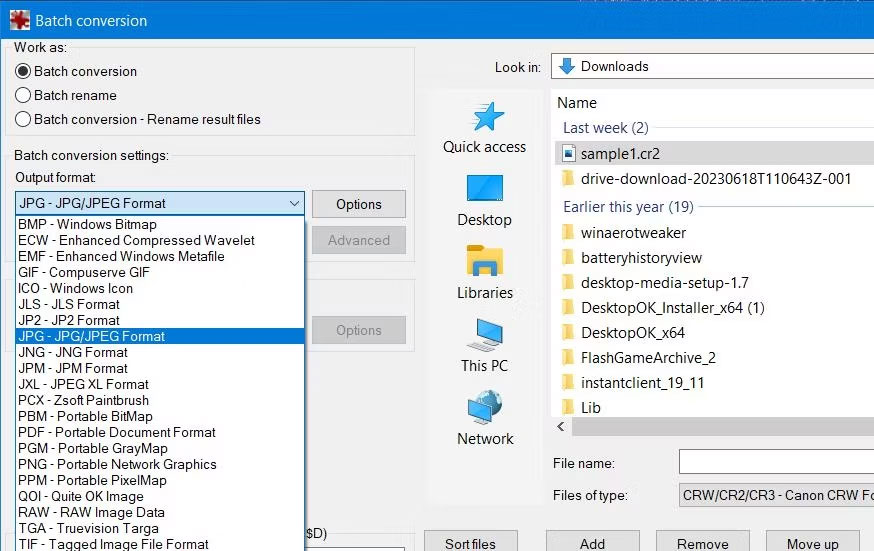
<p style="text-align: justify;">6. Nhấp vào menu drop-down&nbsp;<strong>Output format&nbsp;</strong>để chọn JPG.</p>

<figure>
<div style="text-align: justify;"><img alt="Tùy chọn định dạng đầu ra" data-i="14" data-src="https://st.quantrimang.com/photos/image/2023/06/26/chuyen-doi-cr2-sang-jpg-15.jpg" data-was-processed="true" height="551" src="https://st.quantrimang.com/photos/image/2023/06/26/chuyen-doi-cr2-sang-jpg-15.jpg" width="874" /></div>

<figcaption>
<div style="text-align: justify;">Tùy chọn định dạng đầu ra</div>
</figcaption>
</figure>

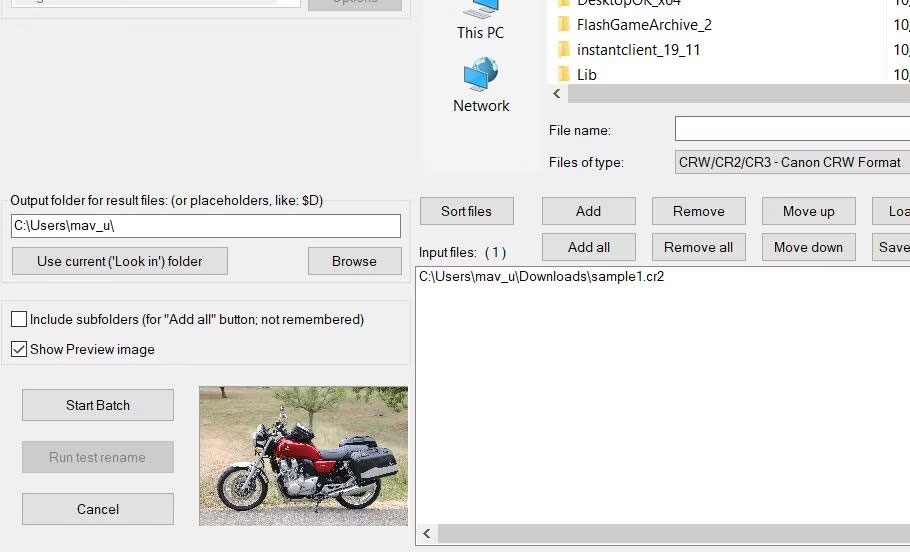
<p style="text-align: justify;">7. Để chọn một định dạng đầu ra, bấm vào tùy chọn&nbsp;<strong>Browse.</strong>&nbsp;Sau đó chọn một thư mục trong cửa sổ mở ra và nhấp vào&nbsp;<strong>OK.</strong></p>

<p style="text-align: justify;">8. Nhấn vào tùy chọn&nbsp;<strong>Start Batch</strong>.</p>

<figure>
<div style="text-align: justify;"><img alt="Nút Start Batch" data-i="15" data-src="https://st.quantrimang.com/photos/image/2023/06/26/chuyen-doi-cr2-sang-jpg-16.jpg" data-was-processed="true" height="552" src="https://st.quantrimang.com/photos/image/2023/06/26/chuyen-doi-cr2-sang-jpg-16.jpg" width="910" /></div>

<figcaption>
<div style="text-align: justify;">Nút Start Batch</div>
</figcaption>
</figure>

<p style="text-align: justify;">9. Nhấp vào&nbsp;<strong>Exit</strong>&nbsp;trong cửa sổ Batch Conversion done.</p>

<p style="text-align: justify;">Chuyển đến thư mục bạn đã chọn để bao gồm file JPG đã chuyển đổi. Ở đó, bạn sẽ thấy kích thước file của nó nhỏ hơn hình ảnh CR2 ban đầu. Bạn có thể xóa ảnh CR2 gốc bằng cách nhấp chuột phải vào file và chọn&nbsp;<strong>Delete</strong>.</p>
		</div>
				<div id="author">
						<p>
				<strong>Nguồn tin:</strong>
				Quantrimang.com
			</p>
		</div>
	</div>
	<div id="footer" class="clearfix">
		<div id="url">
			<strong>URL của bản tin này: </strong><a href="https://www.nguoicodonvn2008.info/vi/news/savefile/kien-thuc-may-tinh/cach-chuyen-doi-hinh-anh-cr2-sang-jpg-tren-windows-7207.html" title="Cách chuyển đổi hình ảnh CR2 sang JPG trên Windows">https://www.nguoicodonvn2008.info/vi/news/savefile/kien-thuc-may-tinh/cach-chuyen-doi-hinh-anh-cr2-sang-jpg-tren-windows-7207.html</a>

		</div>
		<div class="clear"></div>
		<div class="copyright">
			&copy; .&#x3A; Nguoicodonvn2008.info - Cõi lòng người cô đơn &#x3A;.
		</div>
		<div id="contact">
			<a href="mailto:admin@nguoicodonvn2008.info">admin@nguoicodonvn2008.info</a>
		</div>
	</div>
</div>
        <div id="timeoutsess" class="chromeframe">
            Bạn đã không sử dụng Site, <a onclick="timeoutsesscancel();" href="https://nguoicodonvn2008.info/#">Bấm vào đây để duy trì trạng thái đăng nhập</a>. Thời gian chờ: <span id="secField"> 60 </span> giây
        </div>
        <div id="openidResult" class="nv-alert" style="display:none"></div>
        <div id="openidBt" data-result="" data-redirect=""></div>
		</script>
		<div class="car-top">
  <span><img src="https://nguoicodonvn2008.info/themes/default/images/car.png" alt=""></span>
</div>
<script src="https://nguoicodonvn2008.info/assets/js/jquery/jquery.min.js"></script>
<script>var nv_base_siteurl="/",nv_lang_data="vi",nv_lang_interface="vi",nv_name_variable="nv",nv_fc_variable="op",nv_lang_variable="language",nv_module_name="news",nv_func_name="savefile",nv_is_user=0, nv_my_ofs=-4,nv_my_abbr="EDT",nv_cookie_prefix="nv4c_e856T",nv_check_pass_mstime=1738000,nv_area_admin=0,nv_safemode=0,theme_responsive=0,nv_recaptcha_ver=2,nv_recaptcha_sitekey="",nv_recaptcha_type="image",XSSsanitize=1;</script>
<script src="https://nguoicodonvn2008.info/assets/js/language/vi.js"></script>
<script src="https://nguoicodonvn2008.info/assets/js/DOMPurify/purify3.js"></script>
<script src="https://nguoicodonvn2008.info/assets/js/global.js"></script>
<script src="https://nguoicodonvn2008.info/assets/js/site.js"></script>
<script src="https://nguoicodonvn2008.info/themes/default/js/news.js"></script>
<script src="https://nguoicodonvn2008.info/themes/default/js/main.js"></script>
<script src="https://nguoicodonvn2008.info/themes/default/js/custom.js"></script>
<script type="application/ld+json">
        {
            "@context": "https://schema.org",
            "@type": "Organization",
            "url": "https://nguoicodonvn2008.info",
            "logo": "https://nguoicodonvn2008.info/uploads/angel.gif"
        }
        </script>
<script src="https://nguoicodonvn2008.info/themes/default/js/bootstrap.min.js"></script>
<script type="text/javascript">
var $scrolltop = $('.car-top');
$scrolltop.on('click', function () {
    $('html,body').animate({
        scrollTop: 0
    }, 800);
    $(this).addClass("car-run");
    setTimeout(function(){ $scrolltop.removeClass('car-run');}, 1000);
    return false;
});
$(window).on('scroll', function ()
{ 
    if($(window).scrollTop() >= 200)
    {
        $scrolltop.addClass("show");
        $scrolltop.addClass("car-down");
    }
    else
    {
       $scrolltop.removeClass("show");
       setTimeout(function(){ $scrolltop.removeClass('car-down');}, 300);
    }
});
</script>
</body>
</html>