<!DOCTYPE html>
    <html lang="vi" xmlns="http://www.w3.org/1999/xhtml" prefix="og: http://ogp.me/ns#">
    <head>
<title>Cách cài đặt VirtualBox trên máy Mac Apple Silicon</title>
<meta name="description" content="Cách cài đặt VirtualBox trên máy Mac Apple Silicon - Savefile - Tin Tức -...">
<meta name="author" content=".: Nguoicodonvn2008.info - Cõi lòng người cô đơn :.">
<meta name="copyright" content=".: Nguoicodonvn2008.info - Cõi lòng người cô đơn :. [admin@nguoicodonvn2008.info]">
<meta name="robots" content="index, archive, follow, noodp">
<meta name="googlebot" content="index,archive,follow,noodp">
<meta name="msnbot" content="all,index,follow">
<meta name="generator" content="NukeViet v4.5">
<meta http-equiv="Content-Type" content="text/html; charset=utf-8">
<meta property="og:title" content="Cách cài đặt VirtualBox trên máy Mac Apple Silicon">
<meta property="og:type" content="website">
<meta property="og:description" content="Savefile - Tin Tức - https&#x3A;&#x002F;&#x002F;www.nguoicodonvn2008.info&#x002F;vi&#x002F;news&#x002F;savefile&#x002F;kien-thuc-may-tinh&#x002F;cach-cai-dat-virtualbox-tren-may-mac-apple-silicon-8344.html">
<meta property="og:site_name" content=".&#x3A; Nguoicodonvn2008.info - Cõi lòng người cô đơn &#x3A;.">
<meta property="og:url" content="https://www.nguoicodonvn2008.info/vi/news/savefile/kien-thuc-may-tinh/cach-cai-dat-virtualbox-tren-may-mac-apple-silicon-8344.html">
<link rel="shortcut icon" href="https://nguoicodonvn2008.info/favicon.ico">
<link rel="canonical" href="https://www.nguoicodonvn2008.info/vi/news/savefile/kien-thuc-may-tinh/cach-cai-dat-virtualbox-tren-may-mac-apple-silicon-8344.html">
<link rel="alternate" href="https://nguoicodonvn2008.info/vi/news/rss/" title="Tin Tức" type="application/rss+xml">
<link rel="alternate" href="https://nguoicodonvn2008.info/vi/news/rss/karaoke-dual/" title="Tin Tức - Karaoke Dual" type="application/rss+xml">
<link rel="alternate" href="https://nguoicodonvn2008.info/vi/news/rss/nhac-tre/" title="Tin Tức - Nhạc trẻ" type="application/rss+xml">
<link rel="alternate" href="https://nguoicodonvn2008.info/vi/news/rss/tru-tinh/" title="Tin Tức - Trữ tình" type="application/rss+xml">
<link rel="alternate" href="https://nguoicodonvn2008.info/vi/news/rss/nuoc-ngoai/" title="Tin Tức - Nước ngoài" type="application/rss+xml">
<link rel="alternate" href="https://nguoicodonvn2008.info/vi/news/rss/remix/" title="Tin Tức - Remix" type="application/rss+xml">
<link rel="alternate" href="https://nguoicodonvn2008.info/vi/news/rss/tam-su-tinh-yeu/" title="Tin Tức - Tâm sự tình yêu" type="application/rss+xml">
<link rel="alternate" href="https://nguoicodonvn2008.info/vi/news/rss/tho-suu-tam/" title="Tin Tức - Thơ sưu tầm" type="application/rss+xml">
<link rel="alternate" href="https://nguoicodonvn2008.info/vi/news/rss/cuoc-song/" title="Tin Tức - Cuộc sống" type="application/rss+xml">
<link rel="alternate" href="https://nguoicodonvn2008.info/vi/news/rss/phan-mem/" title="Tin Tức - Phần mềm" type="application/rss+xml">
<link rel="alternate" href="https://nguoicodonvn2008.info/vi/news/rss/kien-thuc-may-tinh/" title="Tin Tức - Kiến thức máy tính" type="application/rss+xml">
<link rel="alternate" href="https://nguoicodonvn2008.info/vi/news/rss/hoc-tap/" title="Tin Tức - Học tập" type="application/rss+xml">
<link rel="alternate" href="https://nguoicodonvn2008.info/vi/news/rss/tai-lieu/" title="Tin Tức - Tài liệu" type="application/rss+xml">
<link rel="alternate" href="https://nguoicodonvn2008.info/vi/news/rss/de-thi/" title="Tin Tức - Đề thi" type="application/rss+xml">
<link rel="preload" as="style" href="https://nguoicodonvn2008.info/assets/css/font-awesome.min.css" type="text/css">
<link rel="preload" as="style" href="https://nguoicodonvn2008.info/themes/default/css/bootstrap.non-responsive.css" type="text/css">
<link rel="preload" as="style" href="https://nguoicodonvn2008.info/themes/default/css/style.css" type="text/css">
<link rel="preload" as="style" href="https://nguoicodonvn2008.info/themes/default/css/style.non-responsive.css" type="text/css">
<link rel="preload" as="style" href="https://nguoicodonvn2008.info/themes/default/css/news.css" type="text/css">
<link rel="preload" as="style" href="https://nguoicodonvn2008.info/themes/default/css/custom.css" type="text/css">
<link rel="preload" as="script" href="https://nguoicodonvn2008.info/assets/js/jquery/jquery.min.js" type="text/javascript">
<link rel="preload" as="script" href="https://nguoicodonvn2008.info/assets/js/language/vi.js" type="text/javascript">
<link rel="preload" as="script" href="https://nguoicodonvn2008.info/assets/js/DOMPurify/purify3.js" type="text/javascript">
<link rel="preload" as="script" href="https://nguoicodonvn2008.info/assets/js/global.js" type="text/javascript">
<link rel="preload" as="script" href="https://nguoicodonvn2008.info/assets/js/site.js" type="text/javascript">
<link rel="preload" as="script" href="https://nguoicodonvn2008.info/themes/default/js/news.js" type="text/javascript">
<link rel="preload" as="script" href="https://nguoicodonvn2008.info/themes/default/js/main.js" type="text/javascript">
<link rel="preload" as="script" href="https://nguoicodonvn2008.info/themes/default/js/custom.js" type="text/javascript">
<link rel="preload" as="script" href="https://nguoicodonvn2008.info/themes/default/js/bootstrap.min.js" type="text/javascript">
<link rel="stylesheet" href="https://nguoicodonvn2008.info/assets/css/font-awesome.min.css">
<link rel="stylesheet" href="https://nguoicodonvn2008.info/themes/default/css/bootstrap.non-responsive.css">
<link rel="stylesheet" href="https://nguoicodonvn2008.info/themes/default/css/style.css">
<link rel="stylesheet" href="https://nguoicodonvn2008.info/themes/default/css/style.non-responsive.css">
<link rel="StyleSheet" href="https://nguoicodonvn2008.info/themes/default/css/news.css">
<link rel="stylesheet" href="https://nguoicodonvn2008.info/themes/default/css/custom.css">
<style type="text/css">
	body{background: #fff;}
</style>
    </head>
    <body>
<div id="print">
	<div id="hd_print">
		<h2 class="pull-left">.&#x3A; Nguoicodonvn2008.info - Cõi lòng người cô đơn &#x3A;.</h2>
		<p class="pull-right"><a title=".&#x3A; Nguoicodonvn2008.info - Cõi lòng người cô đơn &#x3A;." href="https://nguoicodonvn2008.info/">https://nguoicodonvn2008.info</a></p>
	</div>
	<div class="clear"></div>
	<hr />
	<div id="content">
		<h1>Cách cài đặt VirtualBox trên máy Mac Apple Silicon</h1>
		<ul class="list-inline">
			<li>Thứ sáu - 10/05/2024 23:29</li>
			<li class="hidden-print txtrequired"><em class="fa fa-print">&nbsp;</em><a title="In ra" href="javascript:;" onclick="window.print()">In ra</a></li>
			<li class="hidden-print txtrequired"><em class="fa fa-power-off">&nbsp;</em><a title="Đóng cửa sổ này" href="javascript:;" onclick="window.close()">Đóng cửa sổ này</a></li>
		</ul>
		<div class="clear"></div>
		<div id="hometext">
		</div>
				<div class="imghome">
			<img alt="Cách cài đặt VirtualBox trên máy Mac Apple Silicon" src="https://st.quantrimang.com/photos/image/2024/05/11/cai-virtualbox-tren-mac-2.jpg" width="460" class="img-thumbnail" />
		</div>
		<div class="clear"></div>
		<div id="bodytext" class="clearfix">
			<p style="text-align: justify;">Nếu không muốn chi tiền cho những thứ như Parallels Desktop để ảo hóa Windows hoặc Linux trên máy Mac thì VirtualBox là một lựa chọn thay thế miễn phí tuyệt vời. Bài viết sau sẽ hướng dẫn bạn cách có thể cài đặt và thiết lập VirtualBox trên máy Mac</p>

<h2 style="text-align: justify;">VirtualBox có hỗ trợ máy Mac Apple Silicon không?</h2>

<p style="text-align: justify;">Virtualbox&nbsp;có các bản build gốc dành cho máy Mac silicon của Apple, nhưng chúng là những bản preview cho nhà phát triển, nghĩa là có thể gặp một số lỗi và vấn đề về hiệu suất. Ngoài ra, sẽ phải sử dụng phiên bản cũ hơn một chút vì Oracle đã không cập nhật phiên bản silicon của Apple trong một thời gian khá dài.</p>

<p style="text-align: justify;">Tuy nhiên, vẫn có thể chạy hầu hết các bản phân phối Linux chính mà không gặp trở ngại nào. Bạn sẽ không gặp phải bất kỳ vấn đề lớn nào khi sử dụng thông thường, dù vẫn có những thiếu sót.</p>

<h2 style="text-align: justify;">Cách cài đặt VirtualBox trên máy Mac Apple Silicon</h2>

<p style="text-align: justify;">Làm theo các bước sau để tải xuống và cài đặt phiên bản gốc của VirtualBox trên bất kỳ máy Mac Apple Silicon nào:</p>

<p style="text-align: justify;">1. Trước tiên, hãy&nbsp;truy cập trang VirtualBox Downloads&nbsp;và cuộn xuống phần&nbsp;<strong>VirtualBox 7.0.8</strong>. Sau đó nhấp vào nút&nbsp;<strong>Developer preview for macOS / Arm64 (M1/M2) hosts&nbsp;</strong>để tải xuống phiên bản Apple silicon của ứng dụng ảo hóa. Máy Mac sẽ tải xuống&nbsp;file DMG&nbsp;vào thư mục&nbsp;<strong>Downloads</strong>.</p>

<figure>
<figcaption>
<div style="text-align: justify;">Trang tải xuống VirtualBox</div>
</figcaption>
</figure>

<div style="text-align: justify;"><br />
<span style="color:rgb(192, 57, 43);"><strong>https://www.virtualbox.org/wiki/Download_Old_Builds_7_0</strong></span></div>

<p style="text-align: justify;">
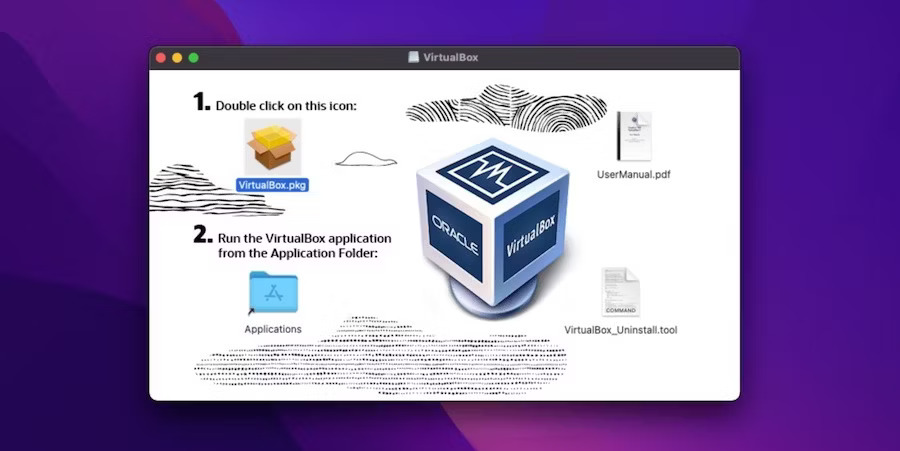
2. Mở file DMG và nhấp đúp vào VirtualBox.pkg để mở trình cài đặt.</p>

<figure>
<div style="text-align: justify;"><br />
<img alt="Trình cài đặt VirtualBox chạy trên macOS" data-adbro-processed="true" data-i="1" data-src="https://st.quantrimang.com/photos/image/2024/05/11/cai-virtualbox-tren-mac-2.jpg" data-was-processed="true" height="451" src="https://st.quantrimang.com/photos/image/2024/05/11/cai-virtualbox-tren-mac-2.jpg" width="900" /><br />
&nbsp;&nbsp;&nbsp;</div>

<figcaption>
<div style="text-align: justify;">Trình cài đặt VirtualBox chạy trên macOS</div>
</figcaption>
</figure>

<p style="text-align: justify;">3. Làm theo hướng dẫn trên màn hình cho đến khi quá trình thiết lập hoàn tất. Máy Mac có thể yêu cầu cung cấp mật khẩu trong quá trình này. Trình cài đặt VirtualBox cũng có thể đề xuất di chuyển file DMG vào Trash sau khi quá trình cài đặt hoàn tất.</p>

<p style="text-align: justify;">Bây giờ, bạn đã cài đặt thành công VirtualBox trên máy Mac Apple silicon của mình. Bạn có thể sử dụng Spotlight Search, Launchpad hoặc thư mục Applications để khởi chạy VirtualBox.</p>

<h2 style="text-align: justify;">Thiết lập máy ảo đầu tiên trong VirtualBox</h2>

<p style="text-align: justify;">Bài viết sẽ hướng dẫn bạn cách thiết lập máy ảo đầu tiên trong VirtualBox cho Mac. Trong trường hợp này, bài viết đã tạo một máy ảo Linux chạy Ubuntu.</p>

<p style="text-align: justify;">Trước khi bắt đầu, cần tải xuống&nbsp;<a data-type="internal" href="https://quantrimang.com/cong-nghe/file-iso-la-gi-155875" title="File ISO là gì?">file ISO</a>&nbsp;cho hệ điều hành muốn cài đặt. Nếu cũng dự định bắt đầu với Ubuntu, bạn có thể download từ trang tải xuống Ubuntu. Tiếp theo, hãy làm theo các bước sau:</p>

<p style="text-align: justify;">
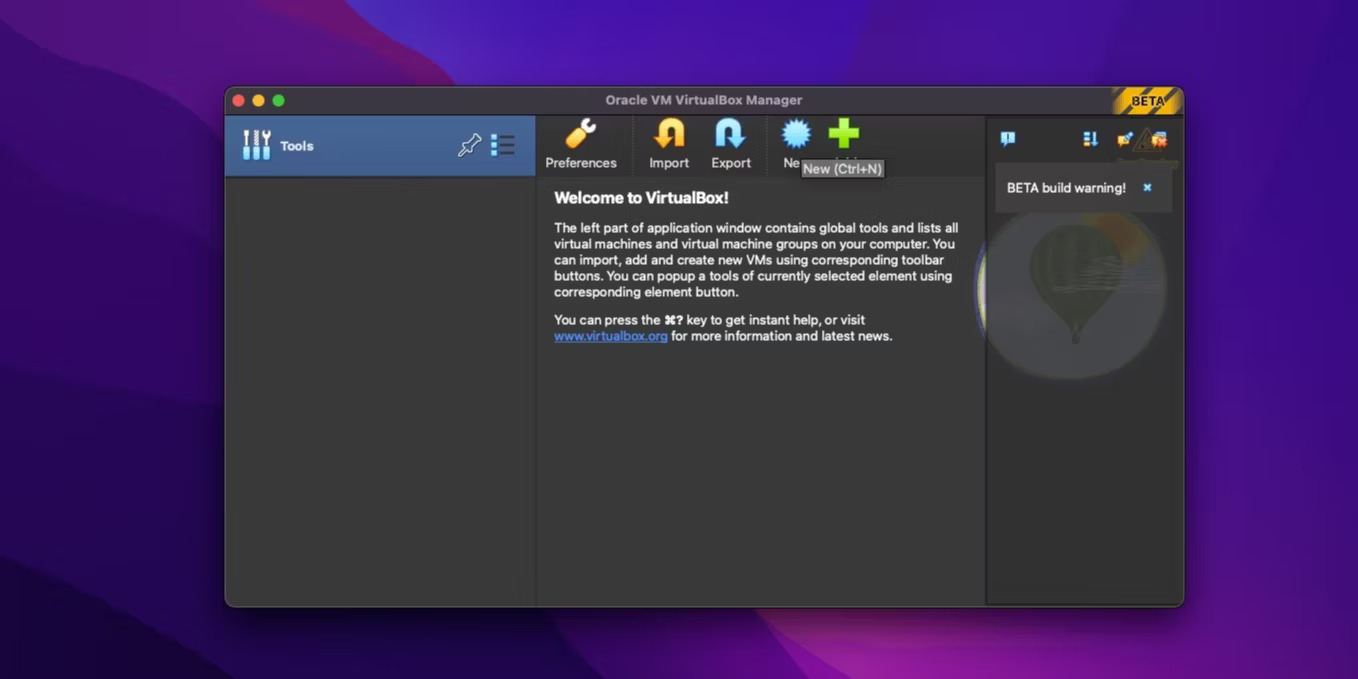
1. Để tạo máy ảo đầu tiên, hãy mở VirtualBox và nhấp vào nút&nbsp;<strong>New</strong>.</p>

<figure>
<div style="text-align: justify;"><img alt="Chọn VM mới trên VirtualBox" data-i="2" data-src="https://st.quantrimang.com/photos/image/2024/05/11/cai-virtualbox-tren-mac-3.jpg" data-was-processed="true" height="679" src="https://st.quantrimang.com/photos/image/2024/05/11/cai-virtualbox-tren-mac-3.jpg" width="1358" /></div>

<figcaption>
<div style="text-align: justify;">Chọn VM mới trên VirtualBox</div>
</figcaption>
</figure>

<div style="text-align: justify;"><iframe allowtransparency="true" aria-label="Advertisement" data-google-container-id="a!3" data-google-query-id="CIuo3_XPhIYDFRWE6QUdrQEDEw" data-load-complete="true" frameborder="0" height="0" hspace="0" id="aswift_2" marginheight="0" marginwidth="0" name="aswift_2" sandbox="" scrolling="no" tabindex="0" title="Advertisement" vspace="0" width="694"></iframe></div>

<p style="text-align: justify;">
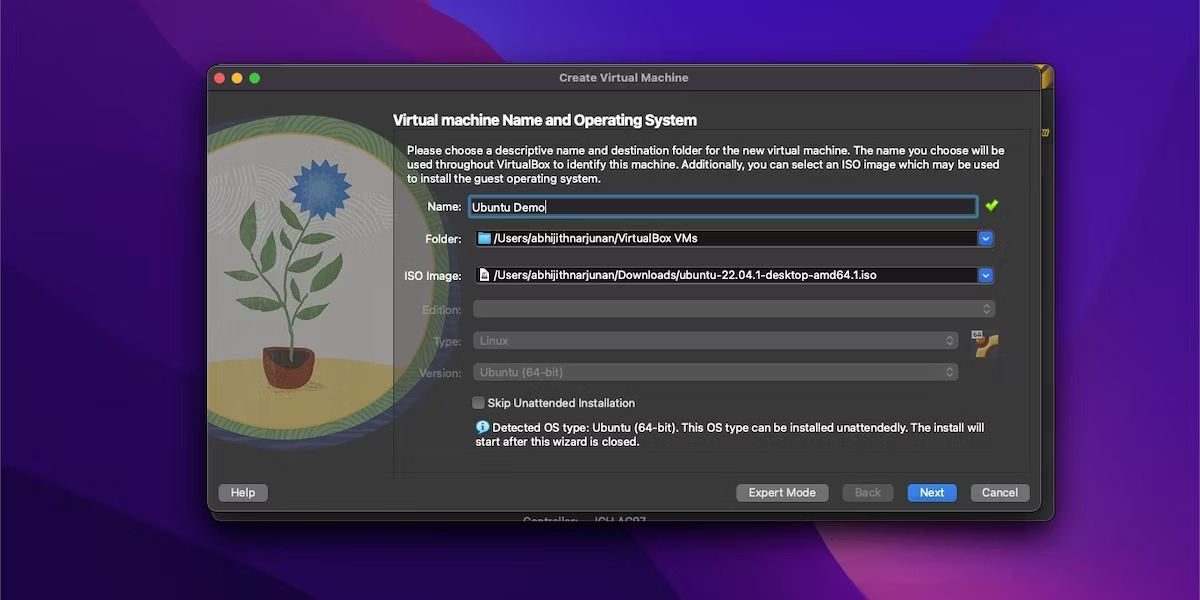
2. Tiếp theo, cung cấp tên cho VM, chọn vị trí lưu trữ và mở file ISO. Nếu đang sử dụng hệ điều hành phổ biến như&nbsp;<a data-type="internal" href="https://quantrimang.com/cong-nghe/meo-va-thu-thuat-sau-khi-cai-dat-ubuntu-84487" title="Mẹo và thủ thuật sau khi cài đặt Ubuntu">Ubuntu</a>, VirtualBox sẽ tự động phát hiện hệ điều hành đó và điền các chi tiết khác. Nếu muốn cấu hình các cài đặt như tài khoản người dùng trên hệ điều hành khách, hãy chọn hộp bên cạnh&nbsp;<strong>Skip Unattended Installation</strong>.</p>

<figure>
<div style="text-align: justify;"><img alt="Chọn tên VM và hệ điều hành trong VirtualBox" data-i="3" data-src="https://st.quantrimang.com/photos/image/2024/05/11/cai-virtualbox-tren-mac-4.jpg" data-was-processed="true" height="600" src="https://st.quantrimang.com/photos/image/2024/05/11/cai-virtualbox-tren-mac-4.jpg" width="1200" /></div>

<figcaption>
<div style="text-align: justify;">Chọn tên VM và hệ điều hành trong VirtualBox</div>
</figcaption>
</figure>

<p style="text-align: justify;">
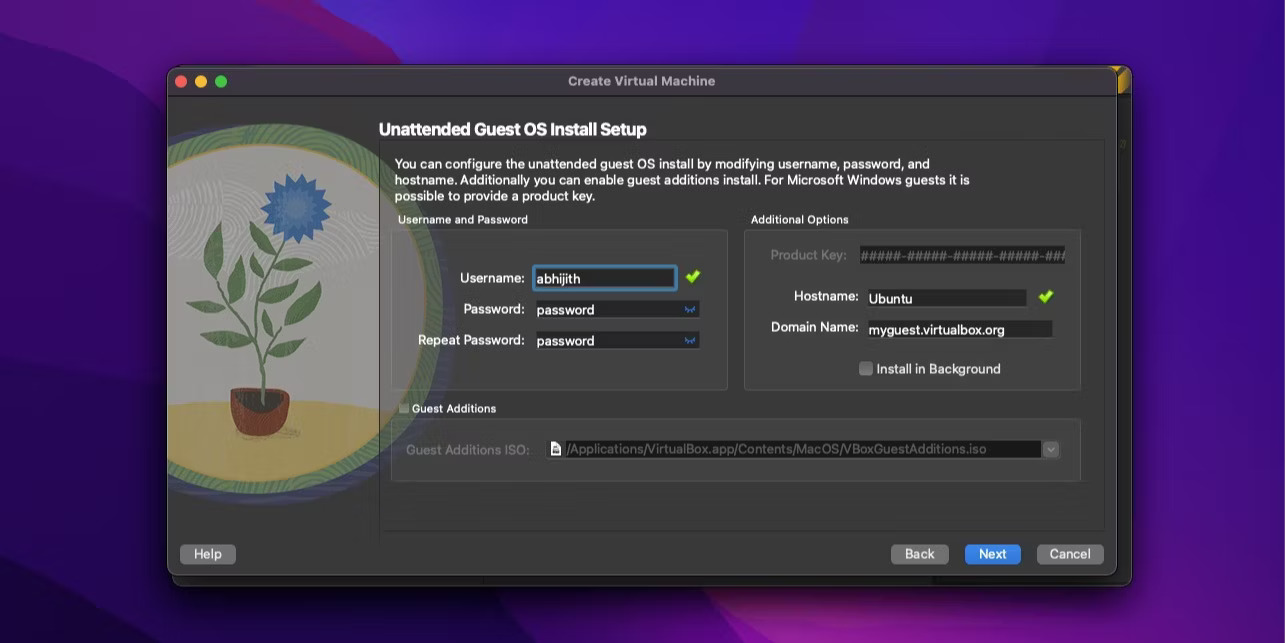
3. Nếu chọn Unattended Installation ở bước cuối cùng, bây giờ, có thể chọn tên người dùng và mật khẩu cho tài khoản chính trong hệ điều hành khách.</p>

<figure>
<div style="text-align: justify;"><img alt="Cung cấp tên người dùng và chi tiết" data-i="4" data-src="https://st.quantrimang.com/photos/image/2024/05/11/cai-virtualbox-tren-mac-5.jpg" data-was-processed="true" height="643" src="https://st.quantrimang.com/photos/image/2024/05/11/cai-virtualbox-tren-mac-5.jpg" width="1285" /></div>

<figcaption>
<div style="text-align: justify;">Cung cấp tên người dùng và chi tiết</div>
</figcaption>
</figure>

<p style="text-align: justify;">
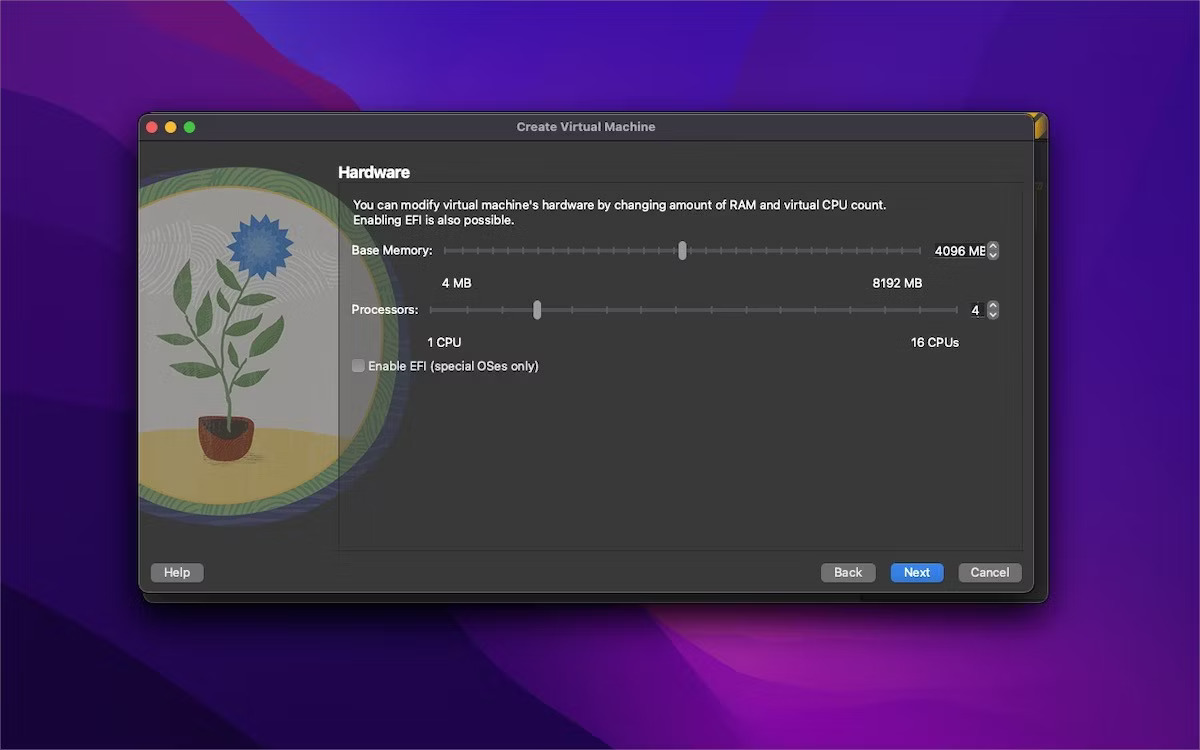
4. Sau khi cung cấp chi tiết đăng nhập cho tài khoản người dùng hệ điều hành, có thể chọn tài nguyên của VM như RAM và bộ xử lý bằng cách kéo thanh trượt. Chọn theo các tác vụ dự định thực hiện với hệ điều hành, nhưng ý tưởng hay là phân bổ một nửa số lượng RAM và lõi CPU của máy Mac cho VM.</p>

<div style="text-align: justify;"><iframe allowtransparency="true" aria-label="Advertisement" data-google-container-id="a!4" data-google-query-id="CO-Fxt_ThIYDFXiH6QUd5g8OcQ" data-load-complete="true" frameborder="0" height="0" hspace="0" id="aswift_3" marginheight="0" marginwidth="0" name="aswift_3" sandbox="" scrolling="no" tabindex="0" title="Advertisement" vspace="0" width="694"></iframe></div>

<figure>
<div style="text-align: justify;"><img alt="Chọn RAM và bộ xử lý cho VM" data-i="5" data-src="https://st.quantrimang.com/photos/image/2024/05/11/cai-virtualbox-tren-mac-6.jpg" data-was-processed="true" height="750" src="https://st.quantrimang.com/photos/image/2024/05/11/cai-virtualbox-tren-mac-6.jpg" width="1200" /></div>

<figcaption>
<div style="text-align: justify;">Chọn RAM và bộ xử lý cho VM</div>
</figcaption>
</figure>

<p style="text-align: justify;">
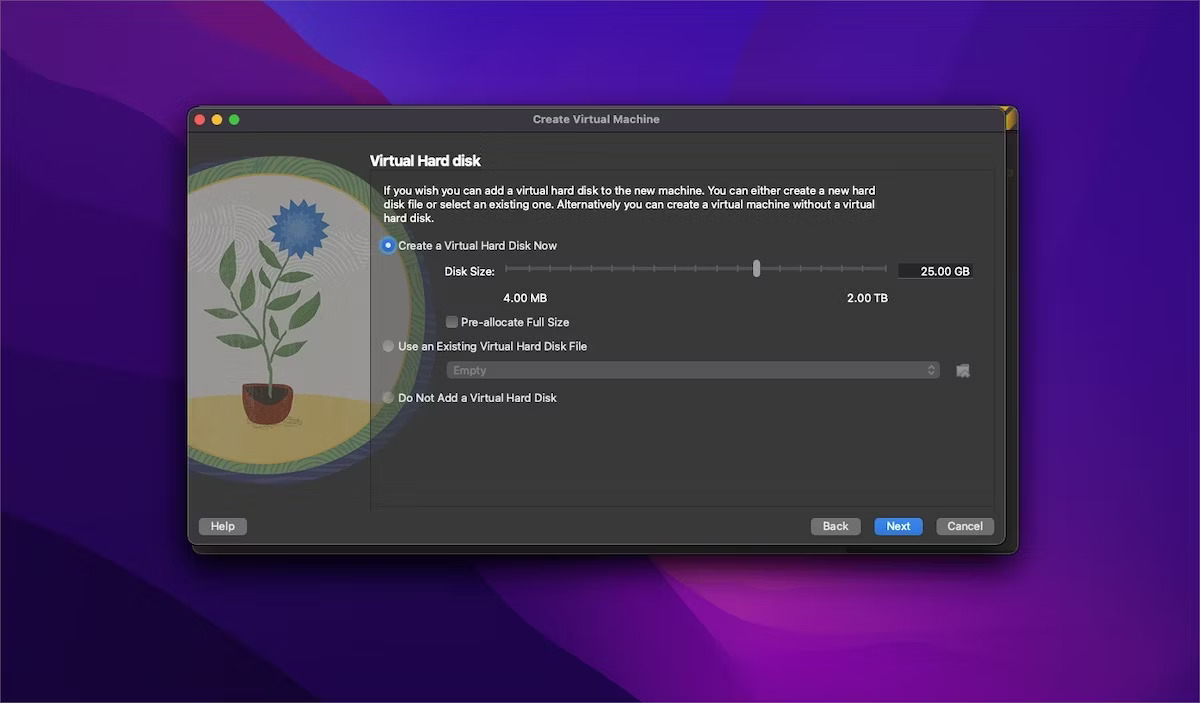
5. Tiếp theo, cần chọn các tùy chọn lưu trữ cho VM. Hãy tham khảo các yêu cầu cơ bản của hệ điều hành và sau đó xem xét không gian cần trên đó để lựa chọn một cách sáng suốt. Trong trường hợp Ubuntu, dung lượng lưu trữ ảo khuyến nghị tối thiểu là 25GB.</p>

<figure>
<div style="text-align: justify;"><img alt="Tạo ổ cứng ảo cho VM trong VirtualBox" data-i="6" data-src="https://st.quantrimang.com/photos/image/2024/05/11/cai-virtualbox-tren-mac-7.jpg" data-was-processed="true" height="703" src="https://st.quantrimang.com/photos/image/2024/05/11/cai-virtualbox-tren-mac-7.jpg" width="1200" /></div>

<figcaption>
<div style="text-align: justify;">Tạo ổ cứng ảo cho VM trong VirtualBox</div>
</figcaption>
</figure>

<p style="text-align: justify;">
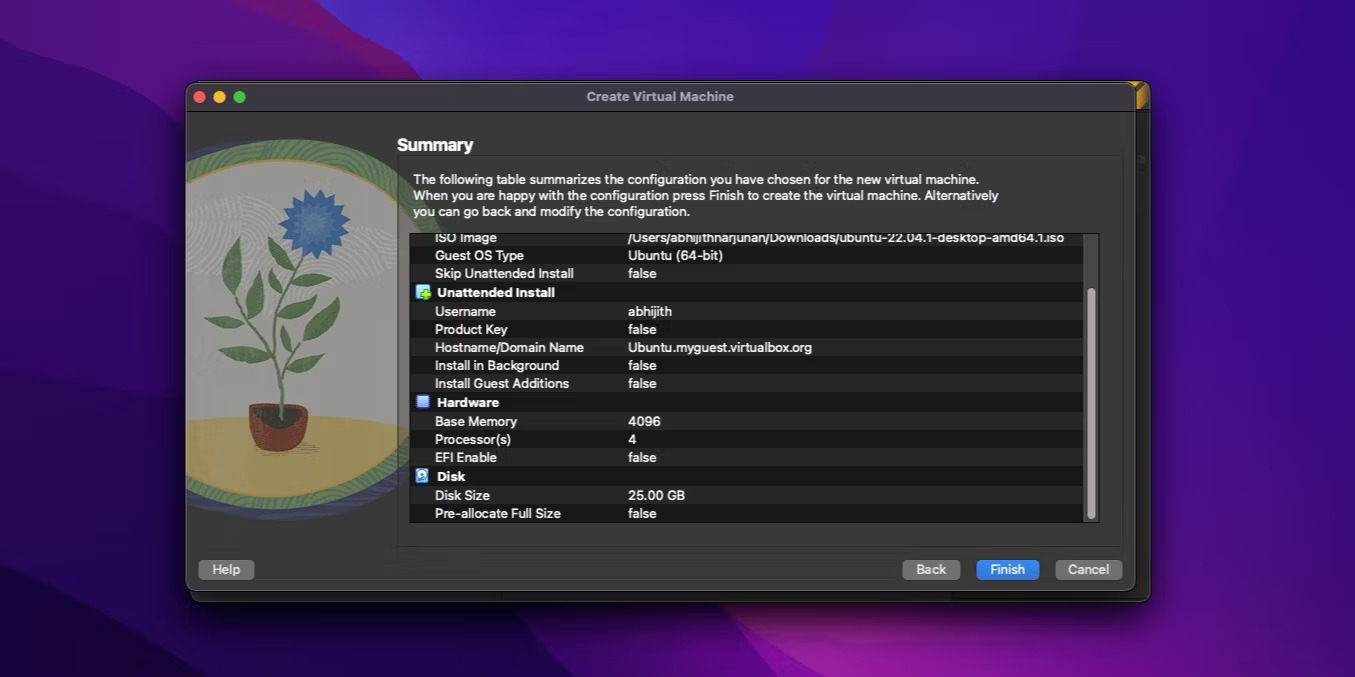
6. Bây giờ, VirtualBox sẽ hiển thị bản tóm tắt toàn bộ cấu hình. Vì vậy, hãy tận dụng cơ hội này để kiểm tra kỹ lựa chọn trước khi tạo VM. Khi đã sẵn sàng, bạn có thể nhấp vào&nbsp;<strong>Finish</strong>.</p>

<figure>
<div style="text-align: justify;"><img alt="Tóm tắt VM của VirtualBox" data-i="7" data-src="https://st.quantrimang.com/photos/image/2024/05/11/cai-virtualbox-tren-mac-8.jpg" data-was-processed="true" height="677" src="https://st.quantrimang.com/photos/image/2024/05/11/cai-virtualbox-tren-mac-8.jpg" width="1355" /></div>

<figcaption>
<div style="text-align: justify;">Tóm tắt VM của VirtualBox</div>
</figcaption>
</figure>

<div style="text-align: justify;">&nbsp;</div>

<p style="text-align: justify;">
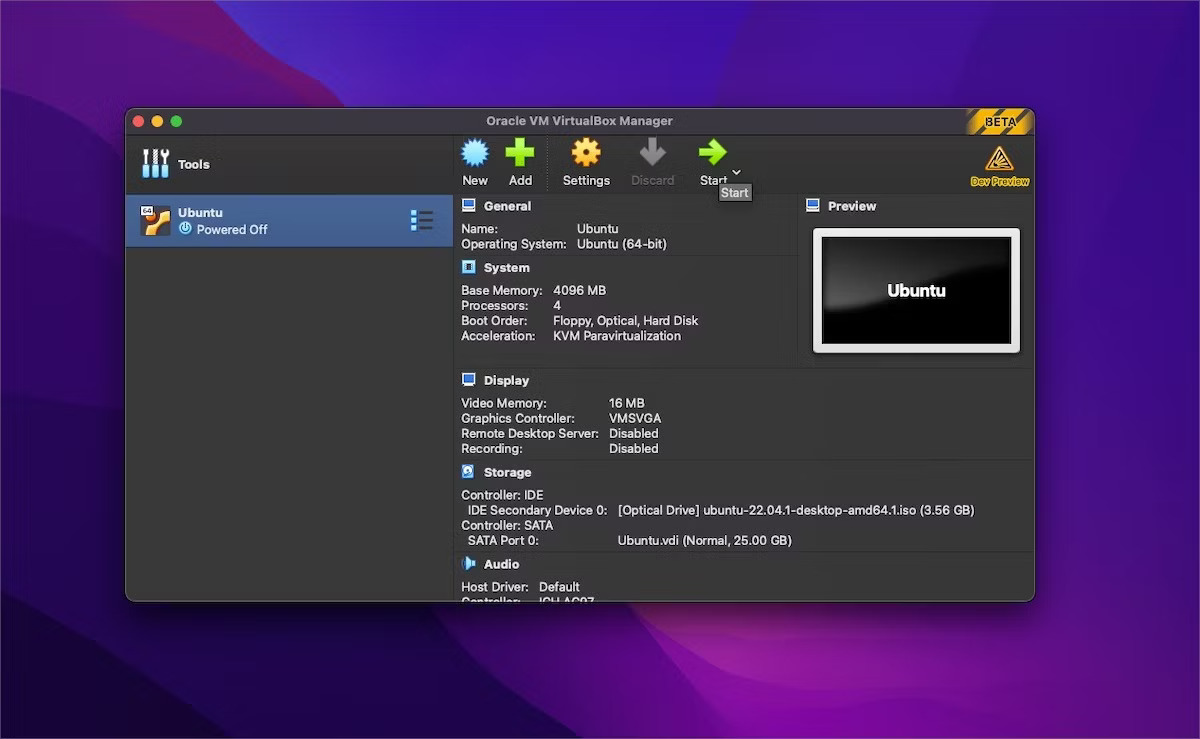
7. VirtualBox có thể mất vài phút để hoàn tất cài đặt hệ điều hành. Sau khi hoàn tất, bạn có thể tìm thấy VM mới trên menu thanh bên VirtualBox. Bây giờ, hãy chọn VM và nhấp vào nút&nbsp;<strong>Start</strong>&nbsp;để khởi động máy ảo.</p>

<figure>
<div style="text-align: justify;"><img alt="Chạy VM mới trong VirtualBox" data-i="8" data-src="https://st.quantrimang.com/photos/image/2024/05/11/cai-virtualbox-tren-mac-9.jpg" data-was-processed="true" height="739" src="https://st.quantrimang.com/photos/image/2024/05/11/cai-virtualbox-tren-mac-9.jpg" width="1200" /></div>

<figcaption>
<div style="text-align: justify;">Chạy VM mới trong VirtualBox</div>
</figcaption>
</figure>

<p style="text-align: justify;">Chúc mừng! Bây giờ, bạn đã tạo xong VM đầu tiên bằng VirtualBox trên máy Mac.</p>

<p style="text-align: justify;">VirtualBox là đủ nếu nhu cầu VM của bạn đơn giản nhưng đừng dựa vào nó để chơi game hoặc xử lý khối lượng công việc nặng. Mặc dù đây là một tùy chọn miễn phí tuyệt vời nhưng nó có những hạn chế về hỗ trợ và tính năng. Vì vậy, nếu định chạy các tác vụ chuyên sâu, bạn nên chạy VM bằng Parallels Desktop hoặc UTM.</p>

<div style="text-align: justify;">&nbsp;</div>
		</div>
				<div id="author">
						<p>
				<strong>Nguồn tin:</strong>
				Quantrimang.com
			</p>
		</div>
	</div>
	<div id="footer" class="clearfix">
		<div id="url">
			<strong>URL của bản tin này: </strong><a href="https://www.nguoicodonvn2008.info/vi/news/savefile/kien-thuc-may-tinh/cach-cai-dat-virtualbox-tren-may-mac-apple-silicon-8344.html" title="Cách cài đặt VirtualBox trên máy Mac Apple Silicon">https://www.nguoicodonvn2008.info/vi/news/savefile/kien-thuc-may-tinh/cach-cai-dat-virtualbox-tren-may-mac-apple-silicon-8344.html</a>

		</div>
		<div class="clear"></div>
		<div class="copyright">
			&copy; .&#x3A; Nguoicodonvn2008.info - Cõi lòng người cô đơn &#x3A;.
		</div>
		<div id="contact">
			<a href="mailto:admin@nguoicodonvn2008.info">admin@nguoicodonvn2008.info</a>
		</div>
	</div>
</div>
        <div id="timeoutsess" class="chromeframe">
            Bạn đã không sử dụng Site, <a onclick="timeoutsesscancel();" href="https://nguoicodonvn2008.info/#">Bấm vào đây để duy trì trạng thái đăng nhập</a>. Thời gian chờ: <span id="secField"> 60 </span> giây
        </div>
        <div id="openidResult" class="nv-alert" style="display:none"></div>
        <div id="openidBt" data-result="" data-redirect=""></div>
		</script>
		<div class="car-top">
  <span><img src="https://nguoicodonvn2008.info/themes/default/images/car.png" alt=""></span>
</div>
<script src="https://nguoicodonvn2008.info/assets/js/jquery/jquery.min.js"></script>
<script>var nv_base_siteurl="/",nv_lang_data="vi",nv_lang_interface="vi",nv_name_variable="nv",nv_fc_variable="op",nv_lang_variable="language",nv_module_name="news",nv_func_name="savefile",nv_is_user=0, nv_my_ofs=-4,nv_my_abbr="EDT",nv_cookie_prefix="nv4c_e856T",nv_check_pass_mstime=1738000,nv_area_admin=0,nv_safemode=0,theme_responsive=0,nv_recaptcha_ver=2,nv_recaptcha_sitekey="",nv_recaptcha_type="image",XSSsanitize=1;</script>
<script src="https://nguoicodonvn2008.info/assets/js/language/vi.js"></script>
<script src="https://nguoicodonvn2008.info/assets/js/DOMPurify/purify3.js"></script>
<script src="https://nguoicodonvn2008.info/assets/js/global.js"></script>
<script src="https://nguoicodonvn2008.info/assets/js/site.js"></script>
<script src="https://nguoicodonvn2008.info/themes/default/js/news.js"></script>
<script src="https://nguoicodonvn2008.info/themes/default/js/main.js"></script>
<script src="https://nguoicodonvn2008.info/themes/default/js/custom.js"></script>
<script type="application/ld+json">
        {
            "@context": "https://schema.org",
            "@type": "Organization",
            "url": "https://nguoicodonvn2008.info",
            "logo": "https://nguoicodonvn2008.info/uploads/angel.gif"
        }
        </script>
<script src="https://nguoicodonvn2008.info/themes/default/js/bootstrap.min.js"></script>
<script type="text/javascript">
var $scrolltop = $('.car-top');
$scrolltop.on('click', function () {
    $('html,body').animate({
        scrollTop: 0
    }, 800);
    $(this).addClass("car-run");
    setTimeout(function(){ $scrolltop.removeClass('car-run');}, 1000);
    return false;
});
$(window).on('scroll', function ()
{ 
    if($(window).scrollTop() >= 200)
    {
        $scrolltop.addClass("show");
        $scrolltop.addClass("car-down");
    }
    else
    {
       $scrolltop.removeClass("show");
       setTimeout(function(){ $scrolltop.removeClass('car-down');}, 300);
    }
});
</script>
</body>
</html>