<!DOCTYPE html>
    <html lang="vi" xmlns="http://www.w3.org/1999/xhtml" prefix="og: http://ogp.me/ns#">
    <head>
<title>Cách cài đặt VirtualBox trên Linux</title>
<meta name="description" content="Cách cài đặt VirtualBox trên Linux - Savefile - Tin Tức -...">
<meta name="author" content=".: Nguoicodonvn2008.info - Cõi lòng người cô đơn :.">
<meta name="copyright" content=".: Nguoicodonvn2008.info - Cõi lòng người cô đơn :. [admin@nguoicodonvn2008.info]">
<meta name="robots" content="index, archive, follow, noodp">
<meta name="googlebot" content="index,archive,follow,noodp">
<meta name="msnbot" content="all,index,follow">
<meta name="generator" content="NukeViet v4.5">
<meta http-equiv="Content-Type" content="text/html; charset=utf-8">
<meta property="og:title" content="Cách cài đặt VirtualBox trên Linux">
<meta property="og:type" content="website">
<meta property="og:description" content="Savefile - Tin Tức - https&#x3A;&#x002F;&#x002F;www.nguoicodonvn2008.info&#x002F;vi&#x002F;news&#x002F;savefile&#x002F;kien-thuc-may-tinh&#x002F;cach-cai-dat-virtualbox-tren-linux-4770.html">
<meta property="og:site_name" content=".&#x3A; Nguoicodonvn2008.info - Cõi lòng người cô đơn &#x3A;.">
<meta property="og:url" content="https://www.nguoicodonvn2008.info/vi/news/savefile/kien-thuc-may-tinh/cach-cai-dat-virtualbox-tren-linux-4770.html">
<link rel="shortcut icon" href="https://nguoicodonvn2008.info/favicon.ico">
<link rel="canonical" href="https://www.nguoicodonvn2008.info/vi/news/savefile/kien-thuc-may-tinh/cach-cai-dat-virtualbox-tren-linux-4770.html">
<link rel="alternate" href="https://nguoicodonvn2008.info/vi/news/rss/" title="Tin Tức" type="application/rss+xml">
<link rel="alternate" href="https://nguoicodonvn2008.info/vi/news/rss/karaoke-dual/" title="Tin Tức - Karaoke Dual" type="application/rss+xml">
<link rel="alternate" href="https://nguoicodonvn2008.info/vi/news/rss/nhac-tre/" title="Tin Tức - Nhạc trẻ" type="application/rss+xml">
<link rel="alternate" href="https://nguoicodonvn2008.info/vi/news/rss/tru-tinh/" title="Tin Tức - Trữ tình" type="application/rss+xml">
<link rel="alternate" href="https://nguoicodonvn2008.info/vi/news/rss/nuoc-ngoai/" title="Tin Tức - Nước ngoài" type="application/rss+xml">
<link rel="alternate" href="https://nguoicodonvn2008.info/vi/news/rss/remix/" title="Tin Tức - Remix" type="application/rss+xml">
<link rel="alternate" href="https://nguoicodonvn2008.info/vi/news/rss/tam-su-tinh-yeu/" title="Tin Tức - Tâm sự tình yêu" type="application/rss+xml">
<link rel="alternate" href="https://nguoicodonvn2008.info/vi/news/rss/tho-suu-tam/" title="Tin Tức - Thơ sưu tầm" type="application/rss+xml">
<link rel="alternate" href="https://nguoicodonvn2008.info/vi/news/rss/cuoc-song/" title="Tin Tức - Cuộc sống" type="application/rss+xml">
<link rel="alternate" href="https://nguoicodonvn2008.info/vi/news/rss/phan-mem/" title="Tin Tức - Phần mềm" type="application/rss+xml">
<link rel="alternate" href="https://nguoicodonvn2008.info/vi/news/rss/kien-thuc-may-tinh/" title="Tin Tức - Kiến thức máy tính" type="application/rss+xml">
<link rel="alternate" href="https://nguoicodonvn2008.info/vi/news/rss/hoc-tap/" title="Tin Tức - Học tập" type="application/rss+xml">
<link rel="alternate" href="https://nguoicodonvn2008.info/vi/news/rss/tai-lieu/" title="Tin Tức - Tài liệu" type="application/rss+xml">
<link rel="alternate" href="https://nguoicodonvn2008.info/vi/news/rss/de-thi/" title="Tin Tức - Đề thi" type="application/rss+xml">
<link rel="preload" as="style" href="https://nguoicodonvn2008.info/assets/css/font-awesome.min.css" type="text/css">
<link rel="preload" as="style" href="https://nguoicodonvn2008.info/themes/default/css/bootstrap.non-responsive.css" type="text/css">
<link rel="preload" as="style" href="https://nguoicodonvn2008.info/themes/default/css/style.css" type="text/css">
<link rel="preload" as="style" href="https://nguoicodonvn2008.info/themes/default/css/style.non-responsive.css" type="text/css">
<link rel="preload" as="style" href="https://nguoicodonvn2008.info/themes/default/css/news.css" type="text/css">
<link rel="preload" as="style" href="https://nguoicodonvn2008.info/themes/default/css/custom.css" type="text/css">
<link rel="preload" as="script" href="https://nguoicodonvn2008.info/assets/js/jquery/jquery.min.js" type="text/javascript">
<link rel="preload" as="script" href="https://nguoicodonvn2008.info/assets/js/language/vi.js" type="text/javascript">
<link rel="preload" as="script" href="https://nguoicodonvn2008.info/assets/js/DOMPurify/purify3.js" type="text/javascript">
<link rel="preload" as="script" href="https://nguoicodonvn2008.info/assets/js/global.js" type="text/javascript">
<link rel="preload" as="script" href="https://nguoicodonvn2008.info/assets/js/site.js" type="text/javascript">
<link rel="preload" as="script" href="https://nguoicodonvn2008.info/themes/default/js/news.js" type="text/javascript">
<link rel="preload" as="script" href="https://nguoicodonvn2008.info/themes/default/js/main.js" type="text/javascript">
<link rel="preload" as="script" href="https://nguoicodonvn2008.info/themes/default/js/custom.js" type="text/javascript">
<link rel="preload" as="script" href="https://nguoicodonvn2008.info/themes/default/js/bootstrap.min.js" type="text/javascript">
<link rel="stylesheet" href="https://nguoicodonvn2008.info/assets/css/font-awesome.min.css">
<link rel="stylesheet" href="https://nguoicodonvn2008.info/themes/default/css/bootstrap.non-responsive.css">
<link rel="stylesheet" href="https://nguoicodonvn2008.info/themes/default/css/style.css">
<link rel="stylesheet" href="https://nguoicodonvn2008.info/themes/default/css/style.non-responsive.css">
<link rel="StyleSheet" href="https://nguoicodonvn2008.info/themes/default/css/news.css">
<link rel="stylesheet" href="https://nguoicodonvn2008.info/themes/default/css/custom.css">
<style type="text/css">
	body{background: #fff;}
</style>
    </head>
    <body>
<div id="print">
	<div id="hd_print">
		<h2 class="pull-left">.&#x3A; Nguoicodonvn2008.info - Cõi lòng người cô đơn &#x3A;.</h2>
		<p class="pull-right"><a title=".&#x3A; Nguoicodonvn2008.info - Cõi lòng người cô đơn &#x3A;." href="https://nguoicodonvn2008.info/">https://nguoicodonvn2008.info</a></p>
	</div>
	<div class="clear"></div>
	<hr />
	<div id="content">
		<h1>Cách cài đặt VirtualBox trên Linux</h1>
		<ul class="list-inline">
			<li>Thứ sáu - 19/11/2021 23:51</li>
			<li class="hidden-print txtrequired"><em class="fa fa-print">&nbsp;</em><a title="In ra" href="javascript:;" onclick="window.print()">In ra</a></li>
			<li class="hidden-print txtrequired"><em class="fa fa-power-off">&nbsp;</em><a title="Đóng cửa sổ này" href="javascript:;" onclick="window.close()">Đóng cửa sổ này</a></li>
		</ul>
		<div class="clear"></div>
		<div id="hometext">
		</div>
				<div class="imghome">
			<img alt="Cách cài đặt VirtualBox trên Linux" src="https://st.quantrimang.com/photos/image/2021/11/20/cai-virtualbox-tren-linux-1.jpg" width="460" class="img-thumbnail" />
		</div>
		<div class="clear"></div>
		<div id="bodytext" class="clearfix">
			<p style="text-align: justify;">Thiết lập một máy ảo có thể là một cách tuyệt vời để kiểm tra phần mềm hoặc hệ điều hành thay thế trên máy tính mà không làm thay đổi hoặc gây rủi ro cho hệ thống hiện tại.</p>

<p style="text-align: justify;">Hãy làm theo hướng dẫn sau để cài đặt VirtualBox trên Linux và tạo máy ảo đầu tiên của bạn.</p>

<h2 style="text-align: justify;">Tải xuống và cài đặt VirtualBox trên Linux</h2>

<p style="text-align: justify;">Trước khi bắt đầu, bạn cần cài đặt VirtualBox trên hệ thống của mình. Bạn có thể tải xuống trực tiếp từ Oracle hoặc trong một số trường hợp, cài đặt từ trình quản lý gói của bản phân phối.</p>

<h3 style="text-align: justify;">Cài đặt VirtualBox thông qua trình quản lý gói hệ thống</h3>

<p style="text-align: justify;">Nếu VirtualBox có sẵn trong kho phần mềm của phân phối, thì việc cài đặt thông qua trình quản lý gói sẽ là cách nhanh chóng, dễ dàng và an toàn nhất. Phiên bản đóng gói trước có khả năng tích hợp tốt hơn với hệ điều hành cụ thể và mang lại hiệu suất tốt hơn.</p>

<p style="text-align: justify;">Để xem VirtualBox có khả dụng trực tiếp thông qua bản phân phối hay không, hãy&nbsp;mở một Terminal&nbsp;và nhập lệnh thích hợp tùy thuộc vào bản phân phối Linux mà bạn hiện đang sử dụng.</p>

<p style="text-align: justify;">Đối với các hệ thống dựa trên Debian như&nbsp;Ubuntu&nbsp;và Linux Mint:</p>

<pre id="pre0">
<code>sudo apt install virtualbox</code></pre>

<p style="text-align: justify;">Đối với các hệ thống dựa trên RHEL như CentOS và Fedora:</p>

<pre id="pre1">
<code>sudo dnf install virtualbox</code></pre>

<p style="text-align: justify;">Trên Arch Linux và các dẫn xuất của nó:</p>

<pre id="pre2">
<code>sudo pacman -S virtualbox</code></pre>

<p style="text-align: justify;">Nếu VirtualBox khả dụng, hãy trả lời yes cho bất kỳ lời nhắc cài đặt nào và mọi thứ sẽ được cài đặt trong giây lát. Khi quá trình cài đặt hoàn tất, bạn cần khởi động lại hệ thống. Sau đó, bạn có thể bỏ qua phần tiếp theo và chuyển đến ngay hướng dẫn về cách thiết lập máy ảo đầu tiên.</p>

<p style="text-align: justify;">Nếu bạn gặp lỗi cho biết rằng không tìm thấy VirtualBox, hãy tiếp tục làm theo phần bên dưới để tải xuống và cài đặt nó từ trang web chính thức.</p>

<h3 style="text-align: justify;">Tải xuống và cài đặt VirtualBox từ Oracle</h3>

<p style="text-align: justify;">Để tải xuống VirtualBox từ Oracle và cài đặt nó, bạn cần phải truy cập trang tải xuống VirtualBox Linux. Từ đó, chọn gói cài đặt phù hợp nhất với hệ điều hành của bạn.</p>

<p style="text-align: justify;">Tải VirtualBox:&nbsp;<span style="color:rgb(192, 57, 43);"><strong>quantrimang.com/virtualbox-184312</strong></span></p>

<p style="text-align: justify;">Khi bạn đã tải xuống gói cài đặt, hãy mở một Terminal và chuyển sang thư mục đã lưu file. Nhập lệnh thích hợp bên dưới để bắt đầu quá trình cài đặt (thay thế bằng tên chính xác của file bạn đã tải xuống).</p>

<p style="text-align: justify;">Đối với các hệ thống dựa trên Debian như Ubuntu và Linux Mint:</p>

<pre id="pre3">
<code>sudo dpkg -i VirtualBox-Version.X.X.deb</code></pre>

<p style="text-align: justify;">Đối với các hệ thống dựa trên RHEL như CentOS và Fedora:</p>

<pre id="pre4">
<code>sudo rpm -i VirtualBox-Version.X.X.rpm</code></pre>

<p style="text-align: justify;">Hệ thống của bạn có thể tải xuống các gói hỗ trợ cần thiết trước khi quá trình cài đặt bắt đầu. Sau khi quá trình cài đặt hoàn tất, bạn cần khởi động lại hệ thống của mình trước khi khởi chạy VirtualBox.</p>

<h2 style="text-align: justify;">Tạo máy ảo với VirtualBox</h2>

<p style="text-align: justify;">
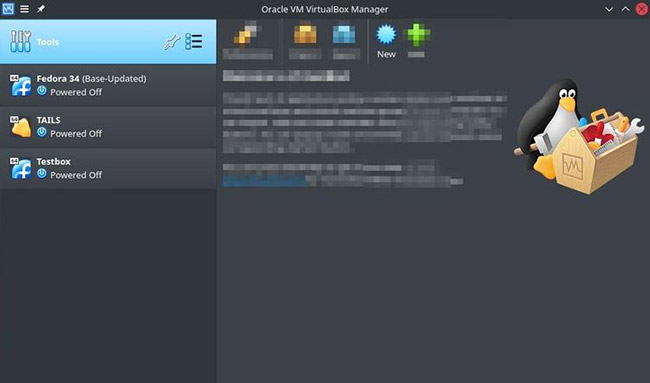
Sau khi bạn đã cài đặt VirtualBox, việc thiết lập máy ảo đầu tiên tương đối dễ dàng. Khi khởi chạy VirtualBox lần đầu tiên, bạn sẽ thấy một menu ngắn. Từ đó, chỉ cần nhấp vào nút&nbsp;<strong>New.</strong></p>

<figure>
<div style="text-align: justify;"><img alt="Nhấp vào nút New" data-i="0" data-src="https://st.quantrimang.com/photos/image/2021/11/20/cai-virtualbox-tren-linux-1.jpg" data-was-processed="true" height="383" src="https://st.quantrimang.com/photos/image/2021/11/20/cai-virtualbox-tren-linux-1.jpg" width="650" /></div>

<figcaption>
<div style="text-align: justify;">Nhấp vào nút New</div>
</figcaption>
</figure>

<p style="text-align: justify;">VirtualBox sẽ yêu cầu bạn đặt tên cho máy ảo mới của mình. Chọn vị trí lưu trữ cho các file máy ảo và chọn hệ điều hành bạn sẽ cài đặt.</p>

<figure>
<div style="text-align: justify;"><img alt="Đặt tên cho máy ảo và chọn vị trí lưu file" data-i="1" data-src="https://st.quantrimang.com/photos/image/2021/11/20/cai-virtualbox-tren-linux-2.jpg" data-was-processed="true" height="383" src="https://st.quantrimang.com/photos/image/2021/11/20/cai-virtualbox-tren-linux-2.jpg" width="650" /></div>

<figcaption>
<div style="text-align: justify;">Đặt tên cho máy ảo và chọn vị trí lưu file</div>
</figcaption>
</figure>

<p style="text-align: justify;">
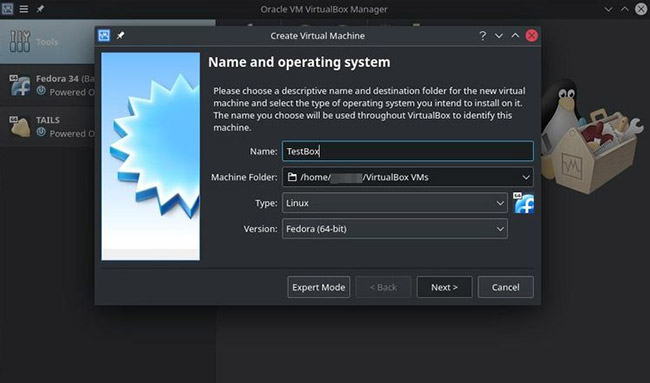
VirtualBox có hỗ trợ tích hợp cho gần như tất cả các hệ điều hành chính, bao gồm Windows, Linux, macOS và thậm chí cả BSD và Solaris.</p>

<p style="text-align: justify;">Sau khi chọn hệ điều hành, VirtualBox sẽ yêu cầu bạn chọn dung lượng RAM để cấp phát cho máy ảo khi nó đang chạy. Thông thường, bạn nên cung cấp cho hệ điều hành khách của mình ít nhất 4GB RAM.</p>

<p style="text-align: justify;">Nếu có dung lượng RAM lớn, bạn có thể nhận được hiệu suất tốt hơn bằng cách tăng số lượng được cấp phát cho hệ thống khách của mình. Tuy nhiên, bạn không nên dùng hơn một nửa RAM vật lý của hệ thống cho máy ảo.</p>

<p style="text-align: justify;">Sau đó VirtualBox sẽ hỏi bạn có muốn tạo một ổ cứng ảo cho máy ảo mới của mình hay không. Vì đây là máy ảo đầu tiên, bạn nên chọn&nbsp;<strong>Create a virtual hard disk now</strong>. Khi được hỏi bạn muốn tạo loại ổ cứng nào, chỉ cần để cài đặt này ở chế độ mặc định, VDI hoặc VirtualBox disk image.</p>

<p style="text-align: justify;">Tiếp theo, VirtualBox sẽ hỏi bạn xem có muốn ổ cứng được cấp phát động hoặc được đặt ở kích thước cố định hay không.</p>

<p style="text-align: justify;">Nếu bạn đặt ổ cứng thành cấp phát động, VirtualBox sẽ khởi động máy bằng một ổ cứng ảo tương đối nhỏ, sẽ tăng thêm khi cần thêm dung lượng (lên đến mức tối đa mà bạn đã đặt). Các ổ đĩa ảo kích thước cố định thường hoạt động tốt hơn, nhưng sự khác biệt chỉ thực sự đáng chú ý nếu bạn đang tạo một ổ lớn.</p>

<figure>
<div style="text-align: justify;"><img alt="Chọn kích thước cho máy ảo" data-i="2" data-src="https://st.quantrimang.com/photos/image/2021/11/20/cai-virtualbox-tren-linux-3.jpg" data-was-processed="true" height="389" src="https://st.quantrimang.com/photos/image/2021/11/20/cai-virtualbox-tren-linux-3.jpg" width="650" /></div>

<figcaption>
<div style="text-align: justify;">Chọn kích thước cho máy ảo</div>
</figcaption>
</figure>

<p style="text-align: justify;">
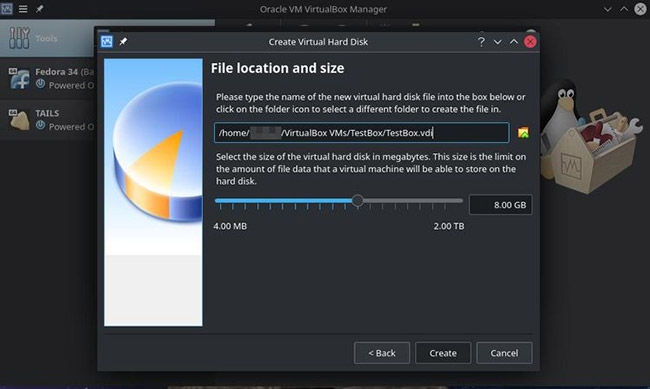
Trên màn hình tiếp theo, hãy đặt kích thước ổ cứng tối đa cho máy ảo. Đối với nhiều hệ thống, VirtualBox sẽ mặc định là 8GB. Mặc dù con số này có thể ổn đối với các cài đặt tối thiểu của một số hệ điều hành, nhưng nếu bạn dự định làm nhiều việc hơn là chỉ sử dụng máy ảo mới của mình để thử nghiệm thông thường, bạn nên đặt giới hạn ổ cứng tối đa cao hơn một chút, lên ít nhất 15 hoặc 20GB.</p>

<p style="text-align: justify;">
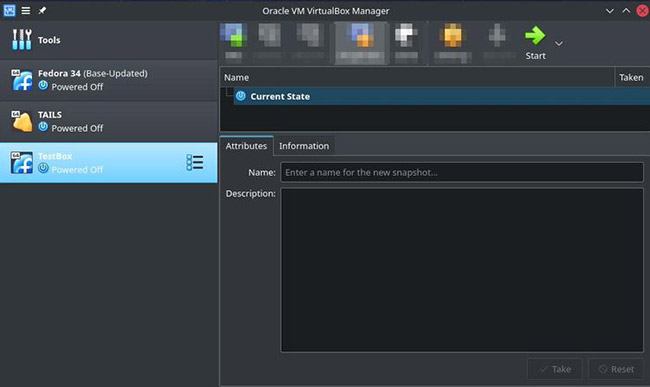
Với thiết lập cấu hình, VirtualBox sẽ quay trở lại menu chính và bạn sẽ thấy một mục nhập cho máy ảo mới của mình ở phía bên trái của cửa sổ VirtualBox.</p>

<p style="text-align: justify;">Nhấp vào máy ảo và bạn sẽ thấy một nút có nhãn&nbsp;<strong>Start</strong>&nbsp;ở trên cùng bên phải.</p>

<figure>
<div style="text-align: justify;"><img alt="Nhấn nút Start" data-i="3" data-src="https://st.quantrimang.com/photos/image/2021/11/20/cai-virtualbox-tren-linux-4.jpg" data-was-processed="true" height="387" src="https://st.quantrimang.com/photos/image/2021/11/20/cai-virtualbox-tren-linux-4.jpg" width="650" /></div>

<figcaption>
<div style="text-align: justify;">Nhấn nút Start</div>
</figcaption>
</figure>

<p style="text-align: justify;">Nhấp vào&nbsp;<strong>Start</strong>&nbsp;để tăng sức mạnh cho máy ảo. VirtualBox sẽ mở một hộp thoại yêu cầu bạn chọn ổ đĩa khởi động. Ổ đĩa khởi động sẽ là ổ đĩa cài đặt cho bất kỳ hệ điều hành nào bạn muốn cài đặt.</p>

<p style="text-align: justify;">Chỉ cần nhấp vào biểu tượng thư mục và chọn image bạn muốn sử dụng. Nhấp vào nút&nbsp;<strong>Add</strong>&nbsp;ở trên cùng bên trái và điều hướng đến thư mục nơi bạn đã lưu trữ phương tiện cài đặt của mình.</p>

<figure>
<div style="text-align: justify;"><img alt=" Nhấp vào nút Add " data-i="4" data-src="https://st.quantrimang.com/photos/image/2021/11/20/cai-virtualbox-tren-linux-5.jpg" data-was-processed="true" height="387" src="https://st.quantrimang.com/photos/image/2021/11/20/cai-virtualbox-tren-linux-5.jpg" width="650" /></div>

<figcaption>
<div style="text-align: justify;">Nhấp vào nút Add</div>
</figcaption>
</figure>

<p style="text-align: justify;">Chọn ổ đĩa bạn muốn sử dụng. Sau đó, nhấp vào&nbsp;<strong>Choose</strong>&nbsp;để tiếp tục.</p>

<figure>
<div style="text-align: justify;"><img alt="Nhấp vào Start để khởi động máy ảo" data-i="5" data-src="https://st.quantrimang.com/photos/image/2021/11/20/cai-virtualbox-tren-linux-6.jpg" data-was-processed="true" height="385" src="https://st.quantrimang.com/photos/image/2021/11/20/cai-virtualbox-tren-linux-6.jpg" width="650" /></div>

<figcaption>
<div style="text-align: justify;">Nhấp vào Start để khởi động máy ảo</div>
</figcaption>
</figure>

<p style="text-align: justify;">
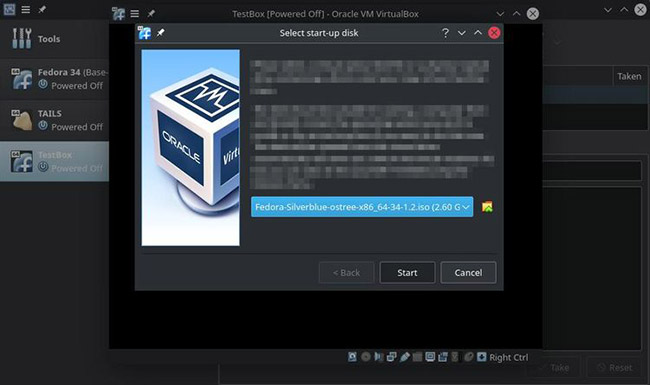
Quay lại màn hình ổ đĩa khởi động đã chọn, bây giờ, bạn sẽ thấy image cài đặt đã chọn. Nhấn&nbsp;<strong>Start</strong>, sau đó máy ảo mới sẽ khởi động và load phương tiện cài đặt.</p>

<p style="text-align: justify;">Từ đó, tất cả những gì bạn cần làm chỉ là làm theo hướng dẫn trên màn hình cho bất kỳ hệ điều hành nào đang cài đặt. Khi quá trình cài đặt hoàn tất, hãy khởi động lại máy ảo và nó sẽ load lên hệ điều hành khách mới, sẵn sàng để bạn sử dụng.</p>

<p style="text-align: justify;">Kể từ thời điểm này, bất cứ khi nào bạn muốn sử dụng máy ảo mới của mình, tất cả những gì bạn cần làm là load VirtualBox và nhấp vào&nbsp;<strong>Start.</strong></p>
		</div>
				<div id="author">
						<p>
				<strong>Nguồn tin:</strong>
				Quantrimang.com
			</p>
		</div>
	</div>
	<div id="footer" class="clearfix">
		<div id="url">
			<strong>URL của bản tin này: </strong><a href="https://www.nguoicodonvn2008.info/vi/news/savefile/kien-thuc-may-tinh/cach-cai-dat-virtualbox-tren-linux-4770.html" title="Cách cài đặt VirtualBox trên Linux">https://www.nguoicodonvn2008.info/vi/news/savefile/kien-thuc-may-tinh/cach-cai-dat-virtualbox-tren-linux-4770.html</a>

		</div>
		<div class="clear"></div>
		<div class="copyright">
			&copy; .&#x3A; Nguoicodonvn2008.info - Cõi lòng người cô đơn &#x3A;.
		</div>
		<div id="contact">
			<a href="mailto:admin@nguoicodonvn2008.info">admin@nguoicodonvn2008.info</a>
		</div>
	</div>
</div>
        <div id="timeoutsess" class="chromeframe">
            Bạn đã không sử dụng Site, <a onclick="timeoutsesscancel();" href="https://nguoicodonvn2008.info/#">Bấm vào đây để duy trì trạng thái đăng nhập</a>. Thời gian chờ: <span id="secField"> 60 </span> giây
        </div>
        <div id="openidResult" class="nv-alert" style="display:none"></div>
        <div id="openidBt" data-result="" data-redirect=""></div>
		</script>
		<div class="car-top">
  <span><img src="https://nguoicodonvn2008.info/themes/default/images/car.png" alt=""></span>
</div>
<script src="https://nguoicodonvn2008.info/assets/js/jquery/jquery.min.js"></script>
<script>var nv_base_siteurl="/",nv_lang_data="vi",nv_lang_interface="vi",nv_name_variable="nv",nv_fc_variable="op",nv_lang_variable="language",nv_module_name="news",nv_func_name="savefile",nv_is_user=0, nv_my_ofs=-4,nv_my_abbr="EDT",nv_cookie_prefix="nv4c_e856T",nv_check_pass_mstime=1738000,nv_area_admin=0,nv_safemode=0,theme_responsive=0,nv_recaptcha_ver=2,nv_recaptcha_sitekey="",nv_recaptcha_type="image",XSSsanitize=1;</script>
<script src="https://nguoicodonvn2008.info/assets/js/language/vi.js"></script>
<script src="https://nguoicodonvn2008.info/assets/js/DOMPurify/purify3.js"></script>
<script src="https://nguoicodonvn2008.info/assets/js/global.js"></script>
<script src="https://nguoicodonvn2008.info/assets/js/site.js"></script>
<script src="https://nguoicodonvn2008.info/themes/default/js/news.js"></script>
<script src="https://nguoicodonvn2008.info/themes/default/js/main.js"></script>
<script src="https://nguoicodonvn2008.info/themes/default/js/custom.js"></script>
<script type="application/ld+json">
        {
            "@context": "https://schema.org",
            "@type": "Organization",
            "url": "https://nguoicodonvn2008.info",
            "logo": "https://nguoicodonvn2008.info/uploads/angel.gif"
        }
        </script>
<script src="https://nguoicodonvn2008.info/themes/default/js/bootstrap.min.js"></script>
<script type="text/javascript">
var $scrolltop = $('.car-top');
$scrolltop.on('click', function () {
    $('html,body').animate({
        scrollTop: 0
    }, 800);
    $(this).addClass("car-run");
    setTimeout(function(){ $scrolltop.removeClass('car-run');}, 1000);
    return false;
});
$(window).on('scroll', function ()
{ 
    if($(window).scrollTop() >= 200)
    {
        $scrolltop.addClass("show");
        $scrolltop.addClass("car-down");
    }
    else
    {
       $scrolltop.removeClass("show");
       setTimeout(function(){ $scrolltop.removeClass('car-down');}, 300);
    }
});
</script>
</body>
</html>