<!DOCTYPE html>
    <html lang="vi" xmlns="http://www.w3.org/1999/xhtml" prefix="og: http://ogp.me/ns#">
    <head>
<title>Cách biến ảnh thành tranh vẽ bằng chức năng Generative Fill trong Photoshop</title>
<meta name="description" content="Cách biến ảnh thành tranh vẽ bằng chức năng Generative Fill trong Photoshop - Savefile - Tin Tức -...">
<meta name="author" content=".: Nguoicodonvn2008.info - Cõi lòng người cô đơn :.">
<meta name="copyright" content=".: Nguoicodonvn2008.info - Cõi lòng người cô đơn :. [admin@nguoicodonvn2008.info]">
<meta name="robots" content="index, archive, follow, noodp">
<meta name="googlebot" content="index,archive,follow,noodp">
<meta name="msnbot" content="all,index,follow">
<meta name="generator" content="NukeViet v4.5">
<meta http-equiv="Content-Type" content="text/html; charset=utf-8">
<meta property="og:title" content="Cách biến ảnh thành tranh vẽ bằng chức năng Generative Fill trong Photoshop">
<meta property="og:type" content="website">
<meta property="og:description" content="Savefile - Tin Tức -...">
<meta property="og:site_name" content=".&#x3A; Nguoicodonvn2008.info - Cõi lòng người cô đơn &#x3A;.">
<meta property="og:url" content="https://www.nguoicodonvn2008.info/vi/news/savefile/kien-thuc-may-tinh/cach-bien-anh-thanh-tranh-ve-bang-chuc-nang-generative-fill-trong-photoshop-9075.html">
<link rel="shortcut icon" href="https://nguoicodonvn2008.info/favicon.ico">
<link rel="canonical" href="https://www.nguoicodonvn2008.info/vi/news/savefile/kien-thuc-may-tinh/cach-bien-anh-thanh-tranh-ve-bang-chuc-nang-generative-fill-trong-photoshop-9075.html">
<link rel="alternate" href="https://nguoicodonvn2008.info/vi/news/rss/" title="Tin Tức" type="application/rss+xml">
<link rel="alternate" href="https://nguoicodonvn2008.info/vi/news/rss/karaoke-dual/" title="Tin Tức - Karaoke Dual" type="application/rss+xml">
<link rel="alternate" href="https://nguoicodonvn2008.info/vi/news/rss/nhac-tre/" title="Tin Tức - Nhạc trẻ" type="application/rss+xml">
<link rel="alternate" href="https://nguoicodonvn2008.info/vi/news/rss/tru-tinh/" title="Tin Tức - Trữ tình" type="application/rss+xml">
<link rel="alternate" href="https://nguoicodonvn2008.info/vi/news/rss/nuoc-ngoai/" title="Tin Tức - Nước ngoài" type="application/rss+xml">
<link rel="alternate" href="https://nguoicodonvn2008.info/vi/news/rss/remix/" title="Tin Tức - Remix" type="application/rss+xml">
<link rel="alternate" href="https://nguoicodonvn2008.info/vi/news/rss/tam-su-tinh-yeu/" title="Tin Tức - Tâm sự tình yêu" type="application/rss+xml">
<link rel="alternate" href="https://nguoicodonvn2008.info/vi/news/rss/tho-suu-tam/" title="Tin Tức - Thơ sưu tầm" type="application/rss+xml">
<link rel="alternate" href="https://nguoicodonvn2008.info/vi/news/rss/cuoc-song/" title="Tin Tức - Cuộc sống" type="application/rss+xml">
<link rel="alternate" href="https://nguoicodonvn2008.info/vi/news/rss/phan-mem/" title="Tin Tức - Phần mềm" type="application/rss+xml">
<link rel="alternate" href="https://nguoicodonvn2008.info/vi/news/rss/kien-thuc-may-tinh/" title="Tin Tức - Kiến thức máy tính" type="application/rss+xml">
<link rel="alternate" href="https://nguoicodonvn2008.info/vi/news/rss/hoc-tap/" title="Tin Tức - Học tập" type="application/rss+xml">
<link rel="alternate" href="https://nguoicodonvn2008.info/vi/news/rss/tai-lieu/" title="Tin Tức - Tài liệu" type="application/rss+xml">
<link rel="alternate" href="https://nguoicodonvn2008.info/vi/news/rss/de-thi/" title="Tin Tức - Đề thi" type="application/rss+xml">
<link rel="preload" as="style" href="https://nguoicodonvn2008.info/assets/css/font-awesome.min.css" type="text/css">
<link rel="preload" as="style" href="https://nguoicodonvn2008.info/themes/default/css/bootstrap.non-responsive.css" type="text/css">
<link rel="preload" as="style" href="https://nguoicodonvn2008.info/themes/default/css/style.css" type="text/css">
<link rel="preload" as="style" href="https://nguoicodonvn2008.info/themes/default/css/style.non-responsive.css" type="text/css">
<link rel="preload" as="style" href="https://nguoicodonvn2008.info/themes/default/css/news.css" type="text/css">
<link rel="preload" as="style" href="https://nguoicodonvn2008.info/themes/default/css/custom.css" type="text/css">
<link rel="preload" as="script" href="https://nguoicodonvn2008.info/assets/js/jquery/jquery.min.js" type="text/javascript">
<link rel="preload" as="script" href="https://nguoicodonvn2008.info/assets/js/language/vi.js" type="text/javascript">
<link rel="preload" as="script" href="https://nguoicodonvn2008.info/assets/js/DOMPurify/purify3.js" type="text/javascript">
<link rel="preload" as="script" href="https://nguoicodonvn2008.info/assets/js/global.js" type="text/javascript">
<link rel="preload" as="script" href="https://nguoicodonvn2008.info/assets/js/site.js" type="text/javascript">
<link rel="preload" as="script" href="https://nguoicodonvn2008.info/themes/default/js/news.js" type="text/javascript">
<link rel="preload" as="script" href="https://nguoicodonvn2008.info/themes/default/js/main.js" type="text/javascript">
<link rel="preload" as="script" href="https://nguoicodonvn2008.info/themes/default/js/custom.js" type="text/javascript">
<link rel="preload" as="script" href="https://nguoicodonvn2008.info/themes/default/js/bootstrap.min.js" type="text/javascript">
<link rel="stylesheet" href="https://nguoicodonvn2008.info/assets/css/font-awesome.min.css">
<link rel="stylesheet" href="https://nguoicodonvn2008.info/themes/default/css/bootstrap.non-responsive.css">
<link rel="stylesheet" href="https://nguoicodonvn2008.info/themes/default/css/style.css">
<link rel="stylesheet" href="https://nguoicodonvn2008.info/themes/default/css/style.non-responsive.css">
<link rel="StyleSheet" href="https://nguoicodonvn2008.info/themes/default/css/news.css">
<link rel="stylesheet" href="https://nguoicodonvn2008.info/themes/default/css/custom.css">
<style type="text/css">
	body{background: #fff;}
</style>
    </head>
    <body>
<div id="print">
	<div id="hd_print">
		<h2 class="pull-left">.&#x3A; Nguoicodonvn2008.info - Cõi lòng người cô đơn &#x3A;.</h2>
		<p class="pull-right"><a title=".&#x3A; Nguoicodonvn2008.info - Cõi lòng người cô đơn &#x3A;." href="https://nguoicodonvn2008.info/">https://nguoicodonvn2008.info</a></p>
	</div>
	<div class="clear"></div>
	<hr />
	<div id="content">
		<h1>Cách biến ảnh thành tranh vẽ bằng chức năng Generative Fill trong Photoshop</h1>
		<ul class="list-inline">
			<li>Thứ năm - 26/09/2024 23:49</li>
			<li class="hidden-print txtrequired"><em class="fa fa-print">&nbsp;</em><a title="In ra" href="javascript:;" onclick="window.print()">In ra</a></li>
			<li class="hidden-print txtrequired"><em class="fa fa-power-off">&nbsp;</em><a title="Đóng cửa sổ này" href="javascript:;" onclick="window.close()">Đóng cửa sổ này</a></li>
		</ul>
		<div class="clear"></div>
		<div id="hometext">
		</div>
				<div class="imghome">
			<img alt="Cách biến ảnh thành tranh vẽ bằng chức năng Generative Fill trong Photoshop" src="https://st.quantrimang.com/photos/image/2024/09/26/bien-anh-thanh-tranh-ve-bang-photoshop-14.jpg" width="460" class="img-thumbnail" />
		</div>
		<div class="clear"></div>
		<div id="bodytext" class="clearfix">
			<p style="text-align: justify;">Cho dù bạn muốn biến ảnh của mình thành tranh màu nước, tranh sơn dầu hay một loại tranh nào khác, đây là cách tạo hiệu ứng bằng Generative Fill trong Photoshop.</p>

<h2 style="text-align: justify;">
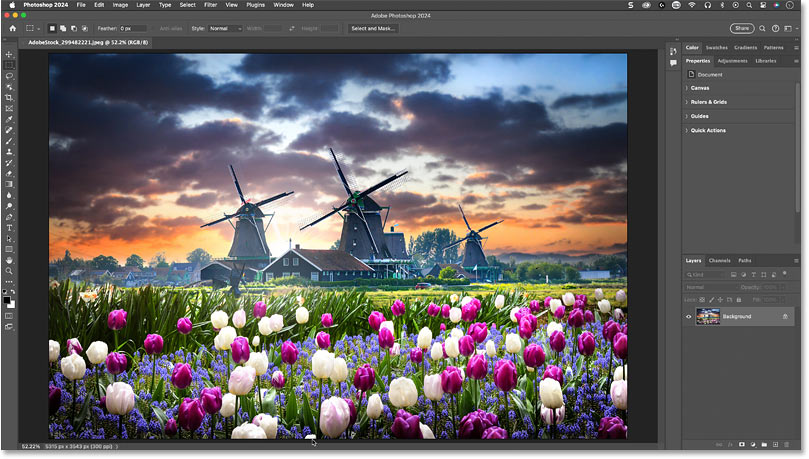
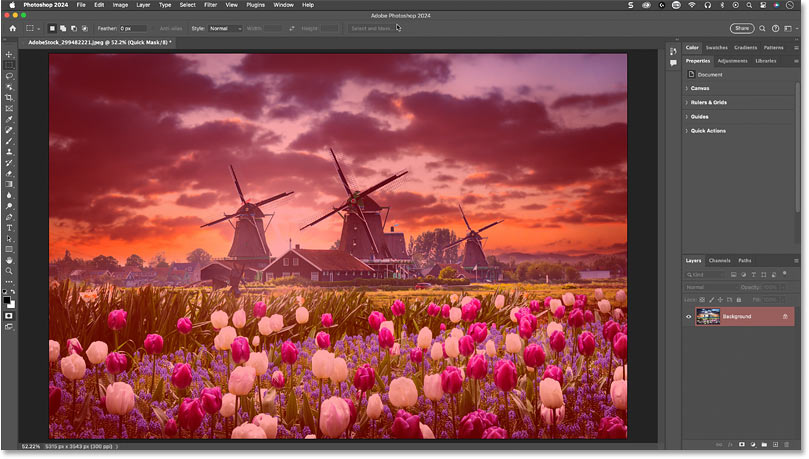
Bước 1: Mở ảnh của bạn</h2>

<p style="text-align: justify;">Vì AI tạo ảnh luôn thay thế chi tiết ảnh gốc bằng chi tiết mới (ngay cả khi áp dụng ở cường độ thấp), hiệu ứng vẽ được tạo bằng Generative Fill có xu hướng hoạt động tốt nhất trên các ảnh như ảnh phong cảnh và ảnh thiên nhiên, trong đó các chi tiết chính xác không quan trọng bằng, chẳng hạn, những đặc điểm trên khuôn mặt của ai đó.</p>

<p style="text-align: justify;">Vì vậy, hướng dẫn sẽ sử dụng ảnh này từ Adobe Stock.</p>

<figure>
<div style="text-align: justify;"><img alt="Ảnh gốc." data-i="0" data-src="https://st.quantrimang.com/photos/image/2024/09/26/bien-anh-thanh-tranh-ve-bang-photoshop-1.jpg" data-was-processed="true" height="459" src="https://st.quantrimang.com/photos/image/2024/09/26/bien-anh-thanh-tranh-ve-bang-photoshop-1.jpg" width="809" /></div>

<figcaption>
<div style="text-align: justify;">Ảnh gốc.</div>
</figcaption>
</figure>

<h2 style="text-align: justify;">
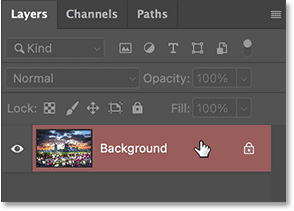
Bước 2: Chuyển sang chế độ Quick Mask</h2>

<p style="text-align: justify;">Để áp dụng Generative Fill ở cường độ nhỏ hơn 100%, cần bắt đầu ở chế độ Quick Mask của Photoshop.
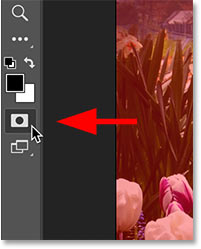
</p>

<p style="text-align: justify;">Trên thanh công cụ, nhấp vào biểu tượng&nbsp;<strong>Quick Mask</strong>&nbsp;(gần cuối, ngay bên dưới các mẫu màu). Hoặc bạn có thể nhấn chữ&nbsp;<strong>Q</strong>&nbsp;trên bàn phím.</p>

<div style="text-align: justify;"><iframe allow="autoplay" allowtransparency="true" aria-label="Advertisement" data-google-container-id="a!2" data-google-query-id="CNSe2fub4ogDFQiI6QUdk7EPLg" data-load-complete="true" frameborder="0" height="0" hspace="0" id="aswift_1" marginheight="0" marginwidth="0" name="aswift_1" sandbox="allow-scripts allow-same-origin allow-forms allow-presentation allow-popups" scrolling="no" tabindex="0" title="Advertisement" vspace="0" width="694"></iframe></div>

<figure>
<div style="text-align: justify;"><img alt="Biểu tượng Quick Mask trên thanh công cụ." data-i="1" data-src="https://st.quantrimang.com/photos/image/2024/09/26/bien-anh-thanh-tranh-ve-bang-photoshop-2.jpg" data-was-processed="true" height="254" src="https://st.quantrimang.com/photos/image/2024/09/26/bien-anh-thanh-tranh-ve-bang-photoshop-2.jpg" width="201" /></div>

<figcaption>
<div style="text-align: justify;">Biểu tượng Quick Mask trên thanh công cụ.</div>
</figcaption>
</figure>

<p style="text-align: justify;">Một cách dễ dàng để biết bạn đang ở chế độ Quick Mask là layer Background trong bảng Layers được highlight màu đỏ.</p>

<figure>
<div style="text-align: justify;"><img alt="Highlight màu đỏ biểu thị chế độ Quick Mask." data-i="2" data-src="https://st.quantrimang.com/photos/image/2024/09/26/bien-anh-thanh-tranh-ve-bang-photoshop-3.png" data-was-processed="true" height="211" src="https://st.quantrimang.com/photos/image/2024/09/26/bien-anh-thanh-tranh-ve-bang-photoshop-3.png" width="294" /></div>

<figcaption>
<div style="text-align: justify;">Highlight màu đỏ biểu thị chế độ Quick Mask.</div>
</figcaption>
</figure>

<h2 style="text-align: justify;">
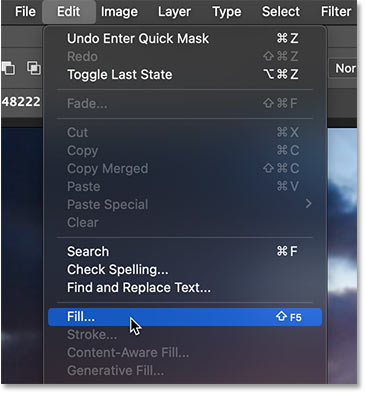
Bước 3: Mở tùy chọn Fill</h2>

<p style="text-align: justify;">Khi chế độ Quick Mask đang hoạt động, hãy vào menu&nbsp;<strong>Edit</strong>&nbsp;trong thanh Menu và chọn&nbsp;<strong>Fill.</strong></p>

<figure>
<div style="text-align: justify;"><img alt="Vào Edit &gt; Fill." data-i="3" data-src="https://st.quantrimang.com/photos/image/2024/09/26/bien-anh-thanh-tranh-ve-bang-photoshop-4.jpg" data-was-processed="true" height="393" src="https://st.quantrimang.com/photos/image/2024/09/26/bien-anh-thanh-tranh-ve-bang-photoshop-4.jpg" width="365" /></div>

<figcaption>
<div style="text-align: justify;">Vào Edit &gt; Fill.</div>
</figcaption>
</figure>

<h2 style="text-align: justify;">Bước 4: Chọn màu tô xám đậm
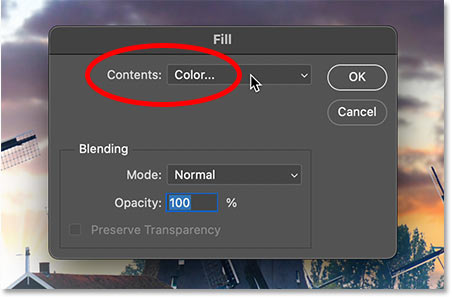
</h2>

<p style="text-align: justify;">Trong hộp thoại&nbsp;<strong>Fill</strong>, hãy đổi tùy chọn&nbsp;<strong>Contents</strong>&nbsp;thành&nbsp;<strong>Color.</strong></p>

<p style="text-align: justify;">Lưu ý rằng ngay cả khi Color đã được chọn, bạn vẫn cần chọn lại để Color Picker mở ra.</p>

<figure>
<div style="text-align: justify;"><img alt="Hộp thoại Fill trong Photoshop" data-i="4" data-src="https://st.quantrimang.com/photos/image/2024/09/26/bien-anh-thanh-tranh-ve-bang-photoshop-5.jpg" data-was-processed="true" height="298" src="https://st.quantrimang.com/photos/image/2024/09/26/bien-anh-thanh-tranh-ve-bang-photoshop-5.jpg" width="452" /></div>

<figcaption>
<div style="text-align: justify;">Hộp thoại Fill trong Photoshop</div>
</figcaption>
</figure>

<div style="text-align: justify;"><iframe allow="autoplay" allowtransparency="true" aria-label="Advertisement" data-google-container-id="a!3" data-google-query-id="CIal2vub4ogDFauG6QUdjFMeTw" data-load-complete="true" frameborder="0" height="0" hspace="0" id="aswift_2" marginheight="0" marginwidth="0" name="aswift_2" sandbox="allow-scripts allow-same-origin allow-forms allow-presentation allow-popups" scrolling="no" tabindex="0" title="Advertisement" vspace="0" width="694"></iframe></div>

<p style="text-align: justify;">
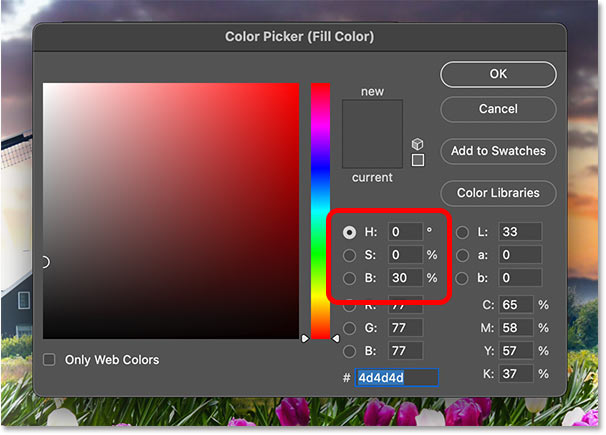
Trong Color Picker, hãy đặt giá trị H (Hue) và S (Saturation) thành 0 để làm việc với màu xám. Sau đó, đặt giá trị B (Brightness) thành 30%.</p>

<p style="text-align: justify;">Hãy coi giá trị độ sáng như giá trị cường độ AI. Giá trị càng cao, thì tác động của Generative Fill lên hình ảnh càng lớn (và hình ảnh sẽ thay đổi càng nhiều). Giá trị càng thấp, thì chi tiết gốc sẽ càng được giữ nguyên.</p>

<p style="text-align: justify;">Đối với hiệu ứng vẽ này, giá trị 20 - 40% thường hoạt động tốt nhất và 30% có xu hướng là điểm lý tưởng. Nhưng bạn luôn có thể lặp lại các bước này với giá trị độ sáng khác để so sánh kết quả.</p>

<figure>
<div style="text-align: justify;"><img alt="" height="0" src="https://ad.doubleclick.net/ddm/trackimp/N1414183.4029011ADBRO/B32372438.401022862;dc_trk_aid=593156466;dc_trk_cid=220664879;ord=1727409006757;dc_lat=;dc_rdid=;tag_for_child_directed_treatment=;tfua=;gdpr=$%7BGDPR%7D;gdpr_consent=$%7BGDPR_CONSENT_755%7D;ltd=;dc_tdv=1?" width="0" /><br />
<img alt="Đặt H và S thành 0, B thành 30% trong Color Picker" data-adbro-processed="true" data-i="5" data-src="https://st.quantrimang.com/photos/image/2024/09/26/bien-anh-thanh-tranh-ve-bang-photoshop-6.jpg" data-was-processed="true" height="435" src="https://st.quantrimang.com/photos/image/2024/09/26/bien-anh-thanh-tranh-ve-bang-photoshop-6.jpg" width="606" /></div>

<figcaption>
<div style="text-align: justify;">Đặt H và S thành 0, B thành 30% trong Color Picker</div>
</figcaption>
</figure>

<h2 style="text-align: justify;">Bước 5: Thoát chế độ Quick Mask</h2>

<p style="text-align: justify;">Nhấp&nbsp;<strong>OK</strong>&nbsp;để đóng Color Picker của Photoshop. Sau đó nhấp&nbsp;<strong>OK</strong>&nbsp;để đóng hộp thoại&nbsp;<strong>Fill.</strong></p>

<p style="text-align: justify;">Vì đang ở chế độ Quick Mask, nên hình ảnh của bạn sẽ xuất hiện với lớp phủ màu đỏ (một cách dễ dàng khác để biết bạn đang ở chế độ Quick Mask).</p>

<figure>
<div style="text-align: justify;"><img alt="Lớp phủ màu đỏ ở chế độ Quick Mask." data-i="6" data-src="https://st.quantrimang.com/photos/image/2024/09/26/bien-anh-thanh-tranh-ve-bang-photoshop-7.jpg" data-was-processed="true" height="459" src="https://st.quantrimang.com/photos/image/2024/09/26/bien-anh-thanh-tranh-ve-bang-photoshop-7.jpg" width="809" /></div>

<figcaption>
<div style="text-align: justify;">Lớp phủ màu đỏ ở chế độ Quick Mask.</div>
</figcaption>
</figure>

<p style="text-align: justify;">Thoát chế độ Quick Mask bằng cách nhấp lại vào biểu tượng Quick Mask trên thanh công cụ hoặc nhấn&nbsp;<strong>Q</strong>&nbsp;trên bàn phím.</p>

<figure>
<div style="text-align: justify;"><img alt="Nhấp vào biểu tượng Quick Mask để đóng biểu tượng đó." data-i="7" data-src="https://st.quantrimang.com/photos/image/2024/09/26/bien-anh-thanh-tranh-ve-bang-photoshop-8.jpg" data-was-processed="true" height="249" src="https://st.quantrimang.com/photos/image/2024/09/26/bien-anh-thanh-tranh-ve-bang-photoshop-8.jpg" width="201" /></div>

<figcaption>
<div style="text-align: justify;">Nhấp vào biểu tượng Quick Mask để đóng biểu tượng đó.</div>
</figcaption>
</figure>

<div style="text-align: justify;"><iframe allow="autoplay" allowtransparency="true" aria-label="Advertisement" data-google-container-id="a!4" data-google-query-id="CNqezIGc4ogDFQCS6QUdnX8hKg" data-load-complete="true" frameborder="0" height="0" hspace="0" id="aswift_3" marginheight="0" marginwidth="0" name="aswift_3" sandbox="allow-scripts allow-same-origin allow-forms allow-presentation allow-popups" scrolling="no" tabindex="0" title="Advertisement" vspace="0" width="694"></iframe></div>

<h2 style="text-align: justify;">
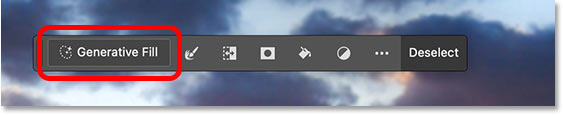
Bước 6: Chọn Generative Fill</h2>

<p style="text-align: justify;">Trong Contextual Task Bar của Photoshop, nhấp vào&nbsp;<strong>Generative Fill</strong>.</p>

<figure>
<div style="text-align: justify;"><img alt="Nhấp vào Generative Fill trong Contextual Task Bar của Photoshop" data-i="8" data-src="https://st.quantrimang.com/photos/image/2024/09/26/bien-anh-thanh-tranh-ve-bang-photoshop-9.jpg" data-was-processed="true" height="115" src="https://st.quantrimang.com/photos/image/2024/09/26/bien-anh-thanh-tranh-ve-bang-photoshop-9.jpg" width="563" /></div>

<figcaption>
<div style="text-align: justify;">Nhấp vào Generative Fill trong Contextual Task Bar của Photoshop</div>
</figcaption>
</figure>

<h2 style="text-align: justify;">
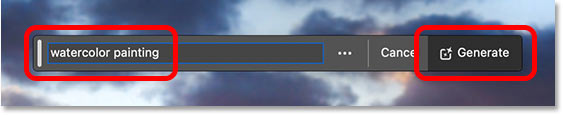
Bước 7: Nhập prompt vẽ tranh và nhấp vào Generate</h2>

<p style="text-align: justify;">Trong hộp lời nhắc, nhập kiểu tranh bạn muốn tạo. Ví dụ sẽ nhập&nbsp;<strong>watercolor painting</strong>.</p>

<p style="text-align: justify;">Sau đó nhấp vào&nbsp;<strong>Generate</strong>.</p>

<figure>
<div style="text-align: justify;"><img alt="Nhập kiểu tranh và nhấp vào Generate." data-i="9" data-src="https://st.quantrimang.com/photos/image/2024/09/26/bien-anh-thanh-tranh-ve-bang-photoshop-10.jpg" data-was-processed="true" height="115" src="https://st.quantrimang.com/photos/image/2024/09/26/bien-anh-thanh-tranh-ve-bang-photoshop-10.jpg" width="563" /></div>

<figcaption>
<div style="text-align: justify;">Nhập kiểu tranh và nhấp vào Generate.</div>
</figcaption>
</figure>

<h2 style="text-align: justify;">
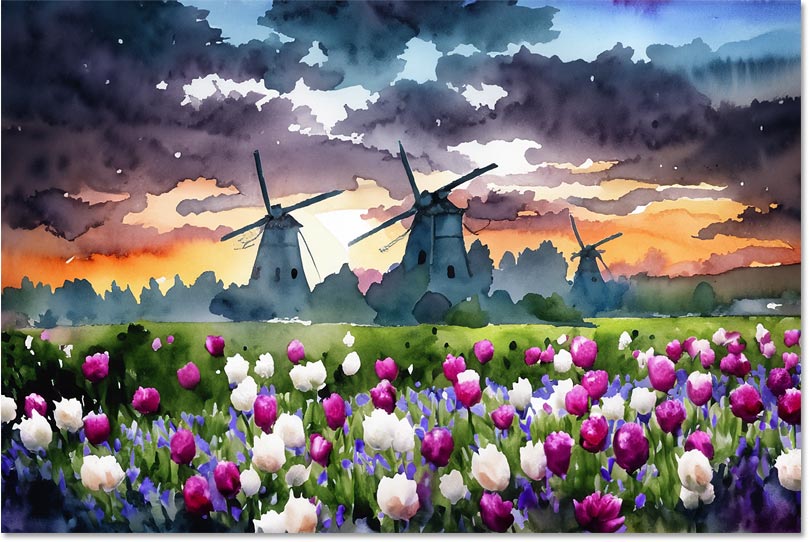
Bước 8: Chọn kết quả tốt nhất</h2>

<p style="text-align: justify;">Bạn sẽ cần đợi vài giây để Photoshop và Adobe Firefly tạo kết quả.</p>

<p style="text-align: justify;">
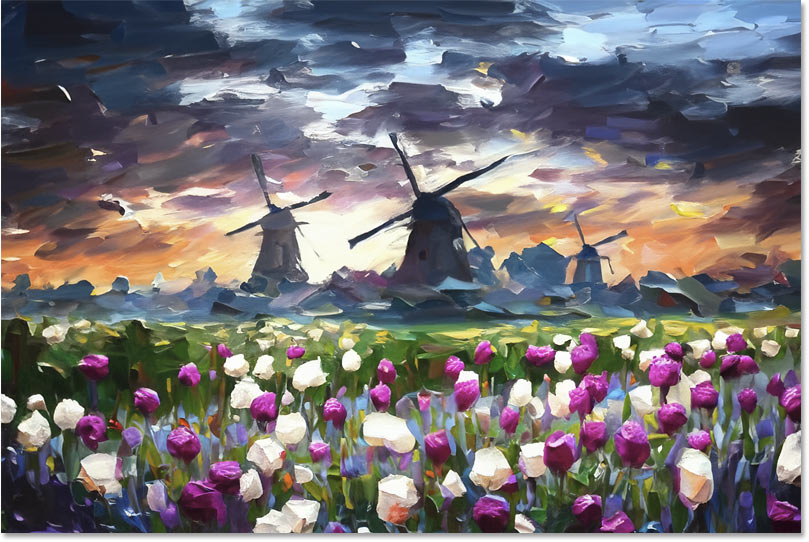
Đây là hiệu ứng tranh màu nước ban đầu. Áp dụng Generative Fill ở cường độ chỉ 30% cho phép giữ lại nhiều chi tiết ban đầu để vẫn có thể phân biệt được hoa và cối xay gió.</p>

<figure>
<div style="text-align: justify;"><img alt="Ảnh đã được chuyển thành tranh màu nước bằng Generative Fill trong Photoshop" data-i="10" data-src="https://st.quantrimang.com/photos/image/2024/09/26/bien-anh-thanh-tranh-ve-bang-photoshop-11.jpg" data-was-processed="true" height="542" src="https://st.quantrimang.com/photos/image/2024/09/26/bien-anh-thanh-tranh-ve-bang-photoshop-11.jpg" width="809" /></div>

<figcaption>
<div style="text-align: justify;">Ảnh đã được chuyển thành tranh màu nước bằng Generative Fill trong Photoshop</div>
</figcaption>
</figure>

<p style="text-align: justify;">
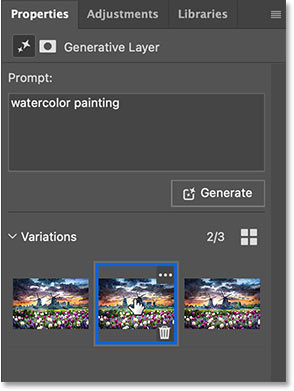
Như thường lệ với Generative Fill, bạn sẽ thấy 3 biến thể của kết quả trong bảng&nbsp;<strong>Properties</strong>&nbsp;để bạn có thể chọn biến thể mà mình thích nhất. Hoặc nhấp vào&nbsp;<strong>Generate</strong>&nbsp;để thử lại.</p>

<figure>
<div style="text-align: justify;"><img alt="Chọn từ ba biến thể trong bảng Properties." data-i="11" data-src="https://st.quantrimang.com/photos/image/2024/09/26/bien-anh-thanh-tranh-ve-bang-photoshop-12.jpg" data-was-processed="true" height="391" src="https://st.quantrimang.com/photos/image/2024/09/26/bien-anh-thanh-tranh-ve-bang-photoshop-12.jpg" width="294" /></div>

<figcaption>
<div style="text-align: justify;">Chọn từ ba biến thể trong bảng Properties.</div>
</figcaption>
</figure>

<h2 style="text-align: justify;">Bước 9: Thử các kiểu vẽ khác nhau</h2>

<p style="text-align: justify;">
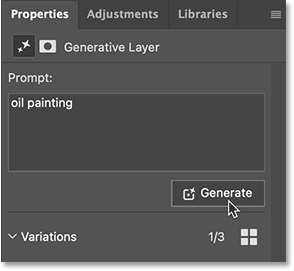
Sau khi tạo hiệu ứng vẽ ban đầu, bạn có thể dễ dàng thử các kiểu vẽ khác nhau chỉ bằng cách thay đổi lời nhắc trong bảng Properties.</p>

<p style="text-align: justify;">Ví dụ sẽ thay đổi lời nhắc từ tranh màu nước sang tranh sơn dầu. Sau đó, nhấp vào Generate.</p>

<figure>
<div style="text-align: justify;"><img alt="Nhập một kiểu vẽ khác và nhấp vào Generate." data-i="12" data-src="https://st.quantrimang.com/photos/image/2024/09/26/bien-anh-thanh-tranh-ve-bang-photoshop-13.png" data-was-processed="true" height="271" src="https://st.quantrimang.com/photos/image/2024/09/26/bien-anh-thanh-tranh-ve-bang-photoshop-13.png" width="294" /></div>

<figcaption>
<div style="text-align: justify;">Nhập một kiểu vẽ khác và nhấp vào Generate.</div>
</figcaption>
</figure>

<div style="text-align: justify;"><iframe allow="autoplay" allowtransparency="true" aria-label="Advertisement" data-google-container-id="a!5" data-google-query-id="CLnnjoKc4ogDFeSI6QUdRkkRnw" data-load-complete="true" frameborder="0" height="0" hspace="0" id="aswift_4" marginheight="0" marginwidth="0" name="aswift_4" sandbox="allow-scripts allow-same-origin allow-forms allow-presentation allow-popups" scrolling="no" tabindex="0" title="Advertisement" vspace="0" width="694"></iframe></div>

<p style="text-align: justify;">Đây là kết quả yêu thích trong 3 kết quả tranh sơn dầu.</p>

<figure>
<div style="text-align: justify;"><img alt="Hiệu ứng tranh sơn dầu được tạo bằng Generative Fill." data-i="13" data-src="https://st.quantrimang.com/photos/image/2024/09/26/bien-anh-thanh-tranh-ve-bang-photoshop-14.jpg" data-was-processed="true" height="542" src="https://st.quantrimang.com/photos/image/2024/09/26/bien-anh-thanh-tranh-ve-bang-photoshop-14.jpg" width="809" /></div>

<figcaption>
<div style="text-align: justify;">Hiệu ứng tranh sơn dầu được tạo bằng Generative Fill.</div>
</figcaption>
</figure>

<p style="text-align: justify;">Vậy là xong! Đó là cách dễ dàng chuyển ảnh thành tranh bằng Generative Fill trong Photoshop.</p>

<div style="text-align: justify;">&nbsp;</div>
		</div>
				<div id="author">
						<p>
				<strong>Nguồn tin:</strong>
				Quantrimang.com:
			</p>
		</div>
	</div>
	<div id="footer" class="clearfix">
		<div id="url">
			<strong>URL của bản tin này: </strong><a href="https://www.nguoicodonvn2008.info/vi/news/savefile/kien-thuc-may-tinh/cach-bien-anh-thanh-tranh-ve-bang-chuc-nang-generative-fill-trong-photoshop-9075.html" title="Cách biến ảnh thành tranh vẽ bằng chức năng Generative Fill trong Photoshop">https://www.nguoicodonvn2008.info/vi/news/savefile/kien-thuc-may-tinh/cach-bien-anh-thanh-tranh-ve-bang-chuc-nang-generative-fill-trong-photoshop-9075.html</a>

		</div>
		<div class="clear"></div>
		<div class="copyright">
			&copy; .&#x3A; Nguoicodonvn2008.info - Cõi lòng người cô đơn &#x3A;.
		</div>
		<div id="contact">
			<a href="mailto:admin@nguoicodonvn2008.info">admin@nguoicodonvn2008.info</a>
		</div>
	</div>
</div>
        <div id="timeoutsess" class="chromeframe">
            Bạn đã không sử dụng Site, <a onclick="timeoutsesscancel();" href="https://nguoicodonvn2008.info/#">Bấm vào đây để duy trì trạng thái đăng nhập</a>. Thời gian chờ: <span id="secField"> 60 </span> giây
        </div>
        <div id="openidResult" class="nv-alert" style="display:none"></div>
        <div id="openidBt" data-result="" data-redirect=""></div>
		</script>
		<div class="car-top">
  <span><img src="https://nguoicodonvn2008.info/themes/default/images/car.png" alt=""></span>
</div>
<script src="https://nguoicodonvn2008.info/assets/js/jquery/jquery.min.js"></script>
<script>var nv_base_siteurl="/",nv_lang_data="vi",nv_lang_interface="vi",nv_name_variable="nv",nv_fc_variable="op",nv_lang_variable="language",nv_module_name="news",nv_func_name="savefile",nv_is_user=0, nv_my_ofs=-4,nv_my_abbr="EDT",nv_cookie_prefix="nv4c_e856T",nv_check_pass_mstime=1738000,nv_area_admin=0,nv_safemode=0,theme_responsive=0,nv_recaptcha_ver=2,nv_recaptcha_sitekey="",nv_recaptcha_type="image",XSSsanitize=1;</script>
<script src="https://nguoicodonvn2008.info/assets/js/language/vi.js"></script>
<script src="https://nguoicodonvn2008.info/assets/js/DOMPurify/purify3.js"></script>
<script src="https://nguoicodonvn2008.info/assets/js/global.js"></script>
<script src="https://nguoicodonvn2008.info/assets/js/site.js"></script>
<script src="https://nguoicodonvn2008.info/themes/default/js/news.js"></script>
<script src="https://nguoicodonvn2008.info/themes/default/js/main.js"></script>
<script src="https://nguoicodonvn2008.info/themes/default/js/custom.js"></script>
<script type="application/ld+json">
        {
            "@context": "https://schema.org",
            "@type": "Organization",
            "url": "https://nguoicodonvn2008.info",
            "logo": "https://nguoicodonvn2008.info/uploads/angel.gif"
        }
        </script>
<script src="https://nguoicodonvn2008.info/themes/default/js/bootstrap.min.js"></script>
<script type="text/javascript">
var $scrolltop = $('.car-top');
$scrolltop.on('click', function () {
    $('html,body').animate({
        scrollTop: 0
    }, 800);
    $(this).addClass("car-run");
    setTimeout(function(){ $scrolltop.removeClass('car-run');}, 1000);
    return false;
});
$(window).on('scroll', function ()
{ 
    if($(window).scrollTop() >= 200)
    {
        $scrolltop.addClass("show");
        $scrolltop.addClass("car-down");
    }
    else
    {
       $scrolltop.removeClass("show");
       setTimeout(function(){ $scrolltop.removeClass('car-down');}, 300);
    }
});
</script>
</body>
</html>