9 cách để mở System Configuration trong Windows
- Thứ hai - 03/01/2022 22:59
- In ra
- Đóng cửa sổ này
Công cụ System Configuration còn được biết đến là file thực thi msconfig.exe. Ứng dụng này hữu ích cho những người muốn quản lý các tùy chọn khởi động Windows, cũng như khắc phục sự cố về tính ổn định và hiệu suất.
Bạn có thể làm tất cả những điều đó từ công cụ nhỏ bé tiện dụng này, nhưng trước tiên, bạn phải biết cách mở System Configuration đã. Trong bài viết này, Quantrimang.com sẽ chỉ cho bạn 9 cách để mở System Configuration (msconfig.exe) trong Windows.
LƯU Ý: Hướng dẫn này áp dụng cho Windows 11, Windows 10, Windows 7 và Windows 8.1. Một số phương pháp hoạt động trong cả 4 phiên bản Windows, những tùy chọn khác chỉ có thể sử dụng trong một hoặc hai phiên bản Windows.
Đối với mỗi phương pháp, bài viết sẽ đề cập đến phiên bản Windows mà nó hoạt động. Nếu bạn không biết mình đang dùng phiên bản Windows nào, hãy đọc hướng dẫn: Xác định phiên bản Windows trên hệ thống.
1. Mở System Configuration sử dụng công cụ tìm kiếm
(Áp dụng cho tất cả các phiên bản Windows)
Như với hầu hết các công cụ Windows, bạn có thể khởi động tiện ích này theo nhiều cách:
- Trong Windows 11, nhấp vào biểu tượng kính lúp trên thanh tác vụ để hiển thị hộp tìm kiếm. Gõ từ khóa MSConfig vào hộp tìm kiếm để tìm System Configuration. Nhấp vào System Configuration trong kết quả tìm kiếm để mở MSConfig, hoặc nhấp vào Run as administrator cho System Configuration ở phía bên phải của hộp tìm kiếm.
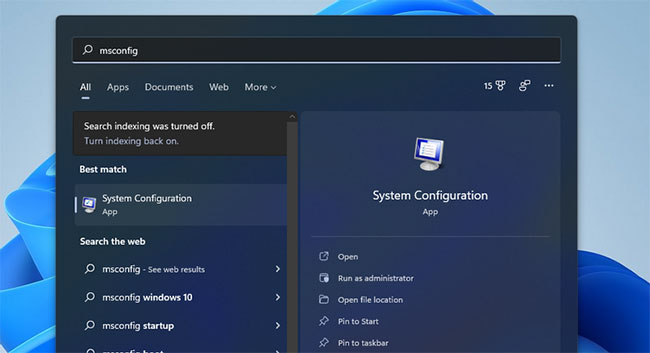
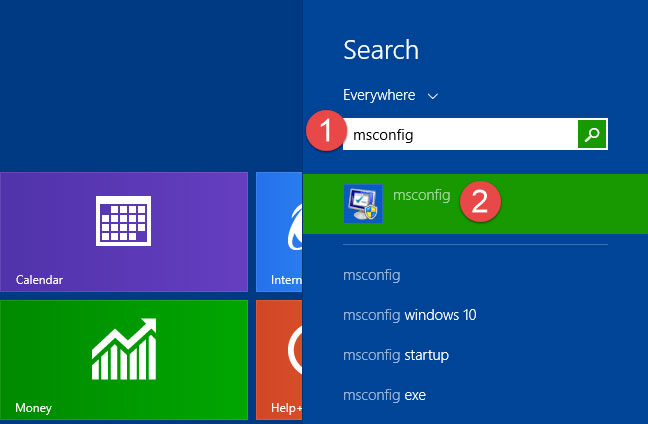
- Trong Windows 10, hãy nhấp hoặc nhấn vào bên trong hộp tìm kiếm trên thanh tác vụ. Nhập "system configuration" hoặc "msconfig" và sau đó nhấp vào kết quả tìm kiếm System Configuration.
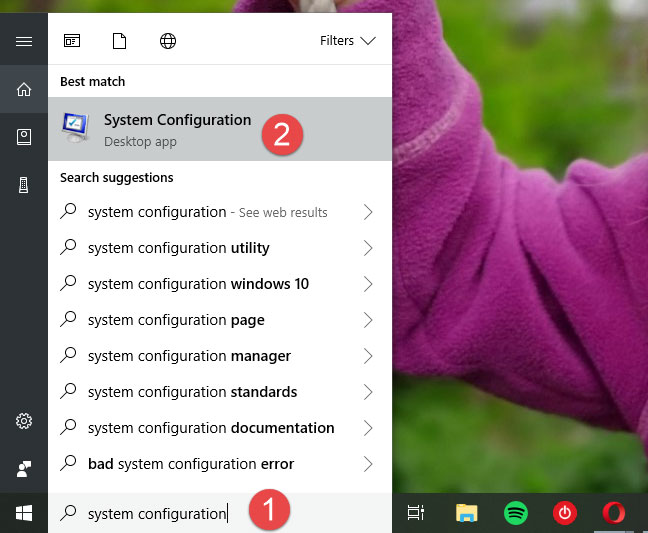
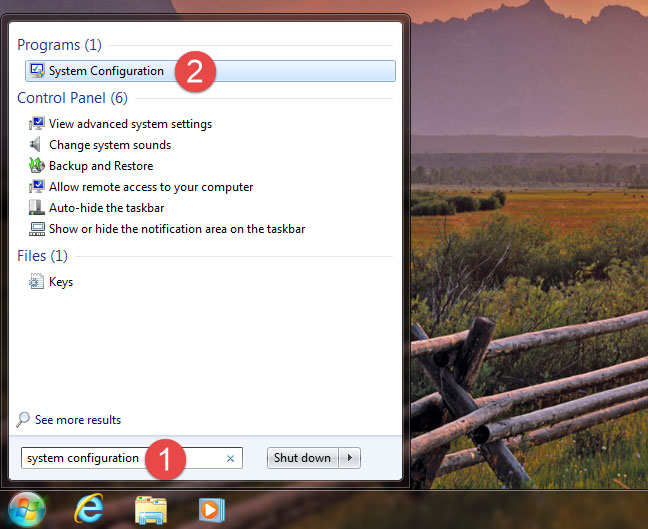
- Trong Windows 7, tìm kiếm "system configuration" hoặc "msconfig" trong menu Start và sau đó nhấp vào shortcut của nó.
- Trong Windows 8.1, chuyển sang Start Screen và nhập "msconfig". Khi kết quả tìm kiếm được hiển thị, nhấp vào msconfig. Lưu ý rằng, trong Windows 8.1, tìm kiếm "system configuration" không mang lại kết quả.
2. Mở công cụ System Configuration bằng menu Start
(Chỉ dành cho Windows 10)
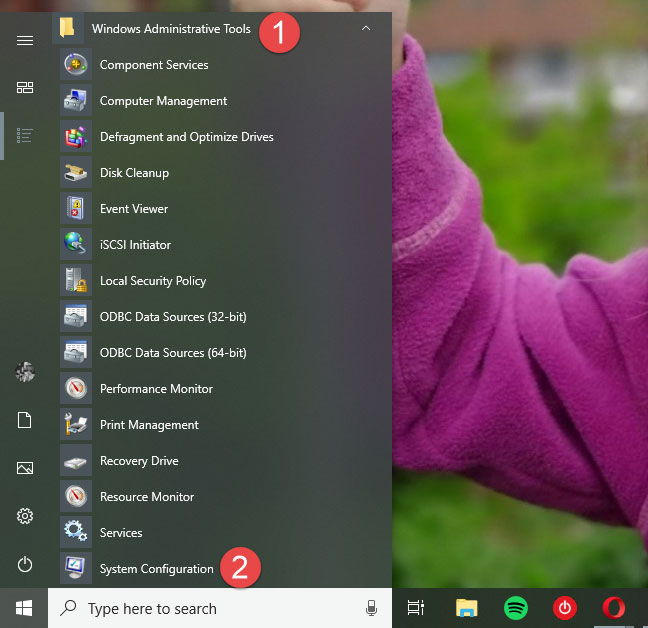
Không giống như Windows 7 và Windows 8.1, Windows 10 bao gồm một shortcut cho System Configuration trong menu Start. Mở menu Start và cuộn xuống Windows Administrative Tools. Trong thư mục này, bấm vào shortcut System Configuration.
3. Mở công cụ System Configuration bằng cửa sổ Run
(Áp dụng cho tất cả các phiên bản Windows)
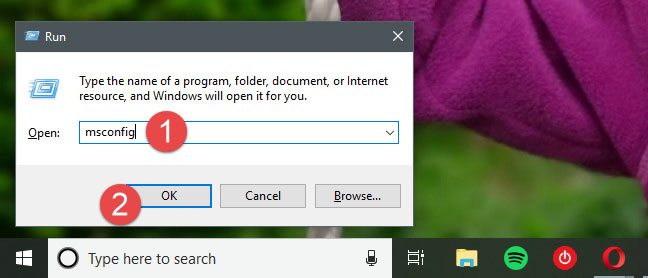
Cửa sổ Run cung cấp một trong những cách nhanh nhất để mở công cụ System Configuration.
Nhấn đồng thời các phím Win+R trên bàn phím để khởi chạy Run, gõ "msconfig", sau đó nhấn Enter hoặc nhấp vào OK. Công cụ System Configuration sẽ mở ngay lập tức.
4. Mở System Configuration bằng cách tạo shortcut ở bất cứ đâu
(Áp dụng cho tất cả các phiên bản Windows)
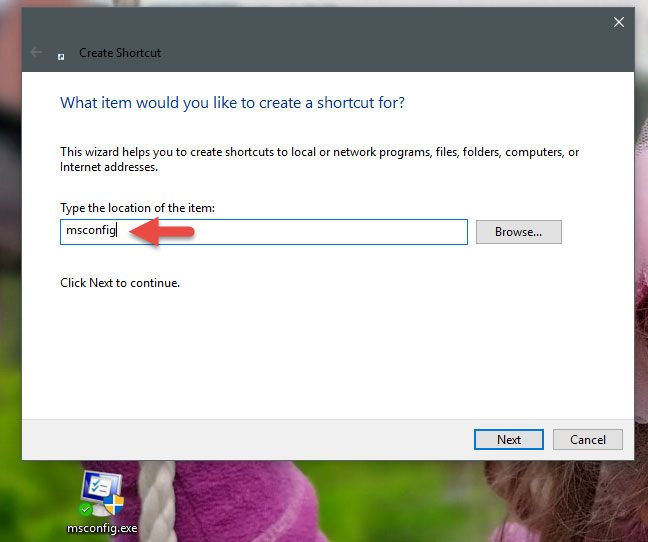
Bất kể phiên bản Windows bạn sử dụng là gì, bạn có thể tạo shortcut đến công cụ System Configuration và sau đó sử dụng nó. Shortcut có thể được đặt ở bất cứ đâu bạn muốn, như trên desktop hoặc trong thư mục Shortcuts. Khi tạo shortcut, hãy sử dụng msconfig làm vị trí đích.
Nếu bạn cần trợ giúp tạo shortcut, tham khảo bài viết: Tạo và tùy chỉnh shortcut ứng dụng trên win 10 để biết thêm chi tiết.
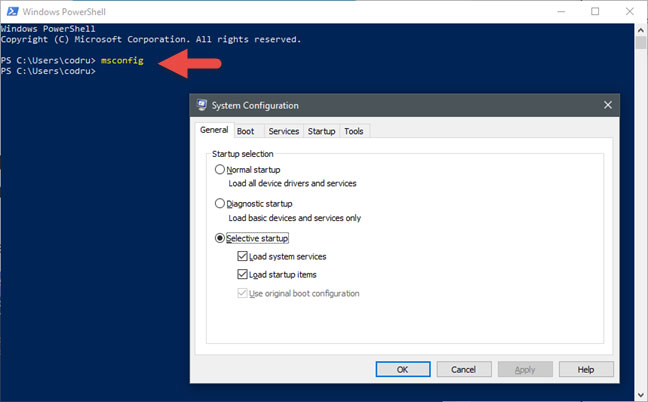
5. Mở System Configuration bằng Command Prompt hoặc PowerShell
(Áp dụng cho tất cả các phiên bản Windows)
Công cụ System Configuration cũng có thể được khởi động từ Command Prompt hoặc PowerShell. Tất cả những gì bạn phải làm là khởi chạy một trong 2 công cụ này, nhập msconfig, sau đó nhấn Enter trên bàn phím.
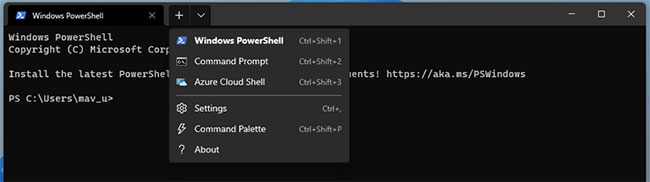
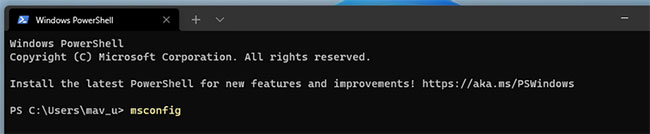
Windows Terminal là một ứng dụng kết hợp cả Command Prompt và PowerShell. Đây là cách bạn có thể mở MSConfig thông qua Windows Terminal trong Windows 11.
- Nhấp chuột phải vào Start và chọn Windows Terminal (Admin) trên menu.
- Nếu một lời nhắc UAC xuất hiện, hãy chọn tùy chọn Yes trên đó.
- Nhấp vào nút Open a new tab và chọn tiện ích Windows PowerShell hoặc Command Prompt mà bạn thích.
- Sau đó, nhập msconfig trong tab PowerShell hoặc Command Prompt và nhấn phím Enter để mở.
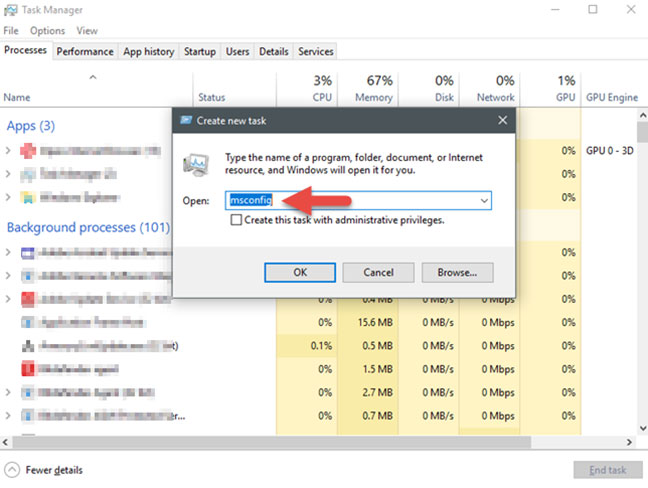
6. Mở System Configuration bằng Task Manager
(Áp dụng cho tất cả các phiên bản Windows)
Bạn cũng có thể mở công cụ System Configuration bằng Task Manager. Nhấn đồng thời các phím Ctrl+Shift+Esc để khởi chạy Task Manager. Nếu bạn đang sử dụng thiết bị Windows 10 hoặc Windows 8.1 và Task Manager mở ở chế độ xem thu nhỏ, hãy nhấp vào More details.. Sau đó, mở menu File, nhấn vào Run new task và nhập lệnh msconfig trong cửa sổ Create new task. Cuối cùng, nhấn Enter trên bàn phím hoặc nhấp vào OK.
7. Mở System Configuration bằng file thực thi của nó
(Áp dụng cho tất cả các phiên bản Windows)
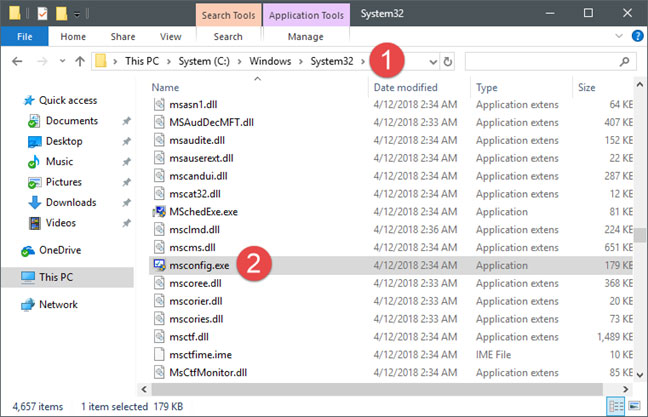
Trong tất cả các phiên bản Windows, công cụ System Configuration thực sự là một file thực thi có tên msconfig.exe, được tìm thấy trong thư mục "C:\Windows\System32". Nếu muốn, bạn có thể mở công cụ bằng cách nhấp đúp vào file thực thi này.
8. Mở MSConfig bằng File Explorer
(Chỉ áp dụng cho Windows 11)
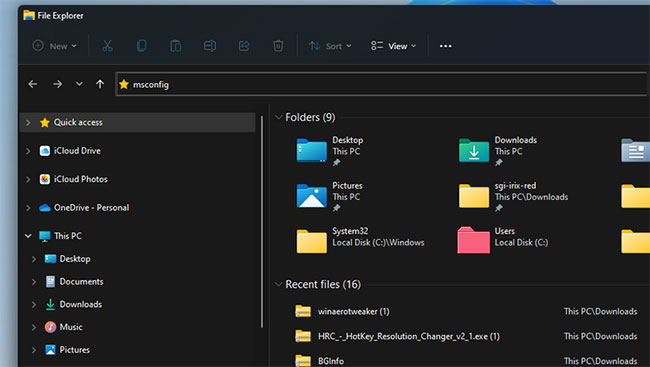
Explorer là tiện ích quản lý file tích hợp trong Windows mà từ đó bạn có thể khởi chạy phần mềm và công cụ. Bạn có thể mở MSConfig từ thư mục System32 của File Explorer hoặc bằng cách nhập một số văn bản trong hộp đường dẫn của Explorer. Dù bằng cách nào, đây là cách khởi động MSConfig thông qua File Explorer.
- Nhấn phím tắt Win + E để mở File Explorer.
- Nhấp vào bên trong thanh đường dẫn thư mục của Explorer và xóa bất kỳ văn bản nào ở đó.
- Sau đó nhấn vào msconfig trên thanh đường dẫn thư mục và nhấn phím Enter.
- Ngoài ra, hãy mở thư mục MSConfig tại đường dẫn C: > Windows > System32. Sau đó, bạn có thể nhấp vào msconfig trong thư mục đó để mở System Configuration.
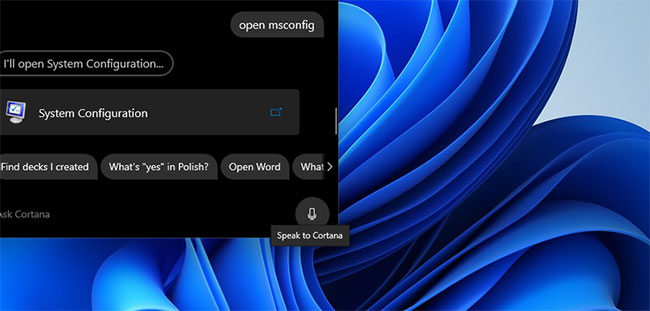
9. Mở MSConfig bằng Cortana
(Chỉ áp dụng cho Windows 11)
Cortana là trợ lý kỹ thuật số trong Windows 11 mà bạn có thể khởi chạy cả phần mềm của bên thứ ba và các công cụ hệ thống. Đây là một ứng dụng khá thú vị, chấp nhận cả lệnh văn bản và giọng nói để khởi chạy phần mềm và công cụ. Bạn có thể mở MSConfig bằng Cortana như sau.
- Nhấp vào biểu tượng vòng tròn Cortana trên thanh tác vụ.
- Nhập open MSConfig trong hộp Ask Cortana.
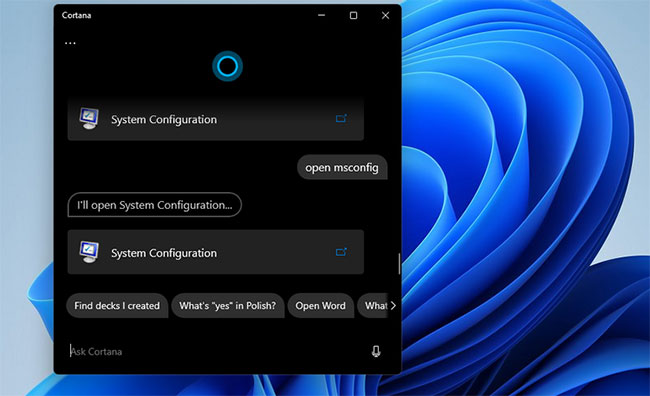
- Sau đó nhấn phím Enter để khởi chạy System Configuration.
- Nếu micro của PC được bật, bạn cũng có thể ra lệnh bằng giọng nói bằng cách nhấp vào nút Speak to Cortana. Sau đó nói “open MSConfig” để yêu cầu Cortana khởi chạy System Configuration.
Có nhiều cách khác nhau để bạn có thể mở MSConfig trong Windows. Dù chọn mở bằng phương pháp nào, bạn sẽ thấy MSConfig là một tiện ích khắc phục sự cố hữu ích để vô hiệu hóa các mục khởi động thừa của bên thứ ba và sửa đổi các tùy chọn khởi động.
Chúc bạn thực hiện thành công!
