7 cách tạo slideshow ảnh trong Windows 11 không cần cài đặt thêm phần mềm
- Thứ ba - 28/03/2023 01:00
- In ra
- Đóng cửa sổ này
Tạo slideshow là một cách tuyệt vời để thể hiện bộ sưu tập ảnh yêu thích của bạn. Có rất nhiều gói phần mềm của bên thứ ba mà bạn có thể thiết lập các bài thuyết trình bằng hình ảnh.
Tuy nhiên, bạn không cần cài đặt bất kỳ ứng dụng bổ sung nào vì Windows 11 đã bao gồm các tính năng và ứng dụng tích hợp sẵn để thiết lập slideshow cơ bản. Dưới đây là sáu cách bạn có thể thiết lập slideshow ảnh trong Windows 11 mà không cần phần mềm bổ sung.
1. Cách thiết lập desktop slideshow
Windows 11 bao gồm một tính năng cho phép bạn thiết lập slideshow trên desktop. Khi được bật, desktop sẽ hiển thị hình ảnh ở một thư mục đã chọn trong một thời gian xác định. Đây là một tính năng slideshow tương đối cơ bản, nhưng bạn vẫn có thể hiển thị tất cả các bức ảnh yêu thích của mình trên màn hình PC với nó. Đây là cách thiết lập slideshow hình ảnh trên desktop trong Windows 11:
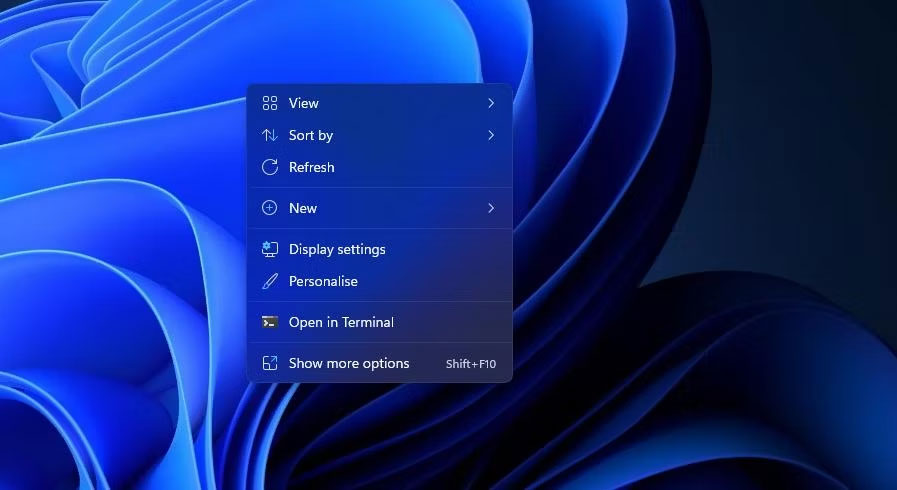
1. Nhấp vào bất kỳ đâu trên desktop bằng nút chuột phải để chọn Personalize.
2. Chọn Background trong Settings.
3. Nhấp đúp vào Personalize your background để mở rộng cài đặt của nó.
4. Chọn tùy chọn Slideshow trong menu drop-down Personalize your background.
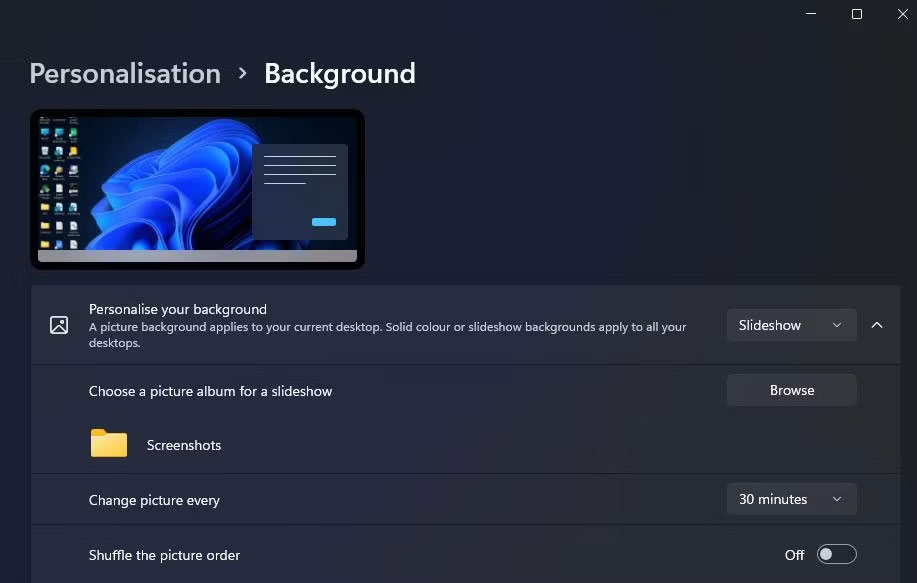
5. Nhấp vào Browse để chọn thư mục chứa ảnh cho slideshow.
6. Chọn tùy chọn Choose this folder.
7. Sau đó, chọn khoảng thời gian hiển thị hình ảnh trên menu drop-down Change picture every.
2. Cách thiết lập slideshow screensaver
Nếu bạn muốn xem những hình ảnh yêu thích của mình mà không có các biểu tượng desktop chồng lên, thay vào đó, hãy thiết lập slideshow screensaver. Windows 11 vẫn bao gồm screensaver, ngay cả khi một số người cho rằng screensaver không còn phù hợp nữa.
Đây là cách bạn có thể thiết lập slideshow screensaver trong Windows 11:
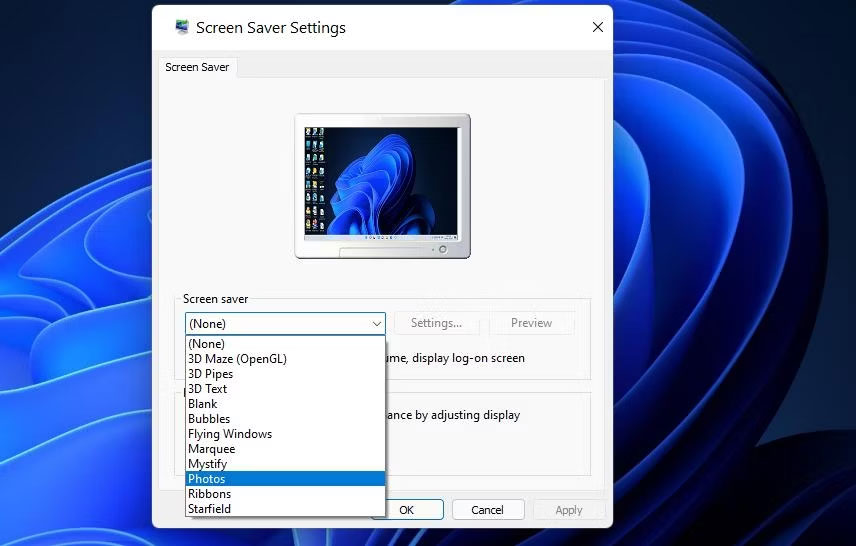
1. Nhập screensaver vào hộp văn bản tìm kiếm của menu Start.
2. Nhấp vào Change screensaver trong kết quả tìm kiếm.
3. Chọn tùy chọn Photos trong menu drop-down được hiển thị ngay bên dưới.
4. Điều chỉnh tùy chọn Wait để cấu hình thời gian screensaver xuất hiện.
5. Nhấn nút Settings để hiển thị các tùy chọn khác.
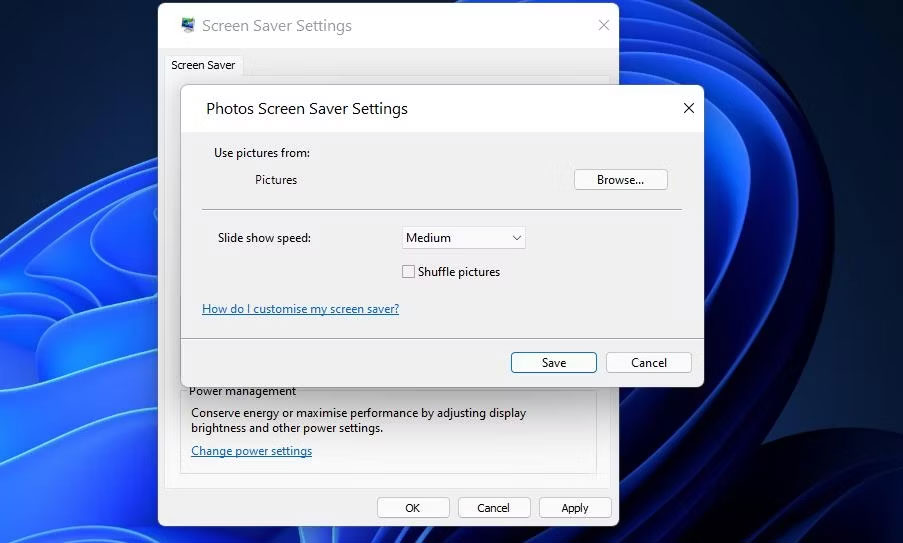
6. Nhấn nút Browse để chọn ảnh.
7. Chọn một thư mục bao gồm các ảnh bạn muốn hiển thị trong bản slideshow và nhấp vào OK để xác nhận.
8. Chọn một tùy chọn trên menu drop-down Slide show speed.
9. Nhấp vào tùy chọn Save > Apply.
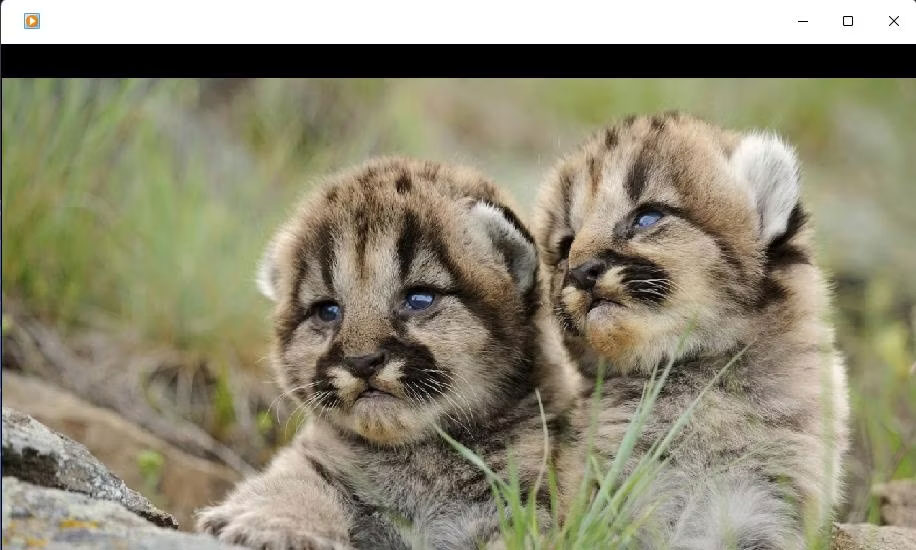
3. Cách thiết lập slideshow với ứng dụng Photos
Photos là ứng dụng chỉnh sửa ảnh và xem ảnh mặc định của Windows 11. Ứng dụng đó bao gồm tùy chọn Slideshow mà bạn có thể chọn để xem tổng hợp các hình ảnh. Bạn có thể xem slideshow trong Photos với tùy chọn đó như sau:
1. Nhấp vào ứng dụng Photos được ghim trên menu Start của Windows 11.
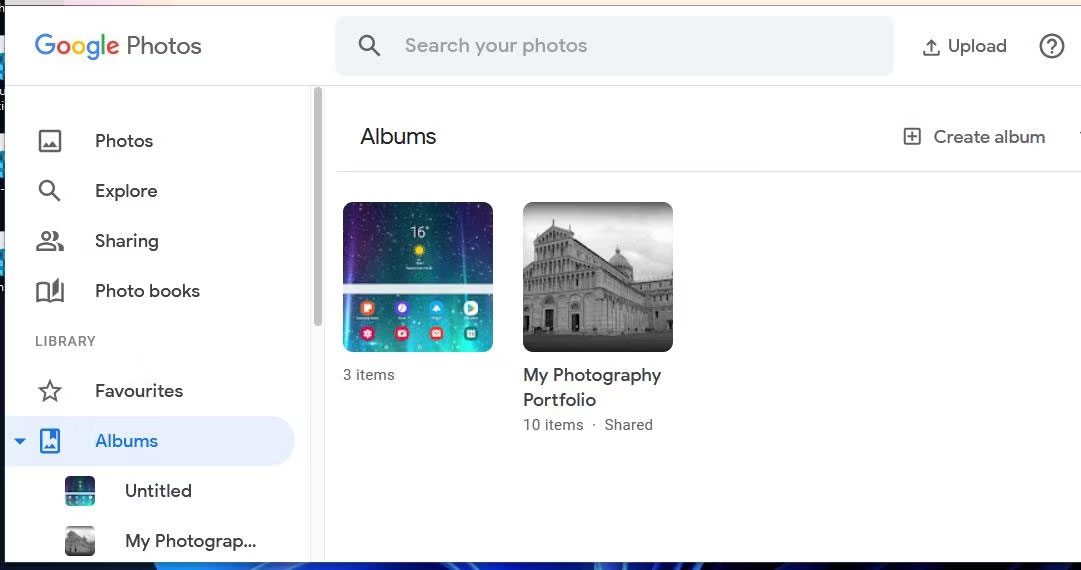
2. Chọn tab Albums.
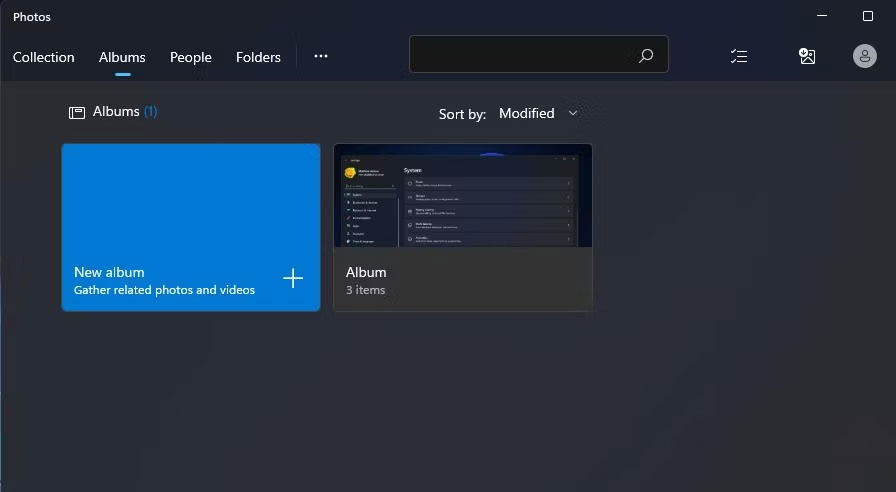
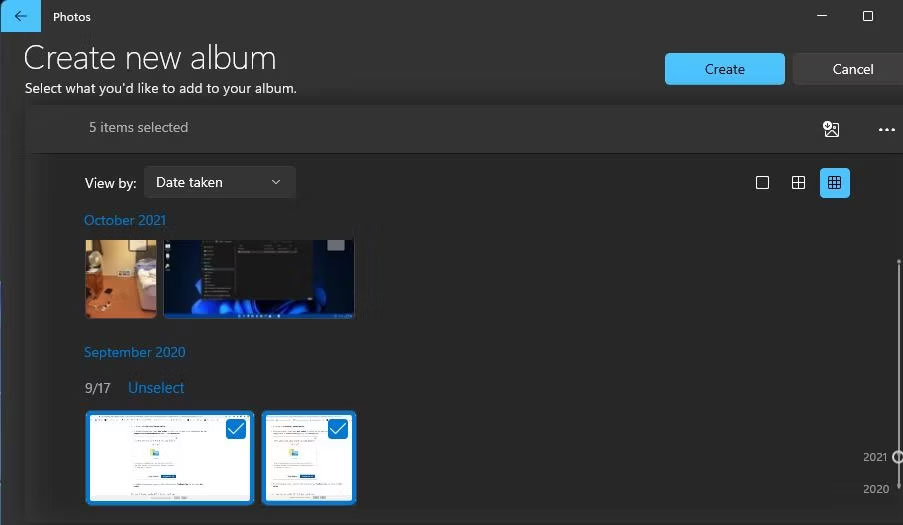
3. Nhấp vào New album để chọn hình ảnh trong Photos để đưa vào bản slideshow. Bạn có thể nhấp vào tùy chọn Import > From folder để chọn những hình ảnh mà bạn không thể tìm thấy trong ứng dụng Photos.
4. Nhấn nút Create để thiết lập album.
5. Chọn album bạn vừa thiết lập trong Photos.
6. Nhấp vào nút Slideshow để xem bản trình bày ảnh của bạn.

4. Cách thiết lập slideshow bằng Video Editor
Video Editor là một ứng dụng mở rộng cho Photos. Ứng dụng đó cho phép người dùng thiết lập slideshow video ảnh với nhiều theme và nhạc nền khác nhau. Dưới đây là các bước để tạo clip slideshow cho ảnh chụp nhanh yêu thích của bạn trong Video Editor:
1. Nhấp vào trong hộp tìm kiếm trên menu Start của Windows 11.
2. Nhập Video Editor trong tiện ích tìm kiếm.
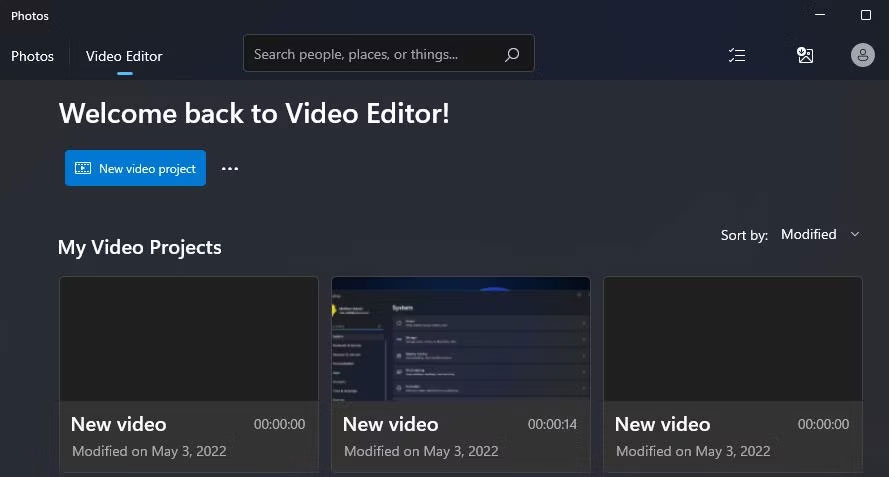
3. Chọn Video Editor để mở tab đó trong Photos.
4. Nhấn nút New video project.
5. Nhập tiêu đề cho clip và nhấp vào tùy chọn OK.
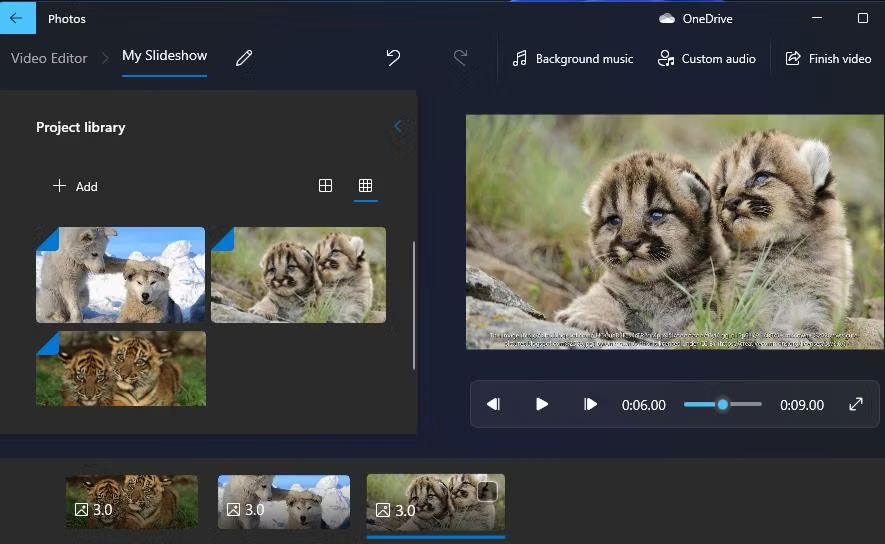
6. Bấm + Add > From this PC để chọn một số hình ảnh cho bản slideshow. Sau đó chọn Open để thêm chúng.
7. Kéo hình thu nhỏ của hình ảnh từ thư viện dự án vào các slide ở cuối tab My Slideshow.
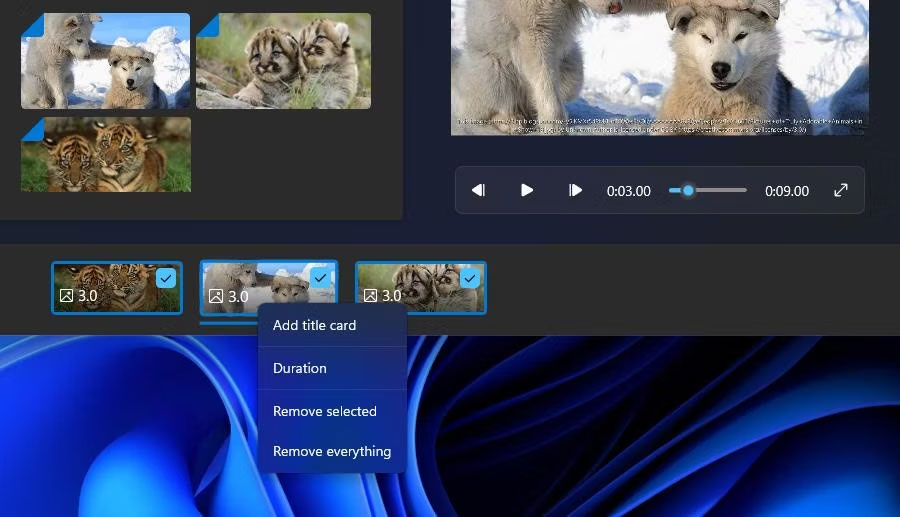
8. Đánh dấu vào tất cả các hộp kiểm của slide và nhấp chuột phải vào một slide để chọn Duration. Sau đó, nhập một giá trị để đặt thời lượng bản slideshow hiển thị tất cả các hình ảnh trước khi thay đổi.
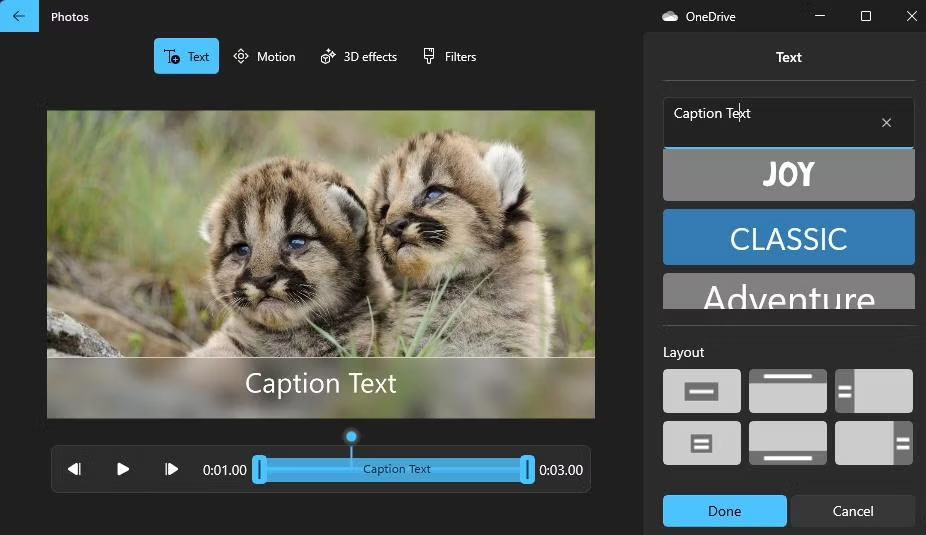
9. Bạn có thể thêm chú thích cho các hình ảnh cụ thể bằng cách nhấp chuột phải vào chúng và chọn tùy chọn Edit > Text. Nhập chú thích vào hộp văn bản, chọn phông chữ và nhấp vào Done.
10. Để thêm một số âm thanh, hãy nhấp vào tùy chọn Background music. Sau đó, chọn một audio scheme và nhấn nút Done.
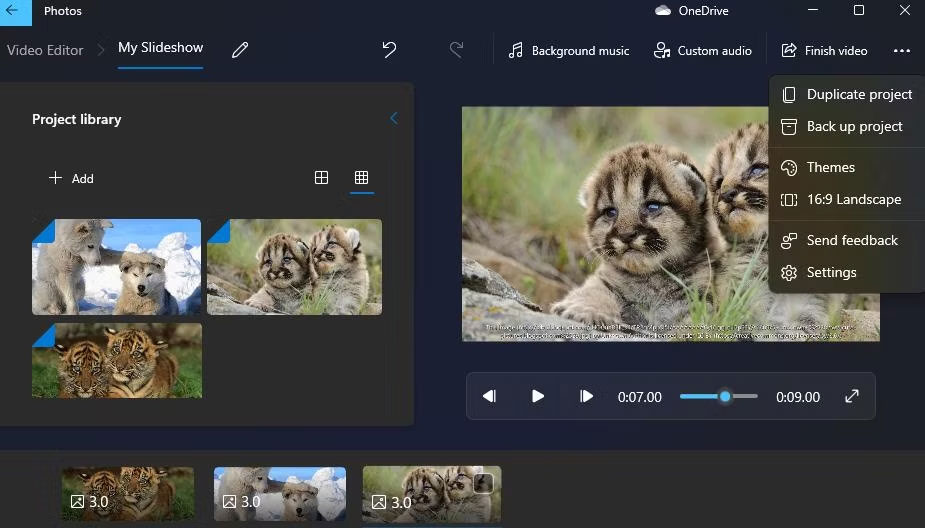
11. Nhấp vào nút ba chấm ở trên cùng bên phải của Video Editor để chọn Themes. Chọn một theme để đặt cho bản slideshow và nhấp vào Done.
12. Nhấn nút Finish video.
13. Chọn một tùy chọn trên menu drop-down Video quality và nhấp vào tùy chọn Export.
5. Cách thiết lập slideshow với Google Photos
Google Photos là một ứng dụng web lưu trữ đám mây để lưu trữ hình ảnh mà bạn có thể sử dụng trong trình duyệt Edge của Windows 11. Bất kỳ ai có tài khoản Google đều có thể lưu ảnh chụp nhanh ở đó. Sau đó làm theo các bước sau để thiết lập slideshow trong Google Photos:
1. Mở Google Photos trong Edge hoặc một trình duyệt khác.
2. Nếu bạn chưa lưu hình ảnh ở đó, hãy nhấp vào Upload > Computer trong Google Photos. Nhấn phím Ctrl để chọn một số ảnh và nhấp vào tùy chọn Open.
3. Chọn Albums ở bên trái của Google Photos.
4. Nhấp vào tùy chọn Create album.
5. Nhập tiêu đề album và nhấn nút Add photos.
6. Chọn một số ảnh và nhấp vào nút Done.
7. Chọn album mới của bạn trong Google Photos.
8. Nhấp vào nút More options (ba dấu chấm) để chọn Slideshow.
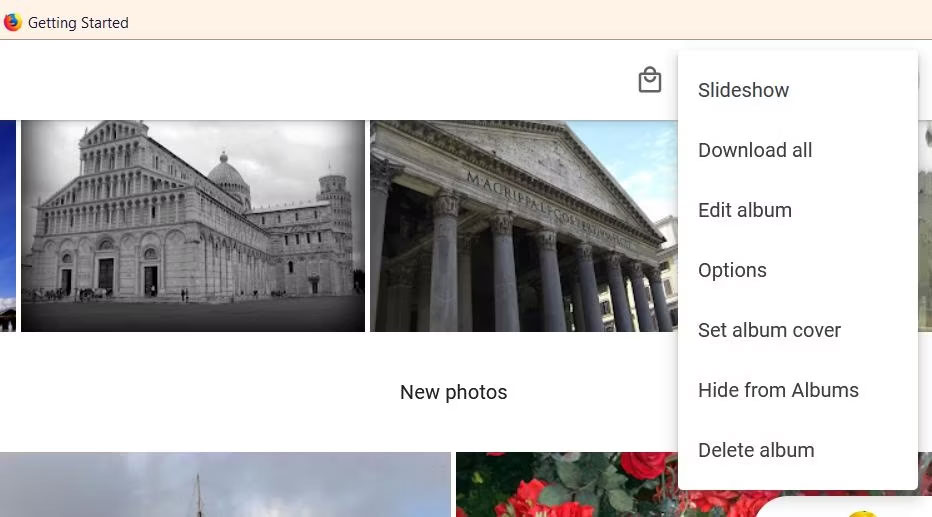
9. Slideshow album của bạn bây giờ sẽ phát ở chế độ toàn màn hình. Nhấp vào mũi tên trái và phải để lướt qua hình ảnh.
6. Cách thiết lập slideshow với Google Slides
Slide là một ứng dụng web thuyết trình của G Suite mà bạn cũng có thể sử dụng bằng tài khoản Google. Ứng dụng đó bao gồm nhiều tùy chọn mở rộng hơn để thiết lập slideshow ảnh với bố cục, hiệu ứng chuyển tiếp, hoạt ảnh và chú thích khác với Google Photos. Đây là các bước thiết lập slideshow hình ảnh cơ bản với Slides:
1. Mở trang chủ Google Slides.
2. Nhấp vào nút Go to Slides.
3. Sau đó chọn tùy chọn Blank presentation.
4. Nhập tiêu đề vào hộp Untitled presentation.
5. Nhấp vào mũi tên xuống nhỏ trên nút New Slide.
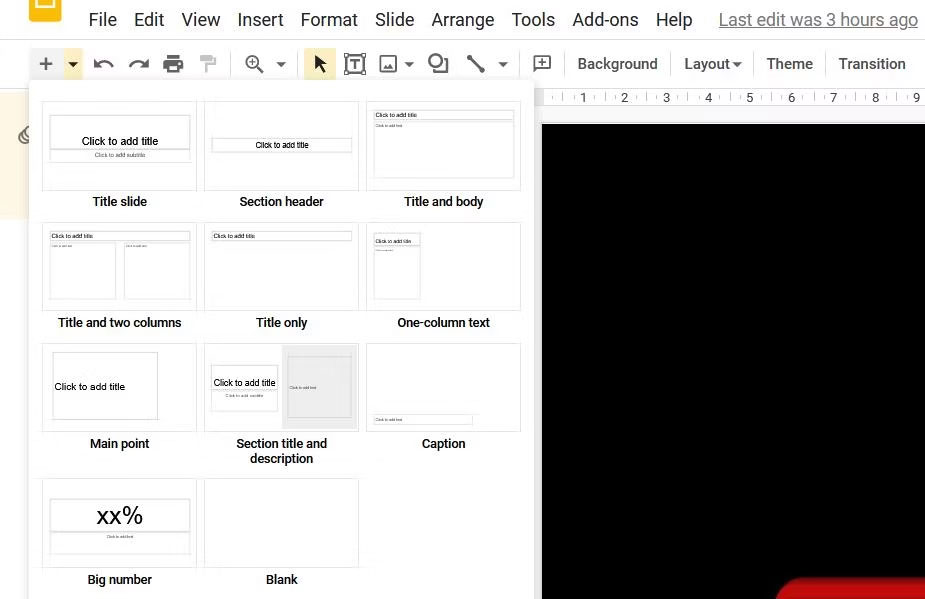
6. Chọn Blank để thêm một slide trống.
7. Lặp lại các bước 5 và 6 để thêm số lượng slide mà bạn cần cho slideshow ảnh của mình.
8. Sau đó, chọn một slide trống để thêm hình ảnh vào và nhấp vào Insert.
9. Chọn Image > Upload from computer trên menu.
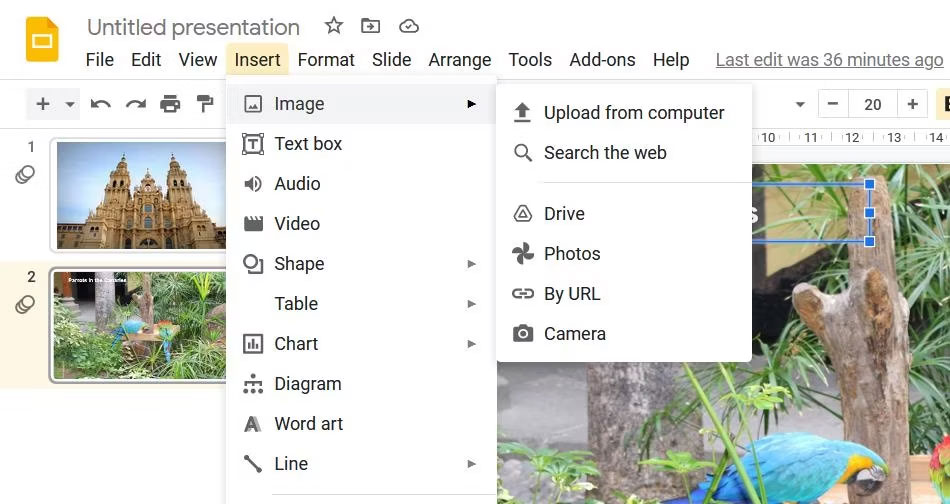
10. Chọn ảnh bạn muốn thêm vào slide và chọn tùy chọn Open.
11. Kéo các đường viền của hình ảnh bằng con trỏ để thay đổi kích thước sao cho ảnh lấp đầy toàn bộ slide.
12. Lặp lại các bước từ 6 đến 9 để thêm ảnh vào tất cả các slide trống trong bản slideshow của bạn.
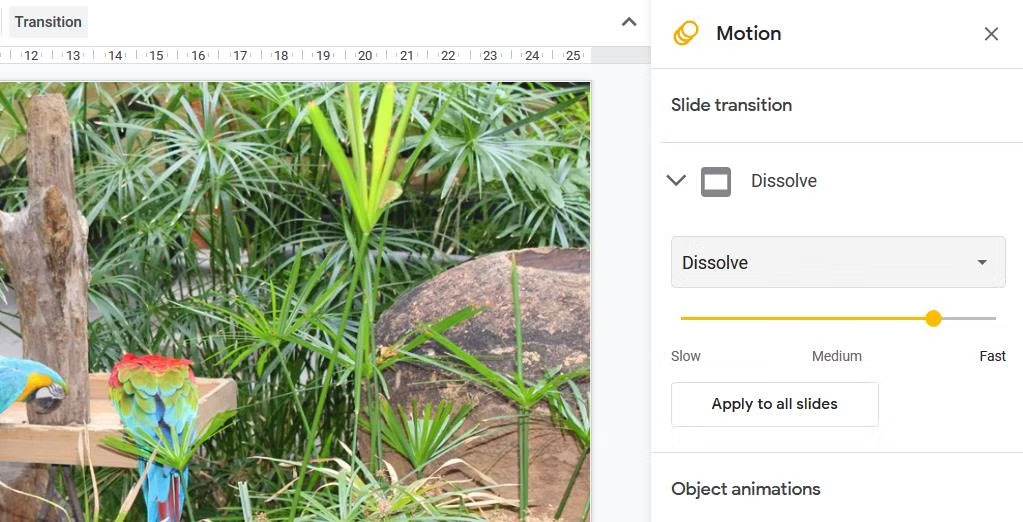
13. Để thêm hiệu ứng chuyển slideshow, nhấn vào nút Transition. Sau đó, chọn một chuyển đổi trên menu drop-down và chọn tùy chọn Apply to all slides.
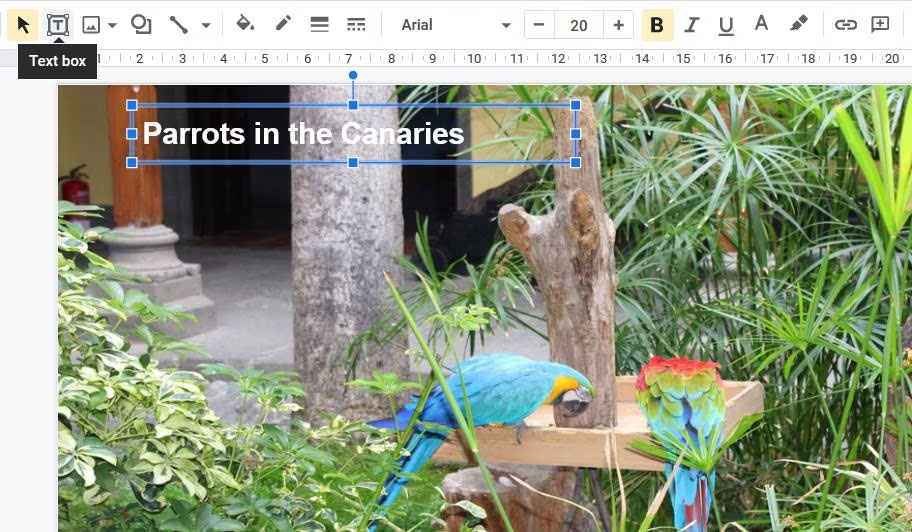
14. Bạn cũng có thể thêm chú thích vào slide bằng cách nhấp vào tùy chọn Text box. Đặt hộp ở dưới cùng hoặc trên cùng của slide và nhập mô tả ảnh vào đó.
15. Nhấp vào nút Slideshow để xem bản trình bày.
16. Bản trình bày của bạn được lưu tự động trong Slides. Tuy nhiên, bạn có thể lưu nó vào ổ cứng bằng cách nhấp vào File > Download và chọn định dạng file Microsoft PowerPoint (hoặc tùy chọn thay thế).
Slides có sẵn nhiều tùy chọn âm thanh, định dạng, văn bản, hình dạng và theme hơn. Bạn cũng có thể bao gồm nhiều hình ảnh trong một slide bằng cách chọn các tùy chọn bố cục khác nhau.
7. Cách thiết lập slideshow với Windows Media Player
Windows Media Player là phần mềm cũ mà bạn có thể phát nhạc, video và xem hình ảnh. Phần mềm đó vẫn đi kèm với Windows 11 và bạn có thể thiết lập slideshow hình ảnh cơ bản với WMP khi nó lập danh mục ảnh trong thư mục người dùng của mình. Đây là cách bạn có thể tạo slideshow hình ảnh với Windows Media Player:
1. Trước tiên, hãy đảm bảo rằng thư mục Pictures người dùng bao gồm các ảnh bạn muốn trong slideshow. Bạn có thể di chuyển ảnh vào thư mục Pictures bằng cách kéo và thả chúng từ thư mục này sang thư mục khác trong File Explorer.
2. Nhập Windows Media Player bên trong hộp tìm kiếm của menu Start.
3. Chọn Windows Media Player để cửa sổ của phần mềm đó xuất hiện.
4. Nhấp vào nút Create playlist.
5. Nhập Image Slideshow vào hộp văn bản danh sách phát.
6. Sau đó nhấp vào mũi tên nhỏ bên cạnh Playlist để mở rộng danh mục đó.
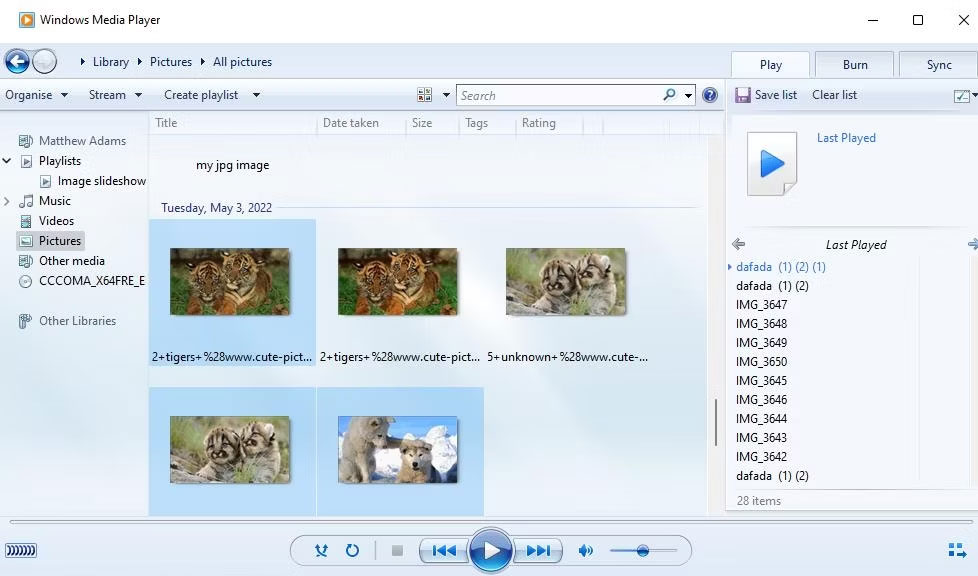
7. Nhấp vào Pictures ở bên trái cửa sổ Windows Media Player.

8. Giữ phím Ctrl và chọn ảnh để đưa vào slideshow.
9. Sau đó, giữ nút chuột trái để kéo lựa chọn hình ảnh vào tiêu đề của danh sách phát trong thanh bên của Windows Media Player.
10. Nhả nút chuột trái khi bạn thấy chú giải công cụ Add to +.
Bây giờ, hãy chọn danh sách phát Image Slideshow trong Windows Media Player, danh sách này sẽ bao gồm các file ảnh bạn đã thêm vào. Nhấn vào nút Play để bắt đầu slideshow. Sau đó, Windows Media Player sẽ hiển thị quá trình phát slideshow cơ bản lướt qua các hình ảnh trong đó với khoảng thời gian khoảng 5 giây. Nếu WMP không tự động hiển thị slideshow, hãy nhấp vào tùy chọn Switch to Now Playing.
Hầu như không cần thiết phải cài đặt phần mềm slideshow của bên thứ ba trong Windows 11, vì bạn có thể khoe những bức ảnh yêu thích của mình bằng những phương pháp trên. Các tính năng slideshow screensaver và desktop tích hợp sẵn của Windows 11 cũng như Google Photos đều phù hợp để hiển thị các bộ sưu tập hình ảnh cơ bản. Bạn có thể thiết lập slideshow ảnh nâng cao hơn kết hợp nhiều hiệu ứng chuyển tiếp khác nhau, nhạc nền, tường thuật âm thanh và chú thích văn bản bằng Video Editor và Google Sheets.
