<!DOCTYPE html>
    <html lang="vi" xmlns="http://www.w3.org/1999/xhtml" prefix="og: http://ogp.me/ns#">
    <head>
<title>7 cách khắc phục tính năng Memory Integrity bị chuyển sang màu xám trên Windows 11</title>
<meta name="description" content="7 cách khắc phục tính năng Memory Integrity bị chuyển sang màu xám trên Windows 11 - Savefile - Tin Tức -...">
<meta name="author" content=".: Nguoicodonvn2008.info - Cõi lòng người cô đơn :.">
<meta name="copyright" content=".: Nguoicodonvn2008.info - Cõi lòng người cô đơn :. [admin@nguoicodonvn2008.info]">
<meta name="robots" content="index, archive, follow, noodp">
<meta name="googlebot" content="index,archive,follow,noodp">
<meta name="msnbot" content="all,index,follow">
<meta name="generator" content="NukeViet v4.5">
<meta http-equiv="Content-Type" content="text/html; charset=utf-8">
<meta property="og:title" content="7 cách khắc phục tính năng Memory Integrity bị chuyển sang màu xám trên Windows 11">
<meta property="og:type" content="website">
<meta property="og:description" content="Savefile - Tin Tức -...">
<meta property="og:site_name" content=".&#x3A; Nguoicodonvn2008.info - Cõi lòng người cô đơn &#x3A;.">
<meta property="og:url" content="https://www.nguoicodonvn2008.info/vi/news/savefile/kien-thuc-may-tinh/7-cach-khac-phuc-tinh-nang-memory-integrity-bi-chuyen-sang-mau-xam-tren-windows-11-7668.html">
<link rel="shortcut icon" href="https://nguoicodonvn2008.info/favicon.ico">
<link rel="canonical" href="https://www.nguoicodonvn2008.info/vi/news/savefile/kien-thuc-may-tinh/7-cach-khac-phuc-tinh-nang-memory-integrity-bi-chuyen-sang-mau-xam-tren-windows-11-7668.html">
<link rel="alternate" href="https://nguoicodonvn2008.info/vi/news/rss/" title="Tin Tức" type="application/rss+xml">
<link rel="alternate" href="https://nguoicodonvn2008.info/vi/news/rss/karaoke-dual/" title="Tin Tức - Karaoke Dual" type="application/rss+xml">
<link rel="alternate" href="https://nguoicodonvn2008.info/vi/news/rss/nhac-tre/" title="Tin Tức - Nhạc trẻ" type="application/rss+xml">
<link rel="alternate" href="https://nguoicodonvn2008.info/vi/news/rss/tru-tinh/" title="Tin Tức - Trữ tình" type="application/rss+xml">
<link rel="alternate" href="https://nguoicodonvn2008.info/vi/news/rss/nuoc-ngoai/" title="Tin Tức - Nước ngoài" type="application/rss+xml">
<link rel="alternate" href="https://nguoicodonvn2008.info/vi/news/rss/remix/" title="Tin Tức - Remix" type="application/rss+xml">
<link rel="alternate" href="https://nguoicodonvn2008.info/vi/news/rss/tam-su-tinh-yeu/" title="Tin Tức - Tâm sự tình yêu" type="application/rss+xml">
<link rel="alternate" href="https://nguoicodonvn2008.info/vi/news/rss/tho-suu-tam/" title="Tin Tức - Thơ sưu tầm" type="application/rss+xml">
<link rel="alternate" href="https://nguoicodonvn2008.info/vi/news/rss/cuoc-song/" title="Tin Tức - Cuộc sống" type="application/rss+xml">
<link rel="alternate" href="https://nguoicodonvn2008.info/vi/news/rss/phan-mem/" title="Tin Tức - Phần mềm" type="application/rss+xml">
<link rel="alternate" href="https://nguoicodonvn2008.info/vi/news/rss/kien-thuc-may-tinh/" title="Tin Tức - Kiến thức máy tính" type="application/rss+xml">
<link rel="alternate" href="https://nguoicodonvn2008.info/vi/news/rss/hoc-tap/" title="Tin Tức - Học tập" type="application/rss+xml">
<link rel="alternate" href="https://nguoicodonvn2008.info/vi/news/rss/tai-lieu/" title="Tin Tức - Tài liệu" type="application/rss+xml">
<link rel="alternate" href="https://nguoicodonvn2008.info/vi/news/rss/de-thi/" title="Tin Tức - Đề thi" type="application/rss+xml">
<link rel="preload" as="style" href="https://nguoicodonvn2008.info/assets/css/font-awesome.min.css" type="text/css">
<link rel="preload" as="style" href="https://nguoicodonvn2008.info/themes/default/css/bootstrap.non-responsive.css" type="text/css">
<link rel="preload" as="style" href="https://nguoicodonvn2008.info/themes/default/css/style.css" type="text/css">
<link rel="preload" as="style" href="https://nguoicodonvn2008.info/themes/default/css/style.non-responsive.css" type="text/css">
<link rel="preload" as="style" href="https://nguoicodonvn2008.info/themes/default/css/news.css" type="text/css">
<link rel="preload" as="style" href="https://nguoicodonvn2008.info/themes/default/css/custom.css" type="text/css">
<link rel="preload" as="script" href="https://nguoicodonvn2008.info/assets/js/jquery/jquery.min.js" type="text/javascript">
<link rel="preload" as="script" href="https://nguoicodonvn2008.info/assets/js/language/vi.js" type="text/javascript">
<link rel="preload" as="script" href="https://nguoicodonvn2008.info/assets/js/DOMPurify/purify3.js" type="text/javascript">
<link rel="preload" as="script" href="https://nguoicodonvn2008.info/assets/js/global.js" type="text/javascript">
<link rel="preload" as="script" href="https://nguoicodonvn2008.info/assets/js/site.js" type="text/javascript">
<link rel="preload" as="script" href="https://nguoicodonvn2008.info/themes/default/js/news.js" type="text/javascript">
<link rel="preload" as="script" href="https://nguoicodonvn2008.info/themes/default/js/main.js" type="text/javascript">
<link rel="preload" as="script" href="https://nguoicodonvn2008.info/themes/default/js/custom.js" type="text/javascript">
<link rel="preload" as="script" href="https://nguoicodonvn2008.info/themes/default/js/bootstrap.min.js" type="text/javascript">
<link rel="stylesheet" href="https://nguoicodonvn2008.info/assets/css/font-awesome.min.css">
<link rel="stylesheet" href="https://nguoicodonvn2008.info/themes/default/css/bootstrap.non-responsive.css">
<link rel="stylesheet" href="https://nguoicodonvn2008.info/themes/default/css/style.css">
<link rel="stylesheet" href="https://nguoicodonvn2008.info/themes/default/css/style.non-responsive.css">
<link rel="StyleSheet" href="https://nguoicodonvn2008.info/themes/default/css/news.css">
<link rel="stylesheet" href="https://nguoicodonvn2008.info/themes/default/css/custom.css">
<style type="text/css">
	body{background: #fff;}
</style>
    </head>
    <body>
<div id="print">
	<div id="hd_print">
		<h2 class="pull-left">.&#x3A; Nguoicodonvn2008.info - Cõi lòng người cô đơn &#x3A;.</h2>
		<p class="pull-right"><a title=".&#x3A; Nguoicodonvn2008.info - Cõi lòng người cô đơn &#x3A;." href="https://nguoicodonvn2008.info/">https://nguoicodonvn2008.info</a></p>
	</div>
	<div class="clear"></div>
	<hr />
	<div id="content">
		<h1>7 cách khắc phục tính năng Memory Integrity bị chuyển sang màu xám trên Windows 11</h1>
		<ul class="list-inline">
			<li>Thứ bảy - 21/10/2023 10:15</li>
			<li class="hidden-print txtrequired"><em class="fa fa-print">&nbsp;</em><a title="In ra" href="javascript:;" onclick="window.print()">In ra</a></li>
			<li class="hidden-print txtrequired"><em class="fa fa-power-off">&nbsp;</em><a title="Đóng cửa sổ này" href="javascript:;" onclick="window.close()">Đóng cửa sổ này</a></li>
		</ul>
		<div class="clear"></div>
		<div id="hometext">
		</div>
				<div class="imghome">
			<img alt="7 cách khắc phục tính năng Memory Integrity bị chuyển sang màu xám trên Windows 11" src="https://st.quantrimang.com/photos/image/2023/10/21/loi-memory-integrity-chuyen-sang-mau-xam-1.jpg" width="460" class="img-thumbnail" />
		</div>
		<div class="clear"></div>
		<div id="bodytext" class="clearfix">
			<p style="text-align: justify;">Tính năng Memory Integrity trong Windows Security có chuyển sang màu xám không? PC của bạn có thông báo &quot;Memory integrity is off. Your device may be vulnerable&quot; nhưng bạn không thể bật nút chuyển đổi? Tính năng Memory Integrity ngăn phần mềm độc hại truy cập vào các tiến trình bảo mật cao khi thiết bị của bạn bị phần mềm độc hại xâm chiếm.</p>

<p style="text-align: justify;">Nhưng điều gì khiến tính năng này chuyển sang màu xám? Trong bài viết này, chúng ta sẽ thảo luận một số cách khắc phục sự cố cơ bản.</p>

<h2 style="text-align: justify;">1. Xác định và khắc phục sự cố driver</h2>

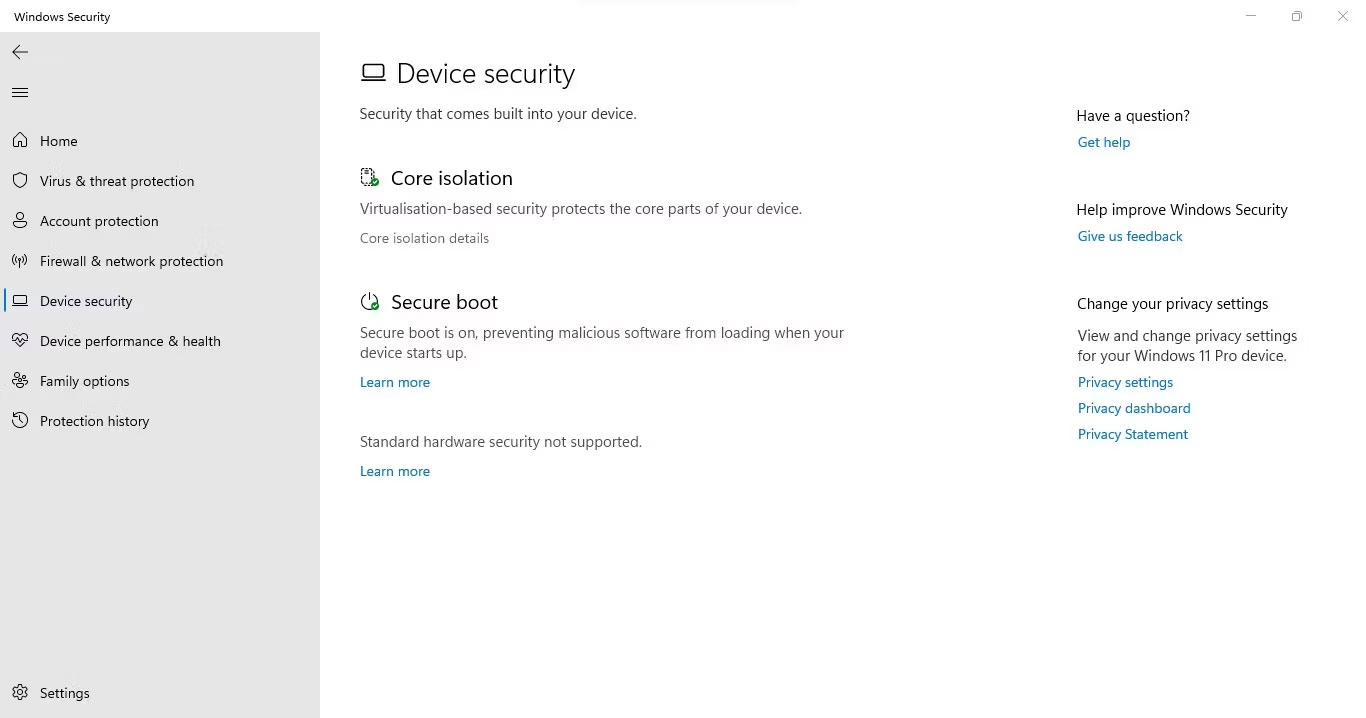
<p style="text-align: justify;">Trong hầu hết các trường hợp, nguyên nhân chính của sự cố đang được thảo luận là do driver lỗi thời hoặc không tương thích, vì vậy hãy bắt đầu bằng cách kiểm tra driver của bạn. Để bắt đầu, hãy gỡ cài đặt mọi driver của bên thứ ba mà bạn đã cài đặt gần đây. Sau đó, mở ứng dụng Windows Security, nhấp vào tab&nbsp;<strong>Device security</strong>&nbsp;từ thanh bên trái và nhấn vào&nbsp;<strong>Core isolation details.</strong></p>

<figure>
<div style="text-align: justify;"><img alt="Nhấp vào tùy chọn Core isolation details trong tab Device security của ứng dụng Windows Security" data-i="0" data-src="https://st.quantrimang.com/photos/image/2023/10/21/loi-memory-integrity-chuyen-sang-mau-xam-1.jpg" data-was-processed="true" height="718" src="https://st.quantrimang.com/photos/image/2023/10/21/loi-memory-integrity-chuyen-sang-mau-xam-1.jpg" width="1366" /></div>

<figcaption>
<div style="text-align: justify;">Nhấp vào tùy chọn Core isolation details trong tab Device security của ứng dụng Windows Security</div>
</figcaption>
</figure>

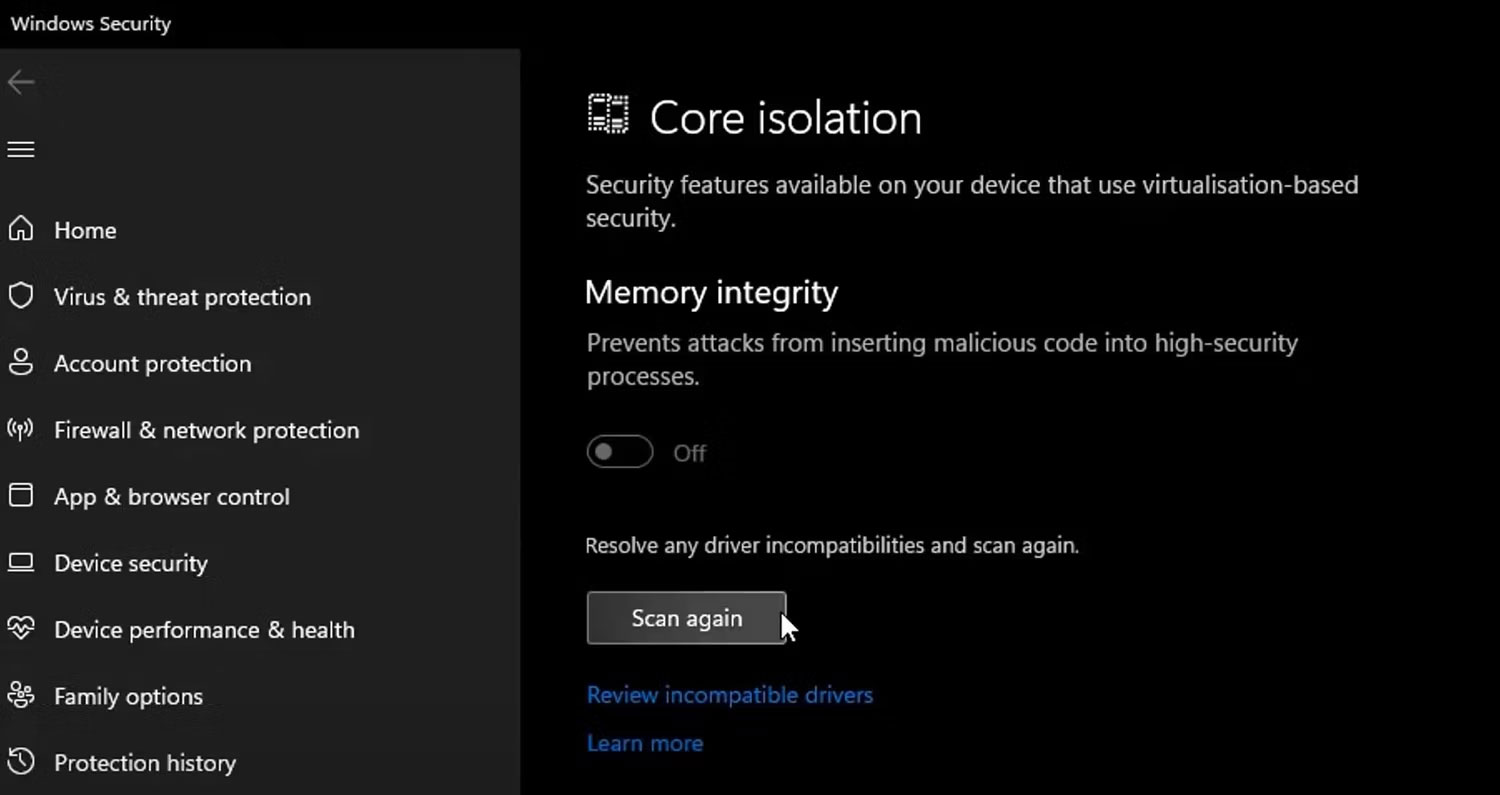
<p style="text-align: justify;">Ở đây, hãy kích hoạt Memory Integrity. Nếu bạn gặp lỗi có nội dung &quot;<strong>Resolve any driver incompatibilities and scan again</strong>&quot;, hãy nhấp vào liên kết&nbsp;<strong>Review incompatible drivers</strong>.</p>

<figure>
<div style="text-align: justify;"><img alt="Nhấp vào Review incompatible drivers trong cài đặt Core isolation của ứng dụng Windows Security" data-i="1" data-src="https://st.quantrimang.com/photos/image/2023/10/21/loi-memory-integrity-chuyen-sang-mau-xam-2.jpg" data-was-processed="true" height="795" src="https://st.quantrimang.com/photos/image/2023/10/21/loi-memory-integrity-chuyen-sang-mau-xam-2.jpg" width="1500" /></div>

<figcaption>
<div style="text-align: justify;">Nhấp vào Review incompatible drivers trong cài đặt Core isolation của ứng dụng Windows Security</div>
</figcaption>
</figure>

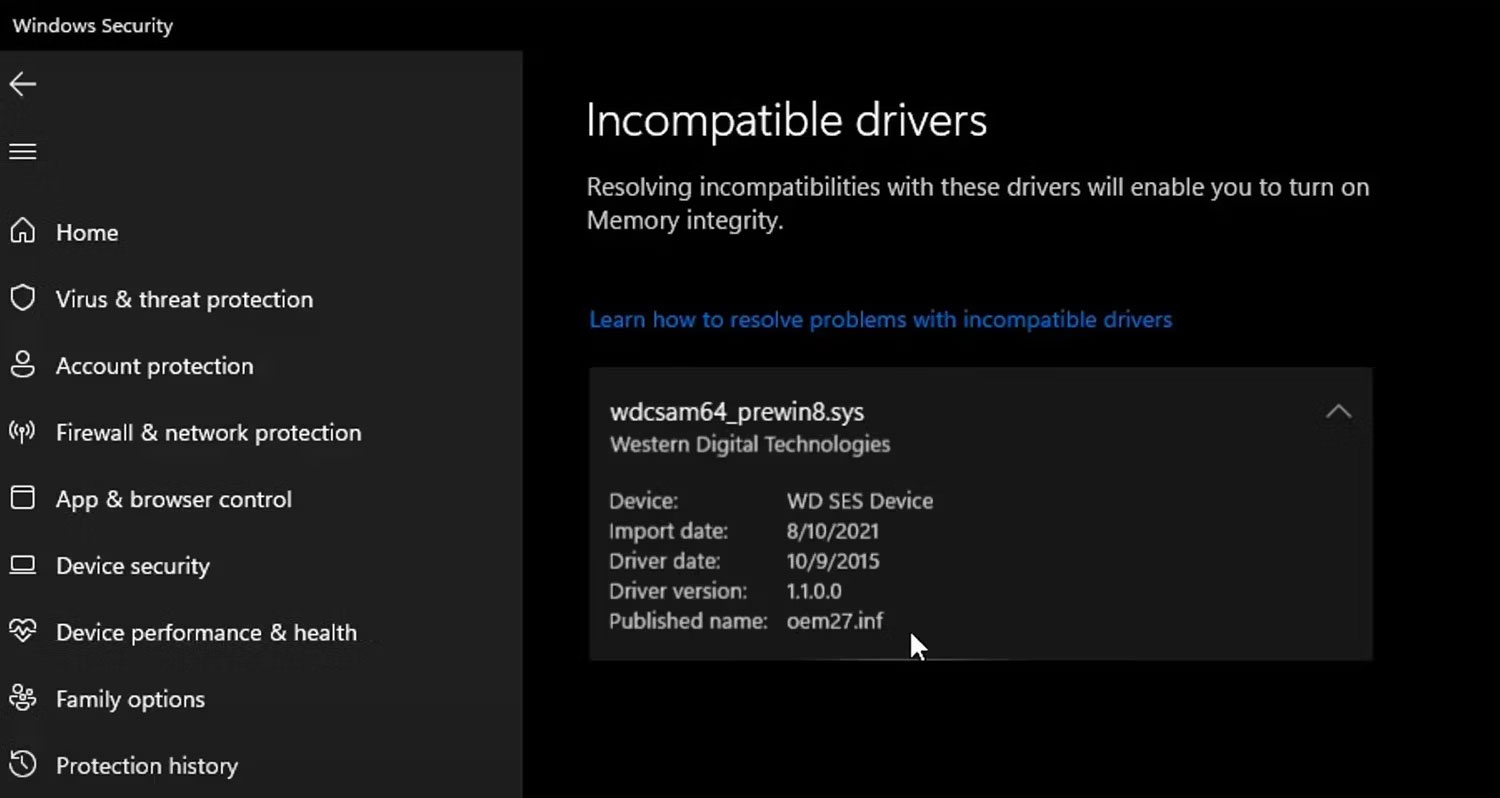
<p style="text-align: justify;">Sau đó, ghi lại bất kỳ driver nào bị nghi ngờ không tương thích với Memory Integrity.</p>

<figure>
<div style="text-align: justify;"><img alt="Ghi lại danh sách driver không tương thích trong cài đặt cách ly lõi trong ứng dụng Windows Security" data-i="2" data-src="https://st.quantrimang.com/photos/image/2023/10/21/loi-memory-integrity-chuyen-sang-mau-xam-3.jpg" data-was-processed="true" height="798" src="https://st.quantrimang.com/photos/image/2023/10/21/loi-memory-integrity-chuyen-sang-mau-xam-3.jpg" width="1500" /></div>

<figcaption>
<div style="text-align: justify;">Ghi lại danh sách driver không tương thích trong cài đặt cách ly lõi trong ứng dụng Windows Security</div>
</figcaption>
</figure>

<p style="text-align: justify;">Sau khi kiểm tra ở trên, hãy làm theo các bước sau để loại trừ các vấn đề liên quan đến driver:</p>

<p style="text-align: justify;">1. Nhấp chuột phải vào nút Start của Windows và chọn&nbsp;<strong>Device Manager</strong>.</p>

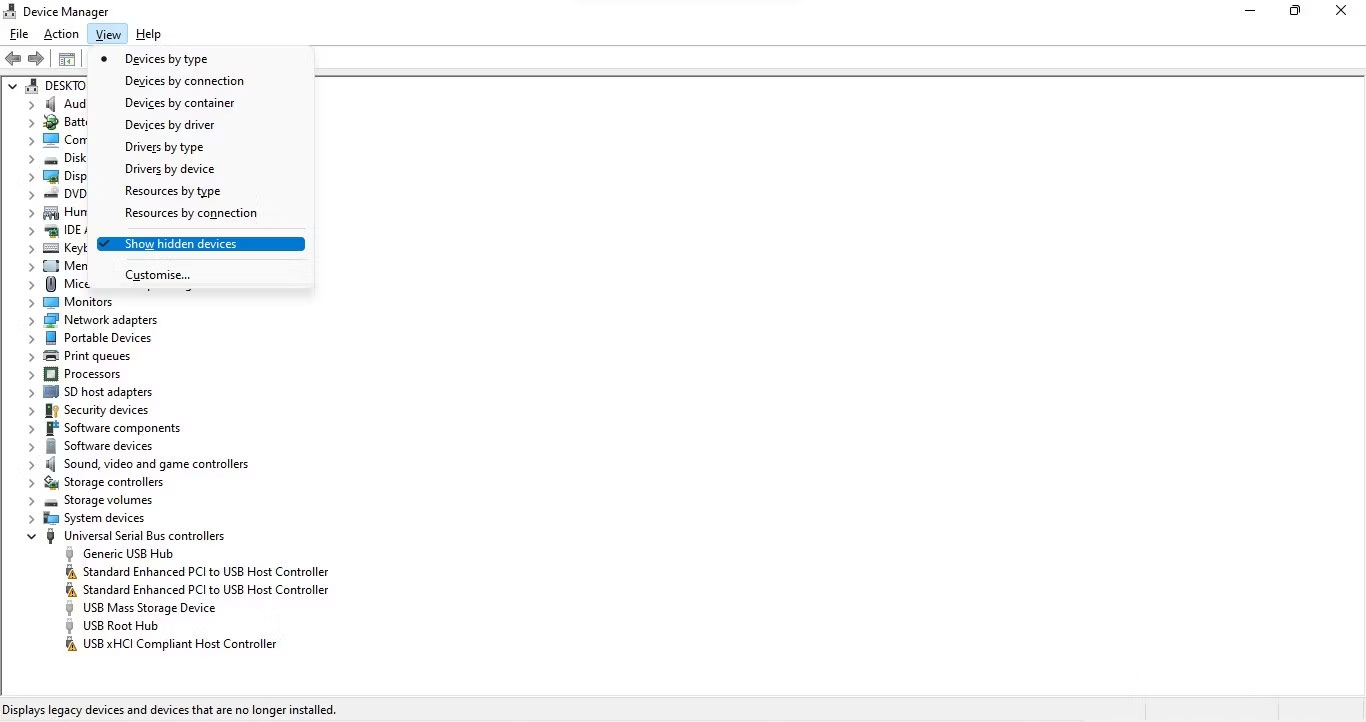
<p style="text-align: justify;">2. Chuyển đến tab&nbsp;<strong>View</strong>&nbsp;và nhấp vào&nbsp;<strong>Show hidden devices</strong>.</p>

<figure>
<div style="text-align: justify;"><img alt="Nhấp vào tùy chọn Show hidden devices trong menu drop-down tab View của ứng dụng Windows Device Manager" data-i="3" data-src="https://st.quantrimang.com/photos/image/2023/10/21/loi-memory-integrity-chuyen-sang-mau-xam-4.jpg" data-was-processed="true" height="722" src="https://st.quantrimang.com/photos/image/2023/10/21/loi-memory-integrity-chuyen-sang-mau-xam-4.jpg" width="1366" /></div>

<figcaption>
<div style="text-align: justify;">Nhấp vào tùy chọn Show hidden devices trong menu drop-down tab View của ứng dụng Windows Device Manager</div>
</figcaption>
</figure>

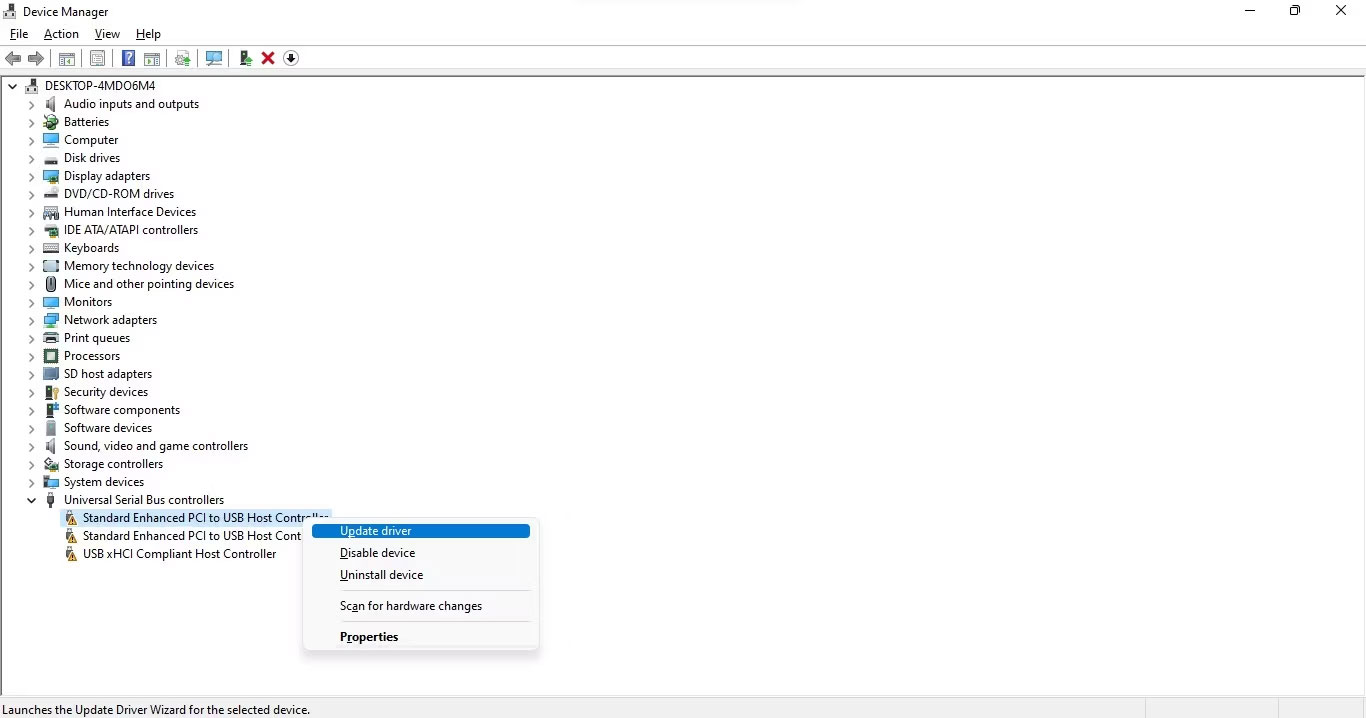
<p style="text-align: justify;">3. Hãy tìm thiết bị có hình tam giác màu vàng với dấu chấm than bên trong hoặc (các) driver có vấn đề được biểu thị bằng Memory Integrity.</p>

<p style="text-align: justify;">4. Nhấp chuột phải vào thiết bị đó và chọn&nbsp;<strong>Update driver</strong>.</p>

<figure>
<div style="text-align: justify;"><img alt="Nhấp vào tùy chọn Update driver bằng cách nhấp chuột phải vào driver không tương thích trong ứng dụng Windows Device Manager" data-i="4" data-src="https://st.quantrimang.com/photos/image/2023/10/21/loi-memory-integrity-chuyen-sang-mau-xam-5.jpg" data-was-processed="true" height="718" src="https://st.quantrimang.com/photos/image/2023/10/21/loi-memory-integrity-chuyen-sang-mau-xam-5.jpg" width="1366" /></div>

<figcaption>
<div style="text-align: justify;">Nhấp vào tùy chọn Update driver bằng cách nhấp chuột phải vào driver không tương thích trong ứng dụng Windows Device Manager</div>
</figcaption>
</figure>

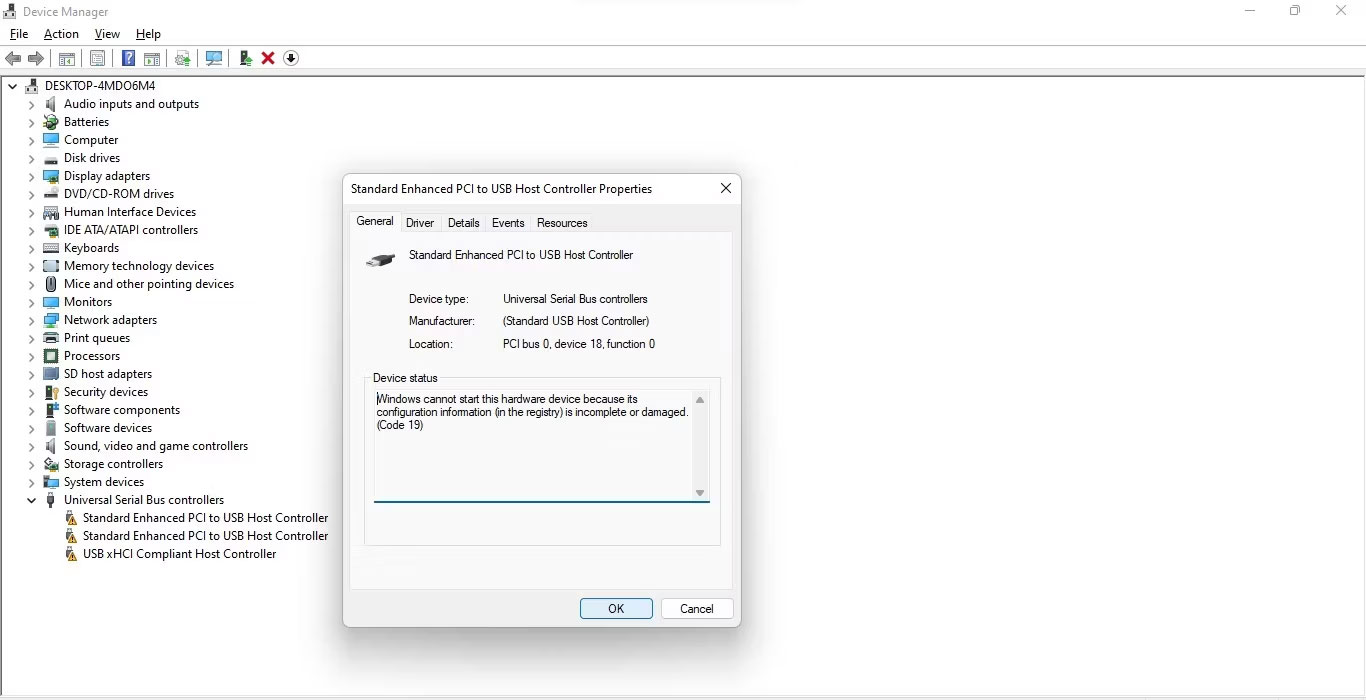
<p style="text-align: justify;">5. Nếu cập nhật driver không giải quyết được vấn đề, hãy nhấp chuột phải vào nó và chọn&nbsp;<strong>Properties</strong>.</p>

<p style="text-align: justify;">6. Trong tab&nbsp;<strong>General</strong>, đọc thông báo trong hộp&nbsp;<strong>Device status</strong>.</p>

<figure>
<div style="text-align: justify;"><img alt="Kiểm tra thông báo trong hộp Device status trong tab General " data-i="5" data-src="https://st.quantrimang.com/photos/image/2023/10/21/loi-memory-integrity-chuyen-sang-mau-xam-6.jpg" data-was-processed="true" height="700" src="https://st.quantrimang.com/photos/image/2023/10/21/loi-memory-integrity-chuyen-sang-mau-xam-6.jpg" width="1366" /></div>

<figcaption>
<div style="text-align: justify;">Kiểm tra thông báo trong hộp Device status trong tab General</div>
</figcaption>
</figure>

<p style="text-align: justify;">7. Hãy lưu ý mã lỗi và truy cập tài liệu hỗ trợ chính thức của Microsoft, nơi liệt kê tất cả các lỗi liên quan đến Device Manager.</p>

<p style="text-align: justify;">8. Tìm thông tin mã liên quan và áp dụng bản sửa lỗi do Microsoft đề xuất để khắc phục sự cố.</p>

<p style="text-align: justify;">Điều gì sẽ xảy ra nếu áp dụng bản sửa lỗi do Microsoft đề xuất không khắc phục được sự cố với driver hoặc không có driver nào có hình tam giác màu vàng? Trong trường hợp đó, bạn sẽ phải sử dụng phần mềm của bên thứ ba để định vị và gỡ cài đặt driver không tương thích hoặc bị hỏng.</p>

<h2 style="text-align: justify;">2. Tìm và gỡ cài đặt driver không tương thích</h2>

<p style="text-align: justify;">Nếu bạn không thể tìm thấy driver không tương thích trong&nbsp;Device Manager, hãy sử dụng chương trình của bên thứ ba, chẳng hạn như Autorun, để xác định driver bị hỏng hoặc không tương thích và gỡ cài đặt chúng.</p>

<p style="text-align: justify;">Bạn có thể làm theo các bước sau để làm điều đó:</p>

<p style="text-align: justify;">1.&nbsp;Tải xuống Autorun&nbsp;từ trang web của Microsoft.:<br />
<span style="color:rgb(192, 57, 43);"><strong>https://learn.microsoft.com/en-us/sysinternals/downloads/autoruns</strong></span></p>

<p style="text-align: justify;">2. Giải nén file.</p>

<p style="text-align: justify;">3. Để chạy ứng dụng với quyền admin, hãy nhấp chuột phải vào file thực thi của ứng dụng đó và chọn&nbsp;<strong>Run as administrator</strong>.</p>

<p style="text-align: justify;">4. Chuyển đến tab&nbsp;<strong>Drivers</strong>.</p>

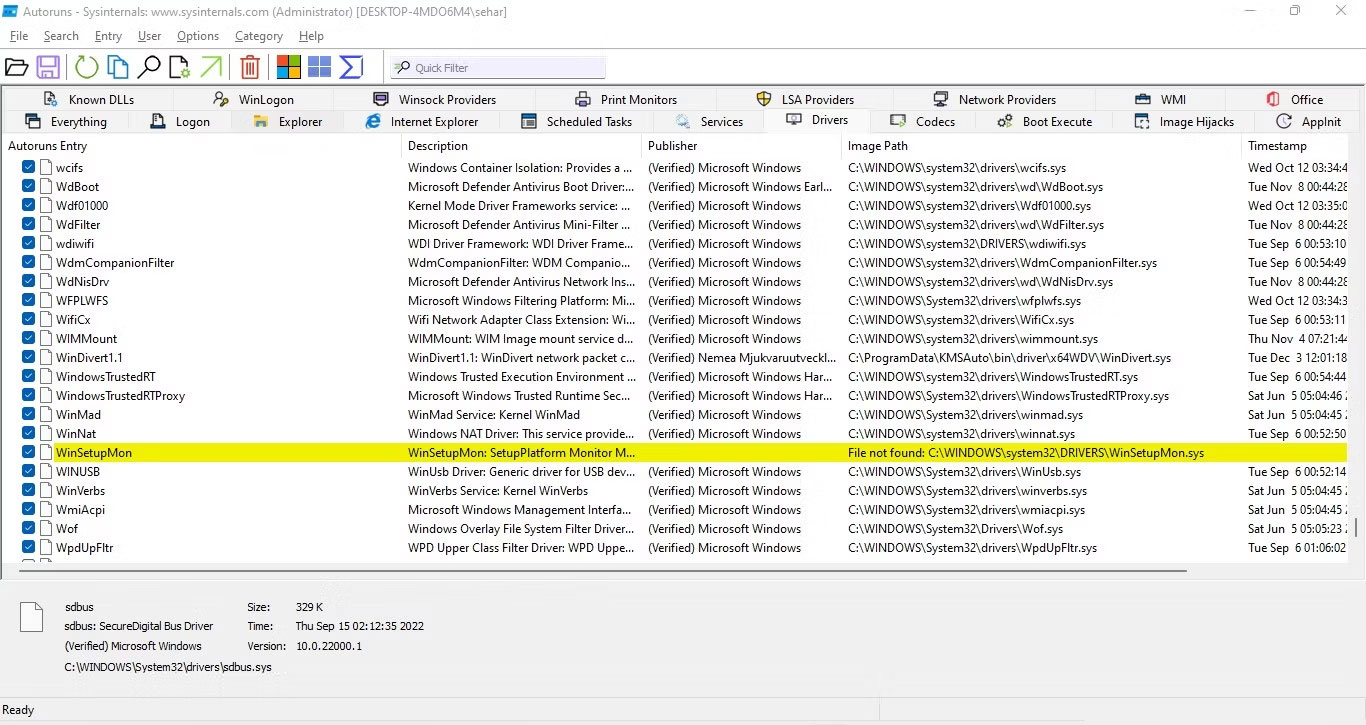
<p style="text-align: justify;">5. Các driver có vấn đề sẽ được đánh dấu, vì vậy hãy xác định vị trí của chúng.</p>

<figure>
<div style="text-align: justify;"><img alt="Kiểm tra driver bị hỏng được đánh dấu trong phần mềm Autoruns" data-i="6" data-src="https://st.quantrimang.com/photos/image/2023/10/21/loi-memory-integrity-chuyen-sang-mau-xam-7.jpg" data-was-processed="true" height="725" src="https://st.quantrimang.com/photos/image/2023/10/21/loi-memory-integrity-chuyen-sang-mau-xam-7.jpg" width="1366" /></div>

<figcaption>
<div style="text-align: justify;">Kiểm tra driver bị hỏng được đánh dấu trong phần mềm Autoruns</div>
</figcaption>
</figure>

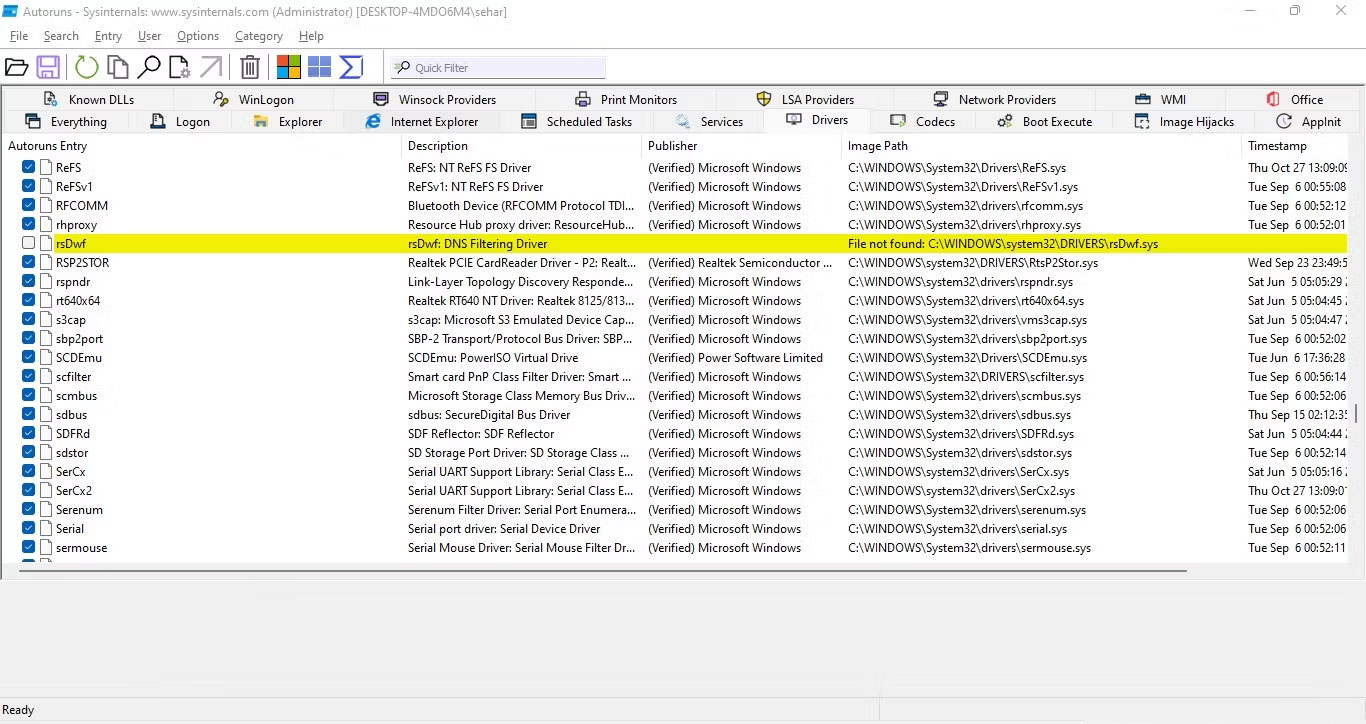
<p style="text-align: justify;">6. Khi chúng đã được định vị, hãy bỏ chọn hộp để tắt chúng.</p>

<figure>
<div style="text-align: justify;"><img alt="Bỏ chọn hộp dành cho driver không tương thích trong tab Drivers của ứng dụng Autorun" data-i="7" data-src="https://st.quantrimang.com/photos/image/2023/10/21/loi-memory-integrity-chuyen-sang-mau-xam-8.jpg" data-was-processed="true" height="724" src="https://st.quantrimang.com/photos/image/2023/10/21/loi-memory-integrity-chuyen-sang-mau-xam-8.jpg" width="1366" /></div>

<figcaption>
<div style="text-align: justify;">Bỏ chọn hộp dành cho driver không tương thích trong tab Drivers của ứng dụng Autorun</div>
</figcaption>
</figure>

<p style="text-align: justify;">7. Nếu bất kỳ driver nào báo lỗi khi tắt, hãy nhấp chuột phải vào driver đó và chọn&nbsp;<strong>Delete</strong>.</p>

<p style="text-align: justify;">8. Cài đặt driver mới nhất từ trang web chính thức hoặc khởi động lại thiết bị của bạn để Windows tự động cài đặt chúng.</p>

<p style="text-align: justify;">Nếu trước đây bạn không thể định vị các driver được xác định là không tương thích theo Memory Integrity thì ứng dụng Autorun sẽ hỗ trợ việc tìm và xóa chúng.</p>

<h2 style="text-align: justify;">3. Gỡ cài đặt các ứng dụng liên quan</h2>

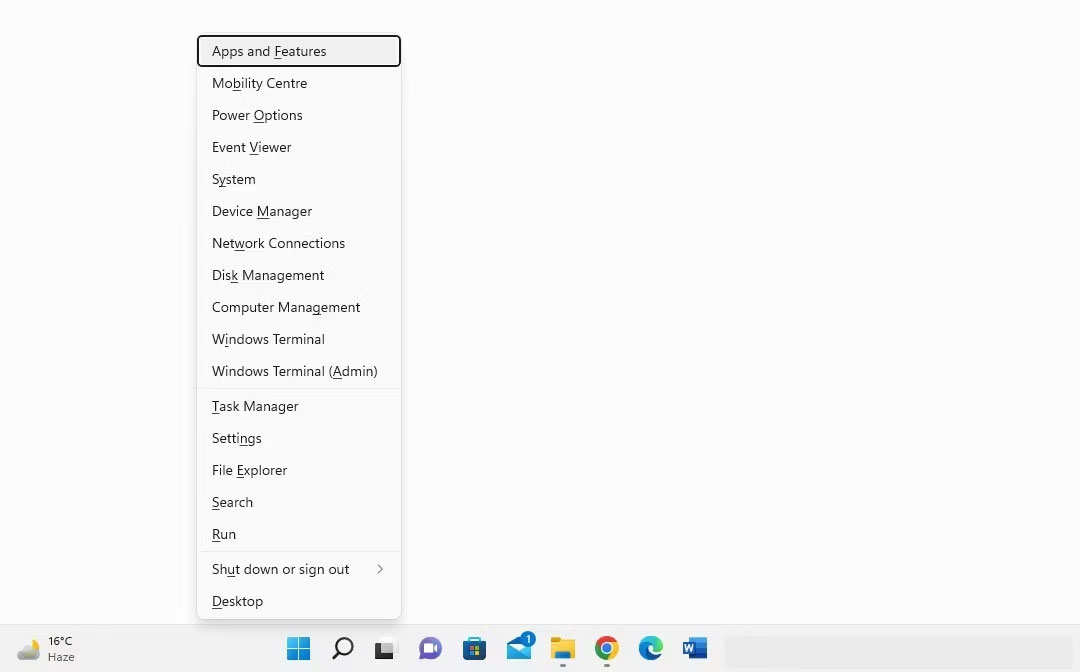
<p style="text-align: justify;">Nếu việc gỡ cài đặt driver không tương thích không hiệu quả, bạn nên gỡ cài đặt ứng dụng hoặc phần mềm bạn đã cài đặt từ cùng một nhà sản xuất với driver. Thực hiện theo các bước sau để làm điều đó:</p>

<p style="text-align: justify;">1. Nhấp chuột phải vào nút Start của Windows và chọn&nbsp;<strong>Apps and Features</strong>.</p>

<figure>
<div style="text-align: justify;"><img alt="Nhấp vào Apps and Features bằng cách nhấp chuột phải vào nút Start của Windows" data-i="8" data-src="https://st.quantrimang.com/photos/image/2023/10/21/loi-memory-integrity-chuyen-sang-mau-xam-9.jpg" data-was-processed="true" height="672" src="https://st.quantrimang.com/photos/image/2023/10/21/loi-memory-integrity-chuyen-sang-mau-xam-9.jpg" width="1080" /></div>

<figcaption>
<div style="text-align: justify;">Nhấp vào Apps and Features bằng cách nhấp chuột phải vào nút Start của Windows</div>
</figcaption>
</figure>

<p style="text-align: justify;">2. Trong danh sách các ứng dụng đã cài đặt, hãy tìm phần mềm của cùng một nhà sản xuất.</p>

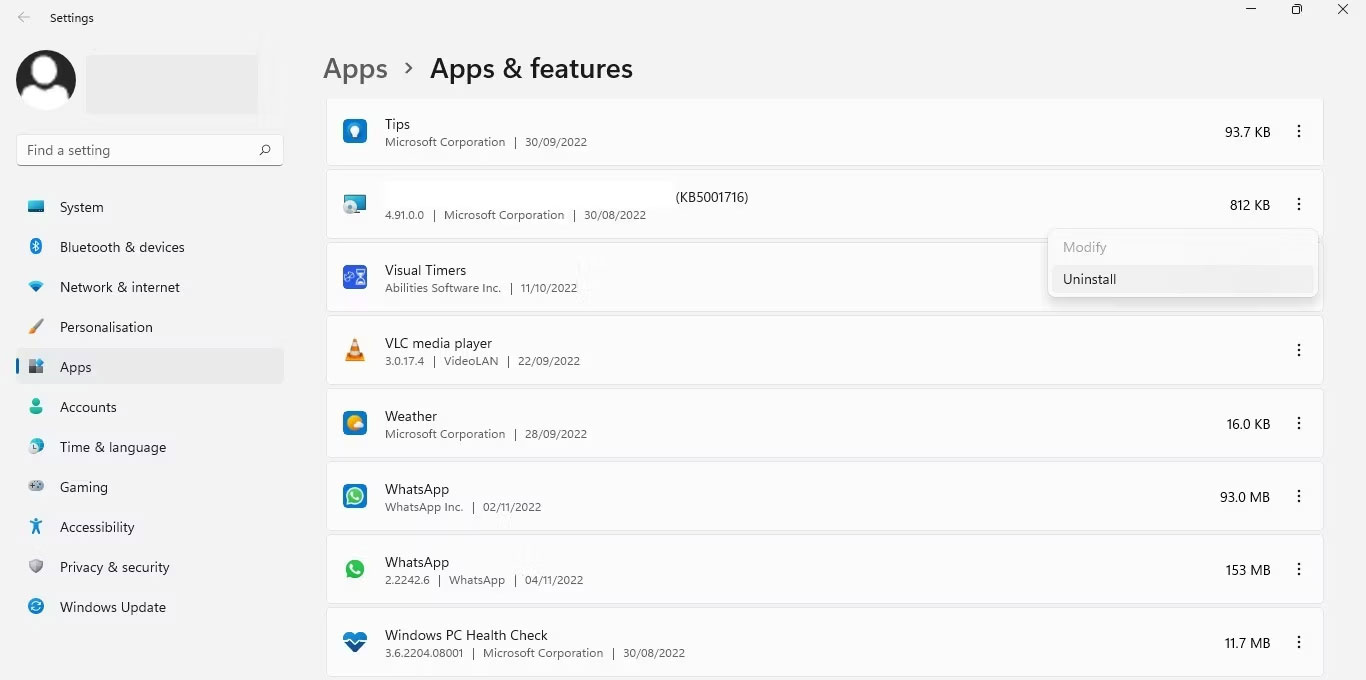
<p style="text-align: justify;">3. Khi tìm thấy chúng, hãy nhấp vào ba dấu chấm dọc bên cạnh chúng và chọn&nbsp;<strong>Uninstall</strong>.</p>

<figure>
<div style="text-align: justify;"><img alt="Nhấp vào nút Uninstall sau khi nhấp vào ba dấu chấm dọc bên cạnh phần mềm trong ứng dụng Windows Settings" data-i="9" data-src="https://st.quantrimang.com/photos/image/2023/10/21/loi-memory-integrity-chuyen-sang-mau-xam-10.jpg" data-was-processed="true" height="680" src="https://st.quantrimang.com/photos/image/2023/10/21/loi-memory-integrity-chuyen-sang-mau-xam-10.jpg" width="1366" /></div>

<figcaption>
<div style="text-align: justify;">Nhấp vào nút Uninstall sau khi nhấp vào ba dấu chấm dọc bên cạnh phần mềm trong ứng dụng Windows Settings</div>
</figcaption>
</figure>

<p style="text-align: justify;">Việc gỡ cài đặt các ứng dụng liên quan từ cùng một nhà sản xuất sẽ giải quyết được vấn đề. Nếu không, hãy đảm bảo rằng đó không phải là sự cố Windows Update.</p>

<h2 style="text-align: justify;">4. Khắc phục các sự cố liên quan đến cập nhật</h2>

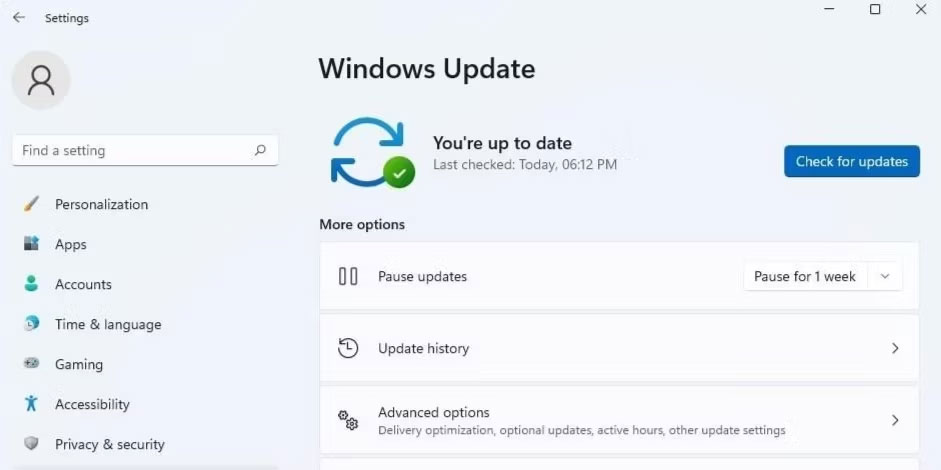
<p style="text-align: justify;">Nếu driver không tương thích hoặc bị hỏng không phải là vấn đề, bạn nên&nbsp;<a data-type="internal" href="https://quantrimang.com/cong-nghe/cach-cap-nhat-windows-len-ban-moi-nhat-156556" title="Cách giữ cho máy tính Windows luôn được cập nhật">đảm bảo hệ thống của mình được cập nhật</a>&nbsp;và không có bản cập nhật nào đang chờ xử lý.</p>

<figure>
<div style="text-align: justify;"><img alt="Kiểm tra cập nhật Windows" data-i="10" data-src="https://st.quantrimang.com/photos/image/2023/10/21/loi-memory-integrity-chuyen-sang-mau-xam-11.jpg" data-was-processed="true" height="470" src="https://st.quantrimang.com/photos/image/2023/10/21/loi-memory-integrity-chuyen-sang-mau-xam-11.jpg" width="941" /></div>

<figcaption>
<div style="text-align: justify;">Kiểm tra cập nhật Windows</div>
</figcaption>
</figure>

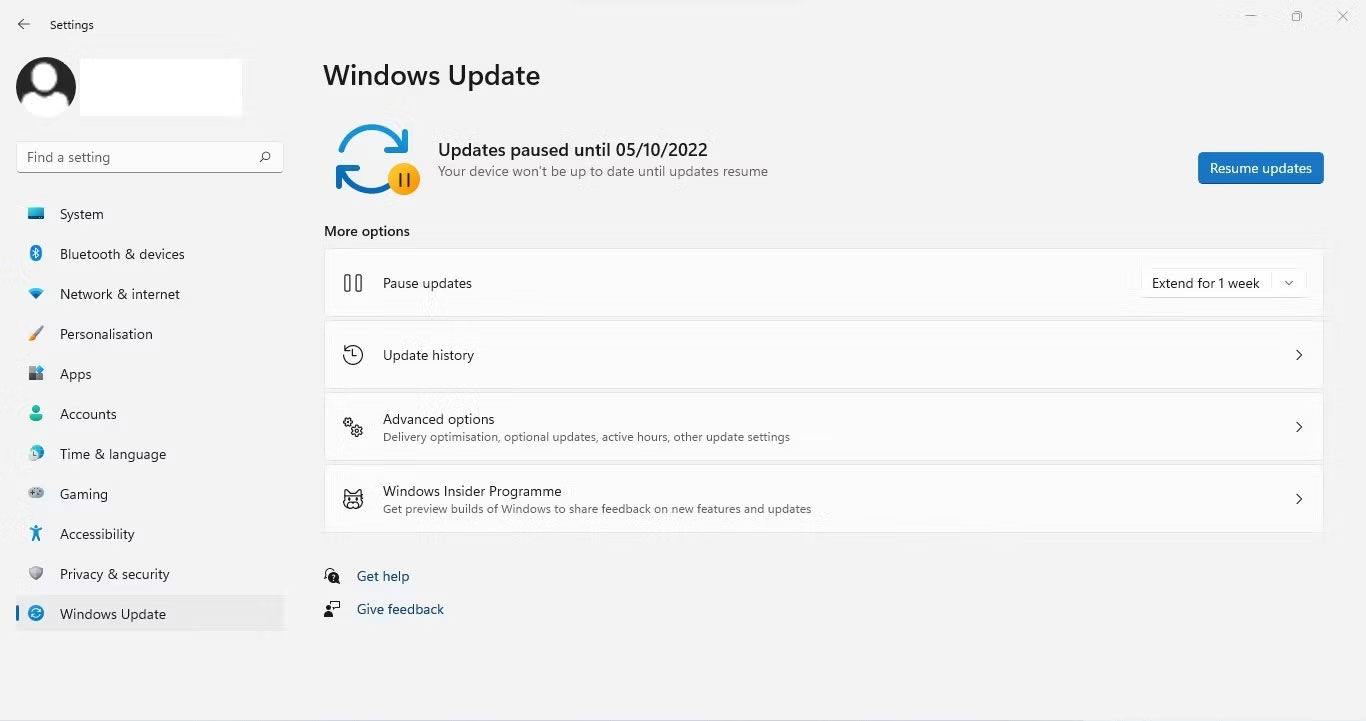
<p style="text-align: justify;">Nếu chúng bị tạm dừng, hãy nhấp vào&nbsp;<strong>Resume updates&nbsp;</strong>để cho phép Windows cập nhật hệ thống của bạn.</p>

<figure>
<div style="text-align: justify;"><img alt="Tiếp tục cập nhật Windows " data-i="11" data-src="https://st.quantrimang.com/photos/image/2023/10/21/loi-memory-integrity-chuyen-sang-mau-xam-12.jpg" data-was-processed="true" height="721" src="https://st.quantrimang.com/photos/image/2023/10/21/loi-memory-integrity-chuyen-sang-mau-xam-12.jpg" width="1366" /></div>

<figcaption>
<div style="text-align: justify;">Tiếp tục cập nhật Windows</div>
</figcaption>
</figure>

<p style="text-align: justify;">Hơn nữa, nếu gần đây bạn gặp sự cố sau khi cài đặt bản cập nhật, bạn nên gỡ cài đặt nó. Hướng dẫn&nbsp;gỡ cài đặt bản cập nhật trong Windows&nbsp;sẽ giải thích cách thực hiện. Nếu các bản cập nhật đang chờ xử lý hoặc được cài đặt gần đây không có lỗi, hãy áp dụng cách khắc phục tiếp theo.</p>

<h2 style="text-align: justify;">5. Sửa các file hệ thống bị hỏng</h2>

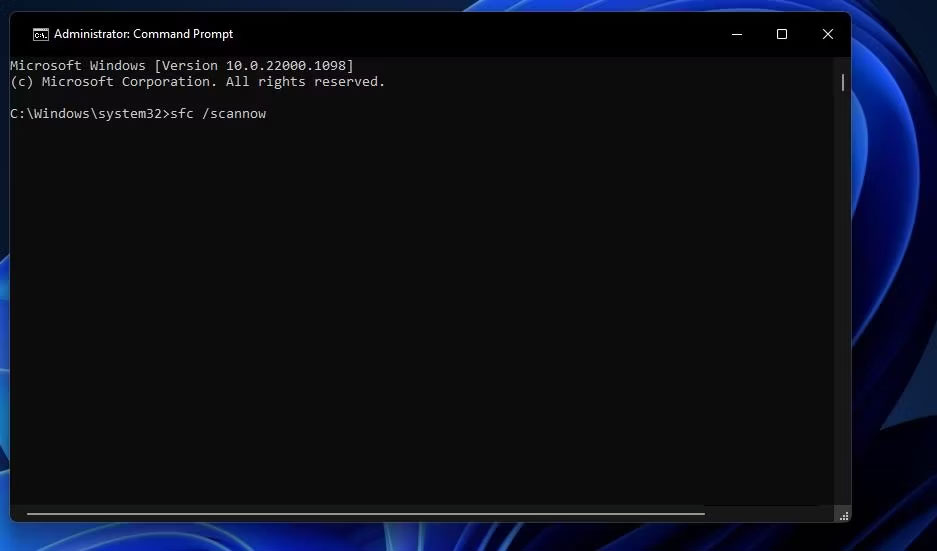
<p style="text-align: justify;">Các file hệ thống bị hỏng cũng là nguyên nhân chính gây ra các sự cố không lường trước được với những tính năng của Windows. Tính năng Memory Integrity có thể đã ngừng hoạt động sau khi virus xâm nhập thiết bị của bạn và làm hỏng các file hệ thống. Vì vậy, bạn phải đảm bảo rằng các file hệ thống của mình còn nguyên vẹn để loại trừ khả năng này.&nbsp;<a data-type="internal" href="https://quantrimang.com/cong-nghe/lam-the-nao-de-chay-sfc-system-file-checker-offline-130204" title="Làm thế nào để chạy SFC (System File Checker) Offline?">Quét SFC</a>&nbsp;có thể hữu ích trong trường hợp này.</p>

<figure>
<div style="text-align: justify;"><img alt="Lệnh SFC" data-i="12" data-src="https://st.quantrimang.com/photos/image/2023/10/21/loi-memory-integrity-chuyen-sang-mau-xam-13.jpg" data-was-processed="true" height="551" src="https://st.quantrimang.com/photos/image/2023/10/21/loi-memory-integrity-chuyen-sang-mau-xam-13.jpg" width="937" /></div>

<figcaption>
<div style="text-align: justify;">Lệnh SFC</div>
</figcaption>
</figure>

<p style="text-align: justify;">Sau khi quá trình quét hoàn tất, hãy tham khảo hướng dẫn của Quantrimang.com về&nbsp;<a data-type="internal" href="https://quantrimang.com/cong-nghe/kiem-tra-va-khac-phuc-tap-tin-he-thong-bi-loi-corrupt-tren-windows-120075" title="Kiểm tra và khắc phục tập tin hệ thống bị lỗi trên Windows">cách sửa chữa các file hệ thống bị hỏng</a>&nbsp;bằng những công cụ tích hợp sẵn trong Windows để bạn có thể phân tích kết quả chính xác.</p>

<h2 style="text-align: justify;">6. Reset ứng dụng Windows Security</h2>

<p style="text-align: justify;">Các sự cố với ứng dụng Windows Security cũng có thể ảnh hưởng đến chức năng của những tính năng bảo mật, chẳng hạn như Memory Integrity.</p>

<p style="text-align: justify;">Một cách để loại trừ những vấn đề như vậy là&nbsp;reset ứng dụng Windows Security. Tuy nhiên, hãy lưu ý một điều: Việc reset Windows Security sẽ hoàn nguyên mọi tùy chỉnh bảo mật mà bạn đã thực hiện cho đến nay. Nếu không phiền, bạn có thể reset Windows Security.</p>

<p style="text-align: justify;">Quá trình reset Windows Security cũng tương tự như reset bất kỳ ứng dụng Windows nào khác. Hãy làm điều đó và hy vọng vấn đề Memory Integrity chuyển sang màu xám sẽ tự giải quyết.</p>

<h2 style="text-align: justify;">7. Phương pháp thay thế để kích hoạt tính năng Memory Integrity</h2>

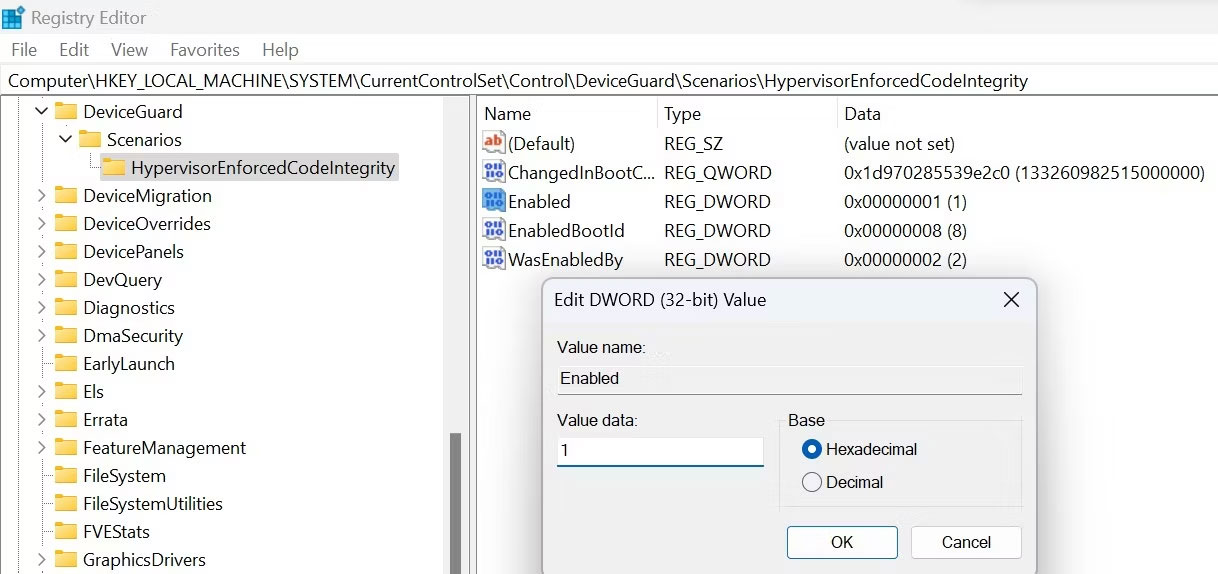
<p style="text-align: justify;">Sử dụng ứng dụng Windows Security không phải là cách duy nhất để kích hoạt tính năng Memory Integrity của Windows. Bạn cũng có thể điều chỉnh cài đặt này trong Registry Editor, cho phép bạn truy cập và sửa đổi cài đặt cấu hình hệ điều hành Windows. Do đó, nếu bạn không thể bật tính năng này từ Windows Security, hãy thử bật tính năng này từ Registry Editor.</p>

<p style="text-align: justify;">Hãy làm theo các bước sau để bật tính năng Memory Integrity từ Registry Editor:</p>

<ol>
	<li style="text-align: justify;">Nhập&nbsp;<strong>&quot;Registry Editor&quot;</strong>&nbsp;trong Windows Search và&nbsp;mở Registry Editor.</li>
	<li>Điều hướng đến đường dẫn sau:
	<pre id="pre0">
<code>Computer\HKEY_LOCAL_MACHINE\SYSTEM\CurrentControlSet\Control\DeviceGuard\Scenarios\HypervisorEnforcedCodeIntegrity</code></pre>
	</li>
	<li style="text-align: justify;">Nhấp chuột phải vào key&nbsp;<strong>Enabled</strong>&nbsp;ở khung bên phải và chọn&nbsp;<strong>Modify...</strong></li>
	<li style="text-align: justify;">Nhập&nbsp;<strong>&quot;1&quot;</strong>&nbsp;trong&nbsp;<strong>Value data</strong>&nbsp;nếu nó chưa có ở đó.</li>
</ol>

<figure>
<div style="text-align: justify;"><img alt="Tinh chỉnh key liên quan đến Memory Integrity trong Windows Register Editor" data-i="13" data-src="https://st.quantrimang.com/photos/image/2023/10/21/loi-memory-integrity-chuyen-sang-mau-xam-14.jpg" data-was-processed="true" height="574" src="https://st.quantrimang.com/photos/image/2023/10/21/loi-memory-integrity-chuyen-sang-mau-xam-14.jpg" width="1218" /></div>

<figcaption>
<div style="text-align: justify;">Tinh chỉnh key liên quan đến Memory Integrity trong Windows Register Editor</div>
</figcaption>
</figure>

<p style="text-align: justify;"><strong>Cảnh báo</strong>: Việc cấu hình sai key trong Registry Editor có thể gây ra những hậu quả không lường trước được. Nếu bạn không quen với việc tinh chỉnh registry, bạn có thể bỏ qua bước này.</p>

<div style="text-align: justify;">&nbsp;</div>
		</div>
				<div id="author">
						<p>
				<strong>Nguồn tin:</strong>
				Quantrimang.com
			</p>
		</div>
	</div>
	<div id="footer" class="clearfix">
		<div id="url">
			<strong>URL của bản tin này: </strong><a href="https://www.nguoicodonvn2008.info/vi/news/savefile/kien-thuc-may-tinh/7-cach-khac-phuc-tinh-nang-memory-integrity-bi-chuyen-sang-mau-xam-tren-windows-11-7668.html" title="7 cách khắc phục tính năng Memory Integrity bị chuyển sang màu xám trên Windows 11">https://www.nguoicodonvn2008.info/vi/news/savefile/kien-thuc-may-tinh/7-cach-khac-phuc-tinh-nang-memory-integrity-bi-chuyen-sang-mau-xam-tren-windows-11-7668.html</a>

		</div>
		<div class="clear"></div>
		<div class="copyright">
			&copy; .&#x3A; Nguoicodonvn2008.info - Cõi lòng người cô đơn &#x3A;.
		</div>
		<div id="contact">
			<a href="mailto:admin@nguoicodonvn2008.info">admin@nguoicodonvn2008.info</a>
		</div>
	</div>
</div>
        <div id="timeoutsess" class="chromeframe">
            Bạn đã không sử dụng Site, <a onclick="timeoutsesscancel();" href="https://nguoicodonvn2008.info/#">Bấm vào đây để duy trì trạng thái đăng nhập</a>. Thời gian chờ: <span id="secField"> 60 </span> giây
        </div>
        <div id="openidResult" class="nv-alert" style="display:none"></div>
        <div id="openidBt" data-result="" data-redirect=""></div>
		</script>
		<div class="car-top">
  <span><img src="https://nguoicodonvn2008.info/themes/default/images/car.png" alt=""></span>
</div>
<script src="https://nguoicodonvn2008.info/assets/js/jquery/jquery.min.js"></script>
<script>var nv_base_siteurl="/",nv_lang_data="vi",nv_lang_interface="vi",nv_name_variable="nv",nv_fc_variable="op",nv_lang_variable="language",nv_module_name="news",nv_func_name="savefile",nv_is_user=0, nv_my_ofs=-4,nv_my_abbr="EDT",nv_cookie_prefix="nv4c_e856T",nv_check_pass_mstime=1738000,nv_area_admin=0,nv_safemode=0,theme_responsive=0,nv_recaptcha_ver=2,nv_recaptcha_sitekey="",nv_recaptcha_type="image",XSSsanitize=1;</script>
<script src="https://nguoicodonvn2008.info/assets/js/language/vi.js"></script>
<script src="https://nguoicodonvn2008.info/assets/js/DOMPurify/purify3.js"></script>
<script src="https://nguoicodonvn2008.info/assets/js/global.js"></script>
<script src="https://nguoicodonvn2008.info/assets/js/site.js"></script>
<script src="https://nguoicodonvn2008.info/themes/default/js/news.js"></script>
<script src="https://nguoicodonvn2008.info/themes/default/js/main.js"></script>
<script src="https://nguoicodonvn2008.info/themes/default/js/custom.js"></script>
<script type="application/ld+json">
        {
            "@context": "https://schema.org",
            "@type": "Organization",
            "url": "https://nguoicodonvn2008.info",
            "logo": "https://nguoicodonvn2008.info/uploads/angel.gif"
        }
        </script>
<script src="https://nguoicodonvn2008.info/themes/default/js/bootstrap.min.js"></script>
<script type="text/javascript">
var $scrolltop = $('.car-top');
$scrolltop.on('click', function () {
    $('html,body').animate({
        scrollTop: 0
    }, 800);
    $(this).addClass("car-run");
    setTimeout(function(){ $scrolltop.removeClass('car-run');}, 1000);
    return false;
});
$(window).on('scroll', function ()
{ 
    if($(window).scrollTop() >= 200)
    {
        $scrolltop.addClass("show");
        $scrolltop.addClass("car-down");
    }
    else
    {
       $scrolltop.removeClass("show");
       setTimeout(function(){ $scrolltop.removeClass('car-down');}, 300);
    }
});
</script>
</body>
</html>