7 cách khắc phục lỗi ứng dụng Films & TV không hoạt động trên Windows 11
- Thứ sáu - 18/11/2022 23:55
- In ra
- Đóng cửa sổ này

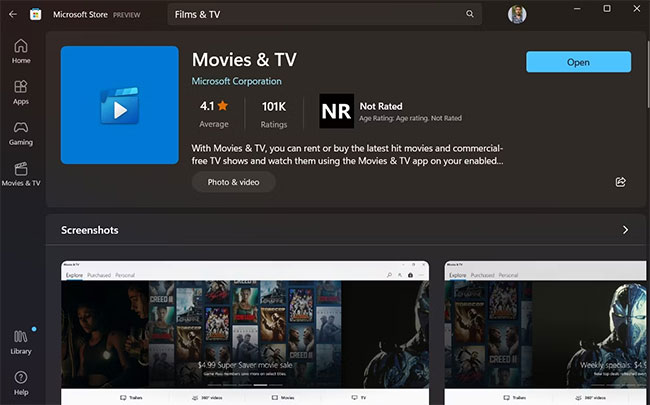
Ứng dụng Film & TV là ứng dụng video mặc định của bạn trong Windows 11. So với phiên bản tiền nhiệm, Windows Media Player, ứng dụng này có nhiều tính năng và khả năng sử dụng tốt hơn. Thật không may, nhiều người dùng gặp tình trạng ứng dụng Film & TV không hoạt động trên PC chạy Windows 11.
Nếu Film & TV trên hệ thống của bạn hoạt động chậm hoặc hoàn toàn không hoạt động, đây là một số cách giúp bạn làm cho công cụ này chạy trơn tru trở lại.
1. Chạy Microsoft Store Apps troubleshooter
Công cụ đầu tiên để sửa chữa ứng dụng Film & TV là trình khắc phục sự cố Windows tích hợp sẵn cho các ứng dụng UWP. Trình khắc phục sự cố quét các file ứng dụng để tìm những sự cố phổ biến và đề xuất các giải pháp phù hợp.
Để chạy Microsoft Store Apps troubleshooter, hãy làm theo các bước bên dưới:
B1: Mở System Settings bằng cách nhấn hotkey Win + I.
B2: Trong tab System, cuộn xuống và chọn tùy chọn Troubleshoot.
B3: Chọn Other troubleshooters trong cửa sổ sau.
B4: Cuộn xuống Microsoft Store Apps và nhấp vào nút Run bên cạnh.
Trình khắc phục sự cố sẽ quét hệ thống của bạn để tìm mọi sự cố hiện có và đề xuất các bản sửa lỗi. Thực hiện theo các hướng dẫn trên màn hình để thực hiện những bản sửa lỗi thành công.
2. Kiểm tra mọi bản cập nhật ứng dụng có sẵn
Windows thường xuyên nhận được những bản cập nhật cho tất cả các ứng dụng UMP. Các bản cập nhật mới nâng cao hiệu suất của ứng dụng và loại bỏ lỗi.
Bạn có thể cập nhật ứng dụng Film & TV bằng cách làm theo hướng dẫn bên dưới:
B1: Mở Microsoft Store.
B2: Nhập Film & TV vào thanh tìm kiếm và nhấn Enter.
B3: Nếu có bất kỳ bản cập nhật nào, bạn sẽ thấy nút Update bên dưới tên ứng dụng. Nhấn vào nó để tải về bản cập nhật.
Sau khi tải xuống và cài đặt bản cập nhật, hãy khởi động lại máy tính, rồi kiểm tra xem sự cố còn diễn ra không.
3. Kiểm tra cài đặt hệ thống
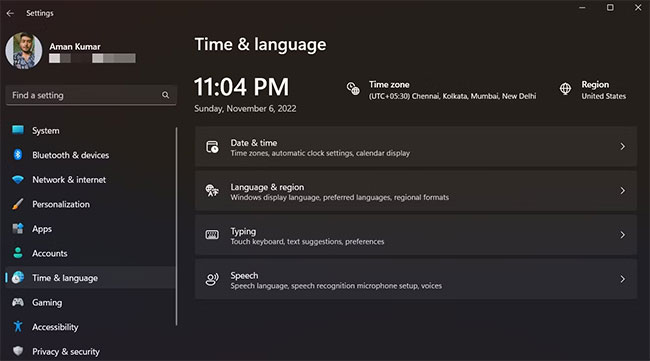
Hầu hết các ứng dụng UWP, bao gồm ứng dụng Film & TV, sẽ không hoạt động nếu cài đặt thời gian, ngôn ngữ ngày tháng và khu vực trên máy tính không chính xác. Bạn sẽ phải cấu hình chính xác các cài đặt này để ứng dụng hoạt động trở lại. Đây là cách thực hiện:
B1: Mở System Settings và chọn Time & language từ bảng điều khiển bên trái.
B2: Chọn Date & time, sau đó thay đổi ngày giờ theo cách thủ công (xem cách thay đổi ngày giờ trên Windows 11).
B3: Tiếp theo, chọn Language & region, rồi chọn quốc gia và ngôn ngữ của bạn.
Mọi thao tác đã hoàn tất. Kiểm tra xem sự cố đã được khắc phục hay chưa.
4. Xóa các file tạm thời trên máy tính
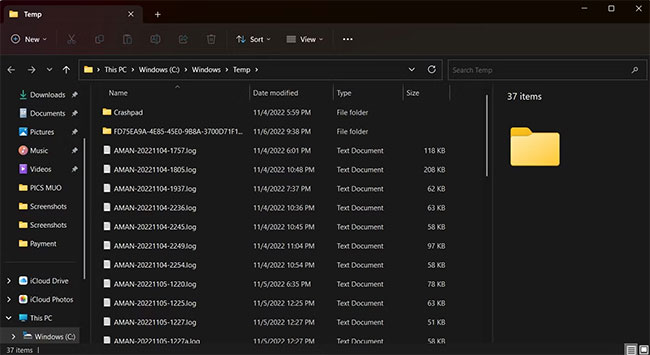
Các chương trình và ứng dụng lưu trữ những file tạm thời của chúng trong thư mục Temp. Nhưng đôi khi, thư mục này có thể bị hỏng và gây ra nhiều sự cố khác nhau, bao gồm cả lỗi đang diễn ra.
Giải pháp trong trường hợp này là xóa nội dung của thư mục Temp. Đây là cách:
B1: Mở hộp thoại Run, nhập Temp vào thanh tìm kiếm và nhấp vào OK.
B2: Nhấn Ctrl + A để chọn tất cả các file và thư mục, sau đó nhấn Shift + Delete để xóa chúng vĩnh viễn.
5. Khôi phục các thư viện mặc định
Film & TV sẽ bị lỗi hoặc hoàn toàn không mở nếu bạn đã xóa một trong các thư viện mặc định. Bạn sẽ phải khôi phục các thư viện mặc định để khắc phục sự cố. Để làm điều này, hãy làm theo các hướng dẫn dưới đây:
B1: Nhấn Win + E để mở Windows Explorer.
B2: Nhấp vào ba dấu chấm ở trên cùng và chọn Options.
B3: Chuyển sang tab View.
B4: Trong phần Advanced settings, cuộn xuống và chọn tùy chọn Show libraries.
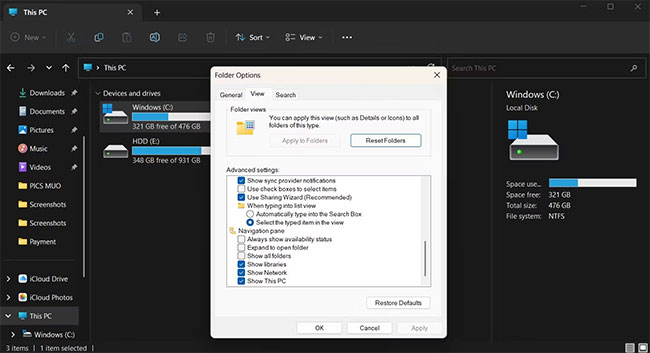
B5: Nhấp vào Apply > OK.
B6: Nhấp vào Libraries trong bảng điều khiển bên trái.
B7: Nhấp chuột phải vào từng thư viện và chọn Delete từ menu ngữ cảnh.
B8: Nhấp chuột phải vào Libraries một lần nữa trong bảng điều khiển bên trái, chọn Show more options > Restore default libraries.
Tất cả dữ liệu thư viện hiện đã được khôi phục. Bây giờ, hãy kiểm tra xem sự cố có còn tiếp diễn không.
6. Reset ứng dụng Film & TV
Windows 11 đi kèm với tùy chọn reset mà bạn có thể sử dụng để loại bỏ hầu hết các sự cố ứng dụng UWP. Khi bạn reset ứng dụng UWP, ứng dụng đó sẽ tự động được khôi phục về cài đặt mặc định.
Bạn có thể reset ứng dụng Film & TV bằng cách làm theo các bước dưới đây:
B1: Mở System Settings và chọn Apps từ bảng điều khiển bên trái.
B2: Chọn tùy chọn Installed apps trong cửa sổ sau.
B3: Xác định vị trí và nhấp vào ba dấu chấm bên cạnh ứng dụng Film & TV.
B4: Chọn Advanced options từ menu ngữ cảnh.
B5: Cuộn xuống và nhấp vào nút Reset. Sau đó, nhấp vào nút Reset một lần nữa để xác nhận lựa chọn của bạn.
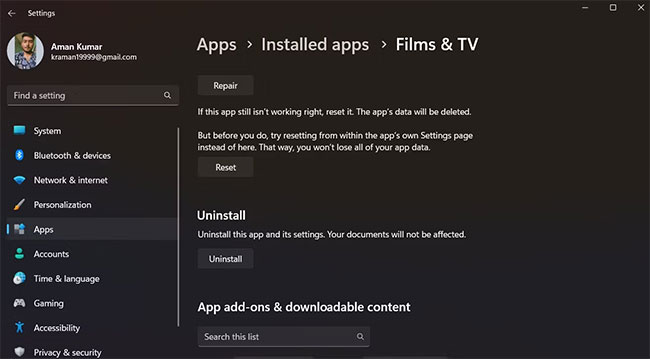
Mọi thao tác hoàn tất. Khởi chạy ứng dụng Film & TV và kiểm tra xem sự cố đã được khắc phục chưa. Nếu bạn vẫn gặp sự cố, hãy sử dụng tùy chọn Repair. Tùy chọn sửa chữa cho phép bạn sửa chữa cài đặt chương trình mà không gặp rắc rối khi cài đặt lại.
Để sửa chữa ứng dụng Film & TV, hãy đi tới Start > System Settings > Apps > Apps and features. Tại đây, xác định vị trí và nhấp vào ba dấu chấm bên cạnh ứng dụng Film & TV. Chọn Advanced options từ menu pop-up.
Tiếp theo, cuộn xuống và nhấp vào nút Repair để bắt đầu quá trình. Sau khi ứng dụng được sửa chữa, bạn sẽ thấy một dấu kiểm bên cạnh nút Repair.
7. Cài đặt lại ứng dụng Films & TV

Khả năng cao là ứng dụng Films & TV không phản hồi do các file của nó bị hỏng. Giải pháp tốt nhất trong trường hợp này là cài đặt lại ứng dụng.
Thật không may, các ứng dụng UWP không có nút Uninstall cổ điển. Vì vậy, bạn sẽ phải sử dụng công cụ dòng lệnh như Windows PowerShell để gỡ cài đặt ứng dụng Films & TV. Đây là cách thực hiện:
B1: Khởi chạy menu Start bằng cách nhấn phím Win.
B2: Trong thanh tìm kiếm, nhập Windows PowerShell và chọn Run as administrator từ ngăn bên phải để mở PowerShell với quyền admin.
B3: Trong cửa sổ PowerShell với quyền admin, nhập lệnh sau và nhấn Enter. Lệnh này sẽ gỡ cài đặt ứng dụng Films & TV khỏi máy tính của bạn.
get-appxpackage *Microsoft.ZuneVideo* | remove-appxpackage
B4: Tiếp theo, hãy mở Microsoft Store và tìm kiếm ứng dụng Films & TV.
B5: Nhấp vào nút Get bên cạnh ứng dụng Films & TV để bắt đầu quá trình tải xuống.
Sau khi ứng dụng được cài đặt trên máy tính của bạn, hãy khởi chạy nó và kiểm tra xem sự cố còn diễn ra không.
Bạn có thể làm được rất nhiều điều trên ứng dụng Films & TV đã được tân trang lại. Nó có giao diện người dùng hoàn toàn mới và cho phép bạn phát video trực tuyến cũng như ngoại tuyến. Tuy nhiên, đôi khi ứng dụng có thể không load được video hoặc ngừng hoạt động hoàn toàn.
Rất may, bạn có thể nhanh chóng reset hoặc cài đặt lại ứng dụng Films & TV để đưa ứng dụng này trở lại trạng thái hoạt động. Ngoài ra, bạn có thể thử các trình phát đa phương tiện khác cho Windows 11.
