6 cách thay đổi Administrator trong Windows
- Thứ hai - 01/07/2024 02:01
- In ra
- Đóng cửa sổ này

Mặc dù Windows thường đặt người dùng đầu tiên trên PC làm quản trị viên (administrator), nhưng có nhiều lý do và cách để thay đổi quản trị viên trong Windows. Cho dù bạn đang thêm người dùng cấp quản trị viên mới, muốn thăng cấp người dùng tiêu chuẩn hay chuyển hoàn toàn sang quản trị viên mới, hướng dẫn này cung cấp 6 cách để thay đổi quản trị viên trong Windows. Chỉ cần chọn phương pháp yêu thích của bạn và bắt đầu.
Lưu ý: Để ngăn những người không phải là quản trị viên có được quyền truy cập trái phép, Windows yêu cầu bạn thực hiện các thay đổi từ tài khoản Administrator hiện có.
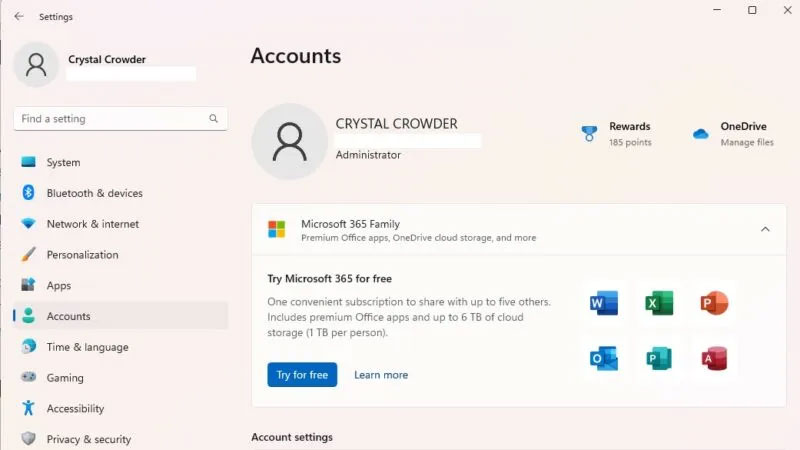
1. Sử dụng Windows Settings
Khi muốn thay đổi quản trị viên trong Windows, cách đơn giản nhất là sử dụng Windows Settings.
1. Mở Settings.
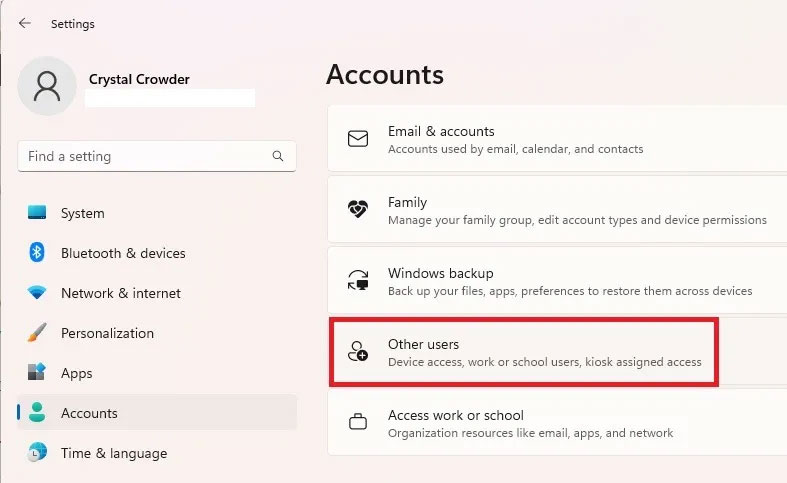
2. Chọn Accounts trong ngăn bên trái.
3. Chọn Other users ở bên phải. Tùy chọn này được gọi là Family & other users trong Windows 10.
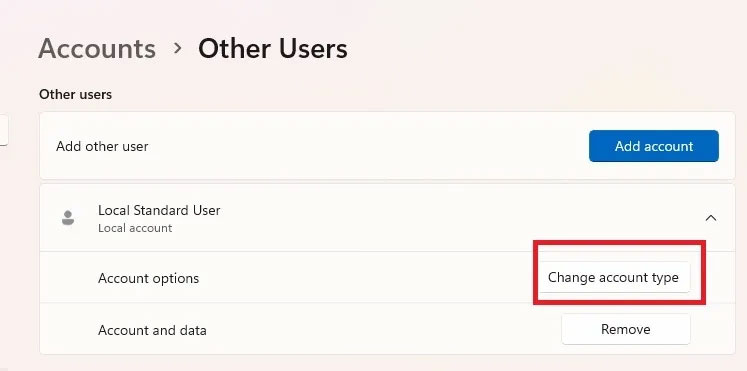
4. Chọn người dùng mong muốn từ danh sách.
5. Nhấn Change account type.
6. Chọn Administrator từ danh sách loại tài khoản và nhấn OK để xác nhận.
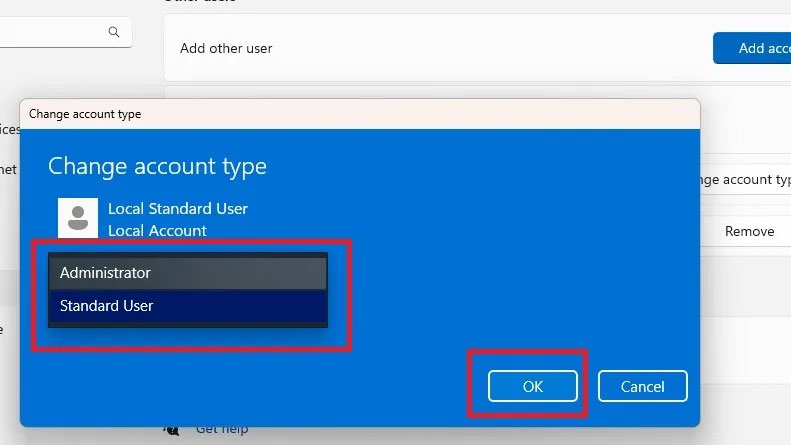
Bạn có thể dễ dàng hạ cấp tài khoản quản trị viên bằng phương pháp tương tự.
2. Thay đổi Administrator trong Windows qua Control Panel
Nếu bạn thích thay đổi cài đặt từ Control Panel hơn là Settings, hãy làm theo các bước sau:
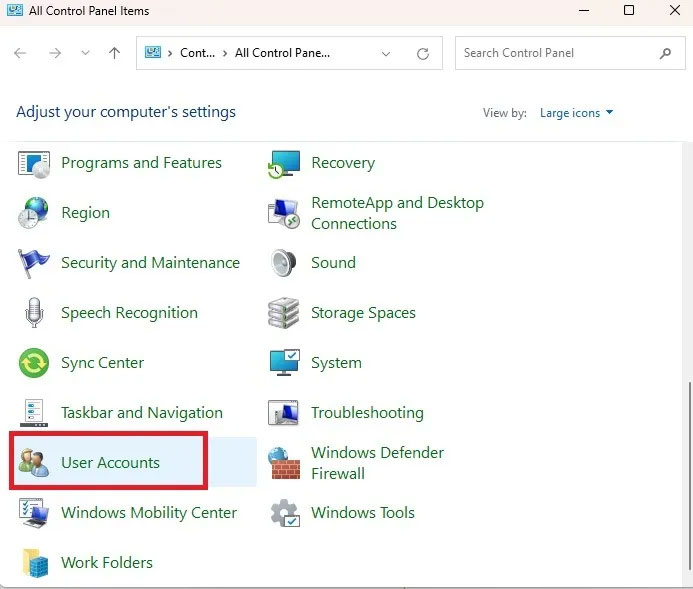
1. Đi tới Start và tìm kiếm Control Panel, sau đó nhấp vào Open.

2. Chọn User Accounts.
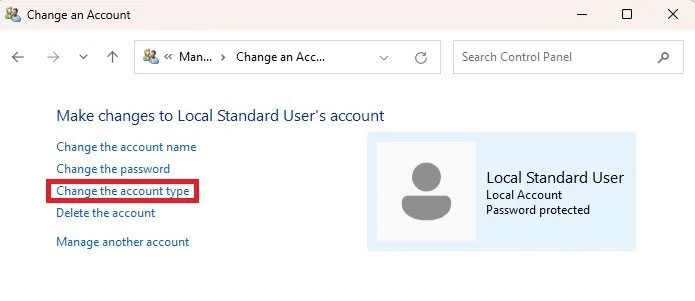
3. Nếu bạn muốn thay đổi loại tài khoản của riêng mình, hãy chọn Change your account type. Đối với các tài khoản khác, hãy chọn Manage another account.

4. Chọn tài khoản bạn muốn thay đổi, sau đó chọn Change the account type.
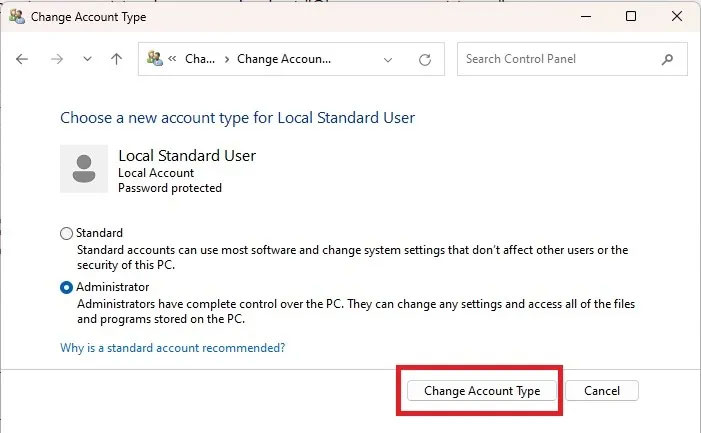
5. Chọn Administrator (hoặc Standard nếu bạn đang hạ cấp) và nhấn Change Account Type.
3. Thay đổi Administrator trong Windows bằng Command Prompt
Nếu bạn không ngại gõ một vài lệnh, thật dễ dàng để thay đổi tài khoản người dùng Windows giữa Standard và Administrator. Hãy bắt đầu bằng cách thay đổi người dùng Standard thành Administrator.
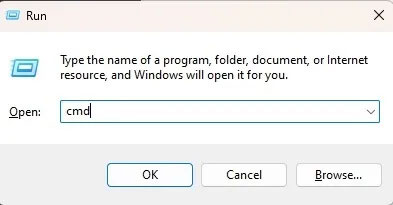
1. Nhấn Win + R, gõ cmd, sau đó nhấn Ctrl + Shift + Enter để mở Command Prompt với quyền admin.
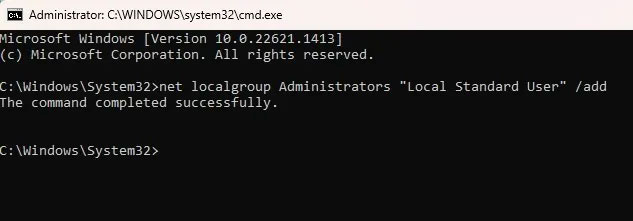
2. Nhập nội dung sau để thay đổi loại tài khoản người dùng thành quản trị viên:
net localgroup Administrators "User Account" /add
Thay thế User Account bằng tên tài khoản người dùng. Đối với tài khoản Microsoft, hãy sử dụng 5 chữ cái đầu tiên trong địa chỉ email của tài khoản. Ví dụ, đối với windowsuser@microsoft.com, tên tài khoản người dùng sẽ là “windo”. Hãy nhớ rằng, bạn có thể sử dụng Windows 11 mà không cần tài khoản Microsoft.
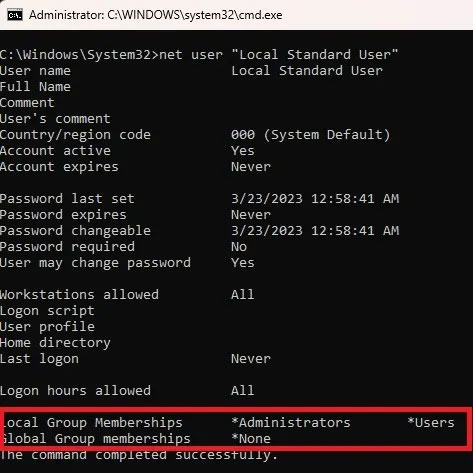
3. Xác minh thay đổi bằng cách gõ:
net user "user name"
Nếu bạn cần hạ cấp tài khoản quản trị viên, quy trình này cũng tương tự:
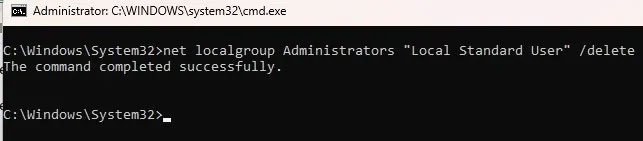
1. Nhập lệnh sau, thay thế User Account bằng tên tài khoản:
net localgroup Administrators "User Account" /delete
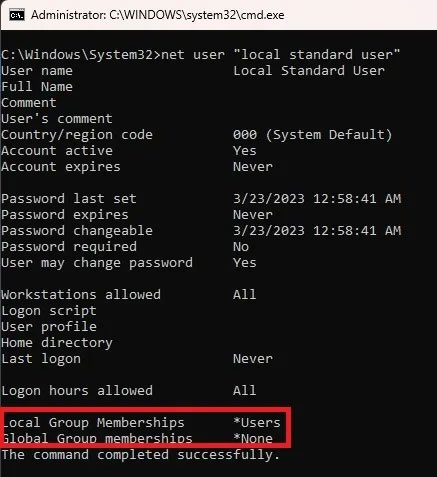
2. Xác minh thay đổi với:
net user "user name"
4. Sử dụng PowerShell
Nếu bạn thích PowerShell hơn, đây là cách thay đổi quản trị viên trong Windows 10 và 11:
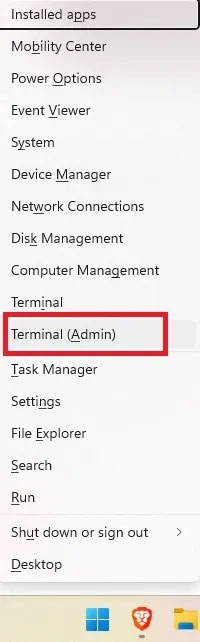
1. Nhấn Win + X và chọn Terminal (Admin). Đối với Windows 10, hãy chọn PowerShell.
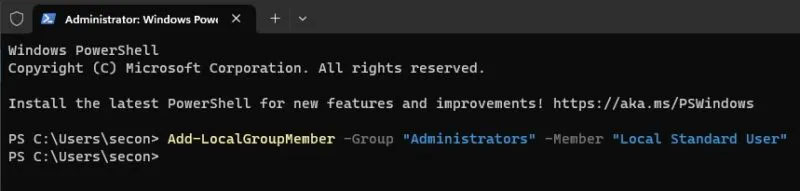
2. Nhập lệnh sau tại dấu nhắc lệnh, thay thế user account bằng tên tài khoản:
Add-LocalGroupMember -Group "Administrators" -Member "User Account"
Cũng giống như Command Prompt, tên người dùng cho tài khoản Microsoft là 5 chữ cái đầu tiên trong địa chỉ email của tài khoản. Bạn cũng có thể sử dụng:
-Member "MicrosoftAccount\emailaddress"
Điều này đưa người dùng Standard lên thành Administrator. Nếu bạn cần hạ cấp một tài khoản:
1. Mở PowerShell và nhập thông tin sau, thay thế User Account bằng tên tài khoản:
Remove-LocalGroupMember -Group "Administrators" -Member "User Account"

Thao tác này sẽ chuyển tài khoản sang người dùng Standard.
5. Sử dụng netplwiz
Một phương pháp nhanh chóng và dễ dàng khác để thay đổi quản trị viên trong Windows là sử dụng netplwiz. Với phương pháp này, mọi người dùng đều được liệt kê và bạn có thể thay đổi qua lại giữa các loại người dùng nếu cần.
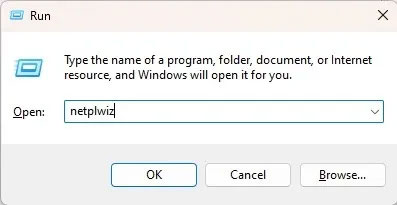
1. Nhấn Win + R để mở Run.
2. Nhập netplwiz và nhấp vào OK.
3. Chọn người dùng mong muốn và nhấp vào Properties.
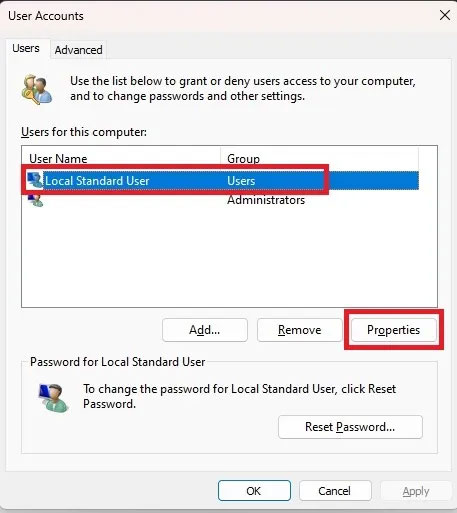
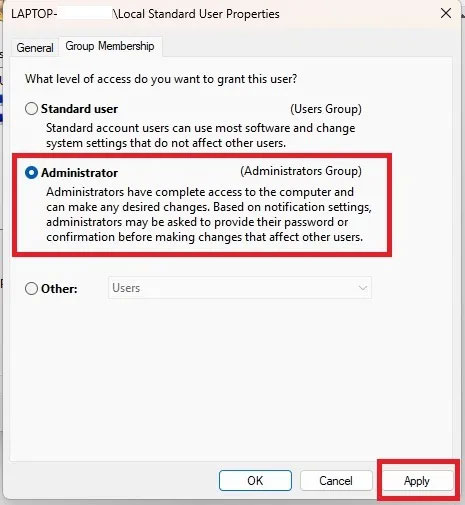
4. Chọn tab Group Membership và thay đổi loại tài khoản. Nhấp vào Apply.
6. Thay đổi Administrator trong Windows thông qua Computer Management
Phương pháp này chỉ hoạt động trên các phiên bản Pro của Windows 10 và 11. Nếu bạn có phiên bản Home, thì tùy chọn này sẽ không khả dụng. Làm theo các bước sau để thay đổi tài khoản trong Windows 10 và 11.
Bạn có thể sử dụng công cụ của bên thứ ba lusrmgmr để nhận được kết quả tương tự. Hướng dẫn này bao gồm các bước cho cả phiên bản Pro của Windows và lusrmgmr. Các ảnh chụp màn hình là từ lusrmgmr.
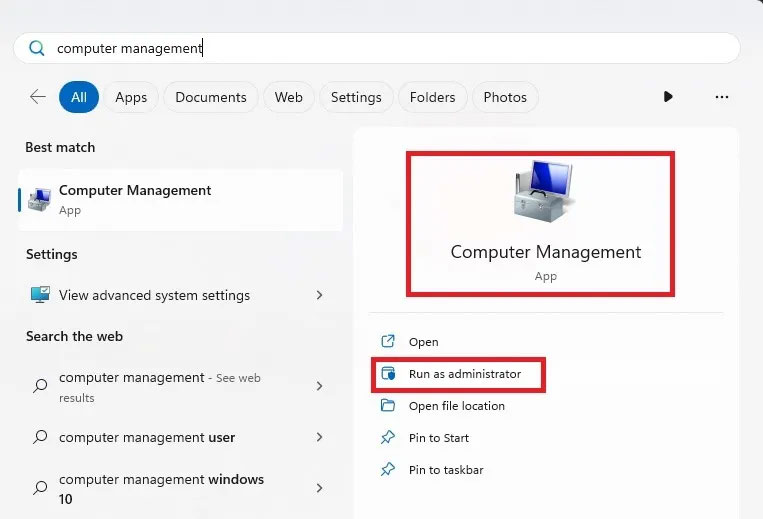
1. Mở menu Start và tìm kiếm Computer Management. Chọn Run as administrator.
2. Mở rộng System Tools > Local Users and Groups.
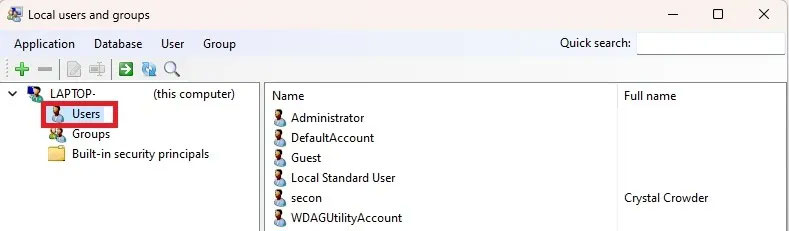
3. Chọn Users để mở danh sách người dùng trong ngăn trung tâm.
4. Nhấp chuột phải vào người dùng và chọn Properties. Nhấp vào Edit cho lusrmgmr.
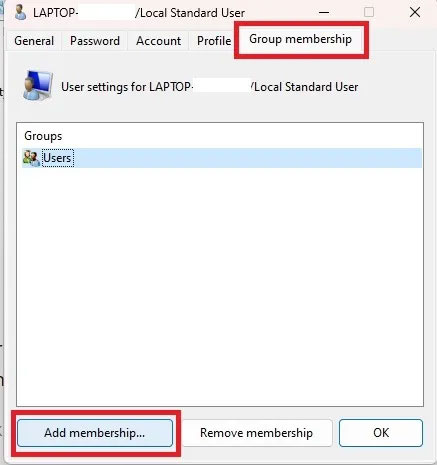
5. Chọn tab Member Of và nhấp vào Add. Nếu sử dụng lusrmgmr, hãy nhấp vào tab Group membership và chọn Add membership.
6. Chọn Advanced.
7. Chọn Find Now.
8. Chọn nhóm Administrators từ danh sách. Trong lusrmgmr, danh sách nhóm xuất hiện ngay lập tức. Chọn Administrators.
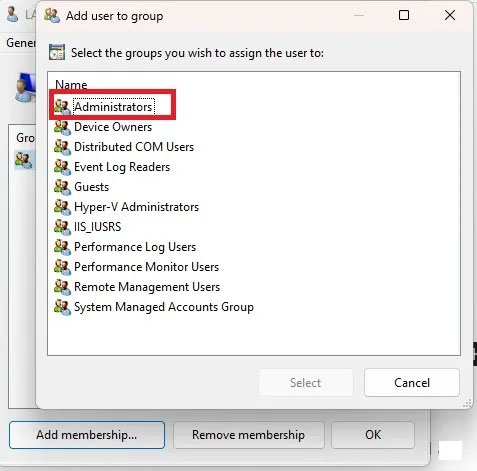
9. Nhấp vào OK để xác nhận lựa chọn của bạn. Trong lusrmgmr, chọn Select.
10. Nhấp vào OK một lần nữa để thoát khỏi cửa sổ. Sau đó, bạn sẽ thấy cả người dùng tiêu chuẩn và quản trị viên đều được liệt kê.
Bạn cũng có thể hạ cấp người dùng bằng quy trình tương tự. Tuy nhiên, bạn sẽ thu hồi quyền thay vì thêm nó.
