<!DOCTYPE html>
    <html lang="vi" xmlns="http://www.w3.org/1999/xhtml" prefix="og: http://ogp.me/ns#">
    <head>
<title>3 cách chạy ứng dụng với tư cách người dùng khác trên Windows 11</title>
<meta name="description" content="3 cách chạy ứng dụng với tư cách người dùng khác trên Windows 11 - Savefile - Tin Tức -...">
<meta name="author" content=".: Nguoicodonvn2008.info - Cõi lòng người cô đơn :.">
<meta name="copyright" content=".: Nguoicodonvn2008.info - Cõi lòng người cô đơn :. [admin@nguoicodonvn2008.info]">
<meta name="robots" content="index, archive, follow, noodp">
<meta name="googlebot" content="index,archive,follow,noodp">
<meta name="msnbot" content="all,index,follow">
<meta name="generator" content="NukeViet v4.5">
<meta http-equiv="Content-Type" content="text/html; charset=utf-8">
<meta property="og:title" content="3 cách chạy ứng dụng với tư cách người dùng khác trên Windows 11">
<meta property="og:type" content="website">
<meta property="og:description" content="Savefile - Tin Tức - https&#x3A;&#x002F;&#x002F;www.nguoicodonvn2008.info&#x002F;vi&#x002F;news&#x002F;savefile&#x002F;kien-thuc-may-tinh&#x002F;3-cach-chay-ung-dung-voi-tu-cach-nguoi-dung-khac-tren-windows-11-6103.html">
<meta property="og:site_name" content=".&#x3A; Nguoicodonvn2008.info - Cõi lòng người cô đơn &#x3A;.">
<meta property="og:url" content="https://www.nguoicodonvn2008.info/vi/news/savefile/kien-thuc-may-tinh/3-cach-chay-ung-dung-voi-tu-cach-nguoi-dung-khac-tren-windows-11-6103.html">
<link rel="shortcut icon" href="https://nguoicodonvn2008.info/favicon.ico">
<link rel="canonical" href="https://www.nguoicodonvn2008.info/vi/news/savefile/kien-thuc-may-tinh/3-cach-chay-ung-dung-voi-tu-cach-nguoi-dung-khac-tren-windows-11-6103.html">
<link rel="alternate" href="https://nguoicodonvn2008.info/vi/news/rss/" title="Tin Tức" type="application/rss+xml">
<link rel="alternate" href="https://nguoicodonvn2008.info/vi/news/rss/karaoke-dual/" title="Tin Tức - Karaoke Dual" type="application/rss+xml">
<link rel="alternate" href="https://nguoicodonvn2008.info/vi/news/rss/nhac-tre/" title="Tin Tức - Nhạc trẻ" type="application/rss+xml">
<link rel="alternate" href="https://nguoicodonvn2008.info/vi/news/rss/tru-tinh/" title="Tin Tức - Trữ tình" type="application/rss+xml">
<link rel="alternate" href="https://nguoicodonvn2008.info/vi/news/rss/nuoc-ngoai/" title="Tin Tức - Nước ngoài" type="application/rss+xml">
<link rel="alternate" href="https://nguoicodonvn2008.info/vi/news/rss/remix/" title="Tin Tức - Remix" type="application/rss+xml">
<link rel="alternate" href="https://nguoicodonvn2008.info/vi/news/rss/tam-su-tinh-yeu/" title="Tin Tức - Tâm sự tình yêu" type="application/rss+xml">
<link rel="alternate" href="https://nguoicodonvn2008.info/vi/news/rss/tho-suu-tam/" title="Tin Tức - Thơ sưu tầm" type="application/rss+xml">
<link rel="alternate" href="https://nguoicodonvn2008.info/vi/news/rss/cuoc-song/" title="Tin Tức - Cuộc sống" type="application/rss+xml">
<link rel="alternate" href="https://nguoicodonvn2008.info/vi/news/rss/phan-mem/" title="Tin Tức - Phần mềm" type="application/rss+xml">
<link rel="alternate" href="https://nguoicodonvn2008.info/vi/news/rss/kien-thuc-may-tinh/" title="Tin Tức - Kiến thức máy tính" type="application/rss+xml">
<link rel="alternate" href="https://nguoicodonvn2008.info/vi/news/rss/hoc-tap/" title="Tin Tức - Học tập" type="application/rss+xml">
<link rel="alternate" href="https://nguoicodonvn2008.info/vi/news/rss/tai-lieu/" title="Tin Tức - Tài liệu" type="application/rss+xml">
<link rel="alternate" href="https://nguoicodonvn2008.info/vi/news/rss/de-thi/" title="Tin Tức - Đề thi" type="application/rss+xml">
<link rel="preload" as="style" href="https://nguoicodonvn2008.info/assets/css/font-awesome.min.css" type="text/css">
<link rel="preload" as="style" href="https://nguoicodonvn2008.info/themes/default/css/bootstrap.non-responsive.css" type="text/css">
<link rel="preload" as="style" href="https://nguoicodonvn2008.info/themes/default/css/style.css" type="text/css">
<link rel="preload" as="style" href="https://nguoicodonvn2008.info/themes/default/css/style.non-responsive.css" type="text/css">
<link rel="preload" as="style" href="https://nguoicodonvn2008.info/themes/default/css/news.css" type="text/css">
<link rel="preload" as="style" href="https://nguoicodonvn2008.info/themes/default/css/custom.css" type="text/css">
<link rel="preload" as="script" href="https://nguoicodonvn2008.info/assets/js/jquery/jquery.min.js" type="text/javascript">
<link rel="preload" as="script" href="https://nguoicodonvn2008.info/assets/js/language/vi.js" type="text/javascript">
<link rel="preload" as="script" href="https://nguoicodonvn2008.info/assets/js/DOMPurify/purify3.js" type="text/javascript">
<link rel="preload" as="script" href="https://nguoicodonvn2008.info/assets/js/global.js" type="text/javascript">
<link rel="preload" as="script" href="https://nguoicodonvn2008.info/assets/js/site.js" type="text/javascript">
<link rel="preload" as="script" href="https://nguoicodonvn2008.info/themes/default/js/news.js" type="text/javascript">
<link rel="preload" as="script" href="https://nguoicodonvn2008.info/themes/default/js/main.js" type="text/javascript">
<link rel="preload" as="script" href="https://nguoicodonvn2008.info/themes/default/js/custom.js" type="text/javascript">
<link rel="preload" as="script" href="https://nguoicodonvn2008.info/themes/default/js/bootstrap.min.js" type="text/javascript">
<link rel="stylesheet" href="https://nguoicodonvn2008.info/assets/css/font-awesome.min.css">
<link rel="stylesheet" href="https://nguoicodonvn2008.info/themes/default/css/bootstrap.non-responsive.css">
<link rel="stylesheet" href="https://nguoicodonvn2008.info/themes/default/css/style.css">
<link rel="stylesheet" href="https://nguoicodonvn2008.info/themes/default/css/style.non-responsive.css">
<link rel="StyleSheet" href="https://nguoicodonvn2008.info/themes/default/css/news.css">
<link rel="stylesheet" href="https://nguoicodonvn2008.info/themes/default/css/custom.css">
<style type="text/css">
	body{background: #fff;}
</style>
    </head>
    <body>
<div id="print">
	<div id="hd_print">
		<h2 class="pull-left">.&#x3A; Nguoicodonvn2008.info - Cõi lòng người cô đơn &#x3A;.</h2>
		<p class="pull-right"><a title=".&#x3A; Nguoicodonvn2008.info - Cõi lòng người cô đơn &#x3A;." href="https://nguoicodonvn2008.info/">https://nguoicodonvn2008.info</a></p>
	</div>
	<div class="clear"></div>
	<hr />
	<div id="content">
		<h1>3 cách chạy ứng dụng với tư cách người dùng khác trên Windows 11</h1>
		<ul class="list-inline">
			<li>Thứ năm - 22/09/2022 00:51</li>
			<li class="hidden-print txtrequired"><em class="fa fa-print">&nbsp;</em><a title="In ra" href="javascript:;" onclick="window.print()">In ra</a></li>
			<li class="hidden-print txtrequired"><em class="fa fa-power-off">&nbsp;</em><a title="Đóng cửa sổ này" href="javascript:;" onclick="window.close()">Đóng cửa sổ này</a></li>
		</ul>
		<div class="clear"></div>
		<div id="hometext">
		</div>
				<div class="imghome">
			<img alt="3 cách chạy ứng dụng với tư cách người dùng khác trên Windows 11" src="https://st.quantrimang.com/photos/image/2022/09/21/chay-ung-dung-voi-tu-cach-nguoi-dung-khac-tren-windows-11-14.jpg" width="460" class="img-thumbnail" />
		</div>
		<div class="clear"></div>
		<div id="bodytext" class="clearfix">
			<p style="text-align: justify;">Khởi chạy một ứng dụng trên Windows sẽ tạo ra một tiến trình mới cho ứng dụng đó trong tài khoản người dùng của bạn. Nếu có nhiều người dùng trên hệ thống, bạn có thể chạy ứng dụng của mình với tư cách là một người dùng khác miễn là bạn có thông tin đăng nhập cho tài khoản kia.</p>

<p style="text-align: justify;">Có một số cách để chạy ứng dụng với tư cách người dùng khác trên&nbsp;Windows 11. Bài viết này sẽ hướng dẫn bạn các cách tiềm năng để chạy ứng dụng với tư cách người dùng khác trên máy tính.</p>

<h2 style="text-align: justify;">1. Chạy ứng dụng với tư cách người dùng khác từ Desktop hoặc Taskbar</h2>

<p style="text-align: justify;">Bạn có thể dễ dàng chạy một ứng dụng hoặc chương trình với tư cách một người dùng khác bằng cách truy cập shortcut trên desktop của ứng dụng hoặc chương trình đó. Dưới đây là các bước bạn cần làm theo.</p>

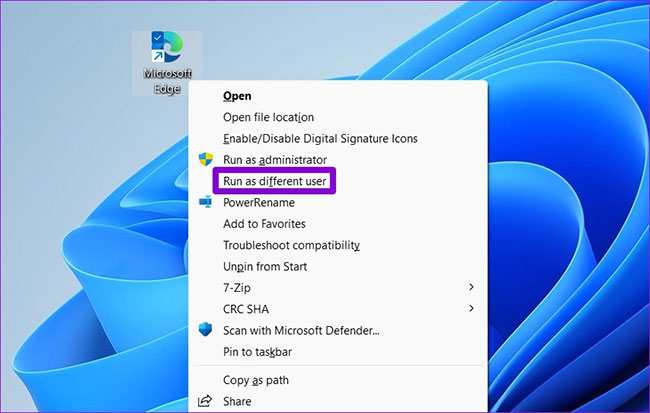
<p style="text-align: justify;"><strong>Bước 1</strong>: Nhấp chuột phải vào ứng dụng bạn muốn chạy với tư cách người dùng khác. Sau đó, giữ phím&nbsp;<strong>Shift</strong>&nbsp;và chọn&nbsp;<strong>Show more options</strong>.</p>

<p style="text-align: justify;"><strong>Bước 2</strong>: Nhả phím&nbsp;<strong>Shift</strong>&nbsp;và chọn&nbsp;<strong>Run as different user</strong>.</p>

<figure>
<div style="text-align: justify;"><img alt="Chọn Run as different user" data-i="0" data-src="https://st.quantrimang.com/photos/image/2022/09/21/chay-ung-dung-voi-tu-cach-nguoi-dung-khac-tren-windows-11-1.jpg" data-was-processed="true" height="413" src="https://st.quantrimang.com/photos/image/2022/09/21/chay-ung-dung-voi-tu-cach-nguoi-dung-khac-tren-windows-11-1.jpg" width="650" /></div>

<figcaption>
<div style="text-align: justify;">Chọn Run as different user</div>
</figcaption>
</figure>

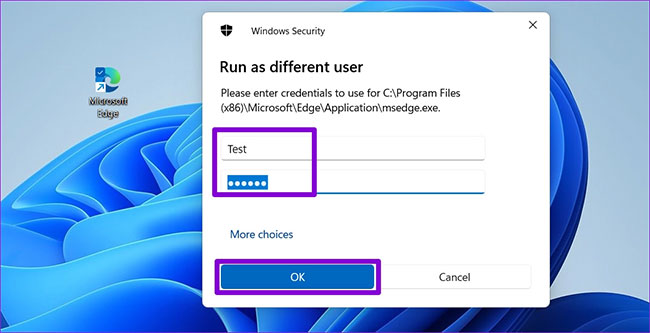
<p style="text-align: justify;"><strong>Bước 3</strong>: Trong cửa sổ&nbsp;<strong>Windows Security</strong>, nhập tên người dùng và mật khẩu của tài khoản bạn muốn sử dụng và nhấp vào&nbsp;<strong>OK.</strong></p>

<figure>
<div style="text-align: justify;"><img alt="Nhập tên người dùng và mật khẩu" data-i="1" data-src="https://st.quantrimang.com/photos/image/2022/09/21/chay-ung-dung-voi-tu-cach-nguoi-dung-khac-tren-windows-11-2.jpg" data-was-processed="true" height="333" src="https://st.quantrimang.com/photos/image/2022/09/21/chay-ung-dung-voi-tu-cach-nguoi-dung-khac-tren-windows-11-2.jpg" width="650" /></div>

<figcaption>
<div style="text-align: justify;">Nhập tên người dùng và mật khẩu</div>
</figcaption>
</figure>

<p style="text-align: justify;">Sau đó, ứng dụng sẽ chạy với tài khoản người dùng được chỉ định.</p>

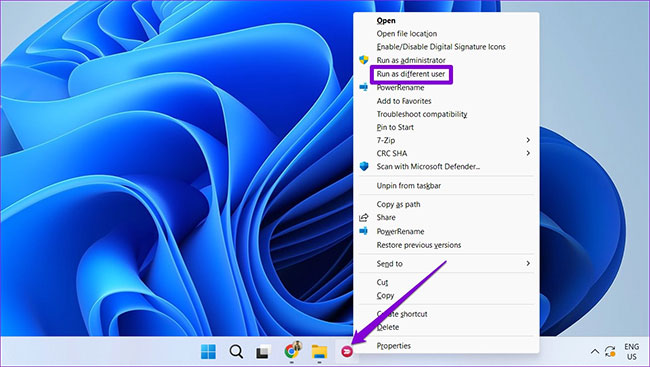
<p style="text-align: justify;">Tương tự, bạn cũng có thể chạy ứng dụng với tư cách người dùng khác từ Taskbar, miễn là bạn đã ghim ứng dụng ở đó. Để làm như vậy, hãy nhấp chuột phải vào biểu tượng ứng dụng trong khi giữ phím&nbsp;<strong>Shift</strong>&nbsp;và chọn&nbsp;<strong>Run as different user</strong>&nbsp;từ menu. Sau đó, nhập thông tin đăng nhập tài khoản vào cửa sổ&nbsp;<strong>Windows Security</strong>&nbsp;và nhấp vào&nbsp;<strong>OK</strong>&nbsp;để khởi chạy ứng dụng.</p>

<figure>
<div style="text-align: justify;"><img alt="Chọn Run as different user" data-i="2" data-src="https://st.quantrimang.com/photos/image/2022/09/21/chay-ung-dung-voi-tu-cach-nguoi-dung-khac-tren-windows-11-3.jpg" data-was-processed="true" height="367" src="https://st.quantrimang.com/photos/image/2022/09/21/chay-ung-dung-voi-tu-cach-nguoi-dung-khac-tren-windows-11-3.jpg" width="650" /></div>

<figcaption>
<div style="text-align: justify;">Chọn Run as different user</div>
</figcaption>
</figure>

<h2 style="text-align: justify;">2. Chạy ứng dụng với tư cách người dùng khác bằng Command Prompt</h2>

<p style="text-align: justify;">Một cách khác để khởi chạy ứng dụng với tư cách người dùng khác là thông qua&nbsp;Command Prompt. Mặc dù điều này nghe có vẻ phức tạp, nhưng việc khởi chạy ứng dụng với tư cách một người dùng khác chỉ yêu cầu bạn chạy một lệnh duy nhất. Phần khó duy nhất là bạn cần biết đường dẫn file của ứng dụng hoặc chương trình mà bạn đang cố gắng khởi chạy.</p>

<p style="text-align: justify;"><strong>Bước 1</strong>: Nhấp vào biểu tượng tìm kiếm trên thanh Taskbar hoặc nhấn phím&nbsp;<strong>Windows + S</strong>&nbsp;để mở menu tìm kiếm. Nhập tên chương trình và chọn&nbsp;<strong>Open file location</strong>.</p>

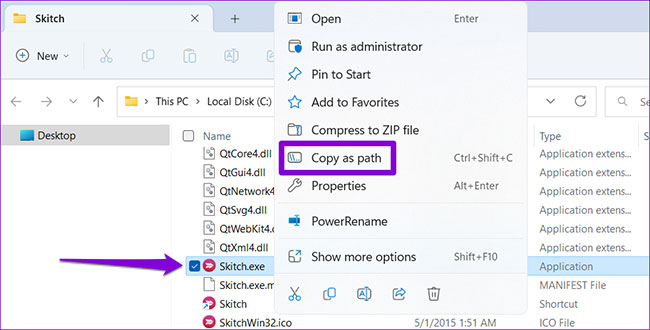
<p style="text-align: justify;"><strong>Bước 2</strong>: Nhấp chuột phải vào file EXE của chương trình và chọn&nbsp;<strong>Copy as path</strong>.</p>

<figure>
<div style="text-align: justify;"><img alt="Chọn Copy as path" data-i="3" data-src="https://st.quantrimang.com/photos/image/2022/09/21/chay-ung-dung-voi-tu-cach-nguoi-dung-khac-tren-windows-11-4.jpg" data-was-processed="true" height="330" src="https://st.quantrimang.com/photos/image/2022/09/21/chay-ung-dung-voi-tu-cach-nguoi-dung-khac-tren-windows-11-4.jpg" width="650" /></div>

<figcaption>
<div style="text-align: justify;">Chọn Copy as path</div>
</figcaption>
</figure>

<p style="text-align: justify;"><strong>Bước 3</strong>: Tiếp theo, nhấp chuột phải vào biểu tượng&nbsp;<strong>Start</strong>&nbsp;và chọn&nbsp;<strong>Terminal (Admin)</strong>&nbsp;từ danh sách.</p>

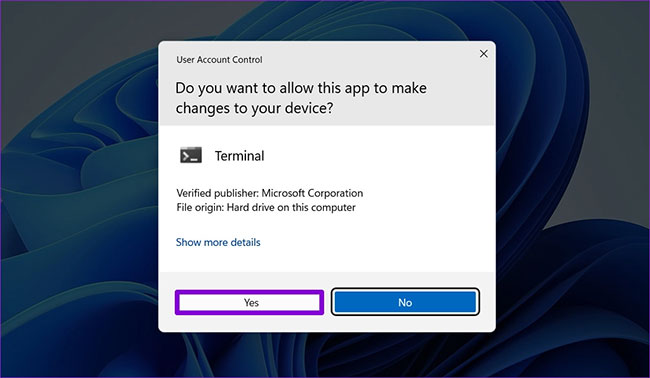
<p style="text-align: justify;"><strong>Bước 4</strong>: Chọn&nbsp;<strong>Yes</strong>&nbsp;khi lời nhắc User Account Control (UAC) xuất hiện.</p>

<figure>
<div style="text-align: justify;"><img alt=" Chọn Yes " data-i="4" data-src="https://st.quantrimang.com/photos/image/2022/09/21/chay-ung-dung-voi-tu-cach-nguoi-dung-khac-tren-windows-11-5.jpg" data-was-processed="true" height="378" src="https://st.quantrimang.com/photos/image/2022/09/21/chay-ung-dung-voi-tu-cach-nguoi-dung-khac-tren-windows-11-5.jpg" width="650" /></div>

<figcaption>
<div style="text-align: justify;">Chọn Yes</div>
</figcaption>
</figure>

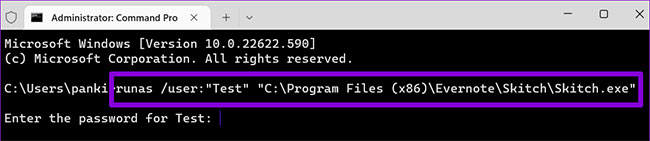
<p style="text-align: justify;"><strong>Bước 5</strong>: Trong console, dán lệnh sau và nhấn&nbsp;<strong>Enter</strong>.</p>

<pre id="pre0">
<code>runas /user:&quot;Username&quot; &quot;FilePath&quot;​</code></pre>

<p style="text-align: justify;">Thay thế&nbsp;<em>Username</em>&nbsp;trong lệnh trên bằng tên tài khoản. Tương tự như vậy, thay thế&nbsp;<em>FilePath</em>&nbsp;trong lệnh trên bằng đường dẫn file đã sao chép trước đó.</p>

<figure>
<div style="text-align: justify;"><img alt="Dán lệnh vào CMD" data-i="5" data-src="https://st.quantrimang.com/photos/image/2022/09/21/chay-ung-dung-voi-tu-cach-nguoi-dung-khac-tren-windows-11-6.jpg" data-was-processed="true" height="141" src="https://st.quantrimang.com/photos/image/2022/09/21/chay-ung-dung-voi-tu-cach-nguoi-dung-khac-tren-windows-11-6.jpg" width="650" /></div>

<figcaption>
<div style="text-align: justify;">Dán lệnh vào CMD</div>
</figcaption>
</figure>

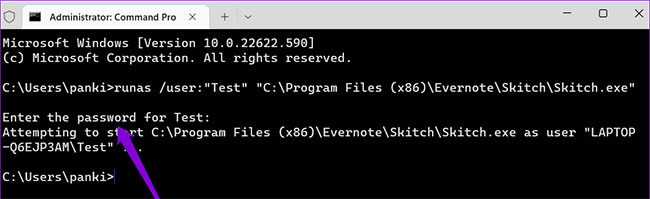
<p style="text-align: justify;"><strong>Bước 6</strong>: Nhập mật khẩu cho tài khoản và nhấn&nbsp;<strong>Enter.</strong></p>

<figure>
<div style="text-align: justify;"><img alt="Nhập mật khẩu cho tài khoản" data-i="6" data-src="https://st.quantrimang.com/photos/image/2022/09/21/chay-ung-dung-voi-tu-cach-nguoi-dung-khac-tren-windows-11-7.jpg" data-was-processed="true" height="199" src="https://st.quantrimang.com/photos/image/2022/09/21/chay-ung-dung-voi-tu-cach-nguoi-dung-khac-tren-windows-11-7.jpg" width="650" /></div>

<figcaption>
<div style="text-align: justify;">Nhập mật khẩu cho tài khoản</div>
</figcaption>
</figure>

<p style="text-align: justify;">Chương trình của bạn sẽ chạy với tư cách người dùng được chỉ định.</p>

<h2 style="text-align: justify;">3. Chạy ứng dụng với tư cách người dùng khác từ menu Start</h2>

<p style="text-align: justify;">Cuối cùng, bạn cũng có thể chạy ứng dụng với tư cách người dùng khác từ menu Start. Tuy nhiên, tùy chọn&nbsp;<strong>Run as different user</strong>&nbsp;không được kích hoạt trước trong menu Start của Windows 11. Vì vậy, bạn phải kích hoạt nó trước bằng cách điều chỉnh một số file Registry.</p>

<p style="text-align: justify;">Như bạn có thể đã biết, các file Registry chứa các cài đặt quan trọng cho Windows và những service của nó. Do đó, bạn sẽ cần sao lưu tất cả các file Registry của mình hoặc tạo điểm khôi phục trước khi tiếp tục những bước bên dưới.</p>

<p style="text-align: justify;"><strong>Bước 1</strong>: Nhấn phím&nbsp;<strong>Windows + S&nbsp;</strong>để mở menu tìm kiếm. Nhập&nbsp;<strong>regedit</strong>&nbsp;vào hộp và chọn&nbsp;<strong>Run as administrator</strong>.</p>

<p style="text-align: justify;"><strong>Bước 2</strong>: Chọn&nbsp;<strong>Yes</strong>&nbsp;khi lời nhắc User Account Control (UAC) hiển thị.</p>

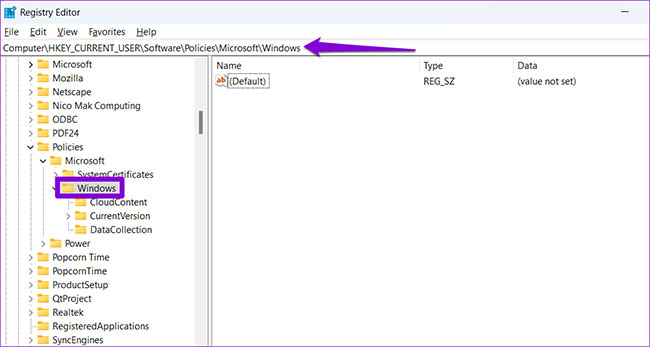
<p style="text-align: justify;"><strong>Bước 3</strong>: Dán đường dẫn sau vào thanh địa chỉ ở trên cùng và nhấn&nbsp;<strong>Enter</strong>&nbsp;để điều hướng nhanh đến Windows key:</p>

<pre id="pre1">
<code>HKEY_CURRENT_USER\Software\Policies\Microsoft\Windows</code></pre>

<figure>
<div style="text-align: justify;"><img alt=" Dán đường dẫn sau vào thanh địa chỉ " data-i="7" data-src="https://st.quantrimang.com/photos/image/2022/09/21/chay-ung-dung-voi-tu-cach-nguoi-dung-khac-tren-windows-11-8.jpg" data-was-processed="true" height="347" src="https://st.quantrimang.com/photos/image/2022/09/21/chay-ung-dung-voi-tu-cach-nguoi-dung-khac-tren-windows-11-8.jpg" width="650" /></div>

<figcaption>
<div style="text-align: justify;">Dán đường dẫn sau vào thanh địa chỉ</div>
</figcaption>
</figure>

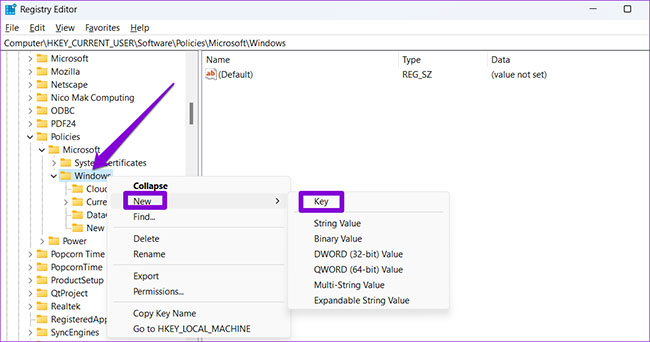
<p style="text-align: justify;"><strong>Bước 4</strong>: Nhấp chuột phải vào key&nbsp;<strong>Windows</strong>, đi tới&nbsp;<strong>New</strong>&nbsp;và chọn&nbsp;<strong>Key.</strong>&nbsp;Đặt tên là&nbsp;<strong>Explorer.</strong></p>

<figure>
<div style="text-align: justify;"><img alt="Đi tới New và chọn Key" data-i="8" data-src="https://st.quantrimang.com/photos/image/2022/09/21/chay-ung-dung-voi-tu-cach-nguoi-dung-khac-tren-windows-11-9.jpg" data-was-processed="true" height="342" src="https://st.quantrimang.com/photos/image/2022/09/21/chay-ung-dung-voi-tu-cach-nguoi-dung-khac-tren-windows-11-9.jpg" width="650" /></div>

<figcaption>
<div style="text-align: justify;">Đi tới New và chọn Key</div>
</figcaption>
</figure>

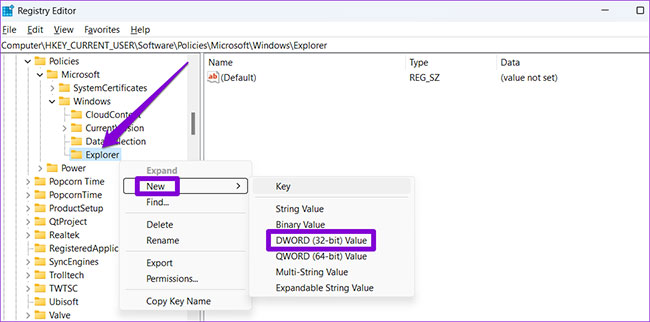
<p style="text-align: justify;"><strong>Bước 5</strong>: Nhấp chuột phải vào key&nbsp;<strong>Explorer</strong>, vào&nbsp;<strong>New</strong>&nbsp;và chọn&nbsp;<strong>DWORD (32-bit) Value.</strong>&nbsp;Đặt tên cho nó là&nbsp;<strong>ShowRunAsDiosystemUserInStart.</strong></p>

<figure>
<div style="text-align: justify;"><img alt="Nhấp chuột phải vào key Explorer, vào New và chọn DWORD (32-bit) Value" data-i="9" data-src="https://st.quantrimang.com/photos/image/2022/09/21/chay-ung-dung-voi-tu-cach-nguoi-dung-khac-tren-windows-11-10.jpg" data-was-processed="true" height="322" src="https://st.quantrimang.com/photos/image/2022/09/21/chay-ung-dung-voi-tu-cach-nguoi-dung-khac-tren-windows-11-10.jpg" width="650" /></div>

<figcaption>
<div style="text-align: justify;">Nhấp chuột phải vào key Explorer, vào New và chọn DWORD (32-bit) Value</div>
</figcaption>
</figure>

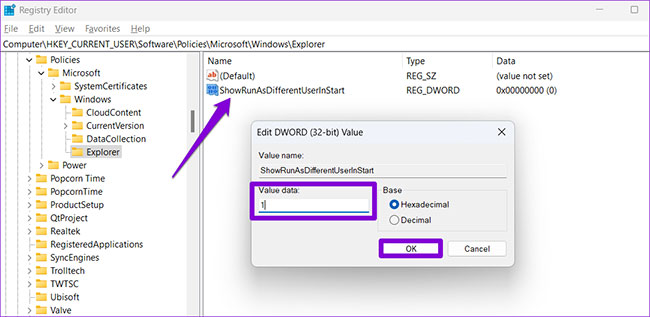
<p style="text-align: justify;"><strong>Bước 6</strong>: Nhấp đúp vào DWORD mới tạo và thay đổi dữ liệu giá trị của nó thành&nbsp;<strong>1</strong>. Sau đó, nhấp vào&nbsp;<strong>OK.</strong></p>

<figure>
<div style="text-align: justify;"><img alt="Nhấp đúp vào DWORD mới tạo" data-i="10" data-src="https://st.quantrimang.com/photos/image/2022/09/21/chay-ung-dung-voi-tu-cach-nguoi-dung-khac-tren-windows-11-11.jpg" data-was-processed="true" height="317" src="https://st.quantrimang.com/photos/image/2022/09/21/chay-ung-dung-voi-tu-cach-nguoi-dung-khac-tren-windows-11-11.jpg" width="650" /></div>

<figcaption>
<div style="text-align: justify;">Nhấp đúp vào DWORD mới tạo</div>
</figcaption>
</figure>

<p style="text-align: justify;"><a href="https://quantrimang.com/cong-nghe/6-cach-khoi-dong-lai-windows-that-pro-116819" title="6 cách khởi động lại máy tính Windows từ đơn giản đến &#039;Pro&#039;">Khởi động lại PC</a>&nbsp;để áp dụng những thay đổi này. Sau đó, bạn sẽ thấy tùy chọn&nbsp;<strong>Run as different user</strong>&nbsp;trong menu Start.</p>

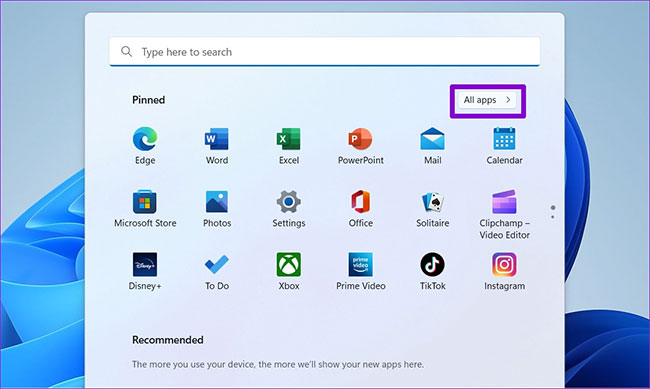
<p style="text-align: justify;"><strong>Bước 1</strong>: Mở menu Start và nhấp vào&nbsp;<strong>All apps</strong>&nbsp;ở góc trên cùng bên phải.</p>

<figure>
<div style="text-align: justify;"><img alt="Nhấp vào All apps" data-i="11" data-src="https://st.quantrimang.com/photos/image/2022/09/21/chay-ung-dung-voi-tu-cach-nguoi-dung-khac-tren-windows-11-12.jpg" data-was-processed="true" height="389" src="https://st.quantrimang.com/photos/image/2022/09/21/chay-ung-dung-voi-tu-cach-nguoi-dung-khac-tren-windows-11-12.jpg" width="650" /></div>

<figcaption>
<div style="text-align: justify;">Nhấp vào All apps</div>
</figcaption>
</figure>

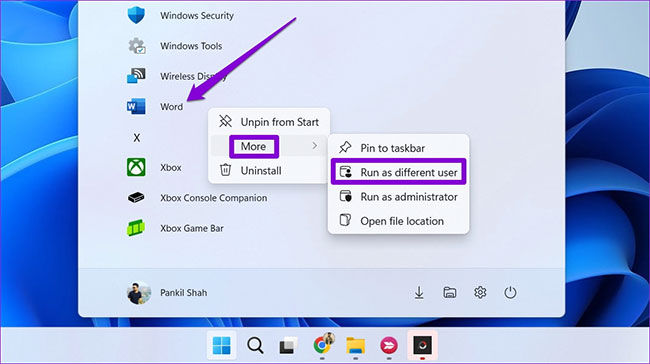
<p style="text-align: justify;"><strong>Bước 2</strong>: Cuộn xuống để tìm ứng dụng bạn muốn khởi chạy với tư cách người dùng khác. Nhấp chuột phải vào nó, đi tới&nbsp;<strong>More</strong>&nbsp;và chọn&nbsp;<strong>Run as different user</strong>.</p>

<figure>
<div style="text-align: justify;"><img alt="Chọn Run as different user" data-i="12" data-src="https://st.quantrimang.com/photos/image/2022/09/21/chay-ung-dung-voi-tu-cach-nguoi-dung-khac-tren-windows-11-13.jpg" data-was-processed="true" height="364" src="https://st.quantrimang.com/photos/image/2022/09/21/chay-ung-dung-voi-tu-cach-nguoi-dung-khac-tren-windows-11-13.jpg" width="650" /></div>

<figcaption>
<div style="text-align: justify;">Chọn Run as different user</div>
</figcaption>
</figure>

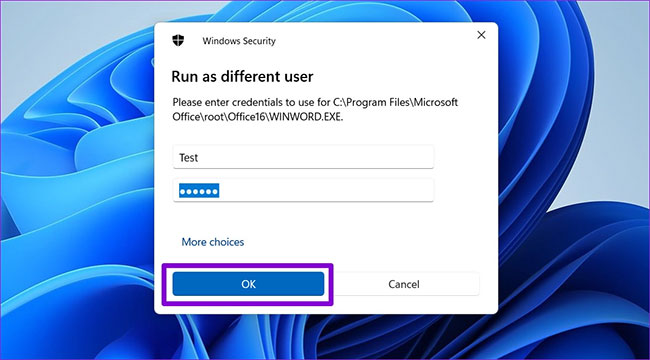
<p style="text-align: justify;"><strong>Bước 3</strong>: Nhập tên người dùng và mật khẩu cho tài khoản bạn muốn sử dụng và nhấn&nbsp;<strong>OK.</strong></p>

<figure>
<div style="text-align: justify;"><img alt="NNhập tên người dùng và mật khẩu cho tài khoản muốn sử dụng" data-i="13" data-src="https://st.quantrimang.com/photos/image/2022/09/21/chay-ung-dung-voi-tu-cach-nguoi-dung-khac-tren-windows-11-14.jpg" data-was-processed="true" height="360" src="https://st.quantrimang.com/photos/image/2022/09/21/chay-ung-dung-voi-tu-cach-nguoi-dung-khac-tren-windows-11-14.jpg" width="650" /></div>

<figcaption>
<div style="text-align: justify;">NNhập tên người dùng và mật khẩu cho tài khoản muốn sử dụng</div>
</figcaption>
</figure>

<p style="text-align: justify;">Khả năng chạy ứng dụng hoặc chương trình với tư cách người dùng khác giúp loại bỏ nhu cầu chuyển đổi giữa các tài khoản. Ngoài việc khởi chạy ứng dụng, bạn cũng có thể chạy các file batch hoặc gói trình cài đặt với tư cách người dùng khác bằng cách sử dụng các phương pháp ở trên.</p>
		</div>
				<div id="author">
						<p>
				<strong>Nguồn tin:</strong>
				Quantrimang.com
			</p>
		</div>
	</div>
	<div id="footer" class="clearfix">
		<div id="url">
			<strong>URL của bản tin này: </strong><a href="https://www.nguoicodonvn2008.info/vi/news/savefile/kien-thuc-may-tinh/3-cach-chay-ung-dung-voi-tu-cach-nguoi-dung-khac-tren-windows-11-6103.html" title="3 cách chạy ứng dụng với tư cách người dùng khác trên Windows 11">https://www.nguoicodonvn2008.info/vi/news/savefile/kien-thuc-may-tinh/3-cach-chay-ung-dung-voi-tu-cach-nguoi-dung-khac-tren-windows-11-6103.html</a>

		</div>
		<div class="clear"></div>
		<div class="copyright">
			&copy; .&#x3A; Nguoicodonvn2008.info - Cõi lòng người cô đơn &#x3A;.
		</div>
		<div id="contact">
			<a href="mailto:admin@nguoicodonvn2008.info">admin@nguoicodonvn2008.info</a>
		</div>
	</div>
</div>
        <div id="timeoutsess" class="chromeframe">
            Bạn đã không sử dụng Site, <a onclick="timeoutsesscancel();" href="https://nguoicodonvn2008.info/#">Bấm vào đây để duy trì trạng thái đăng nhập</a>. Thời gian chờ: <span id="secField"> 60 </span> giây
        </div>
        <div id="openidResult" class="nv-alert" style="display:none"></div>
        <div id="openidBt" data-result="" data-redirect=""></div>
		</script>
		<div class="car-top">
  <span><img src="https://nguoicodonvn2008.info/themes/default/images/car.png" alt=""></span>
</div>
<script src="https://nguoicodonvn2008.info/assets/js/jquery/jquery.min.js"></script>
<script>var nv_base_siteurl="/",nv_lang_data="vi",nv_lang_interface="vi",nv_name_variable="nv",nv_fc_variable="op",nv_lang_variable="language",nv_module_name="news",nv_func_name="savefile",nv_is_user=0, nv_my_ofs=-4,nv_my_abbr="EDT",nv_cookie_prefix="nv4c_e856T",nv_check_pass_mstime=1738000,nv_area_admin=0,nv_safemode=0,theme_responsive=0,nv_recaptcha_ver=2,nv_recaptcha_sitekey="",nv_recaptcha_type="image",XSSsanitize=1;</script>
<script src="https://nguoicodonvn2008.info/assets/js/language/vi.js"></script>
<script src="https://nguoicodonvn2008.info/assets/js/DOMPurify/purify3.js"></script>
<script src="https://nguoicodonvn2008.info/assets/js/global.js"></script>
<script src="https://nguoicodonvn2008.info/assets/js/site.js"></script>
<script src="https://nguoicodonvn2008.info/themes/default/js/news.js"></script>
<script src="https://nguoicodonvn2008.info/themes/default/js/main.js"></script>
<script src="https://nguoicodonvn2008.info/themes/default/js/custom.js"></script>
<script type="application/ld+json">
        {
            "@context": "https://schema.org",
            "@type": "Organization",
            "url": "https://nguoicodonvn2008.info",
            "logo": "https://nguoicodonvn2008.info/uploads/angel.gif"
        }
        </script>
<script src="https://nguoicodonvn2008.info/themes/default/js/bootstrap.min.js"></script>
<script type="text/javascript">
var $scrolltop = $('.car-top');
$scrolltop.on('click', function () {
    $('html,body').animate({
        scrollTop: 0
    }, 800);
    $(this).addClass("car-run");
    setTimeout(function(){ $scrolltop.removeClass('car-run');}, 1000);
    return false;
});
$(window).on('scroll', function ()
{ 
    if($(window).scrollTop() >= 200)
    {
        $scrolltop.addClass("show");
        $scrolltop.addClass("car-down");
    }
    else
    {
       $scrolltop.removeClass("show");
       setTimeout(function(){ $scrolltop.removeClass('car-down');}, 300);
    }
});
</script>
</body>
</html>