24 lệnh PowerShell cơ bản hữu ích dành cho Windows
- Thứ sáu - 04/12/2020 23:51
- In ra
- Đóng cửa sổ này
Trong những năm vừa qua, Microsoft đã cố gắng để biến PowerShell thành 1 trong những công cụ quản lý toàn diện dành cho Windows. Hầu hết các hệ thống server của Microsoft đều khuyến cáo mọi người sử dụng PowerShell, có thể thực hiện được rất nhiều chức năng mà không cần phải can thiệp bằng Command Prompt như trước kia.
Đối với mỗi người quản trị hệ thống Windows, họ cần phải làm quen và sử dụng PowerShell từ những bước cơ bản ban đầu. Sau đây, chúng tôi sẽ giới thiệu với các bạn 24 lệnh không thể thiếu khi bắt tay làm quen với PowerShell.
1. Get-Help
Đầu tiên và trước tiên, tất cả mọi người cần tìm hiểu về bất cứ câu lệnh, cú pháp nào là Get-Help. Ví dụ nếu muốn kiểm tra về Get-Process thì gõ lệnh như sau:
Get-Help -Name Get-Process
và Windows sẽ hiển thị đầy đủ cú pháp. Bên cạnh đó, Get-Help còn được sử dụng đi kèm với danh từ và động từ riêng rẽ, ví dụ với lệnh động từ Get:
Get-Help -Name Get-*
2. Set-ExecutionPolicy
Mặc dù bạn có thể tạo và thực thi các đoạn mã PowerShell khác nhau, nhưng ở chế độ mặc định Microsoft đã tắt bỏ tính năng này để phòng tránh các loại mã độc khác nhau khi xâm nhập vào hệ thống có thể tự kích hoạt và khởi động trong môi trường PowerShell. Người sử dụng có thể áp dụng lệnh Set-ExecutionPolicy để thiết lập các mức bảo mật khác nhau, cụ thể có 4 lựa chọn phù hợp:
- Restricted: đây là chính sách mặc định của hệ thống, các câu lệnh PowerShell đều bị khóa, người sử dụng chỉ có thể nhập lệnh nhưng không thực thi được.
- All Signed: nếu bạn hoặc người quản trị thiết lập mức All Signed thì các đoạn mã sẽ được thực thi, nhưng chỉ áp dụng với những thành phần được chỉ định rõ ràng.
- Remote Signed: chính sách bảo mật khi ở mức này, bất cứ đoạn mã PowerShell được tạo bên trong hệ thống local sẽ được phép hoạt động. Còn những mã tạo qua remote thì chỉ được phép chạy khi gán thuộc tính đầy đủ.
- Unrestricted: không áp dụng bất cứ hình thức ngăn cấm nào trong hệ thống.
Cú pháp chung của lệnh này bao gồm tên của lệnh Set-ExecutionPolicy đứng sau chính sách. Ví dụ như sau:
Set-ExecutionPolicy Unrestricted
3. Get-ExecutionPolicy
Nếu bạn phải làm việc trên hệ thống server không quen thuộc, thì cần phải biết chính sách mức chính sách bảo mật nào đang được áp dụng trên đó trước khi thực thi bất cứ câu lệnh hoặc đoạn mã nào đó. Để làm việc này, các bạn sử dụng lệnh Get-ExecutionPolicy.
4. Get-Service
Câu lệnh này sẽ liệt kê tất cả các dịch vụ đã được cài đặt trên hệ thống. Nếu cần tìm hiểu kỹ hơn về 1 dịch vụ bất kỳ nào đó, hãy thêm -Name và tên của dịch vụ đó, Windows sẽ hiển thị đầy đủ chi tiết, tình trạng liên quan.
5. ConvertTo-HTML
Khi cần xem hoặc tạo báo cáo đầy đủ về thông tin, tình trạng hiện thời của toàn bộ hệ thống, hãy sử dụng chức năng chuyển đổi định dạng ConvertTo-HTML. Trước tiên, các bạn cần chỉ định đường dẫn file chuyển đổi sau khi dùng ConvertTo-HTML, tham số -Property có nhiệm vụ khởi tạo thuộc tính trong file HTML, sau cùng là đặt tên cho file chuyển đổi. Cú pháp chung của lệnh này như sau:
Get-Service | ConvertTo-HTML -Property Name, Status > C:\services.htm
6. Export-CSV
Sau khi tạo báo cáo bằng HTML dựa trên dữ liệu của PowerShell, bạn cũng có thể trích xuất dữ liệu PowerShell thành file CSV để sử dụng với Microsoft Excel. Cú pháp chung cũng tương tự như câu lệnh trên:
Get-Service | Export-CSV c:\service.csv
7. Select-Object
Việc sử dụng các lệnh trên để tìm hiểu về hệ thống, bạn sẽ phát hiện ra rằng có rất nhiều thuộc tính kèm trong file CSV. Tính năng này tỏ ra thực sự hữu ích khi cho phép người sử dụng chỉ định những thuộc tính cố định trong các mối liên kết. Ví dụ, để tạo file CSV có chứa tên của các dịch vụ riêng biệt trong hệ thống và tình trạng đi kèm, các bạn có thể sử dụng cú pháp chung như sau:
Get-Service | Select-Object Name, Status | Export-CSV c:\service.csv
8. Get-EventLog
Người sử dụng hoàn toàn có thể dùng PowerShell để phân tích các sự kiện xảy ra trong hệ thông qua file log. Có 1 vài tham số cụ thể đối với các dịch vụ khác nhau, nhưng hãy thử nghiệm bằng cách thêm -Log ở phía trước tên file log. Ví dụ, để xem file log Application thì các bạn sử dụng lệnh sau:
Get-EventLog -Log "Application"
Tuy nhiên, cú pháp này không thực sự phổ biến trong các hoàn cảnh làm việc, khi mà người sử dụng có thể lựa chọn giữa phương pháp lưu báo cáo thành định dạng HTML hoặc CSV.
9. Get-Process
Đi kèm với lệnh Get-Service để hiển thị danh sách các dịch vụ hiện thời của hệ thống, cú pháp Get-Process được dùng để liệt kê toàn bộ các tiến trình đang hoạt động.
10. Stop-Process
Đôi khi, có những dịch vụ trong hệ thống bị rơi vào trạng thái “treo”. Đối với những trường hợp như vậy, hãy dùng lệnh Get-Process để xác định tên hoặc ID chính xác của tiến trình đó, và tắt tiến trình này bằng lệnh Stop-Process. Ví dụ, để tắt hoạt động của chương trình NotePad thì gõ lệnh như sau:
Stop-Process -Name notepad
 Stop-Process -ID 2668
Nhưng hãy lưu ý vì ID của các tiến trình sẽ thay đổi theo hệ thống.
11. Get-Command

Windows PowerShell cho phép khám phá các lệnh và tính năng của nó bằng Get-Command. Nó hiển thị danh sách các lệnh của một tính năng cụ thể hoặc cho một mục đích cụ thể dựa trên tham số tìm kiếm.
Bạn chỉ cần nhập Get-Command sau truy vấn tìm kiếm của mình trong PowerShell. Ví dụ: Get-Command *-service* hiển thị các lệnh có “-service” trong tên. Hãy nhớ sử dụng dấu hoa thị ở cả hai đầu của truy vấn, vì nó là một ký tự đại diện giúp tìm kiếm điều chưa biết.
12. Invoke-Command
Khi bạn muốn chạy một lệnh hoặc một script của PowerShell - cục bộ hoặc từ xa trên một hay nhiều máy tính - “Invoke-Command” sẽ là người bạn đồng hành hữu ích. Nó rất dễ sử dụng và giúp bạn kiểm soát hàng loạt máy tính.
Bạn phải nhập Invoke-Command theo sau là lệnh hoặc script với đường dẫn đầy đủ của nó.
Ví dụ, bạn có thể chạy lệnh “Get-EventLog” bằng cách sử dụng:
Invoke-Command -ScriptBlock {Get-EventLog system -Newest 50}
... hoặc trên máy tính từ xa “Server01” sử dụng:
Invoke-Command -ScriptBlock {Get-EventLog system -Newest 50} -ComputerName Server01
13. Invoke-Expression
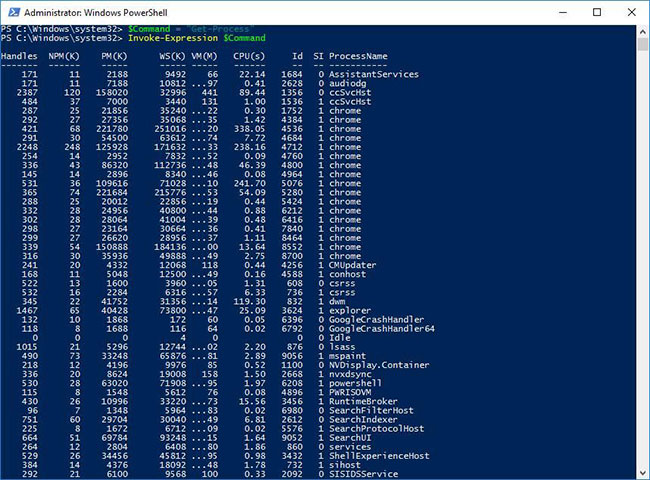
Invoke-Expression chạy một lệnh hoặc biểu thức khác. Nếu bạn đang cung cấp một biểu thức hoặc một chuỗi làm đầu vào cho nó, lệnh này trước tiên sẽ đánh giá, sau đó chạy nó, nhưng cũng chỉ hoạt động cục bộ, không giống như lệnh trước.
Bạn phải nhập Invoke-Expression theo sau là một lệnh hoặc một biểu thức. Ví dụ, bạn có thể gán một biến “$Command” với một chuỗi cho biết lệnh “Get-Process”. Khi bạn chạy Invoke-Expression $Command, “Get-Process” sẽ được chạy dưới dạng lệnh trên máy tính cục bộ.
14. Invoke-WebRequest
Bạn có thể tải xuống, đăng nhập và thu thập thông tin trên các trang web và dịch vụ web trong khi làm việc trên Windows PowerShell bằng cách sử dụng Invoke-WebRequest.
Bạn phải sử dụng Invoke-WebRequest theo sau là các tham số của nó. Ví dụ, bạn có thể lấy các liên kết trên một trang web nhất định bằng cách sử dụng lệnh dưới dạng:
(Invoke-WebRequest -Uri "https://docs.microsoft.com").Links.Href
15. Get-Item
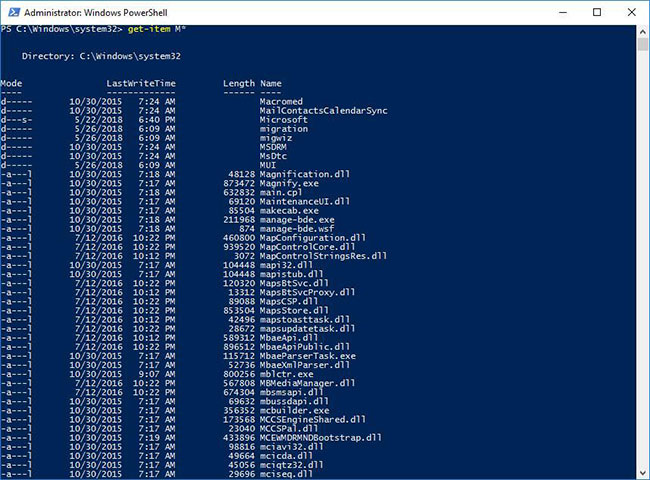
Nếu bạn đang tìm kiếm thông tin về một mục tại bất kỳ vị trí nào, chẳng hạn như một file trên ổ cứng, Get-Item là cách tốt nhất để lấy được thông tin đó trong Windows PowerShell. Bạn phải biết rằng nó không lấy nội dung của mục, chẳng hạn như file và thư mục con trong một thư mục nhất định, trừ khi được bạn chỉ định rõ ràng.
Bạn phải nhập Get-Item theo sau là một đường dẫn hoặc một chuỗi cùng với các tham số của nó nếu có. Ví dụ, bạn có thể lấy tất cả các mục (file hoặc thư mục) bắt đầu bằng “M” trong thư mục hiện tại bằng cách sử dụng Get-Item M*. Cùng với nội dung của những thư mục, nó cũng có thể lấy nội dung của các registry key.
16. Copy-Item
Nếu cần sao chép file và thư mục trên ổ đĩa lưu trữ của mình hoặc các mục nhập registry và key trong Registry, bạn có thể sử dụng Copy-Item. Nó hoạt động tương tự như lệnh cp trong Command Prompt, nhưng tốt hơn nhiều.
Bạn cũng có thể sử dụng lệnh Copy-Item để sao chép và đổi tên các mục trong cùng một lệnh - đặt tên mới làm đích. Ví dụ, bạn có thể sao chép và đổi tên “Services.htm” thành “MyServices.txt” bằng lệnh:
Copy-Item "C:\Services.htm" -Destination "C:\MyData\MyServices.txt"
17. Remove-Item

Nếu bạn muốn xóa các mục như file, thư mục, hàm, registry key và các biến, Remove-Item là lệnh dành cho bạn. Điều thú vị nhất là nó cung cấp những thông số để bao gồm và loại trừ các mục.
Bạn có thể sử dụng lệnh Remove-Item để xóa các mục khỏi những vị trí cụ thể bằng cách sử dụng các tham số. Ví dụ, bạn có thể xóa file “MyServices.txt” bằng lệnh:
Remove-Item "C:\MyData\MyServices.txt"
18. Get-Content
Khi bạn cần xem nội dung của file văn bản tại một vị trí cụ thể, bạn mở và đọc nó trong một trình soạn thảo code/văn bản như Notepad++. Trong Windows PowerShell, bạn có thể sử dụng Get-Content để truy xuất nội dung mà không cần mở file.
Ví dụ, bạn có thể truy xuất 50 dòng nội dung của “Services.htm” bằng lệnh:
Get-Content "C:\Services.htm" -TotalCount 50
19. Set-Content
Bạn có thể lưu văn bản vào file bằng cách sử dụng Set-Content, tương tự như lệnh echo của Bash Shell. Kết hợp với Get-Content, bạn cũng có thể truy xuất nội dung của một file và sao chép nó vào file khác bằng lệnh này.
Ví dụ, bạn có thể nhập Set-Content để viết hoặc thay thế nội dung của một file bằng nội dung mới. Hơn nữa, bạn có thể kết hợp nó với ví dụ của lệnh trước đó để lưu đầu ra vào một file mới có tên “Sample.txt” bằng cách sử dụng:
Get-Content "C:\Services.htm" -TotalCount 50 | Set-Content "Sample.txt"
20. Get-Variable
Nếu bạn đang muốn sử dụng các biến trong Windows PowerShell, lệnh Get-Variable sẽ giúp bạn trực quan hóa các giá trị của biến. Nó hiển thị chúng dưới dạng bảng và cho phép bao gồm, loại trừ và sử dụng các ký tự đại diện.
Bạn có thể sử dụng lệnh này bằng cách gõ Get-Variable, sau đó là các tùy chọn và tham số của nó. Ví dụ: bạn có thể truy xuất giá trị cho một biến có tên “desc” bằng cách sử dụng code sau:
Get-Variable -Name "desc"
21. Set-Variable
Bạn có thể gán hoặc thay đổi/reset lại giá trị của một biến bằng cách sử dụng lệnh Set-Variable. Bên cạnh đó, bạn cũng có thể đặt một biến đơn giản bằng định dạng ${ $VarName = VarValue }$ như:
$desc = "A Description"
Bạn có thể sử dụng lệnh Set-Variable theo sau là các tham số để đặt một biến. Ví dụ, bạn có thể đặt giá trị cho một biến có tên “desc” bằng cách sử dụng lệnh:
Set-Variable -Name "desc" -Value "A Description"
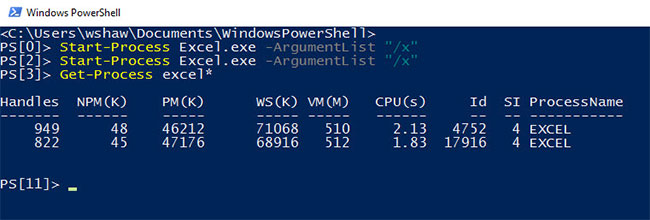
22. Start-Process
Windows PowerShell giúp bạn dễ dàng bắt đầu một hoặc nhiều tiến trình trên máy tính của mình. Lệnh này sẽ rất hữu ích trong các ứng dụng tạo script, vì nó là một trong những lệnh bắt buộc bạn phải có để tự động hóa một tác vụ.
Bạn có thể gõ Start-Process sau đó là các tham số để sử dụng lệnh. Ví dụ, bạn có thể khởi động Notepad bằng cách gõ lệnh sau trong Windows PowerShell:
Start-Process -FilePath "notepad" -Verb runAs
23. Start-Service
Nếu bạn muốn khởi động một service trên máy tính của mình, lệnh Start-Service có thể giúp bạn thực hiện điều tương tự từ Windows PowerShell. Nó đủ mạnh để khởi động một service, ngay cả khi service đó bị vô hiệu hóa trên máy tính của bạn.
Bạn cần chỉ định tên của service trong khi sử dụng lệnh Start-Service. Ví dụ: Start-Service -Name "WSearch" sẽ khởi động service Windows Search trên máy tính cục bộ của bạn.
24. Stop-Service
Nếu bạn muốn dừng các service đang chạy trên máy tính của mình, lệnh Stop-Service sẽ trở nên vô cùng hữu ích. Bạn cần chỉ định tên của service cùng với Stop-Service. Ví dụ, nhập Stop-Service -Name "WSearch" để dừng service "Windows Search" trên máy tính của bạn.
